Templates
The Templates are an advanced feature used to map individual hardware components with a specific brand and type ( for example, Cisco 12816 or Juniper Networks M40).
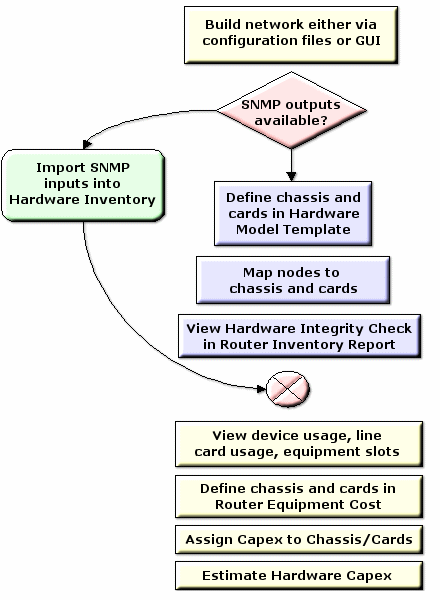
There are two levels of templates in the Hardware Model feature: Chassis and Card. A Chassis Template defines the number of slots on the chassis and can also designate a slot to be occupied by a card template if so desired. A Card Template defines the number of ports on the card as well as the media type of the ports. When a Chassis Template is applied to a node, that node receives all the properties of the Chassis Template. To view the list of available templates, click on the Tools menu and select Hardware Model Template.

Template Actions
When clicking on the Actions button in the templates window, the following options are available:
Action |
Description |
|---|---|
New Chassis Template |
This opens the Chassis Template Builder window, allowing you to create a new chassis template. |
New Card Template |
This opens the Card Template Builder window, allowing you to create a new chassis template. |
Import from Spreadsheet |
Import templates from a CSV formatted spreadsheet. |
Import from Hardware Equipment Cost |
Import templates from the Hardware Equipment Cost window. |
Export |
Saves the current template information in a CSV formatted spreadsheet file. |
Organizing Templates
When right-clicking in the templates window, the following options are available:
Action |
Description |
|---|---|
Create Category |
Creates a new folder in which to organize templates. Note that templates can be dragged and dropped into this new folder. |
Create Alias |
Creates an alias for the selected template. |
Duplicate |
Creates a duplicate of a template. |
View/Modify |
Opens a template to be viewed and modified |
Rename |
Renames a template |
Apply Selected Template |
Opens the Apply Template window, allowing you to select a set of nodes to which the selected template is applied. |
Delete |
Removes a template from the template library |
Chassis Template Builder
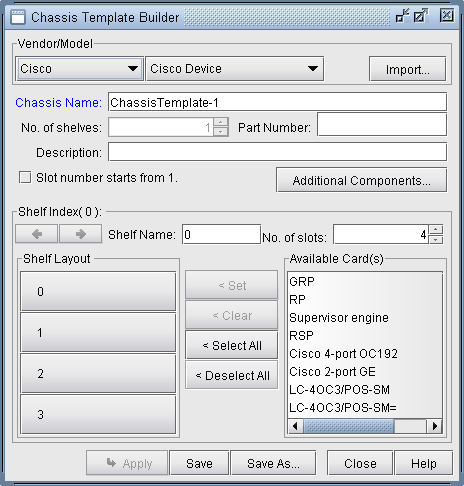
In this window, you can specify the following fields:
Vendor/model (select a generic vendor if the desired vendor is unspecified)
Chassis name
Part number
Number of shelves: Currently, only switches are allowed to have more than one shelf. In the future, the program will support multiple shelves for standard routers as well as switches.
Description
Slot number starts from 1: This options specifies whether the slot number starts at 1 (or 0).
Shelf name
Number of slots
Shelf layout
Once you select the number of shelves, you can select a particular shelf to specify the shelf layout by using the Shelf Index’s previous and next buttons. For a particular shelf name, you can specify the number of slots on that shelf using the up and down arrows next to No. of Slots..
To customize the shelf layout using the available cards, you should select the slot(s) in the shelf layout to which the card is applied. To select a range of shelves, you can click the first shelf and <Shift>-click the last shelf. To select shelves one by one, you can also <Ctrl>-click each additional shelf. Once the shelves have been selected, you should select a card from the Available Card(s) list. If the desired card does not exist, you can create a new card by right clicking in the Available Card(s) list and selecting New Card Template. When both the shelves and the card have been selected, clicking the Set button will assign the selected card to the selected shelves.
Shelf Layout Options
Action |
Description |
|---|---|
Set |
Moves selected card into selected slots |
Clear |
Erases the cards in selected slots |
Select All |
Selects all slots |
Deselect All |
Deselects all slots |
Chassis Template Builder Options
Action |
Description |
|---|---|
Import |
Imports template information from an XML file |
Apply |
When in modify mode, this option is used to apply the template to specific nodes in the network. |
Save |
Saves the chassis template information in the template library |
Save As |
Saves the chassis template information as an XML file on the client machine |
Help |
Brings up the online help for the hardware model chapter |
Applying the Template
A selected template can be applied to nodes by pressing the Apply button.

The template is applied to the nodes selected by you in the Router list. To select one at a time, you can click the checkboxes to the left of those nodes. You can also select a range of rows by clicking the first row and shift-clicking the last row. Then you can select or de-select those entries from the right-click menu. Click Apply to have the template applied to selected nodes.
Select All: Selects all rows
Mark as Selected: Marks selected rows
Clear: Clears selected rows
Clear All: Clears all rows
Card Template Builder

You should specify the following fields
Apply this template to: Select the vendor here �?� �?� �?� �?� �?� �?� �?� �?�
Card Name: Required field
Abbreviation
Part Number
No. of adapters
Max No. of Ports
Description
CPU/Processor card
Ports in Card
Modifying Ports
When a new card is created, the ports are all unassigned. It is up to you to assign specific media types to each port. This is done by selecting the desired ports in the box labeled Ports in Card, specifying the proper settings to the right, and clicking the Change button to apply the settings to the selected ports. Below is a list of the settings available for a port.
Port Name
Adapter No.
Port No.
Bandwidth (bps)
Port Media: Selecting the Port Media automatically populates the Bandwidth (bps) field
Card Template Builder Options
Action |
Description |
|---|---|
Import |
Imports template information from an XML file |
Save |
Saves the slot/card template in the template library |
Save As |
Saves the template information into an XML file on the client machine for later import. |
Vendor Hardware Support for Templates
A specific vendor can be specified during chassis or card template creation. The Hardware Model template module supports the following vendors: Cisco, Juniper Networks, Riverstone, Alcatel, Nortel, Tellabs. For all other vendors, this field can be set to Generic.