View and Modify Policy Based Routes
The workflow is as follows:
Use the configuration files import to create your network.
View policies from the link window.
Check how the policies will affect routing by performing a path analysis.
Modify the link PBR field to perform what-if studies.
Importing the Config Files
Viewing PBR Details from the Link Window
Select the Network > Elements > Links menu. To display the PBR route map in the link table summary pane, right-click on a column header and select Table Options. Select PBR_A and PBR_Z from the Available items window and click “Add>” to move them to the Selected Item(s) window and then click “OK”.
PBR_A and PBR_Z refer to the route-map names in both directions on the link. PBR_A refers to the direction from Node A to Node Z, while PBR_Z refers to the direction from Node Z to Node A.
Scroll so that you can see the PBR_A and PBR_Z headings. Click on the columns to sort the columns and see which interfaces have policies on them.
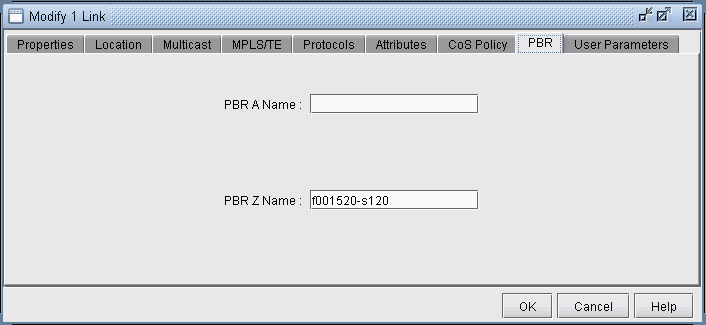
Select a link row for a link that has an interface with a policy applied to it. Then click the PBR tab. The tab is divided into a section for the interface on Node A and a section for the interface on Node Z. Each section contains the PBR information, including the route-map, sequence number, match criteria, and the action to perform if there is a match.
Figure 1: PBR Tab
Path Placement
To perform a path placement, select Network > Path&Capacity> Path. Optionally specify a source and/or destination IP address (to match against the route map) that corresponds to a node’s loopback address or one of its interface addresses. Then click on the map the from-node followed by the to-node.
The Path window will be displayed. In addition, the Console window will display the relevant policy based routing information.
Modifying Link PBR Field
You can modify a link to specify which policy to use on an interface from the Links tab of the Network Info table. To do so, navigate to Links tab. You can sort on the PBR_A and PBR_Z column to quickly see which links have policies attached to them. The instructions are the same as given in step 1.
Select the links you want to modify from the table and click Modify. On the Modify Link window, select the PBR tab.
Enter in the name of the Policy for the interface in the node A to node Z direction or vice versa. The policy name should correspond to a route-map on node A for the AZ direction or node Z for the reverse direction. If the policy typed in is invalid, an error message will pop up. Click “OK” and view the Console message to see possible PBR policies to apply for the link interface. When you are finished modifying the link, click OK. You can then retry a path analysis.
PBR Example
The following 6-router network will explain a case of policy based routing that checks the source IP address of incoming packets against the match condition of the route-map statement to determine whether to take the action in the route-map statement. (Note that more sophisticated policies can be used to check other properties such as the destination IP address, protocol information, etc.)
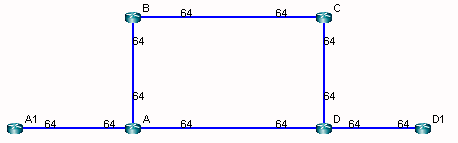
In this example, router A has applied the following route-map on its interface to A1:
route-map my_route_map permit 20
match ip address 111
set interface Serial1/0/1
!
The corresponding match condition is specified in the access list (111) as follows: “access-list 111 permit 10.5.5.5 0.0.0.0.” The corresponding interface to forward to in case the match condition is satisfied is Serial1/0/1, which connects A to B. As a result of the policy, router A will forward any packet coming from A1 with a source IP address of 10.5.5.5 out the interface Serial1/0/1 toward B. A Path analysis is used to verify the routing behavior.
Suppose a path analysis is performed from A1 to D1 by selecting Network > Path & Capacity > Paths. The source and destination IP addresses must be entered in to simulate Policy Based Routing. In this case, we use 10.5.5.5 as the source IP address (router A1’s IP address). The packet is then forwarded to router B. This example uses OSPF and the links have equal OSPF metric, so after the packet is forwarded to B, it may equally well go from B to C to D to D1 as back to A and then to D to D1.
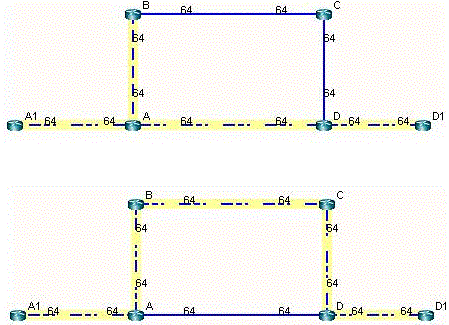
The results are also displayed in the Console. The Console messages for the left figure above are as follows:
* * * A1(A1) - D1(D1): bw= 0 * * *
- - Find path from A1 to D1 (0.0.0.0)
- - Apply PBR my_route_map at A:
           Set interface to Serial1/0/1
           PBR route from A to B
                new     10.5.5.5     D1    0 R,A2Z 02,02      A1--A--B--C--D--D1
(OSPF) Route-cost=325. Max_Path_Bw= 1.536M
Tunnels matching search criteria: 0
On the other hand, suppose a path analysis is performed from A1 to D1 using another interface IP address at A1 such as 10.10.10.17. In this case, the source IP address no longer matches the route-map condition and hence the routing table (OSPF in this case) is used instead:
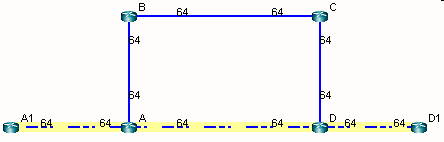
The corresponding Console message appears as follows:
* * * A1(A1) - D1(D1): bw= 0 * * *
-- Find path from A1 to D1 (0.0.0.0)
-- Apply PBR my_route_map at A:
       new   10.10.10.17    D1   0 R,A2Z 02,02    A1--A--D--D1
(OSPF) Route-cost=195. Max_Path_Bw= 1.536M