Routing Protocol Details
-
To modify protocol information on a link,
navigate
to the Links
tab..
Select one or more links to be modified and click the
Modify
button. In the resulting Modify Links window, select the Protocols tab.
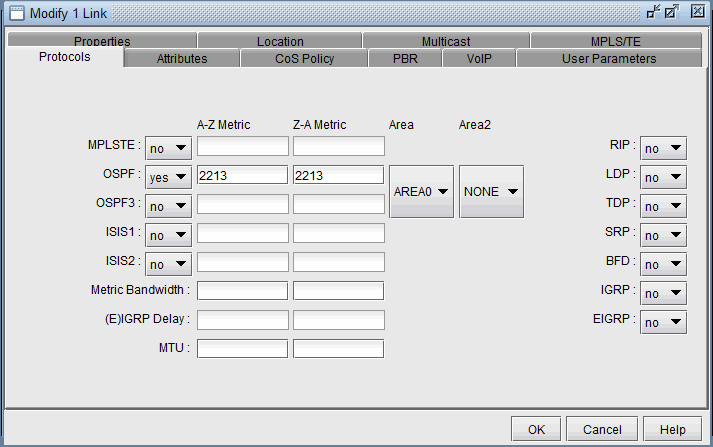
Figure 1: Modify Link Protocols Tab
The following sections provide more details about configuring protocol-specific information.
RIP
No metrics need to be entered for RIP since the metrics will all be the same.
Click Design > Design Options > Path Placement to open the Path Placement pane. Set the routing method should to Constant Distance and the Max Hop to 15.
IGRP and EIGRP
For IGRP and EIGRP, the metric can be changed via the Metric Bandwidth and (E)IGRP Delay fields. These fields are based on the bandwidth and delay interface statements and should be distinguished from the physical bandwidth and propagation delay given on the link Properties tab. The units should be entered into the textbox, e.g. “10M” for 10Mbps and “100us” for 100 microseconds. These values will be used to calculate the metric according to the following formula:

By default, the program sets K1=K3=1 and K2=K4=K5=0 in the formula above. In this case, only the bandwidth and delay are used to calculate the IGRP and EIGRP metric, using a function of the slowest interface bandwidth and the sum of the delays of the outgoing interfaces on the path. To obtain delay’ in the formula above, the interface delays (in microseconds) that are summed together will be divided by 10 for IGRP and then multiplied by 256 for EIGRP. To obtain bandwidth’, 10^7 will be divided by the interface bandwidth in Kbps for IGRP and then multiplied by 256 for EIGRP.
To change the K-values from the text file before opening the network, the following line can be added to or edited in the dparam file: IGRP_param1= TOS:0,K1:1,K2:0,K3:1,K4:0,K5:0
Click Design > Design Options > Path Placement pane to open the Path Placement pane. Set the routing method to IGRP or EIGRP. The Max Hop, can also be configured here (e.g., 100 for IGRP) according to the metric maximum-hops command.
OSPF
OSPF metrics can be directly changed by setting the cost to the right of the OSPF row (or OSPF3 row in the case of OSPF version 3) under the “A-Z Metric” and “Z-A Metric” columns.
Otherwise, if this number is not configured, the program will use the interface bandwidth (corresponding to the bandwidth statement for the interface) and the OSPF reference bandwidth to calculate the metric using the formula:reference_bandwidth/interface_bandwidth, where the default reference_bandwidth=10^8.
To modify the interface bandwidth for metric calculation purposes, enter it in the Metric Bandwidth fields. The left textbox is for the interface for Node A and the right textbox is for the interface for Node Z. (The Location tab will indicate which node is Node A and which node is Node Z.) Again, note that the metric bandwidth can be different from the physical bandwidth. The default unit is bps but can be modified by adding to the number a suffix of K for Kbps, M for Mbps, and G for Gbps.
To change the reference bandwidth from the default value, select the Nodes view from the Network Info window. Select the node(s) to modify and click the Modify button. Then select the IP tab and enter in an OSPF Reference BW. The default unit is bps but can be modified by adding to the number a suffix of K for Kbps, M for Mbps, and G for Gbps.
Figure 3: Entering in the Reference BW from the Modify Nodes, IP Tab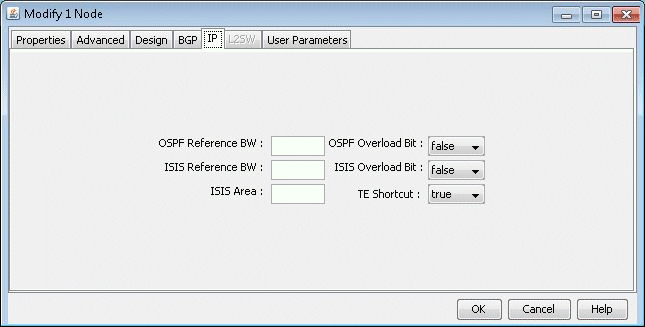
To specify which area the link belongs to, select it from the Area drop-down box. A secondary area can also be specified in the Area2 drop-down box if the link belongs to more than one area. If there is no area available in the drop-down box, an area can be first added from Modify > Protocols > OSPF Areas. Click Add. AREA0 will automatically be added. Subsequently you can enter in additional areas.
To set the OSPF overload bit, select the Nodes view from the Network Info window. Select the node(s) to modify and click the Modify button. Then select the IP tab and change the OSPF Overload Bit to true. If the OSPF overload bit is set, transit OSPF traffic will not be routed through the router.
ISIS and ISIS2
In the Network > Elements > Links window, Protocols tab, the ISIS level 1 metrics can be changed in the “A-Z Metric” and “Z-A Metric” columns to the right of ISIS1 . ISIS level 2 metrics can be changed in the “A-Z Metric” and “Z-A Metric” columns to the right of ISIS2.
To view a node’s ISIS System ID, right-click the Nodes table header column and select Table Options... Next, select ISIS_System_ID, and add it to the columns to be displayed. Other ISIS related column options for the Nodes view include ISIS_Area, ISIS_Overload_Bit, and ISIS_Ref_BW. The ISIS Area can also be viewed from the Protocols tab in the Nodes view.
To change the ISIS reference bandwidth from the default value, select the Nodes view from the Network Info window. Select the node(s) to modify and click the Modify button. Then select the IP tab and enter in an ISIS Reference BW. The default unit is bps but can be modified by adding to the number a suffix of K for Kbps, M for Mbps, and G for Gbps.
To set the ISIS overload bit, select the Nodes view from the Network Info window. Select the node(s) to modify and click the Modify button. Then select the IP tab and change the ISIS Overload Bit to true. If the ISIS overload bit is set, transit ISIS traffic will not be routed through the router.
MPLS-TE
The tunnel metric for MPLS-TE can be changed in the “A-Z Metric” and “Z-A Metric” columns to the right of MPLS-TE. LSP tunnels that are not set to route according to the current IGP routing protocol will be routed according to these metrics.
Updating Link Properties from a File
Link delay and OSPF/ISIS metric information can also be modified in batch through the text mode version. This file format also flexible and can support the following fields:
NodeA, NodeZ, Node, InterfaceA, InterfaceZ, Interface, DelayAZ, DelayZA, LatencyA2Z, LatencyZ2A, Delay, IPaddrZ, IPaddr, RoundTripDelay, linkname, OSPFMetric, ISIS2Metric, ISIS1Metric, LinkName, BWType, Node, Interface, DelayAZ, DelayZA
The first line should specify the columns using a comma separated list of the above keywords, including a column for the node and the interface or IP address at the minimum. The subsequent lines should specify the Node/Interface or Node/IP pair and the other relevant columns to update. For example:
#!NodeA,Interface,LatencyA2Z,LatencyZ2A,OSPFMetric
LDN2600,Ethernet0/1,50,50,10
To load in this file, select Tools > Text/ASCII Mode or in a console window, type /u/wandl/bin/bbdsgn specfilepath.
Select from the Main menu: 5. Modify Configuration > 4. Link Configuration > u. Update Link Properties from a File. Select ? for the help menu for information on the input file format.
Select 2. Input File Name and enter in the location of the file to use for updating the links (absolute or relative path is acceptable here). Select 3. Error Output Name to enter the location of an optional file for outputting errors. Select 4. Operation to indicate which fields to update based on the input file (the default includes all fields) and q to exit this menu.
Select 5. Update link configuration to perform the actual input based on the specified input file.
After the update is finished, type ‘q’ until the Main Menu is reached. In text mode, select 2. Save Files menu to save the changes, or in Java graphics mode, quit out of the menu and save via File > Save Network...