Topology Filter
The topology filter service allows you to limit the nodes appearing in your NorthStar topology to a subset of the nodes in your network. This capability might be important if your network contains more nodes than your NorthStar license covers and you want to control which nodes NorthStar recognizes. You might also want to filter out nodes that are not important for traffic engineering management such as aggregation layer nodes or route reflectors, for example. Prior to the development of the topology filter service, the typical method for excluding nodes from the topology was to create cumbersome firewall filters on the JunosVM that rejected traffic both to and from each of those nodes.
The topology filter is only available in NorthStar installations utilizing BMP for the topology acquisition method; the topology filter does not support NTAD topology acquisition protocol. The topology filter is added to the BMP messaging pipeline between the BMP monitor and the topology server. See Understanding Network Topology Acquisition on the NorthStar Controller and Configuring Topology Acquisition for information about topology acquisition.

Enabling the Topology Filter Service
To enable the topology filter, use a text editing tool such as vi to modify the northstar.cfg file, setting the topology acquisition method to BMP (default is NTAD) and the BMP client port used by Toposerver to 10004 (default is 10002):
[root@ns]# vi /opt/northstar/data/northstar.cfg
.
.
.
topology_src_protocol=2
.
.
.
bmp_port=10004
Use supervistorctl restart to restart the BMP monitor,
topology filter, and topology server processes after you make the
changes to the northstar.cfg file:
[root@northstar]# supervisorctl restart bmp:bmpMonitor northstar:topologyfilter northstar:toposerver
The Topology Filter Window
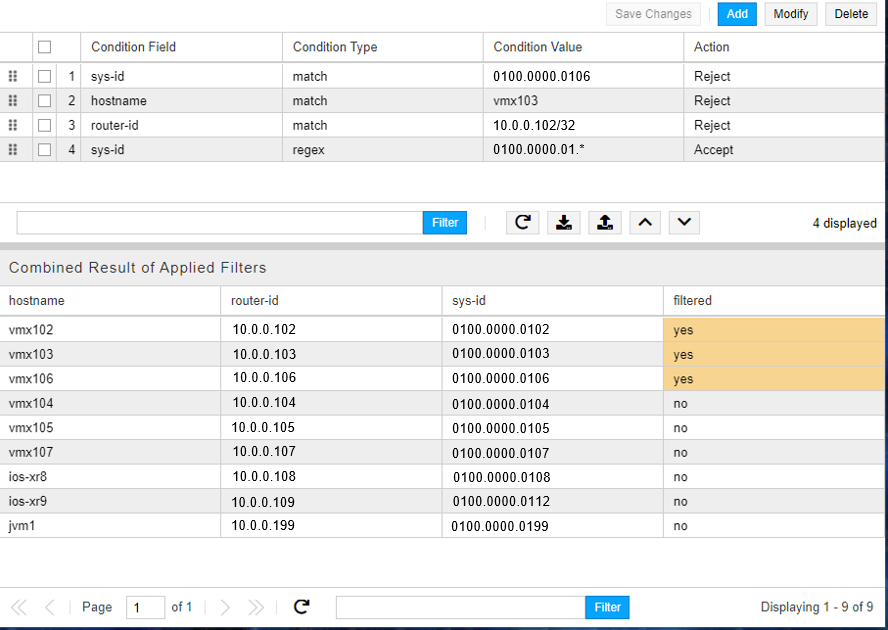
Filtering the topology involves creating a series of rules, each one consisting of the field to search on (condition field), the value to look for (condition value), and the action to take if the value is matched (action). The rules are applied in sequence order. Once a node is matched based on a rule, it cannot be matched by a subsequent rule. The topology filter service does link checking, removing links that involve an excluded node, even if the excluded node is reporting information to the traffic engineering database.
Access the topology filter by navigating to Administration > Topology Filter in the web UI. Figure 1 shows an example of the topology filter window with some rules already entered in the Filter List section at the top and the results of applying those rules in the Combined Result of Applied Filters section at the bottom.

In the Filter List at the top of the window:
The buttons in the upper right corner allow you to add, modify, or delete rules. Select a rule for modification or deletion by clicking the check box beside the rule. You can delete multiple rules at the same time. If you selection multiple rules for modification, you can only change the Action field (Accept or Reject).
The Save Changes button turns orange when there are unsaved changes to the filter list (including a change in sequence order), to remind you to save your changes. Saving your changes activates the filter and propagates the filtered topology to the topology map. The results section at the bottom of the topology filter window is also updated with the combined results, identifying which nodes were accepted and which were filtered out. Expect a slight delay before the results update.
Each line in the filter list is a rule with the condition field, condition type, condition value, and action indicated. The rules are numbered and the sequence order is significant.
The grab icon (six dots) in each line indicates you can drag and drop the rules to change the sequence order.
From the tool bar at the bottom of the filter list, you can:
Use the Filter field to view just a subset of defined rules. Enter the search criteria text and click Filter. Rules not containing the search criteria you enter in the Filter field are hidden from view. To clear the filter and view the entire rules list again, click the X in the Filter field (only visible when the rules list is filtered). This is a useful feature for longer lists of rules.
Reload the topology filter. This allows you to return to the last-saved set of rules without saving your most recent changes.
Export the rules to a CSV file.
Import rules from a CSV file.
Click the check box beside one rule and use the up and down arrows to shift the rule up or down in the sequence order.
In the Combined Result of Applied Filters section at the bottom of the window:
Every node in the full topology is listed. The filtered column indicates “yes” if the node was filtered out (excluded), and “no” if the node was not filtered (still included in the topology).
From the tool bar at the bottom of the Results section you can:
Navigate through multiple pages of results using the forward and backward arrows.
Reload the filtered devices. There is an automatic refresh of the results ten seconds after clicking Save Changes. The reload option is available in case an additional refresh is needed to capture all the latest changes.
Use the Filter field to view just a subset of results. Enter the search criteria text and click Filter. Results not containing the search criteria you enter in the Filter field are hidden from view. To clear the filter and view the entire results list again, click the X in the Filter field (only visible when the results list is filtered).
Adding Rules
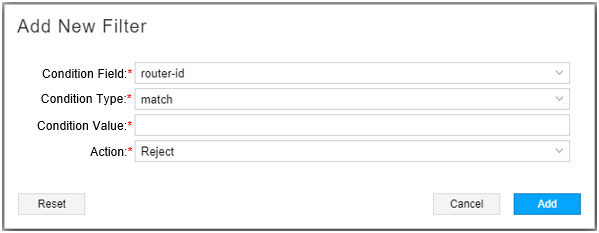
Click Add at the top of the Topology Filter window to display the Add New Filter window shown in Figure 2.

All fields are required. In this window:
Use the drop-down menu to select the Condition Field as either router-id, sys-id, or hostname.
Use the drop-down menu to select the Condition Type as match or regex (regular expression). For router-id, only match is allowed.
Enter the Condition Value. This is a free-form text field.
Use the drop-down menu to select the Action as either Accept or Reject.
Click Reset if you want to clear your entries in the window. Click Cancel to cancel the add request. Click Add to add the rule to the list.
See the examples shown in Figure 1.
New rules appear in red text at the bottom of the list. Shift the rows up or down to change the order of the rules, either by dragging and dropping or by using the up/down arrows in the center tool bar. Click Save Changes to save the revised list of rules and apply the filter to the topology.
To remove all filtering, simply select all the rules (click their check boxes) and click Delete.
