Define Class Maps
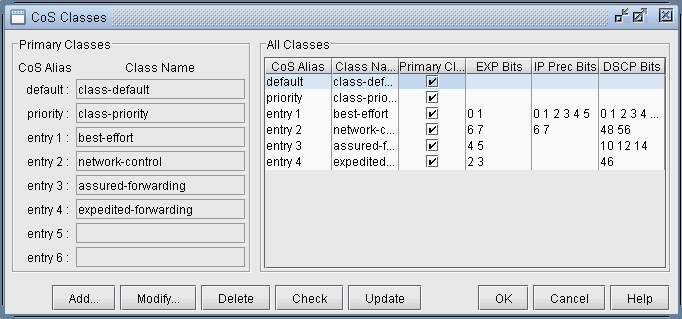
The first thing to do is to define the names of the CoS classes. In Modify mode, select Modify > QoS > CoS Classes for the CoS Classes window.
Figure 1: Names of CoS Classes
If router configuration files with CoS class definitions were parsed, the classes defined in the configuration files will appear here. Only eight unique classes (default, priority, and six additional classes) can be defined in the network model-- these eight classes are called primary classes. In a network with more than eight classes, each additional class must be mapped as an alias of one of the eight primary classes. When importing configuration files, the parser will automatically perform the alias mapping through a best-approximation algorithm that takes into account the EXP, IP Precedence, and DSCP bits assigned to each class. If this approximation is off, the user can modify the alias mappings here.
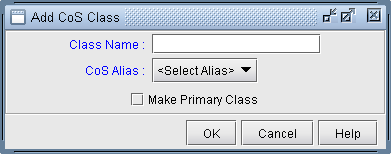
Click on the Add button to add a new class. Enter a class name, select an alias from the CoS Alias drop-down box, and choose whether or not you want it to be a primary class by checking the Make Primary Class box. Then click on the OK button. You may add as many CoS classes as needed.
Figure 2: Add CoS Class
Note that you can have multiple CoS Classnames that correspond to the same CoS Alias. However, one and exactly one of these must be declared as the Primary Class for each CoS Alias. These CoS Classnames that are declared as the Primary Class will be populated in the Primary Classes panel.
To modify a CoS class, select it from the “All Classes” panel and click on the Modify button. After all changes have been made to the CoS class, click on the OK button.
DEFAULT class
If traffic does not satisfy the match criteria of other classes included in the policy map, then that traffic is treated as part of the “default” traffic.
PRIORITY class
The entry after “default” would be considered the “priority” class, however it may be changed. The Priority class is for priority queueing, which is also called Low Latency Queueing. Packets belonging to the priority class are sent before other packets.
You may check to see if there are any errors in the CoS class definitions or any conflicts with CoS policies by clicking on the Check button.
When done, click OK to submit changes to the server.
Button |
Description |
|---|---|
Check |
This checks to verify that all CoS classes are assigned to an alias; all non-empty aliases have a primary class defined; and that there are no “gaps” between the definition of aliases. For example, if class 3 is defined without having class 2 defined, the program will shift class 3 classes to class 2. |
OK |
This saves the changes made to the CoS class mapping and closes the window. |
Cancel |
This discards any changes made to the CoS class mapping and closes the window. |
Related Cisco Commands
Router(config) # class-map class-map-name
In NorthStar Planner’s modeling, there is no direct specification of class-map match criteria such as protocol type, input interface or access group. Instead, traffic modeling with CoS policies is accomplished by allowing the user to assign a single CoS class to particular demands/traffic as described in Adding Traffic Inputs. If a demand/traffic is routed over a particular interface, then it will be treated according to the policies defined for that class in the interface’s policy map, if any.
