Help us improve your experience.

Let us know what you think.

Do you have time for a two-minute survey?


Network Menu: Summary

To obtain general information about the network under review, select Summary from the Network menu. The Network Summary window will appear displaying statistics about the various network elements in the network, including nodes, links, and demands. The demand statistics indicate the average and maximum hops of demands and the number of placed, unplaced, and deactivated demands. Placed demands are demands that were routed over the network. Unplaced demands were demands that failed to route over the network. Deactivated demands are demands that are not routed over the network, for example, demands from a node to itself.
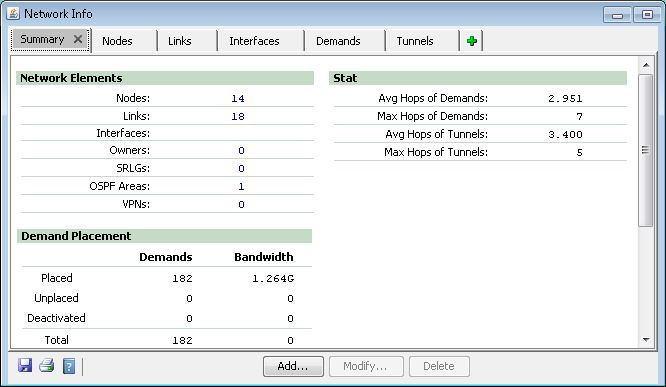
Figure 1: Network Summary Window (Options May Vary)Network Summary Window (Options May Vary)

In some windows such as the Nodes window, you can find a text field labeled Filter and icons labeled Search by Property, Advanced Search, and Filter from Map. These allow you to search for and display a subset of the network elements that match your filter or search criteria. This section uses the Nodes window as an example.

Note:

The search functionality for the Filter and Advanced Search is not case-sensitive. For example, ID = abc also matches ABC. The filter searches all entries within the current table.

The following sections provide more information on the options available.

Filter

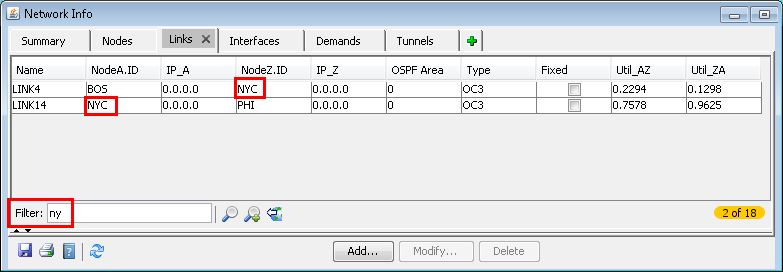
In the Nodes window, type the text you wish to perform a search on in the Filter box. To reset the list of elements, clear the text field.

Figure 2: Filter Text BoxFilter Text Box

Search by Property

In the Nodes window, type the text you wish to perform a search on in the Filter box. To reset the list of elements, clear the text field.

Figure 3: Filter Text BoxFilter Text Box

Advanced Search

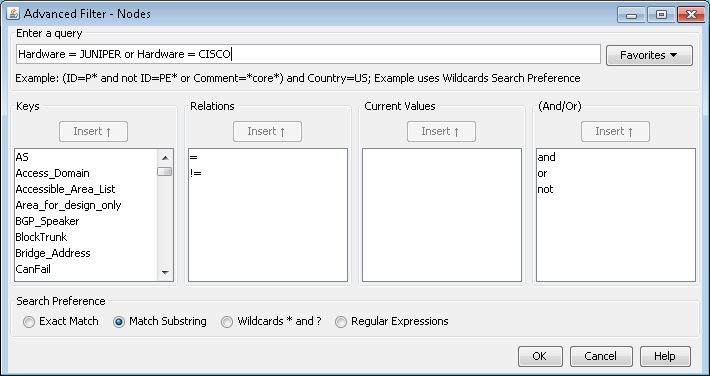
The Advanced Search offers more filtering options. In the Advanced Filter window, a basic query statement consists of a keyword, followed by a relation, and then a value (for example, “Hardware=ETHERNET”). More complicated queries can be formed by joining statements using the and, or, and not conjunctions. Left and right parentheses can be used to override the order of precedence (the “and” operator takes precedence over the “or” operator).

Figure 4: Advanced Filters for NodesAdvanced Filters for Nodes

You can type your query directly in the Enter a query text box. Or use the lists for Keys, Relations, Current Values, and And/Or. To insert text into the query text box from one of the lists, select the desired item from the list, and then click Insert. The Current Values list will automatically populate with valid values for the selected Key. You can choose a value from the Current Values list, or simply type in your own. Once you have specified your query in the Enter a query text box, click OK to apply the search filter.

Table 1: Advanced Search Preference Options

Option

Description

Exact Match

The query matches a value if the two strings match exactly

Match Substring

(Default) The query matches if it is a substring of the value. For instance, "id = S" matches BOSTON as well as SEATTLE.

Wildcards * and ?

When the "*" character is used in the query, it matches any text. The "?" character matches any one character.

Regular Expressions

Allows regular expressions in the query. This is like regular expressions in Unix.

Here is an advanced filter node example. To find all devices that have an ID beginning with N1 but not N11, together with Ethernet and token ring, all east of the Mississippi River in the U.S., select Wildcards * and ? for the search preference and type:

(ID = N1* and not ID = N11* or type=ethernet or type=tokenring) and lon > -90 and lon < -60 and Country = US

Here is an advanced filter link example. To find all OC3 links that either belong to area AREA0 or have an endpoint whose IP address begins with 10.101 but not 10.101.1.1, select Wildcards * and ? for the search preference and type:

Trunk = OC3 and (Area = AREA0 or IP_A = 10.101* or IP_Z = 10.101* and not (IP_A = 10.101.1.1 or IP_Z = 10.101.1.1)

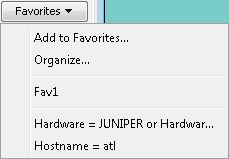
To save a query as favorite, select Favorites > Add to Favorite and enter in a name for the query. The Favorites menu displays the favorite queries by name, followed by a list of most recent queries. Select Favorites > Organize to reorder, rename, or delete queries. Note that the favorites settings are saved on the client machine.

Figure 5: Search FavoritesSearch Favorites

Navigation Page Setup

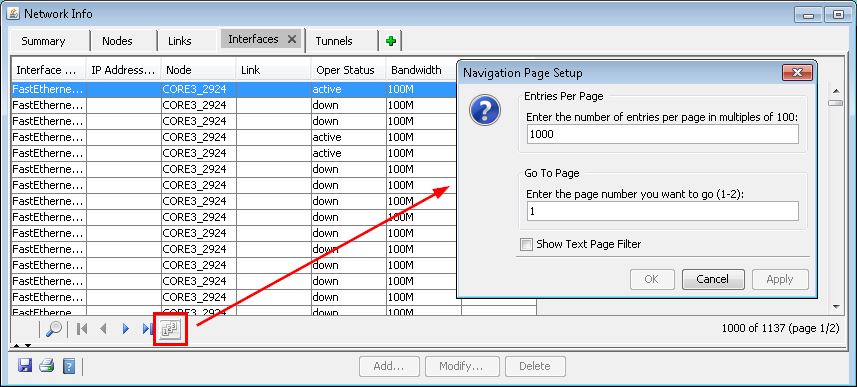
For the Interfaces, Demands, and Tunnel tables, the default display is 1000 entries per page and the Filter text box is disabled to enhance performance. Click the Navigation Page Setup icon to change these settings.

Figure 6: Navigation Page SetupNavigation Page Setup

Table Options

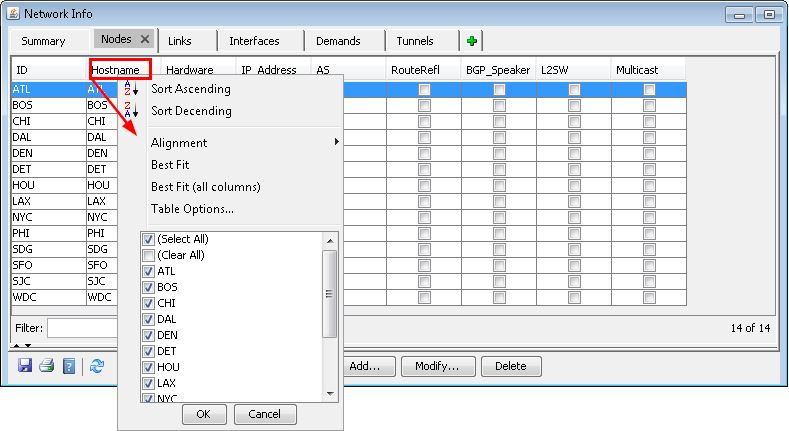
Many tables can be customize by right-clicking on a column header in the table. The following options may be available:

  • Sort Ascending/Descending: Sorts the column entries in ascending or descending order. You can also sort a column directly by left-clicking the respective column header.

  • Alignment Left/Right/Center: Positions the text within a column on the left side, right side, or center of the cell.

  • Best Fit: Sizes each column to fit the longest text in each column.

  • Best Fit (all columns): Sizes all columns to fit the longest text for each column.

  • Filter Checkbox: Filters the table based on the entry selections of the column. Select All checks all entries and Clear All de-selects all entries

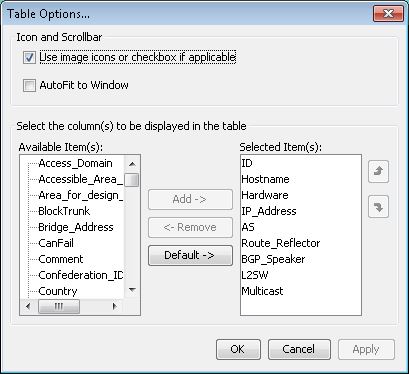
  • Table Options: Opens a window that allows you to select which columns should be displayed. These settings are saved on the client.

    Figure 7: Right-Click Table ColumnsRight-Click Table Columns
  • Use image icons or a checkbox if applicable: Some fields can be displayed with an image icon or text (for example, certain hardware types). For these fields, if this checkbox is checked, the image icon is displayed. Otherwise, the corresponding text is displayed.

  • AutoFit to Window: Adjusts the columns to fit inside the width of the table. Columns are given equal width. This option is useful if there are not too many columns.

  • Selected Item(s): You can select the desired columns to display in the table by moving them from the Available Item(s) list to the Selected Item(s) list. To do so, select the item in the Available Item(s) list and click Add. Select one or more items in the Selected Item(s) list and use the Up / Down Arrows to rearrange the column order. For multiple selection, use <Ctrl >-click or <Shift>-click.</Shift></Ctrl>

    Figure 8: Table OptionsTable Options