NorthStar Ingress Peer Engineering
The goal of Ingress Peer Engineering (IPE) in NorthStar is to steer traffic away from congested links by influencing the links from which traffic enters the NorthStar managed network from other domains (ingress links). To do that, you configure a BGP policy to be applied to an ingress ASBR. The policy (conditions and actions) is inserted into the export list.
You can have one policy per ingress ASBR, with support for multiple terms (rules) within the policy.
Conditions can include:
-
Route filters on prefixes (you can specify different prefixes for each term). You define a route filter list which is then referenced in the condition.
-
Regular expressions on AS paths.
Figure 1 shows an example in which NorthStar is receiving traffic on ASBR1 from AS domain 2. To steer traffic away from the congested link, a BGP policy is applied to the ingress ASBR which causes the uncongested link to be favored over the congested link.
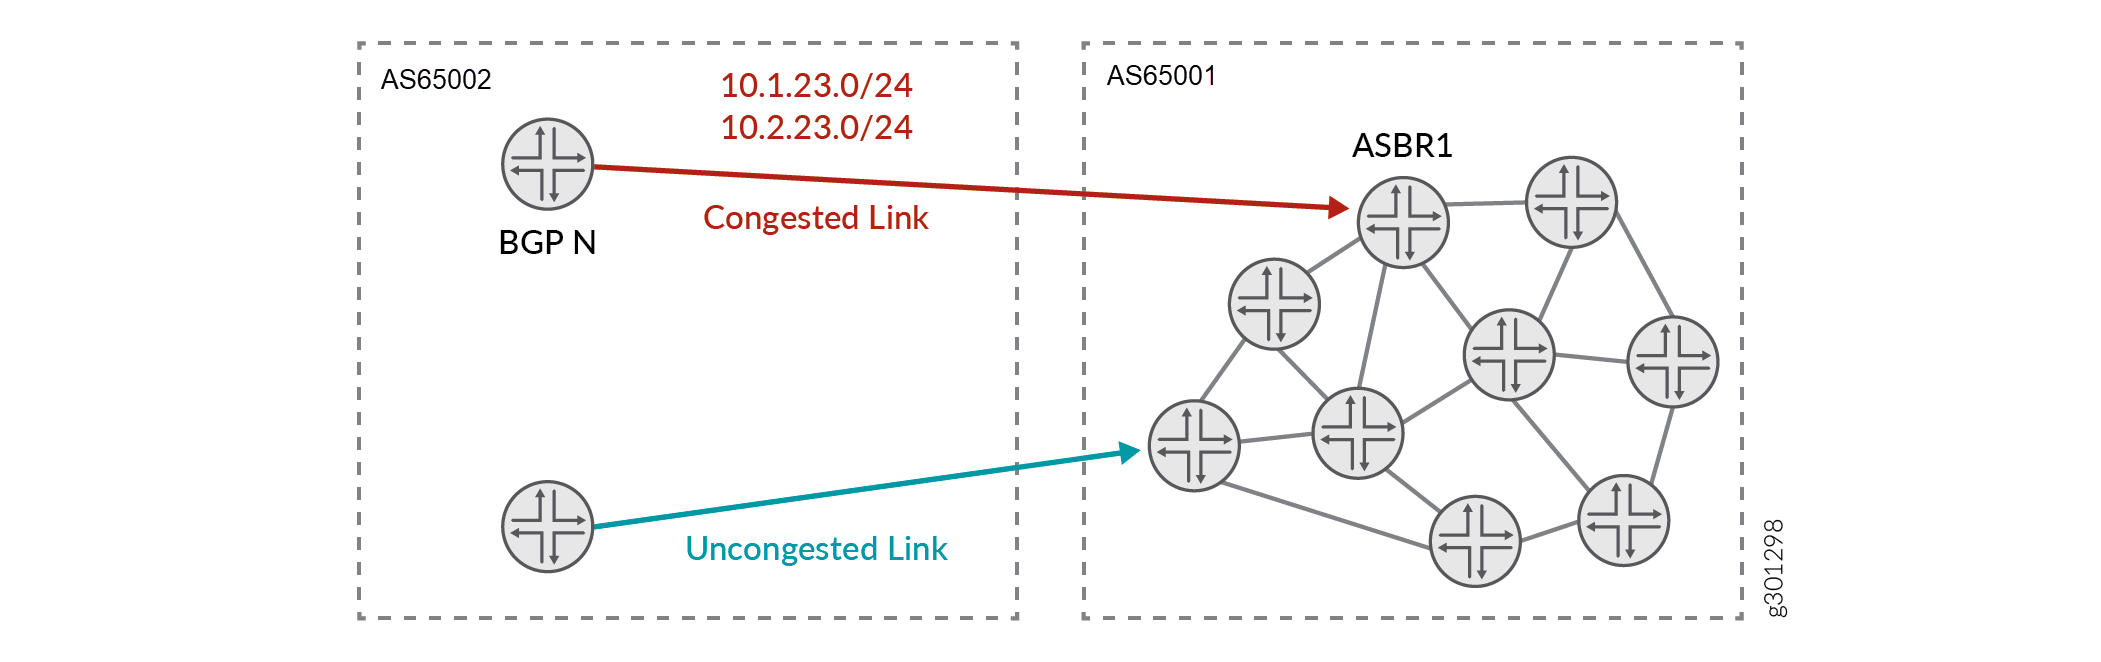
In the BGP policy, actions are defined that divert traffic to the uncongested link. Actions can include:
-
Prepending of the AS path with a local AS number. With this action, the shortest AS path is preferred. Prepending makes the AS path longer; the longer the AS path, the lower the priority. This results in diverting traffic away from a congested ingress link, but does not influence where the traffic goes instead.
-
Multi-Exit Discriminator (MED). With this action, the lowest MED metric is preferred. The lower the MED, the higher the priority.
If you include both actions, the shortest AS path has priority over the MED metric.
In the Junos OS, the IPE policy is inserted as the first item into the export list within the BGP configuration. Inserting it as the first item ensures that the policy is applied.In IOS-XR, the IPE policy overwrites any configured export policy in the BGP configuration because IOS does not have a “list” of policies.
You might find the following Junos OS documentation helpful for background:
NorthStar uses Netflow to sample traffic from the peers. This includes statistics from the traffic coming in, demand reports generation to show which AS is responsible for the most traffic, and extending the demands visibility to the ingress external border router.
See Netflow Collector for information about viewing demands in the web UI.
NorthStar Configuration Requirements for IPE
On the NorthStar application server, there are two settings important for the IPE features in NorthStar to function properly. They are described in Table 1.
|
Setting |
Notes |
|---|---|
|
aggregate-by-prefix |
This value must be set to “always”. Netflow aggregates all traffic from a specific ingress PE router to a specific destination (prefix) within the defined period of time. In the network information table, you would see that the demand name reflects where the traffic is going as opposed to reflecting the BGP next hop. To modify the setting, use the NorthStar CLI command set northstar analytics netflowd aggregate-by-prefix. |
|
generate-as-demands |
By default, this parameter is not set and AS demands are not generated. Unless you specify otherwise, AS demands do not appear through the REST API or through Demand Reports in the UI, even if valid netflow records are being exported. You enable the generation of AS demands by using the NorthStar Note:
This setting is not a requirement for IPE but gives you detailed reports depicting how flows traverse the network from AS domains to other AS domains. |
IPE Traffic Demand Report Generation
When you create a Demand Reports task using Administration > Task Scheduler, you can select a check box to include IPE Demands. For each IPE demand, the resulting report includes:
-
Ingress ASBR (name of the router within the NorthStar domain where the traffic was received)
-
External Ingress Peer (IP address of the BGP neighbor from which the traffic came)
-
Egress ASBR (name of the router from which the traffic left the NorthStar managed network)
-
Prefix
In addition, the many types of AS demand reports that are also selectable in a Demand Reports task can be useful tools for evaluating ingress and egress traffic patterns.
Creating an IPE Policy Using the Web UI
You create IPE policies from the IPE Policy tab in the network information table. The IPE Policy tab is not displayed by default. Click the + sign in the tabs heading bar and select IPE Policy to add the tab.
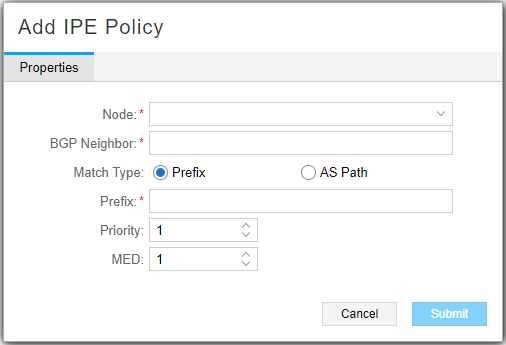
To create a policy, click Add in the network information table bottom tool bar. The Add IPE Policy window is displayed as shown in Figure 2. The fields are described in Table 2.
|
Field |
Description |
|---|---|
|
Node |
Ingress ASBR. |
|
BGP Neighbor |
IP address of the BGP neighbor. |
|
Match Type |
Select the condition as either Prefix or AS Path (mutually exclusive). |
|
Prefix |
Prefix. This field is only available if you select Prefix as the condition. |
|
RegEx |
Regular expression for the AS path. This field is only available if you select AS Path as the condition. Note:
Regex syntax can be different between operating systems. |
|
Priority |
Priority for action of prepending of the AS path with a local AS number. If you specify any number greater than zero, the local AS number is prepended to the AS path. The longer the AS path, the lower the priority. |
|
MED |
Value for the action of selecting based on the MED metric. The lower the MED, the higher the priority. |
Click Submit to complete the policy addition.
To modify an existing policy, select the row in the network information table and click Modify in the bottom tool bar. The Modify IPE Policy window is displayed where you can change some parameters. To delete a selected policy, click Delete in the bottom tool bar. A delete message is displayed, prompting you to confirm your intention to delete the policy.
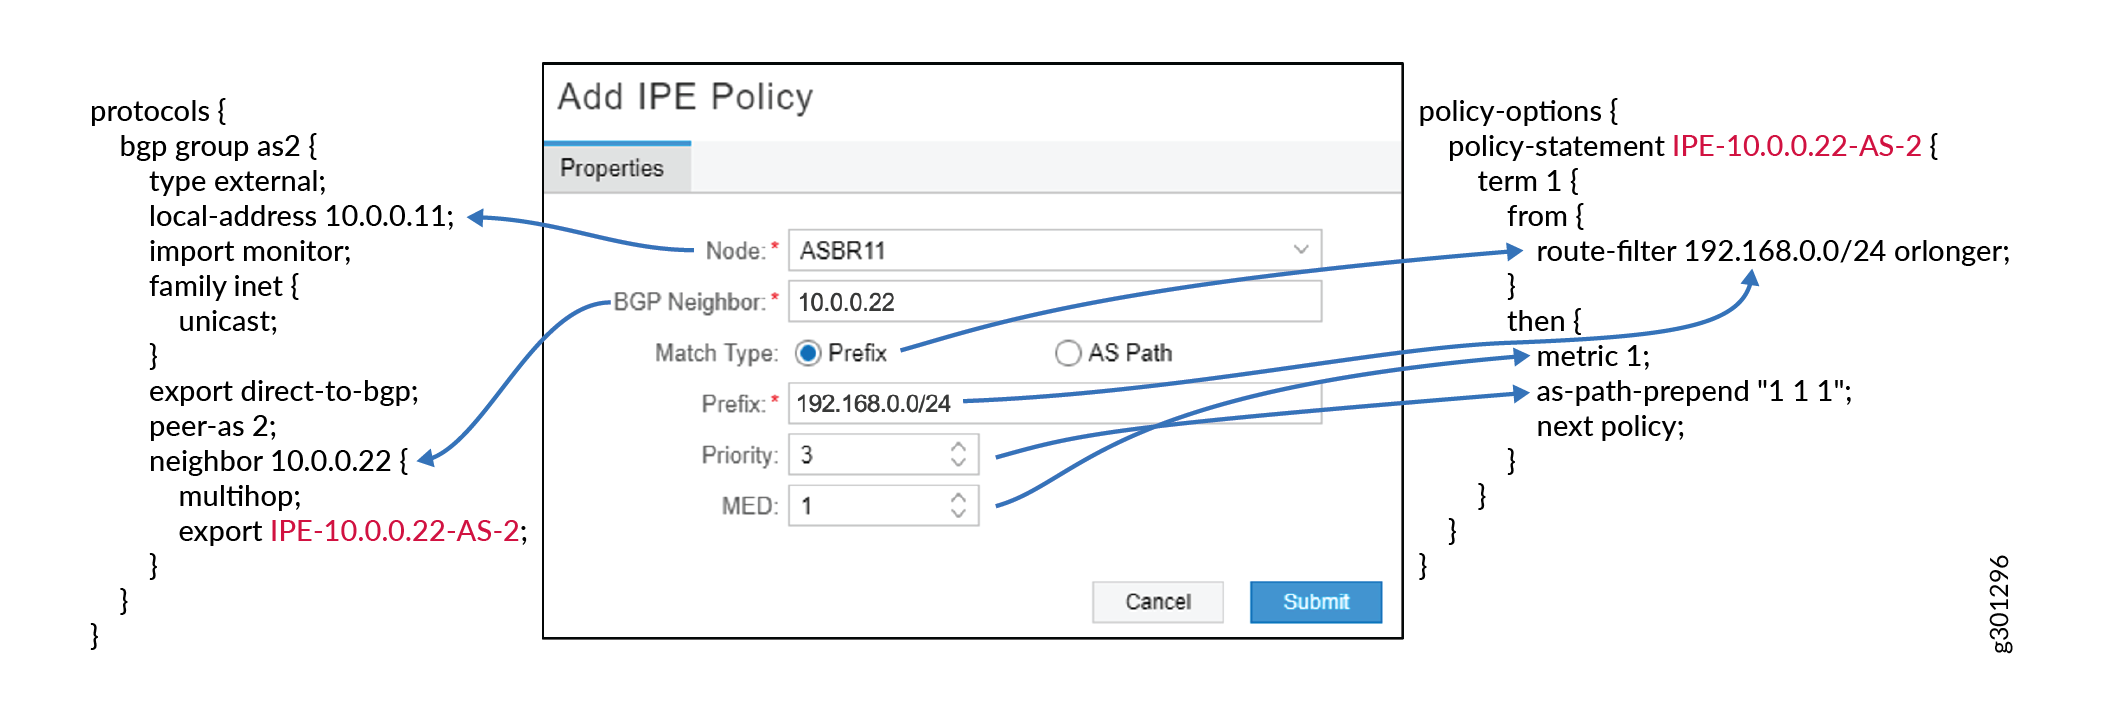
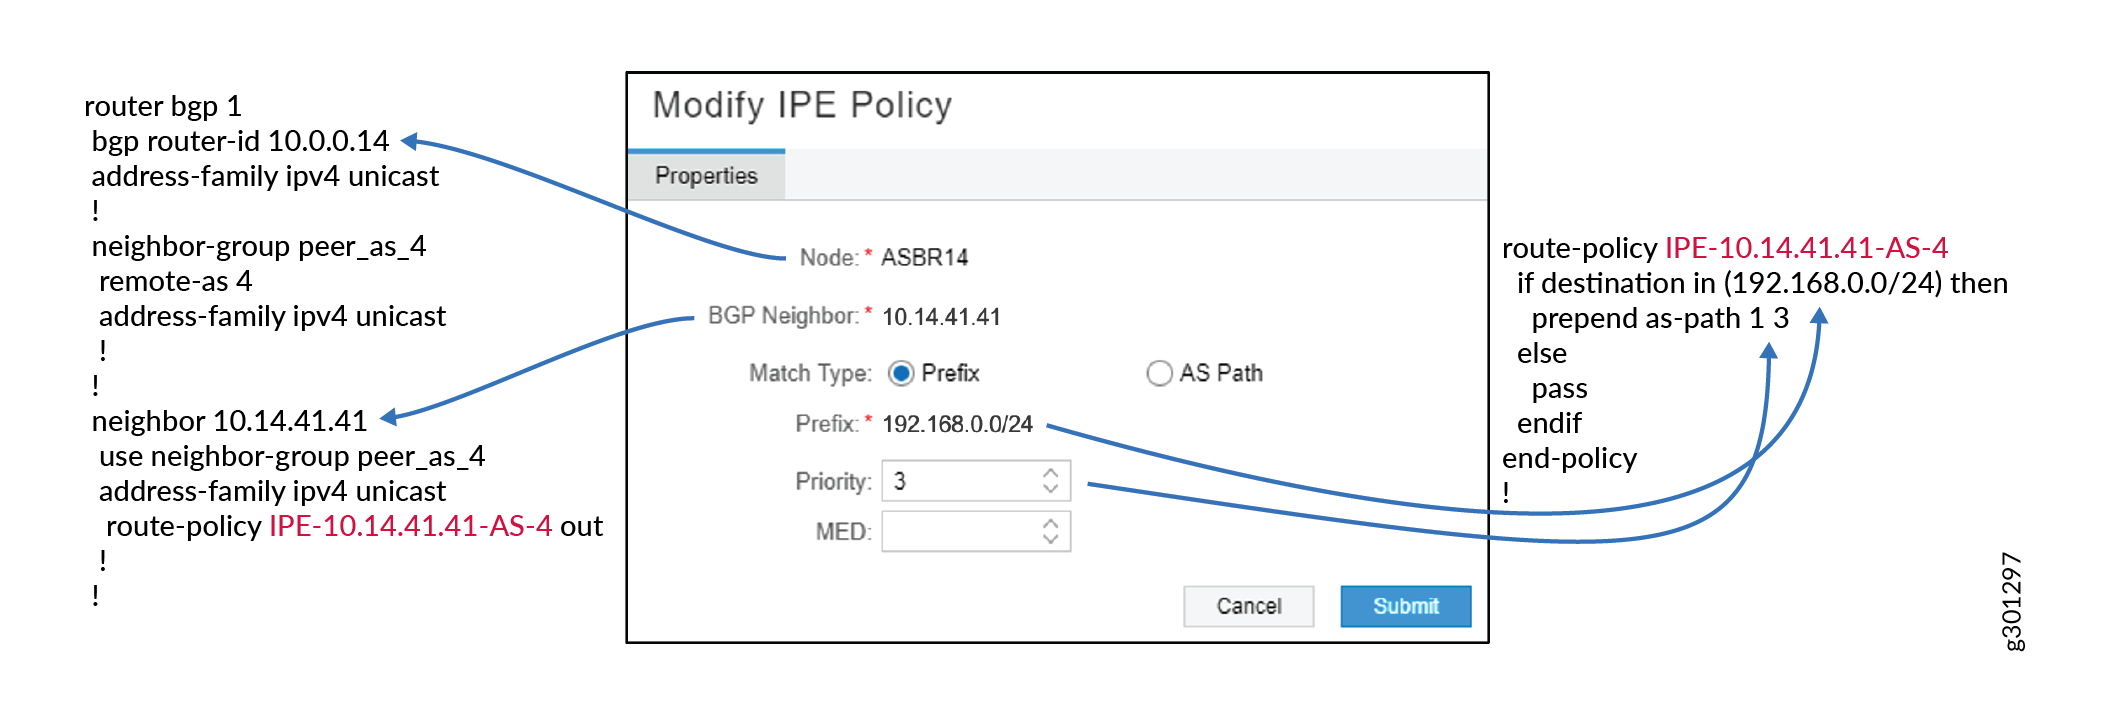
Figure 3 and Figure 4 show examples of how the input into the Add IPE Policy and Modify IPE Policy windows map to Junos OS and IOS-XR configuration.
An alternative to using the Add IPE Policy window is to create policies by selecting specific demands on the Demand tab in the network information table.
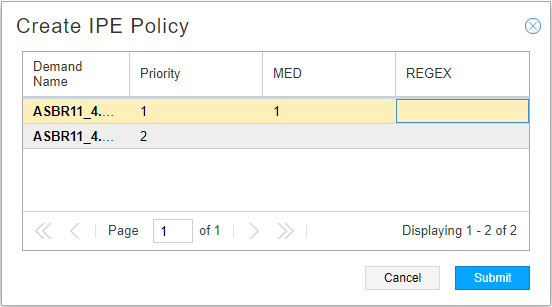
Select one or more demands in the Demand tab, right-click, and select Create IPE Policy. This brings up the Create IPE Policy window shown in Figure 5 where you can specify policy parameters for each demand. If you enter a regular expression for the AS path, the regular expression is used as the condition (over the prefix). If you do not specify a regular expression, the prefix is used. This can be faster because you don’t have to specify the node and neighbor.
Viewing IPE Policy Traffic
From the IPE Policy tab in the network information table, you can view a chart showing traffic on the interface when an IPE policy has been applied. You can use this traffic information to evaluate the traffic going through the interface to determine if the policy is effective. For example, if you apply a policy with the goal of reducing traffic on a congested interface, and the traffic chart shows significant reduction, that’s a good indication the policy is working.
In the table of configured policies, right-click a policy and select View IPE Policy Traffic. A new tab in the network information table is created where you can see traffic over time for that specific policy. In the upper left corner of the traffic chart, you can select a time window of one hour (selected by default), one day, or seven days. Or you can select to customize a time range by specifying a start and end day and time.