Configure Certificate-Based Authentication in Policy Enforcer
Users typically gain access to resources from an application or system on the basis of their username and password. You can also use certificates to authenticate and authorize sessions among various servers and users. Only one authentication mode is supported at a time and all users are authenticated using the selected authentication mode. In this use case, you’ll learn how to configure certificate-based authentication for a Policy Enforcer user.
Benefits
Certificate-based authentication over a Secure Sockets Layer (SSL) connection is the most secure type of authentication.
Before You Begin
-
Install Junos Space Security Director. See Junos Space Security Director Installation and Upgrade Guide.
-
Install and configure Security Director Insights as Policy Enforcer, see Security Director Insights Installation and Upgrade Guide.
-
Generate X.509 certificates, and make sure that the user certificates are available on your local machine. See Generate SSL certificates.
Only mandatory fields and other required fields are included in the procedures in this use case.
Overview
Starting in Policy Enforcer Release 20.1R1, you can enable certificate-based authentication for the Policy Enforcer user.
The following topology shows Policy Enforcer configured in Junos
Space Security Director. The user can configure certificate-based
authentication mode and use certificates to gain access to the application.
Generate SSL certificates
Let’s learn how to generate a certification authority (CA) certificate, generate a client certificate and a private key for the SSL client, and then convert the client certificate and private key to Personal Information Exchange-pkcs#12 format for use by web browsers.
- Generate a CA certificate
- Generate Client SSL certificates
- Copy the Certificates from the Linux Server to Your Local Machine
Generate a CA certificate
-
Enter the following details, for example:
-
Country Name: IN
-
State or Province name: KAR
-
Locality Name: BAN
-
Organization Name: Juniper
-
Organization Unit Name: space
-
Common Name: space_user
The certificate is issued by this name.
-
Email Address: example@juniper.com
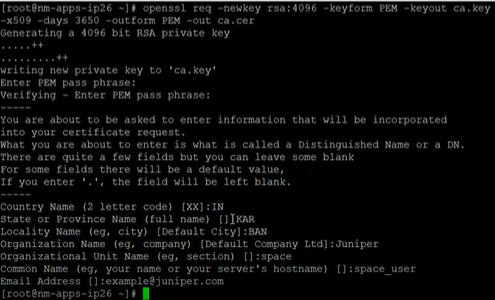
The CA certificate is generated.

-
Generate Client SSL certificates
-
Enter the export password, for example 123456.
You’ll need this password to import the certificate to the web browser.
The following certificates are generated:

Similarly, generate client2.cer, client2.key, and client2.p12 certificates with the following details, for example:
-
Country Name: IN
-
State or Province name: KAR
-
Locality Name: BAN
-
Organization Name: Juniper
-
Organization Unit Name: space
-
Common Name: space_user2
The certificate is issued by this name.
-
Email Address: example2@juniper.com
-
In this example, we will use the generated client1 certificates for the Junos Space user (user1) and client2 certificates for the Policy Enforcer user (pe_user).
Copy the Certificates from the Linux Server to Your Local Machine
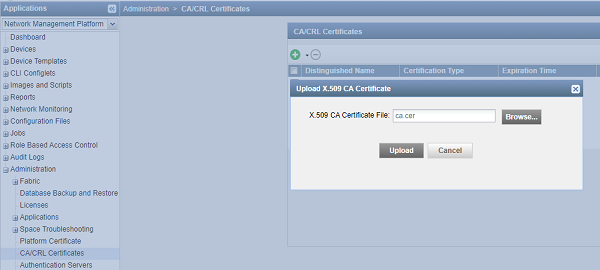
Upload the CA Certificate
Let’s upload the CA certificate or the root certificate to verify user certificates. The private key of the root certificate is used to sign the user certificates, which then inherits the trustworthiness of the root certificate.
To upload a CA certificate:
-
Browse the X.509 CA certificate file (for example: ca.cer) from your local machine that you generated in Generate SSL certificates.
Upload the User Certificate
Let’s upload user certificates to authenticate the Junos Space user by using certificate-based authentication. You need to upload the corresponding certificate for each user for the Junos Space server to authenticate the user. To create a user in Junos Space Network Management Platform, see Create Users in Junos Space Network Management Platform.
To upload the user certificate for an existing user, for example user1:
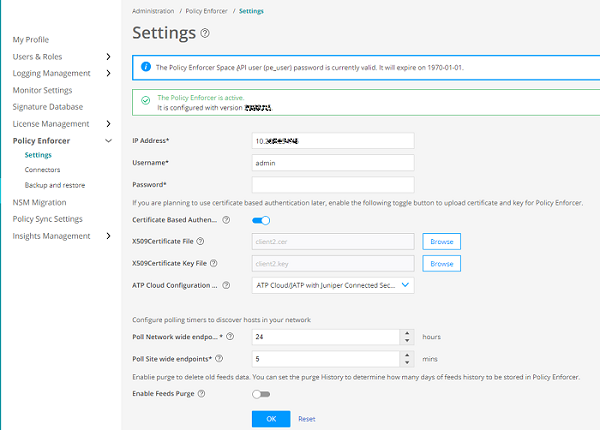
Upload X.509 Certificate File in Policy Enforcer
After you configure Policy Enforcer, a new user called pe_user is created. You must add X.509 certificate for the pe_user for seamless certificate-based authentication. Policy Enforcer authenticates with Junos Space Security Director and Junos Space Network Management Platform using certificates in the certificate-based authentication mode.
-
Enable Certificate Based Authentication.
This provides seamless operation when Junos Space Network Management Platform user switches to certificate-based authentication mode.
After uploading the certificates on the Settings Page, navigate
to Junos Space Network Management Platform, select User > Role Based Access control > User Accounts. Right-click the pe_user, and select Modify User. Here,
you can view the certificate details uploaded for the pe_user.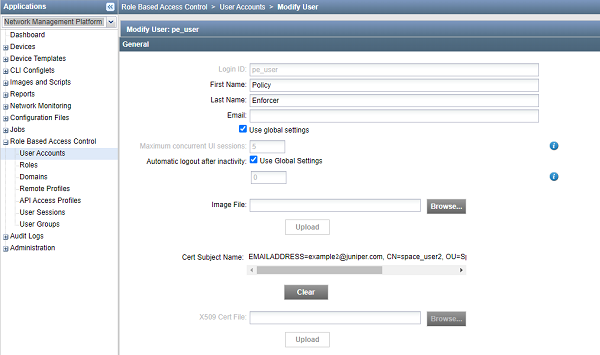
Configure the Web Browser Settings
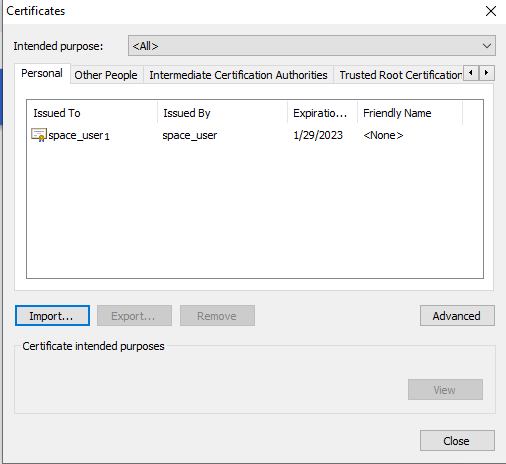
You must import the Personal Information Exchange-pkcs#12 file type certificate uploaded to the Junos Space user (user1) on all the supported web browser settings page. In this example, let’s upload the client1.p12 on Google Chrome to enable certificate-based authentication.
-
Browse the personal information file type, for example: client1.p12.
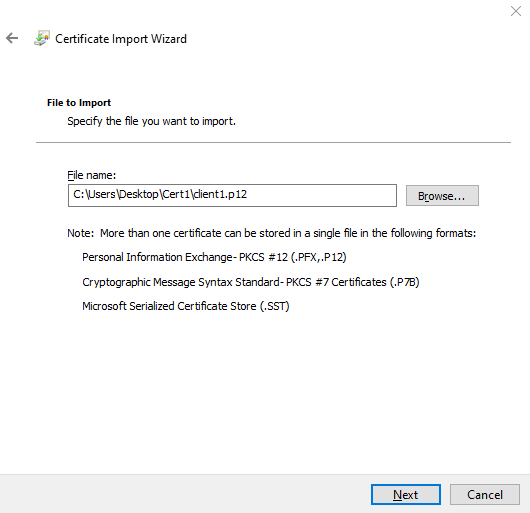
You must select the personal information file type of the same certificate that you selected for the Junos Space Network Management Platform user (user1) as in Upload the User Certificate.
-
Click OK.
A success message is displayed and the certificate is added to your web browser settings.
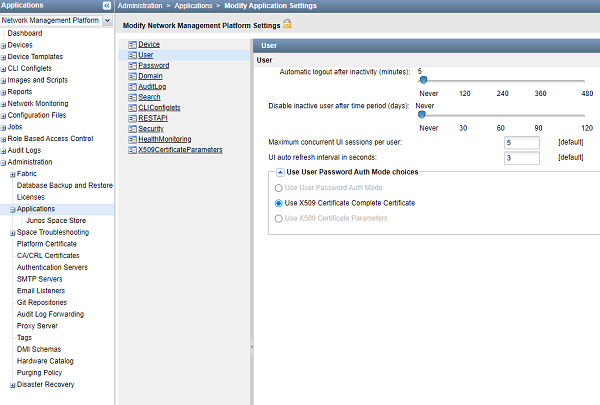
Change the User Authentication Mode to Certificate-Based Authentication Mode
Now let’s change the authentication mode from password-based to complete certificate–based for users to get authenticated on the basis of their certificates.
-
Select the Use X509 Certificate Complete Certificate option as the authentication mode.
The Change Summary page is displayed.
Verify the Certificate-Based Authentication Mode
Purpose
Let’s verify that you can log in to Junos Space Network Management Platform using certificates.
Action
-
Access the Junos Space Network Management Platform application.
The following pop-up is displayed.

-
Click OK.
The Security Page is displayed.
-
Click Allow.
The user1 is logged in to the Junos Space Network Management application without providing any username and password.
Troubleshoot Authentication Issues
Problem
Description
You must follow all the steps in the previous sections to enable certificate-based authentication. However, if you are restricted from logging in by using certificate–based authentication mode, then you can change the authentication mode to password-based from the CLI.
Solution
To change the authentication mode to password-based authentication from the CLI:
-
Log in to the CLI of the Junos Space server VIP node.
-
Navigate to the following directory: /var/www/cgi-bin.
-
Type the following command:
./setSpaceAuthMode password-basedThe authentication mode is changed to password-based, and you can login with the username and password.