Help us improve your experience.

Let us know what you think.

Do you have time for a two-minute survey?


NSM Migration

Before You Begin

Migrating policies from NSM requires the NSM database to be exported in .xdiff format. You must copy this file to your local machine and provide its path to migrate policies from NSM to Security Director.

Starting in Junos Space Security Director Release 16.2, you can migrate firewall and NAT policies from Network and Security Manager (NSM) to Security Director for a set of devices. All objects supported by Security Director (addresses, services, address groups, service groups, and schedulers) can be imported with the policy, with the exception of polymorphic objects. Rules referring to unsupported objects are disabled after the migration. For example, if a firewall policy rule is configured with the VPN tunnel or if a NAT pool is configured with a routing instance, such rules are disabled after the migration.

At any time, only a single migration from the NSM workflow can be triggered on Security Director. Figure 1 shows the device import workflow.
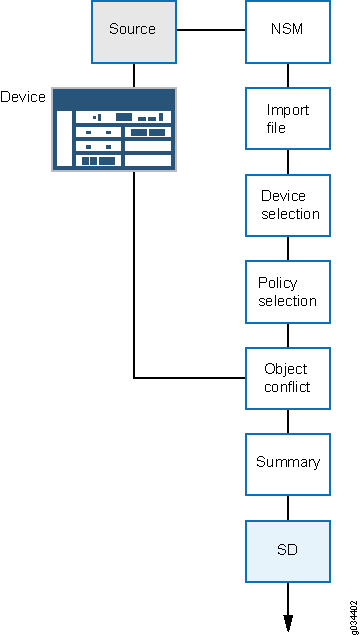
Figure 1: High-Level Device Import WorkflowHigh-Level Device Import Workflow

You can migrate policies from the NSM database (for the NSM Release 2010.3 to Release 2012.2) into Security Director.

The following NSM features are supported during the migration:

  • Firewall policies with global rules (including support for the global address book)

  • NAT policies with support for the global address book

  • Nested address group support (Junos OS Release 11.2 and later)

  • Negate address group support in firewall rules

  • Service offload support in firewall rules

  • Source address or source port option in static NAT

  • Source port option in source NAT

Note:

NSM to Security Director migration is not supported for ScreenOS devices.

To import policies from NSM:

  1. Select Administration > NSM Migration.

    The Migration From NSM page appears.

  2. Click Launch.

    The NSM Migration page appears.

  3. Browse to the path where the .xdiff file is stored, and select the appropriate .xdiff file generated from NSM. Click OK to import the .xdiff file to the Security Director server.

    The Devices page appears showing the name of the available devices, the IP address of each device, the Junos OS version of each device, the platform, the device family, and the domain.

  4. Select the devices for which you want to import the policies, and click Next.

    The Managed Services summary page appears. This page provides the following information.

    • Policy name and type (firewall or NAT)

    • Number of rules with errors or warnings

    • Summary that includes:

      • Number of IP addresses, services, or NAT pool objects

      • Rules with unsupported objects

  5. Select the policy that you want to import, and click Next.

    The Conflict Resolution page appears showing a list of conflicts, if any. An object conflict occurs when the name of the object to be imported matches an existing object, but the definition of the object does not match.

    Conflicting objects can be IP addresses, services, or NAT pool objects. You can take the following actions for the conflicting objects:

    • Rename object—Give the conflicting object a new name.

    • Overwrite with imported value—Overwrite the existing object with the new object.

    • Keep existing object—Keep the existing object, and ignore the new object.

    Once the initial naming conflict has been resolved, the object conflict resolution checks for further conflicts with the new name and definition until resolution is complete.

    Note:

    If Security Director finds further conflicts, the Conflict Resolution page is refreshed to display the new conflicts.

  6. After all object conflicts are resolved, click Finish.

    After the import is complete, a comprehensive report for each policy imported is available. You can download the summary report from your browser to your local machine. The summary report is saved as SummaryReport.zip.

  7. Go to the Firewall Policy or NAT Policy workspace to view the imported policies. Security Director creates a group policy without associating any devices with it. You can continue to import policy objects for all other devices. All imported device policies will show up as group policies in Security Director. You can perform all normal firewall or NAT policy functions on these imported policies.
Note:
  • If a group has more than 300 rules, Security Director automatically breaks the group into multiple rule groups, each containing 400 rules. The only exception is that these groups are placed last in the list of groups. The size of the last group is calculated by the upper threshold of 300 rules and lower threshold of 100 rules.

  • _DE is affixed to the device specific policies name by Security Director. You cannot directly assign device specific policies to a group policy. Assign devices to the device specific policies first, and then assign those devices to the group policies.

  • _PRE is affixed to the group policy names that are added before the device specific policies and _POST is affixed to the group policy names that are added after the device specific policies.

Release History Table
Release
Description
16.2
Starting in Junos Space Security Director Release 16.2, you can migrate firewall and NAT policies from Network and Security Manager (NSM) to Security Director for a set of devices.