Example: Configuring Stateful NAT64 for Handling IPv4 Address Depletion
This example configures stateful NAT64 on an MX Series 3D Universal Edge router with a Services DPC. The configuration replicates the example flow found in draft-ietf-behave-v6v4-xlate-stateful-12 and RFC 6146 Stateful NAT64: Network Address and Protocol Translation from IPv6 Clients to IPv4 Servers.
This example contains the following sections:
Requirements
This example uses the following hardware and software components:
An MX Series 3D Universal Edge router with a Services DPC or an M Series Multiservice Edge router with a services PIC
Junos OS Release 10.2 or later
A name server that supports DNS64
This configuration example has been tested using the software release listed and is assumed to work on all later releases.
Implementation
Juniper Networks routers with a Services PIC or Services Dense Port Concentrator (DPC) support stateful NAT64. The system directs IPv6 packets coming from IPv6-only hosts to a Services DPC where the packets are translated to IPv4 according to the configuration. In the reverse path, the system sends IPv4 packets to the Services DPC where additional system processes reverse the translation and send the corresponding IPv6 packet back to the client.
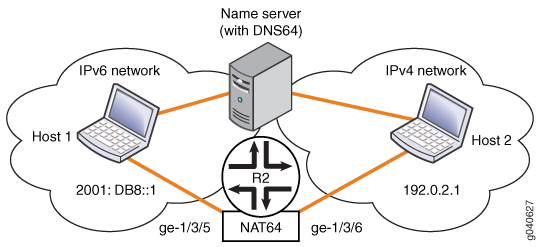
Configuration Overview and Topology
Figure 1 shows an MX Series
router, Router R2, implementing NAT64 with two Gigabit Ethernet interfaces
and a Services DPC. The interface connected to the IPv4 network is ge-1/3/6, and the interface connected to the IPv6 network is ge-1/3/5.
Also shown is a local name server with DNS64 functionality,
which the system uses as part of the translation process. The local
name server is configured with the /96 prefix assigned
to the local NAT64 router.
Configuration
Configuring stateful NAT64 involves the following tasks:
Configuring the PIC and the Interfaces
Step-by-Step Procedure
To configure the PIC and interfaces on Router R2:
Edit the
chassisconfiguration to enable a Layer 3 service package. The service package with its associated service package (sp-) interface is used to manipulate traffic before it is delivered to its destination. For details about configuring packages, see the Junos OS Services Interfaces Configuration Guide.Configure the service package at the
[edit chassis fpc pic adaptive-services]hierarchy level. This example assumes that the PIC is in FPC 5, slot 0.[edit chassis] fpc 5 { pic 0 { adaptive-services { service-package layer-3; } } }Configure the
ge-1/3/5interface connected to the IPv6 network:Include the
family inet(IPv4) andfamily inet6(IPv6) statements at the[edit interfaces interface-name unit unit-number]hierarchy level.Include the IPv6 address at the
[edit interfaces
unit unit-number family inet6 address]
hierarchy level.Configure a service set at the
[edit interfaces interface-name unit unit-number family
service input service-set]
and the[edit interfaces interface-name unit unit-number family service output service-set]hierarchy levels.[edit interfaces] ge-1/3/5 { description "IPv6-only domain"; unit 0 { family inet; family inet6 { service { input { service-set set_0; } output { service-set set_0; } } address 2001:DB8::1/64; } } }
Configure the
ge-1/3/6interface connected to the IPv4 network:Include the
family inetstatement at the[edit interfaces unit unit-number]hierarchy level.Include the IPv4 address at the
[edit interfaces
unit unit-number family inet]
hierarchy level.[edit interfaces] ge-1/3/6 { description "Internet-IPv4 domain"; unit 0 { family inet { address 192.0.1.1/16; } } }
Configure the services interface, in this example,
sp-5/0/0. This example configures a system log for any services on the local host.The service package associated with this interface was configured in Step 2. Specify both the IPv4 and IPv6 address families at the
[edit interfaces interface-name unit unit-number]hierarchy level. The service set you configure in Configuring the Service Set is associated with this interface.[edit interfaces] sp-5/0/0 { services-options { syslog { host local { services any; log-prefix XXXXXXXX; } } } unit 0 { family inet; family inet6; } }
Configuring the NAT64 Pool
Step-by-Step Procedure
Use this procedure to configure the NAT64 router, Router
R2, with the /96 prefix to represent IPv4 addresses in
the IPv6 address space. IPv6 packets addressed to a destination address
containing the /96 prefix are then routed to the IPv6 interface
of the NAT router. You also configure one or more IPv4 transport addresses
for the NAT pool.
This example shows how to configure the network address translation
for the IPv4 address 203.0.113.1/32. It also shows how
to configure the IPv6 prefix 64:FF9B::/96. To configure
the NAT64 pool:
Configure an IPv4 transport address for the pool at the
[edit services nat pool pool-name]hierarchy level. Configure the NAT pool port to be automatically assigned.[edit services nat] pool src-pool-nat64 { address 203.0.113.0/24; port automatic; }Configure a NAT rule to translate the packets from the IPv6 network. NAT rules specify the traffic to be matched and the action to be taken when traffic matches the rule.
In this example, only one rule is required to accomplish the address translation. The rule selects all traffic coming from the source address on the IPv6 network,
2001:DB8::1/128. The transport address configured in Step 1 is then specified for the translation using the/96prefix.Configure the rule at the
[edit services nat rule rule-name]hierarchy level as follows:[edit services nat] rule nat64 { match-direction input; term t1 { from { source-address { 2001:DB8::0/96; } destination-address { 64:FF9B::/96; } } then { translated { source-pool src-pool-nat64; destination-prefix 64:FF9B::/96; translation-type { stateful-nat64; } } } } }
Configuring the Service Set
Step-by-Step Procedure
To configure the service set for the NAT service on Router
R2, you must associate the previously configured rule (nat64) and service interface (sp-5/0/0) with the service set.
You also include a system log configuration.
To configure these settings at the [edit services service-set service-set-name] hierarchy level:
Configure the system log.
[edit services service-set set_0]
syslog {
    host local {
        services any;
        log-prefix XXXSVC-SETYYY;
    }
}
Associate the NAT rule and the service interface with the service set at the
[edit services service-set service-set-name]hierarchy level.[edit services ] service-set set_0 { nat-rules nat64; interface-service { service-interface sp-5/0/0; } }On Router R2, commit the configuration.
user@R2> commit check
configuration check succeeds
user@R2> commit
Verifying NAT64 Operation
You can use the following features to verify your NAT64 configuration:
CLI commands on the router
Logging
You can also use a test tool that can generate IPv6 flows directed
to the MX Series router, using the well-known prefix (64:FF9B::/96) as the destination.
Among others, you can use the following CLI commands to verify your NAT64 configuration:
show services stateful-firewall flows
show services stateful-firewall conversations
show services nat pool detail
show services stateful-firewall statistics extensive
In this example:
In the input direction, the IPv4 destination address is fetched from the IPv6 destination address whose prefix matches the destination-prefix configured from the specified prefix length.
In the reverse or output direction, the IPv4 address is suffixed to the destination-prefix at the prefix length specified.
To confirm the NAT64 configuration, perform these tasks:
- Display NAT64 Flows
- Display NAT64 Conversations
- Display Global NAT Pool-Related Statistics
- Check System Logs
- Verify That NAT64 Conversations Take Place
Display NAT64 Flows
Purpose
Display and verify that the NAT64 flows are created and contain correct network address translation.
Action
To display the NAT64 flows on Router R2, use the show services stateful-firewall flows command.
user@R2> show services stateful-firewall flows
Interface: sp-5/0/0, Service set: set_0
Flow                                                    State      Dir     Frm count
TCP        2001:db8::4:1160  ->64:ff9b::c000:201:80     Forward    I               5
    NAT source     2001:db8::4:1160    ->     203.0.113.1:
    NAT dest   64:ff9b::c000:201:80    ->       192.0.2.1:80
TCP        2001:db8::2:1166  ->64:ff9b::c000:201:80     Forward    I               5
    NAT source     2001:db8::2:1166    ->     203.0.113.1:1420
    NAT dest   64:ff9b::c000:201:80    ->       192.0.2.1:80
TCP          192.0.2.1:80    ->    203.0.113.1:1413     Forward    O               4
    NAT source       192.0.2.1:80      -> 64:ff9b::c000:201:21286
    NAT dest       203.0.113.1:1413    ->     2001:db8::4:1167
TCP        2001:db8::3:1123  ->64:ff9b::c000:201:80     Forward    I               5
    NAT source     2001:db8::3:1123    ->     203.0.113.1:1385
    NAT dest   64:ff9b::c000:201:80    ->       192.0.2.1:80
TCP          192.0.2.1:80    ->    203.0.113.1:1376     Forward    O               4
    NAT source       192.0.2.1:80      -> 64:ff9b::c000:201:21367
    NAT dest       203.0.113.1:1376    ->     2001:db8::3:1120
TCP        2001:db8::3:1136  ->64:ff9b::c000:201:80     Forward    I               5
    NAT source     2001:db8::3:1136    ->     203.0.113.1:1424
    NAT dest   64:ff9b::c000:201:80    ->       192.0.2.1:80
TCP        2001:db8::4:1146  ->64:ff9b::c000:201:80     Forward    I               5
    NAT source     2001:db8::4:1146    ->     203.0.113.1:1350
    NAT dest   64:ff9b::c000:201:80    ->       192.0.2.1:80
TCP        2001:db8::3:1110  ->64:ff9b::c000:201:80     Forward    I               5
    NAT source     2001:db8::3:1110    ->     203.0.113.1:1346
    NAT dest   64:ff9b::c000:201:80    ->       192.0.2.1:80
TCP          192.0.2.1:80    ->    203.0.113.1:1428     Forward    O               4
    NAT source       192.0.2.1:80      -> 64:ff9b::c000:201:21367
    NAT dest       203.0.113.1:1428    ->     2001:db8::4:1172
TCP          192.0.2.1:80    ->    203.0.113.1:1393     Forward    O               4
    NAT source       192.0.2.1:80      -> 64:ff9b::c000:201:80
    NAT dest       203.0.113.1:1393    ->     2001:db8::2:1157
TCP          192.0.2.1:80    ->    203.0.113.1:1346     Forward    O               4
    NAT source       192.0.2.1:80      -> 64:ff9b::c000:201:21367
    NAT dest       203.0.113.1:1346    ->     2001:db8::3:1110
TCP        2001:db8::2:1148  ->64:ff9b::c000:201:80     Forward    I               5
    NAT source     2001:db8::2:1148    ->     203.0.113.1:1366
    NAT dest   64:ff9b::c000:201:80    ->       192.0.2.1:80
TCP          192.0.2.1:80    ->    203.0.113.1:1363     Forward    O               4
Meaning
In the sample output, the NAT source and NAT destination addresses of the Input (I) and Output (O) directions are displayed. The NAT64 flows listed in this output are in no specific order.
Display NAT64 Conversations
Purpose
Display and verify that the NAT64 conversations (collections of related flows) are correct.
Action
To display NAT64 conversations on Router R2, use the show services stateful-firewall conversations command. In contrast
to the flows command that reports all flows in no specific
order, the output of the conversations command groups the
flows that belong to a conversation for easy troubleshooting of communication
between a specific pair of hosts.
user@R2> show services stateful-firewall conversations
Interface: sp-5/0/0, Service set: set_0

Conversation: ALG protocol: tcp
  Number of initiators: 1, Number of responders: 1
Flow                                                State    Dir       Frm count
TCP        2001:db8::3:1188  ->64:ff9b::c000:201:80  Forward  I               5
    NAT source     2001:db8::3:1188    ->     203.0.113.1:1580
    NAT dest   64:ff9b::c000:201:80    ->       192.0.2.1:80
TCP          192.0.2.1:80    ->    203.0.113.1:1580  Forward  O               4
    NAT source       192.0.2.1:80      -> 64:ff9b::c000:201:21303
    NAT dest       203.0.113.1:1580    ->     2001:db8::3:1188

Conversation: ALG protocol: tcp
  Number of initiators: 1, Number of responders: 1
Flow                                                State    Dir       Frm count
TCP        2001:db8::4:1213  ->64:ff9b::c000:201:80  Forward  I               5
    NAT source     2001:db8::4:1213    ->     203.0.113.1:1551
    NAT dest   64:ff9b::c000:201:80    ->       192.0.2.1:80
TCP          192.0.2.1:80    ->    203.0.113.1:1551  Forward  O               4
    NAT source       192.0.2.1:80      -> 64:ff9b::c000:201:21367
    NAT dest       203.0.113.1:1551    ->     2001:db8::4:1213

Conversation: ALG protocol: tcp
  Number of initiators: 1, Number of responders: 1
Flow                                                State    Dir       Frm count
TCP        2001:db8::3:1169  ->64:ff9b::c000:201:80  Forward  I               5
    NAT source     2001:db8::3:1169    ->     203.0.113.1:1523
    NAT dest   64:ff9b::c000:201:80    ->       192.0.2.1:80
TCP          192.0.2.1:80    ->    203.0.113.1:1523  Forward  O               4
    NAT source       192.0.2.1:80      -> 64:ff9b::c000:201:80
    NAT dest       203.0.113.1:1523    ->     2001:db8::3:1169

Conversation: ALG protocol: tcp
  Number of initiators: 1, Number of responders: 1
Flow                                                State    Dir       Frm count
TCP        2001:db8::2:1233  ->64:ff9b::c000:201:80  Forward  I               5
    NAT source     2001:db8::2:1233    ->     203.0.113.1:1621
    NAT dest   64:ff9b::c000:201:80    ->       192.0.2.1:80
TCP          192.0.2.1:80    ->    203.0.113.1:1621  Forward  O               4
    NAT source       192.0.2.1:80      -> 64:ff9b::c000:201:21367
    NAT dest       203.0.113.1:1621    ->     2001:db8::2:1233

Conversation: ALG protocol: tcp
  Number of initiators: 1, Number of responders: 1
Flow                                                State    Dir       Frm count
TCP        2001:db8::2:1218  ->64:ff9b::c000:201:80  Forward  I               5
    NAT source     2001:db8::2:1218    ->     203.0.113.1:1575
    NAT dest   64:ff9b::c000:201:80    ->       192.0.2.1:80
TCP          192.0.2.1:80    ->    203.0.113.1:1575  Forward  O               4
    NAT source       192.0.2.1:80      -> 64:ff9b::c000:201:21367
    NAT dest       203.0.113.1:1575    ->     2001:db8::2:1218

Conversation: ALG protocol: tcp
  Number of initiators: 1, Number of responders: 1
Flow                                                State    Dir       Frm count
TCP        2001:db8::4:1220  ->64:ff9b::c000:201:80  Forward  I               5
    NAT source     2001:db8::4:1220    ->     203.0.113.1:1572
    NAT dest   64:ff9b::c000:201:80    ->       192.0.2.1:80
TCP          192.0.2.1:80    ->    203.0.113.1:1572  Forward  O               4
    NAT source       192.0.2.1:80      -> 64:ff9b::c000:201:21367
    NAT dest       203.0.113.1:1572    ->     2001:db8::4:1220

Conversation: ALG protocol: tcp
  Number of initiators: 1, Number of responders: 1
Flow                                                State    Dir       Frm count
TCP        2001:db8::2:1211  ->64:ff9b::c000:201:80  Forward  I               5
    NAT source     2001:db8::2:1211    ->     203.0.113.1:1554
    NAT dest   64:ff9b::c000:201:80    ->       192.0.2.1:80
TCP          192.0.2.1:80    ->    203.0.113.1:1554  Forward  O               4
    NAT source       192.0.2.1:80      -> 64:ff9b::c000:201:21286
    NAT dest       203.0.113.1:1554    ->     2001:db8::2:1211
Meaning
The sample output displays the NAT64 conversations between specific pairs of hosts.
Display Global NAT Pool-Related Statistics
Purpose
Display and verify global NAT statistics related to pool usage.
Action
To display global NAT pool-related statistics on Router R2, use the show services nat
pool detail command. You normally use this command in
conjunction with the show services stateful-firewall flows
command used in Display NAT64 Flows, which displays the source and output of the
translation.
user@R2> show services nat pool detail
Interface: sp-5/0/0, Service set: set_0
  NAT pool: src-pool-nat64, Translation type: dynamic
    Address range: 203.0.113.1-203.0.113.254
    Port range: 512-65535, Ports in use: 102, Out of port errors: 0, Max ports used: 192
  NAT pool: _jpool_nat64_t1_, Translation type: static
    Address range: 0.100.255.155-0.100.255.154
Meaning
The sample output displays relevant statistics and information about the NAT64 pools.
Check System Logs
Purpose
Check the system logs because the system creates detailed logs as sessions are created and deleted.
Action
When a session is created based on the example setup, two logs are provided. The first log indicates the rule and term that the packet matched. The second log indicates the flow creation.
user@R2> show log messages
Oct 21 22:14:14  H1 (FPC Slot 5, PIC Slot 0) XXXSVC-SETYYY{set_0}[FWNAT]: ASP_SFW_CREATE_ACCEPT_FLOW: proto 6 (TCP) application: any, ge-1/3/5.0:2001:db8:0:0:0:0:0:1:1025 -> 64:ff9b:0:0:0:0:c000:201:80, creating forward or watch flow ; source address and port translate to 203.0.113.1:1593 ; destination address translates to 192.0.2.1
When the sessions end, the system creates a log indicating the NAT pool address and port release in addition to the delete flow log, as follows:
Oct 21 22:14:17  H1 (FPC Slot 5, PIC Slot 0) XXXSVC-SETYYY{set_0}[FWNAT]:ASP_NAT_POOL_RELEASE: natpool release 203.0.113.1:1593[1]
Oct 21 22:14:17  H1 (FPC Slot 5, PIC Slot 0) XXXSVC-SETYYY{set_0}[FWNAT]: ASP_SFW_DELETE_FLOW: proto 6 (TCP) application: any, (null)(null)2001:db8:0:0:0:0:0:1:1025 -> 64:ff9b:0:0:0:0:c000:201:80, deleting forward or watch flow ; source address and port translate to 203.0.113.1:1593 ; destination address translates to 192.0.2.1
Meaning
The sample output displays the log messages that can be seen when a session is created and when a session ends.
Verify That NAT64 Conversations Take Place
Purpose
Verify that the NAT64 conversations are taking place. Current support for the application-layer gateway (ALG) is limited to ICMP and traceroute.
Action
To verify that the NAT64 conversations are occuring
on Router R2, use the show services stateful-firewall conversations command. The following is sample output for an ICMP echo test (ping).
user@R2> show services stateful-firewall conversations
Interface: sp-5/0/0, Service set: set_0

Conversation: ALG protocol: icmpv6
  Number of initiators: 1, Number of responders: 1
Flow                                                State    Dir       Frm count
ICMPV6     2001:db8::2       ->64:ff9b::c000:201     Watch    I              21
    NAT source     2001:db8::2         ->     203.0.113.1
    NAT dest   64:ff9b::c000:201       ->       192.0.2.1
ICMP         192.0.2.1       ->    203.0.113.1       Watch    O              21
    NAT source       192.0.2.1         -> 64:ff9b::c000:201
    NAT dest       203.0.113.1         ->     2001:db8::2
Meaning
The sample output displays the results of the ICMP echo test.