ON THIS PAGE
Configure Your APs as IEEE 802.1X Supplicants
For added security, use this feature to block traffic to an access point (AP) until its credentials are verified.
Certain models of Juniper Mist APs can authenticate to their uplink wired switch by using IEEE 802.1X authentication. When 802.1X authentication is implemented, the switch blocks traffic to the AP at the port until its credentials are presented and matched on the authentication server (a RADIUS server). When the AP is authenticated, the switch stops blocking traffic.
To get the 802.1X supplicant feature working on your supported Juniper Mist™ APs, ensure that the APs have the required firmware, enable 802.1X the switch port profile and the device profile, and add the Juniper Mist CA certificate to your RADIUS server.
Deployment Considerations
The preferred method to deploy your Juniper Mist APs with 802.1X at the edge is to leverage a guest VLAN on the switch side. With a guest VLAN that is completely locked down, except for access to the Mist cloud, the AP can connect to the cloud, receive its configuration, and download the correct AP firmware version (if required). Once it has the supplicant configuration, the AP will attempt to authenticate to the network.
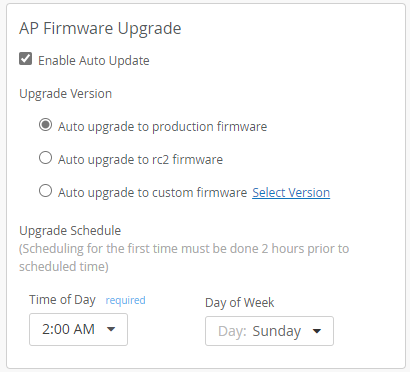
Requirements: AP firmware version 0.14.x or higher is required. To ensure that all APs meet this requirement, the processes below include enabling auto-upgrade in the site settings. This way, all APs automatically get the required firmware to support this feature.
The following APs do not support 802.1x supplicants: AP21, AP41, AP61, and BT11.
Enable Auto-Update to Version 0.14.x or Higher
802.1X is supported in Juniper Mist AP firmware version 0.14.x or higher. To ensure that all APs meet this requirement, enable auto-upgrade in the site settings. This way, all APs automatically get the required firmware to support this feature.
-
Under Upgrade Version, select Auto upgrade for production
firmware to get the latest firmware.
Enable 802.1X in the Switch Port Profile
On your switch, enable 802.1X authentication for the ports that your APs connect to. We recommend using a Guest VLAN, server reject VLAN, or MAC auth fallback with a default VLAN that allows AP connectivity to the Mist Cloud, at least for initial deployment of the site. This way, APs can safely connect to the cloud to receive the initial configuration and AP firmware.
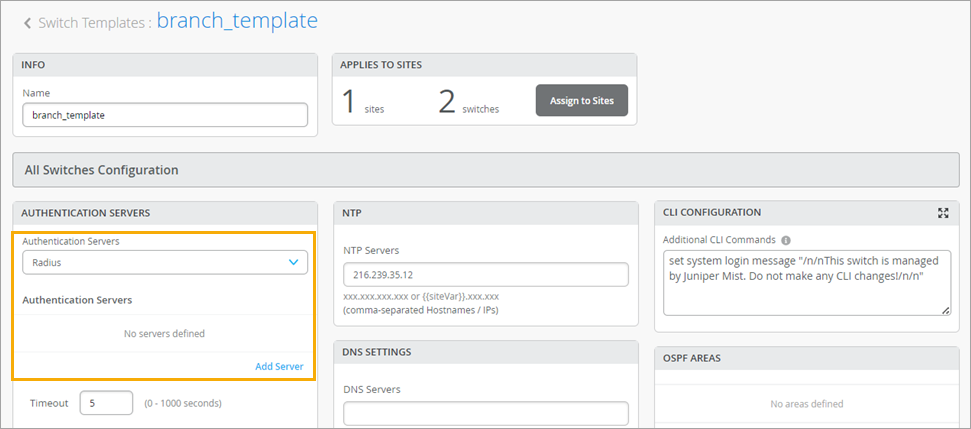
To configure 802.1X in the Port Profile:
-
In the Authentication Servers section, add your
RADIUS servers.
-
In the Shared Elements section, enable 802.1X and
either MAC Authentication or Guest Network.
802.1X with MAC Authentication—With this option, your RADIUS server has full visibility and control. When an AP connects, the switch performs MAC authentication. RADIUS should return a default/unknown device VLAN with access to the Mist Cloud. Then the AP connects to the cloud, downloads firmware if necessary, and receives the supplicant configuration. Next, the AP requests RADIUS authentication. When the AP is authenticated, the switch places the AP in the specified VLAN(s).
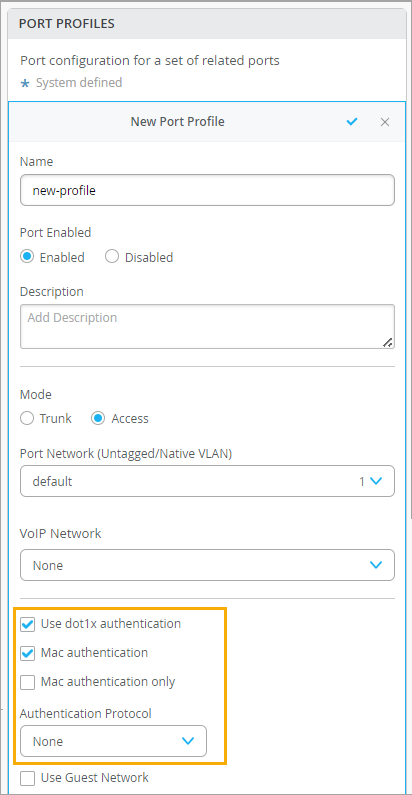
802.1X with Guest Network—With this method, you use a Guest VLAN to provide limited access to new APs until they connect to the Mist cloud and get their configuration. When an AP connects, it is placed on the Guest VLAN. Then it connects to cloud, downloads firmware if necessary, and receives the supplicant configuration. Next, the AP requests RADIUS authentication. When the AP is authenticated, the switch places the AP in the specified VLAN(s).
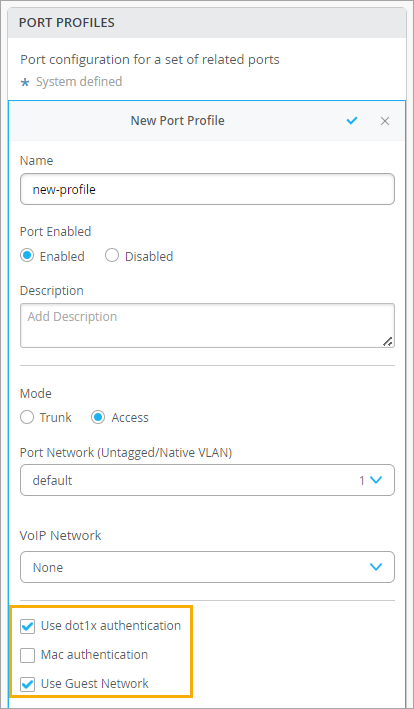
Note:Also identify the VLAN in the port profile so that the APs are assigned to the desired VLAN(s). Alternatively, assign VLANs via RADIUS. See Assigning VLANs via RADIUS (If Applicable).
Assigning VLANs via RADIUS (If Applicable)
If you use Mist Edge and tunnel all of your WLANs, then likely an AP connecting to a switch port configured as access will suffice. However if you don’t use Mist Edge, or have WLANs local traffic breakout, then you probably need the switch port to be a trunk. Most switch operating systems allow you to return multiple VLANs from RADIUS.
For Junos, you can either return multiple Egress-VLANID or Egress-VLAN-Name.
Example for Egress-VLAN-Name:
- 1 = tagged
- 2 = untagged
- vlan-2 and vlan-3 are the VLAN names on the switch
In the example below, VLAN 1vlan-2 is tagged, and VLAN 2vlan-3 is untagged:
       001094001144 Cleartext-Password := "001094001144“
             Tunnel-Type = VLAN,
             Tunnel-Medium-Type = IEEE-802,
             Egress-VLAN-Name += 1vlan-2,
Egress-VLAN-Name += 2vlan-3,For help with configuration, see your Junos OS documentation.
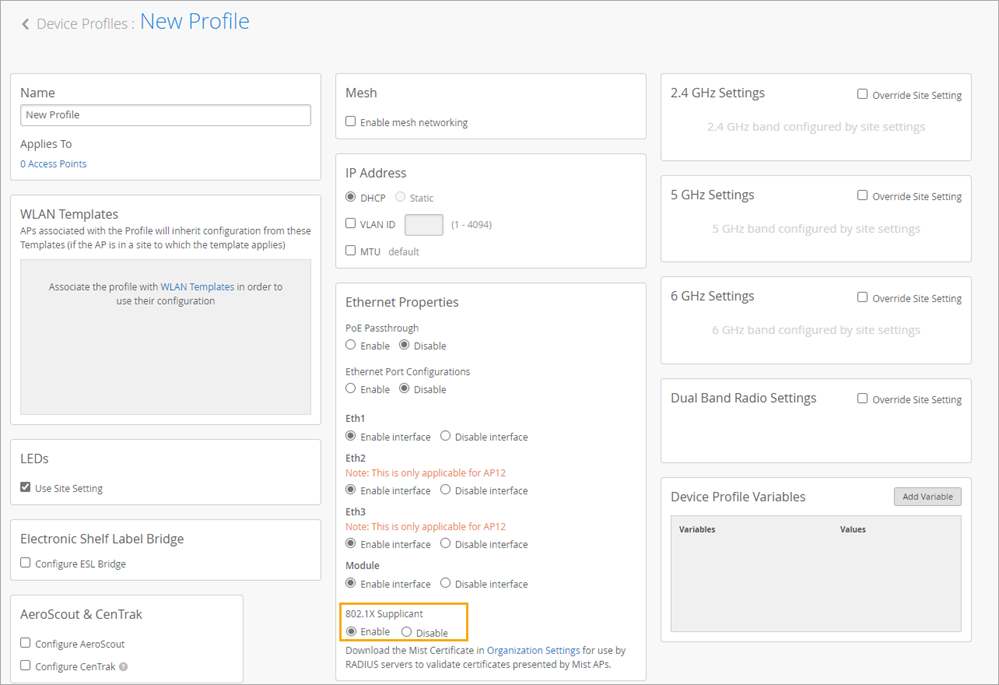
Enable the 802.1X Supplicant Option in the Device Profile
To quickly configure multiple APs at once, set up a device profile with this feature enabled. You'll then apply the device profile to the APs. When the AP connects to the cloud for the first time, it will receive the supplicant configuration straight away.
-
In the Ethernet Properties section of the Device
Profile, find the 802.1X Supplicant option, and click
Enable.
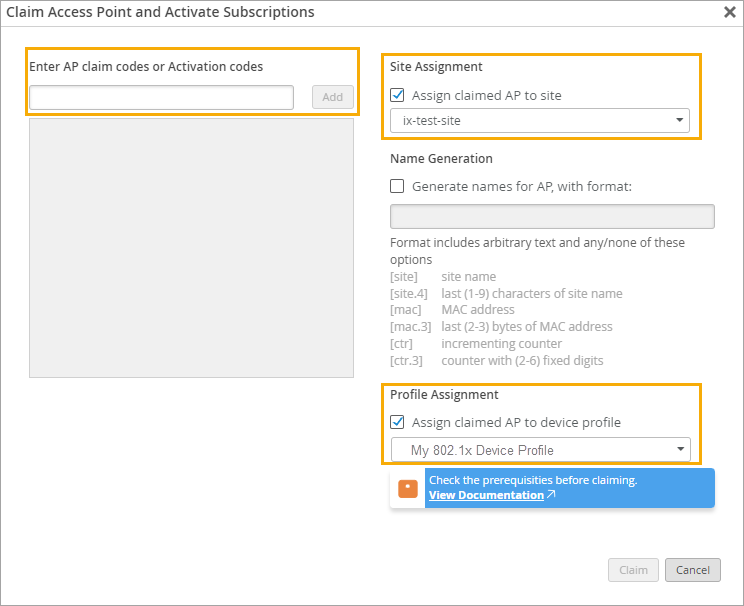
Apply the Device Profile to Your APs
When you claim your APs into your organization, apply the device profile and identify the site. This way, when you bring your APs online, they'll get the firmware through the auto-upgrade settings in the site configuration, and they'll get the AP configuration from the device profile.
-
In the pop-up window, enter the activation codes or claim codes, select the
site, and select the device profile.
Access Assurance Configuration
If you are a Juniper Mist Access Assurance customer, the configuration is extremely simple. You only need to create a label and a policy to match on for the AP authentications and optionally return configuration back to the switch. Juniper Mist Access Assurance automatically knows about the organization's CA, and does not need to be manually added into the certificate store.
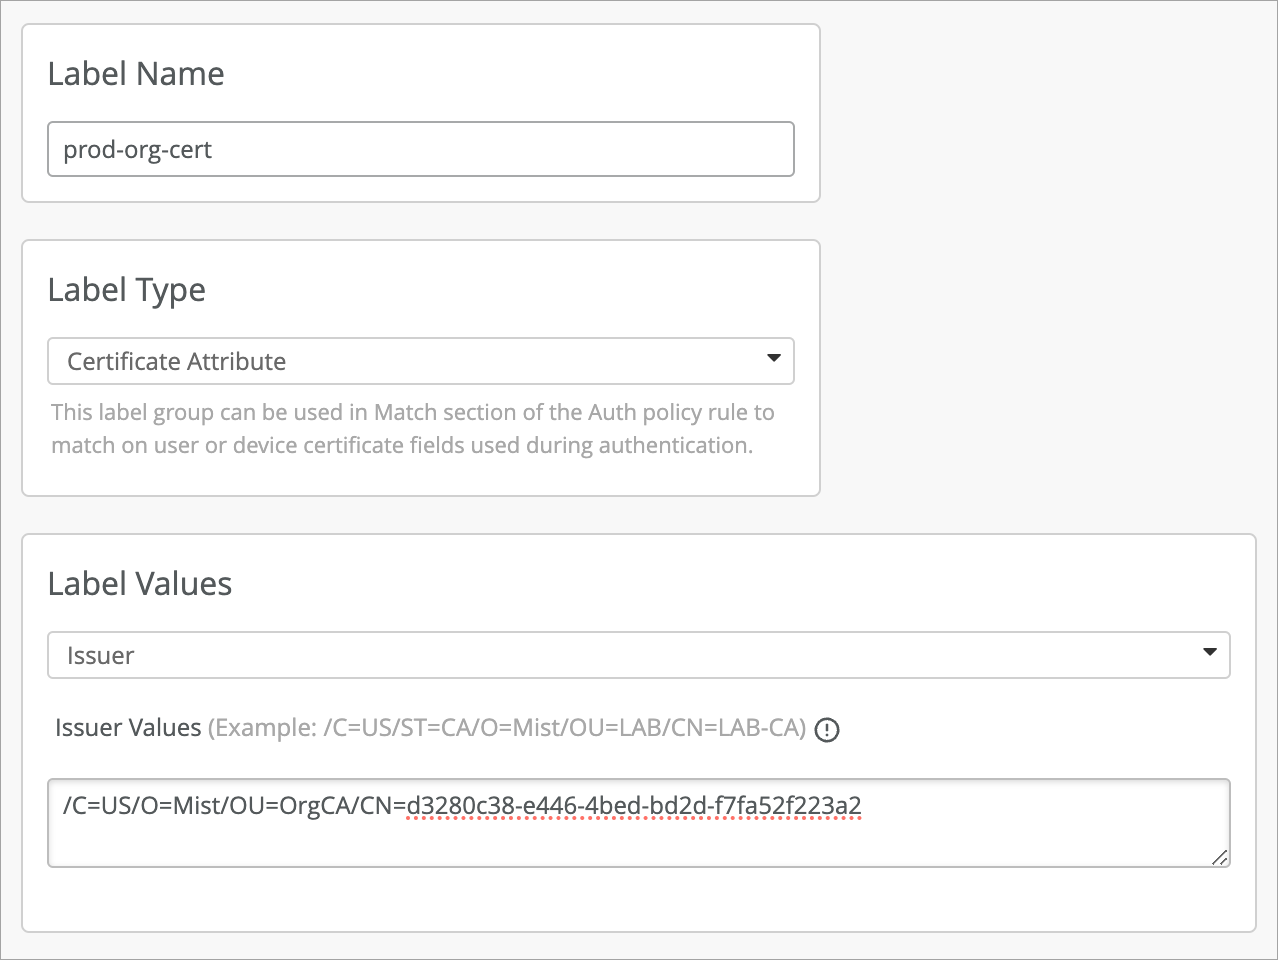
Auth Policy Label
Here is an example label to match the AP authentications. The label type is Certificate Attribute with the value set to Issuer. The value is your Org ID.
/C=US/O=Mist/OU=OrgCA/CN=d3280c38-e446-4bed-bd2d-f7fa52f223a2
Auth Label
After you make your matching label, you can create your policy. In this example, the rule is to match on the AP certificate, wired authentication, and EAP-TLS. Upon successful authentication, a trunk VLAN configuration is returned to the switch.

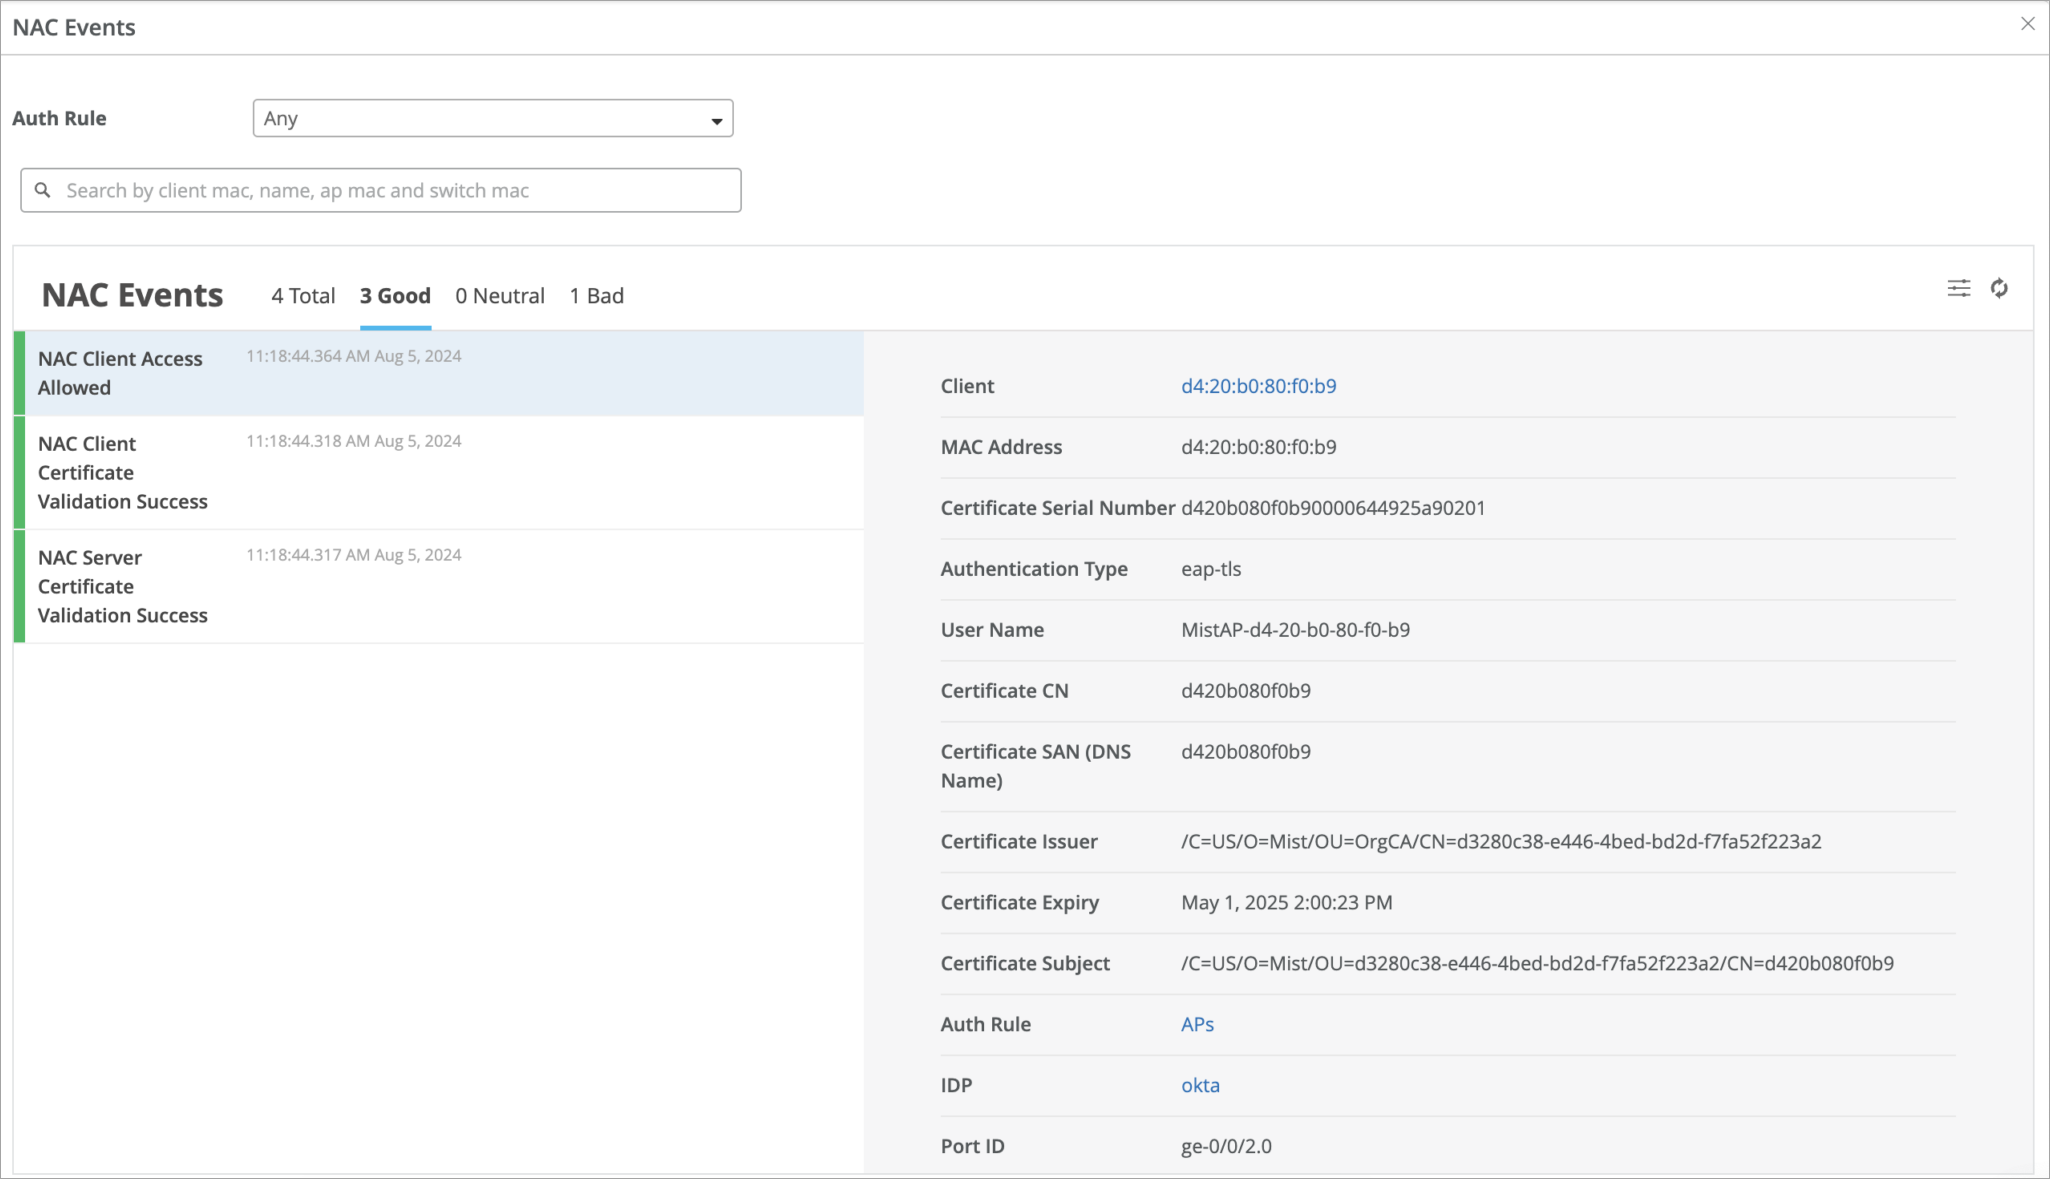
Validation
If all goes well, you will see your AP authenticated.
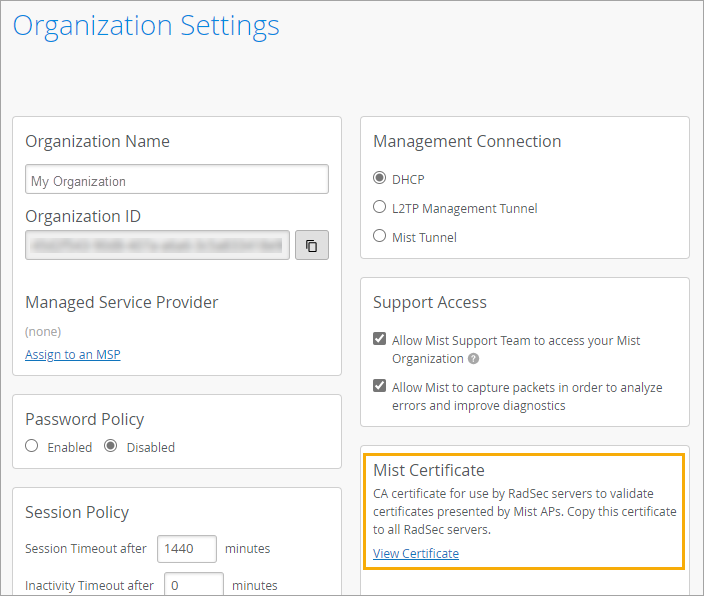
Importing Your Certificate to Your RADIUS Server
Juniper Mist generates a unique CA certificate for your organization. You need to import this certificate to your RADIUS server so that the server can authenticate your APs.
You can find your Mist Certificate on the Organization > Settings page.