Help us improve your experience.

Let us know what you think.

Do you have time for a two-minute survey?


Enable Guest Portal Single Sign-On Access with OneLogin™

Use this information if you want to integrate with OneLogin™ to authenticate guest users.

Juniper Mist supports SAML 2.0 for device authentication onto the network. As such, you can set up a Single Sign-On (SSO) WLAN for guest access using OneLogin™ as the Identity Provider (IdP). SAML SSO allows users to log on once to their identity provider, and then seamlessly access multiple other web applications without having to log in again. Both Juniper Mist guest portal and OneLogin support RADIUS EAP-TTLS/PAP and EAP-PEAP/MSCHAPv2 authentication methods.

Before you begin setting up the Guest Portal, you should have admin credentials for your OneLogin portal and already have a SAML application (or be ready to create one) that your Mist clients can access (see: Configuring SSO for SAML-Enabled Applications for instructions).

You'll need the following information from the OneLogin SAML application (Figure 1) to configure the OneLogin SSO in the Juniper Mist portal (Figure 2).

In addition, you'll need to copy the Portal SSO URL from the Mist portal to your OneLogin application to complete that side of the setup (the Portal SSO URL doesn't get created until after you save the initial WLAN configuration, so you actually loop back to the WLAN configuration page).

  • For the OneLogin application, the Signature Algorithm should be set to SHA-256. At the same time as you make this change, you can copy and save the X.509 Certificate for later use in the Juniper Mist portal. The x.509 certificate is the public certificate that establishes trust between OneLogin and your Juniper Mist Guest Portal.

  • Also from your OneLogin application, copy and save the values shown for Issuer URL and SAML 2.0 Endpoint.

    Figure 1: OneLogin SAML App SSO Configuration Screen

    OneLogin SAML App SSO Configuration Screen

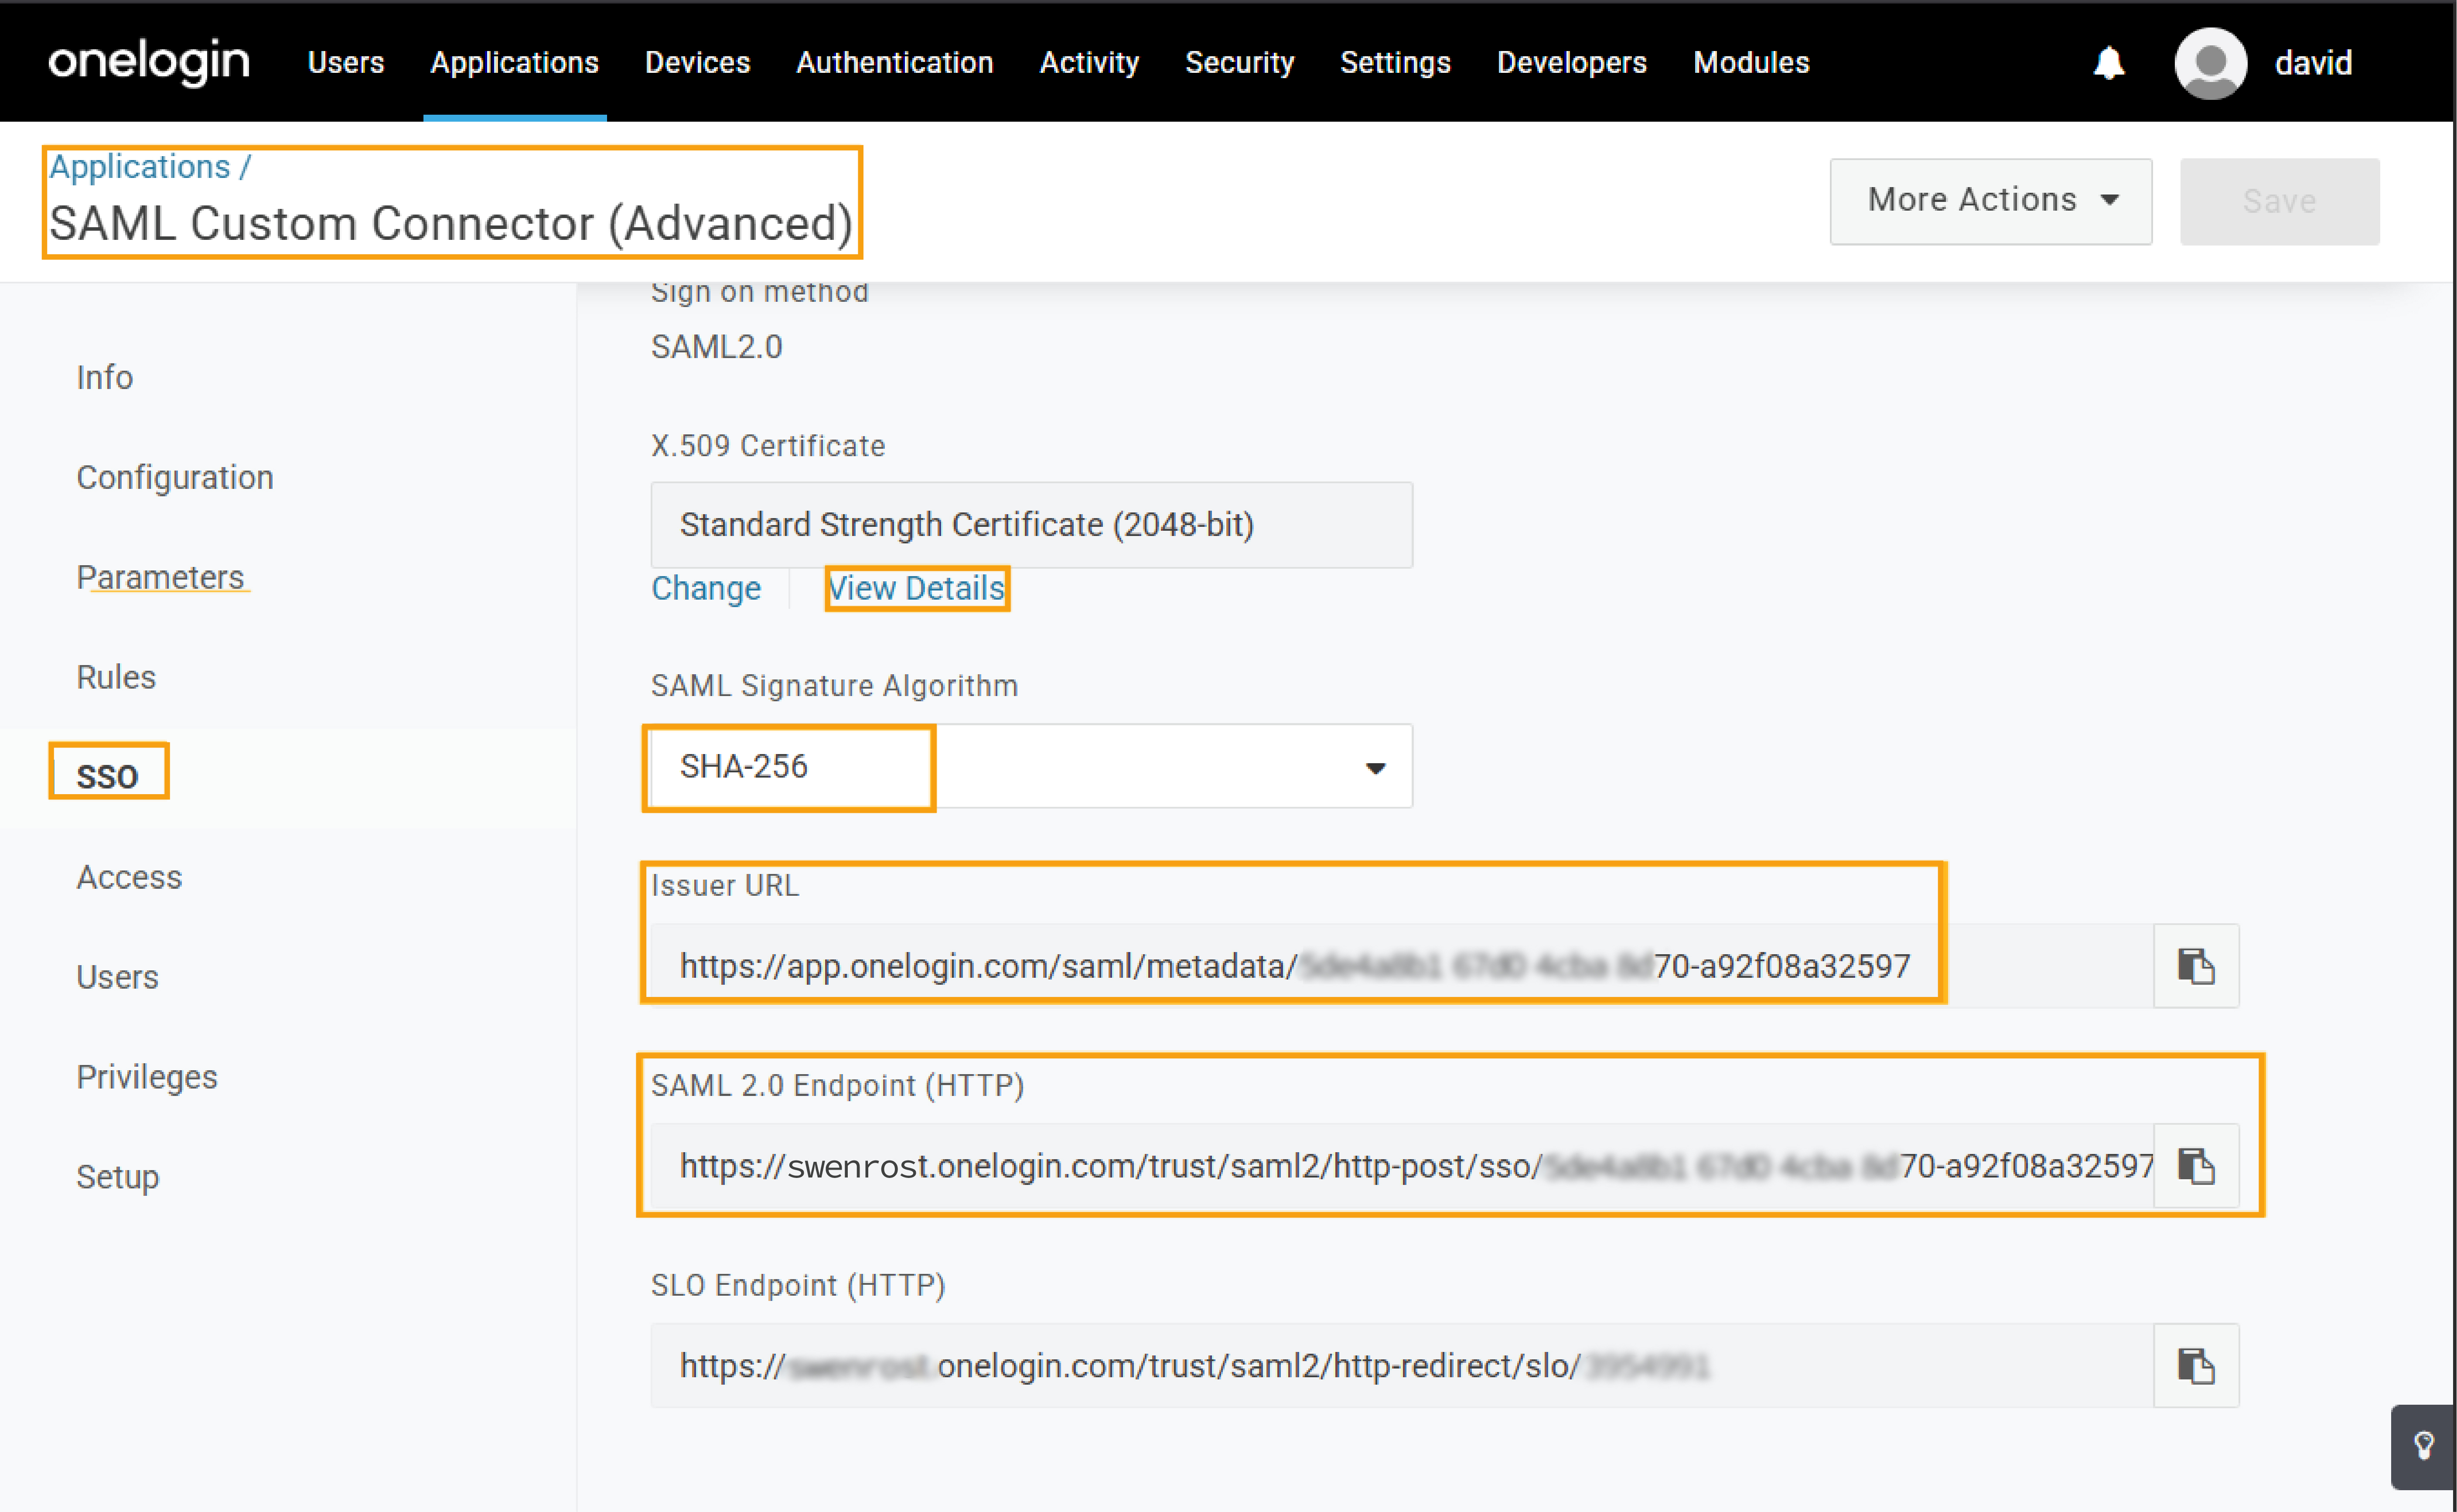
To set up a WLAN with SSO access from OneLogin:

  1. From the Juniper Mist menu, click Site | Wireless > WLAN and then either select an existing WLAN from the list that appears or click the Add WLAN button to create a new one.
    Figure 2: Configuration Details for OneLogin Interoperation
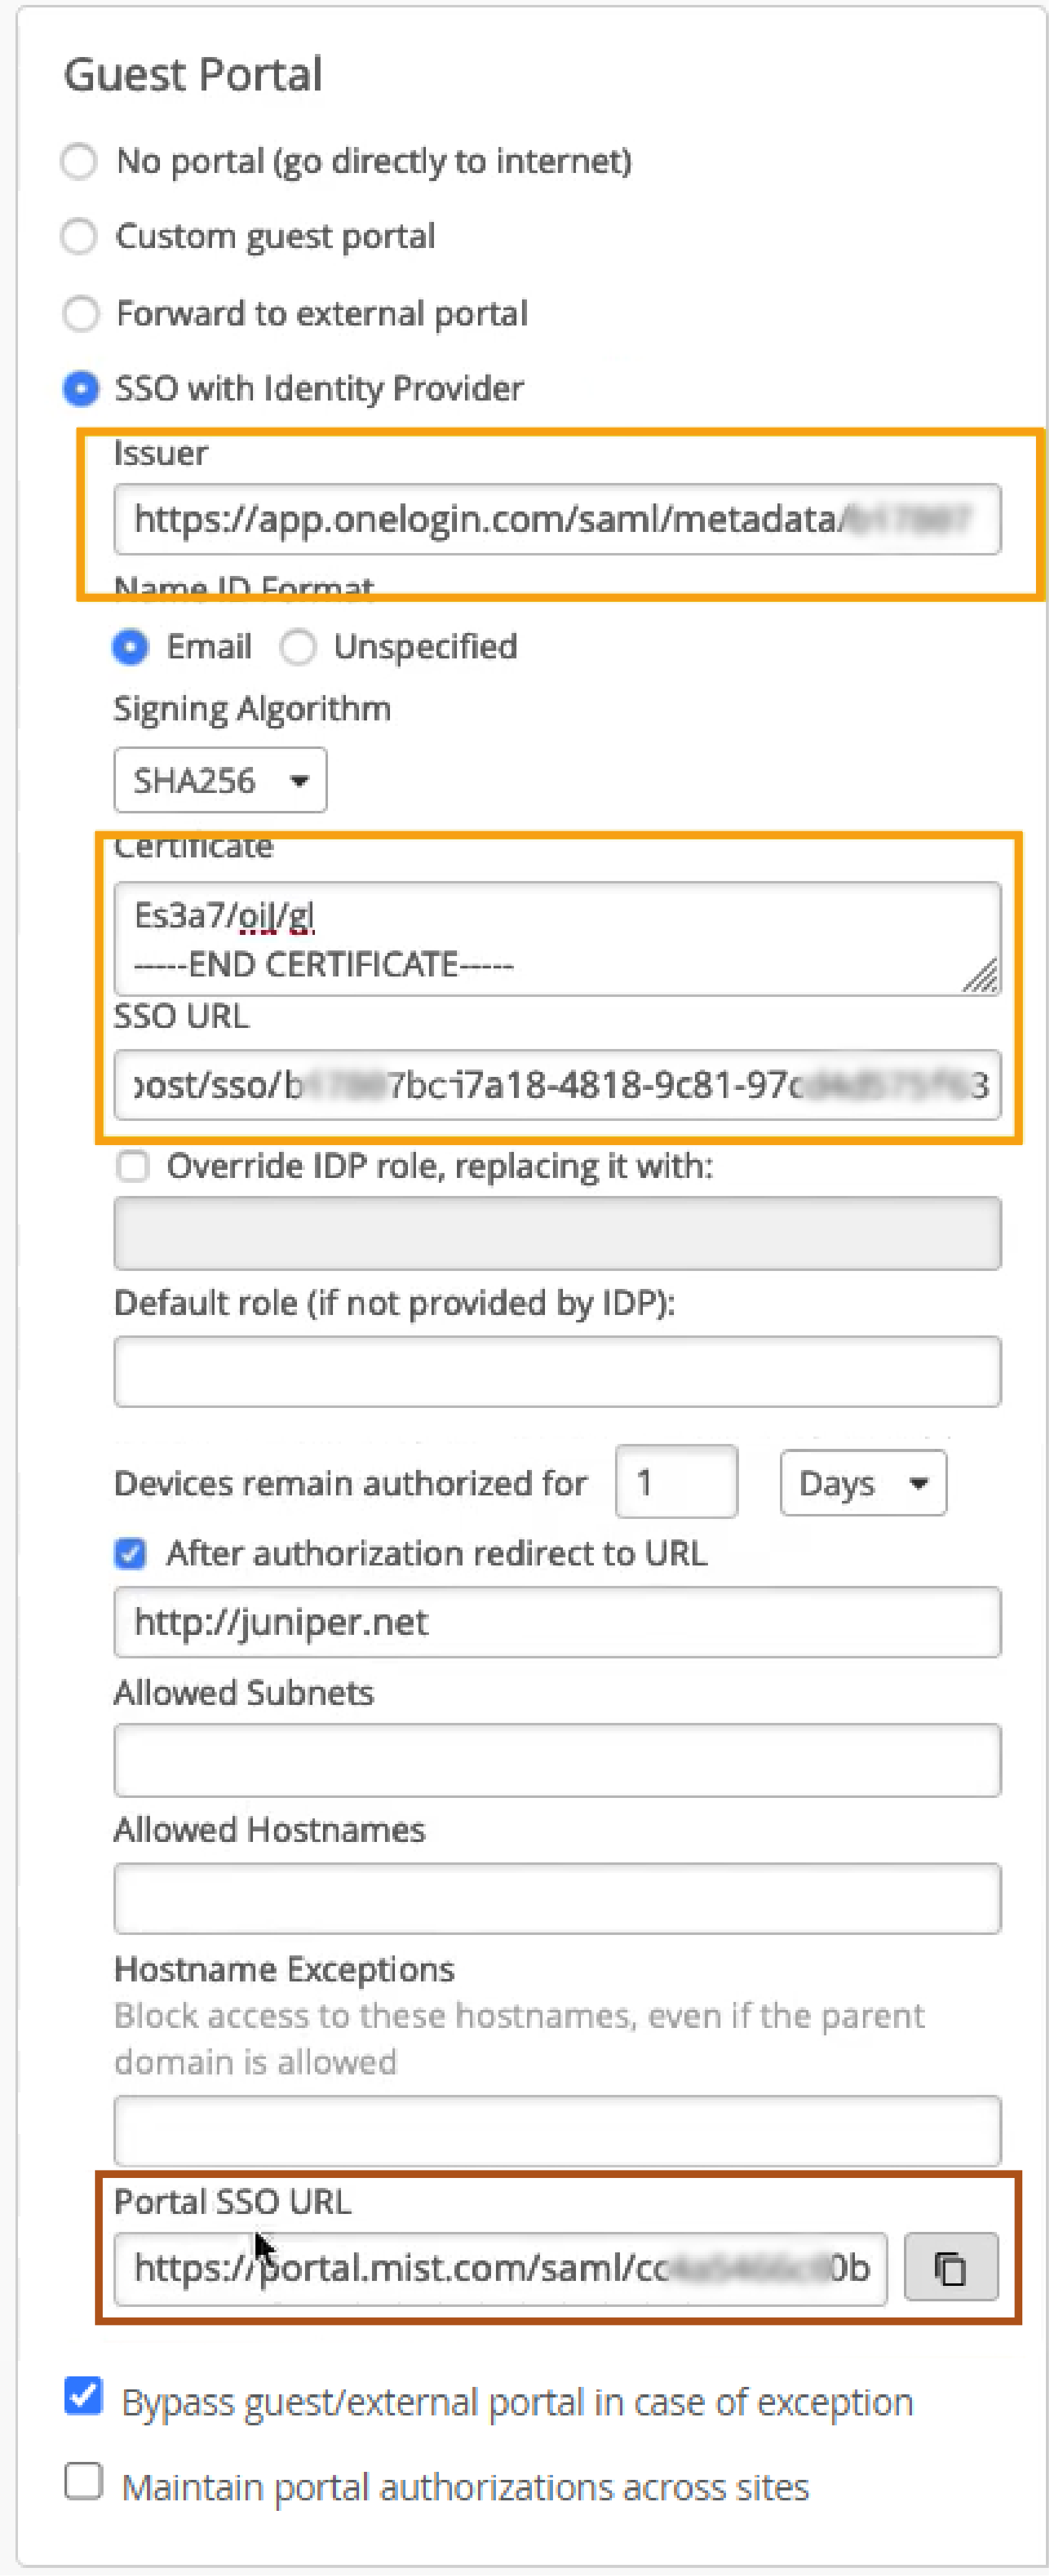
    Configuration Details for OneLogin Interoperation
  2. Scroll to the Guest Portal section of the WLAN configuration page, and then select SSO with Identity Provider.
  3. In the fields that appear, use the information you gathered from your OneLogin SAML application, (Figure 1), to fill in the following:
    • Issuer—Enter the issuer URL from your OneLogin application.

    • SSO URL—Enter the SAML 2.0 Endpoint from your OneLogin application.

    • Certificate—Paste the X.509 Certificate for your OneLogin application.

  4. (Optional) You can limit how long clients can stay on the network before having to log in again. To do so, select a time from the Devices remain authorized for __ field.
  5. (Optional) After a client logs in, you can redirect them to a given URL or home page. To do so, type that URL in the After authorization redirect to URL field.
  6. Click the Create or Save button, as the case may be, to upload the configuration to the Mist cloud and generate the Portal SSO URL , which you will need to enter in the OneLogin SAML application so it can recognize requests from the Guest Portal.
  7. Reopen the WLAN configuration page for your WLAN, and then Copy the Portal SSO URL.
  8. For detailed instructions, see Advanced SAML Custom Connector. Otherwise, you can go to the OneLogin Application Details page and paste the Portal SSO URL you just copied into the following fields:
    • RelayState

    • Audience (EntityID)

    • Recipient

    • ACS (Consumer) URL Validator

    • ACS (Consumer) URL

    • Login URL

    On the same page in the OneLogin App configuration, you can you can include a SAML Signature Element for assertions and the responses. Select Both.
    With regards to setting up the OneLogin application for interoperation with the Juniper Mist Guest Portal, the above is the only configuration you need. However, you will also need to specify which users you want the application to appear for.
  9. To have the OneLogin login page open correctly when redirected by the Guest Portal, you may need to specify various hostnames to cover the domain. Do this in the Allowed Hostnames field on the Juniper Mist WLAN configuration page. Use this page from OneLogin, or a packet capture to monitor port 53 and see what the domain resolves to.
  10. When the Bypass guest/external portal in case of exception option is enabled, if an AP cannot reach the portal or OneLogin service, it will automatically authorize the client to connect to the WLAN.
  11. Click Save to complete the OneLogin SSO for your Guest Portal.
To verify that everything is working correctly, log out of the OneLogin portal and then log in at the WLAN you just created. You will be redirected to the OneLogin page where you can enter your login credentials, and then redirected to the Juniper Networks homepage (or whatever URL you specified).