Switch Policies
To ensure more granular control over network access, you can now create switch policies, which act as access control lists (ACLs) for your Juniper Mist-managed switches. You can use port profile-based and RADIUS-based policies.
About Switch Policies
Your switch can use the following types of policies:
-
Port Profile-Based Policy—Applied as a layer 2 filter on the switchport in the input direction for all ports where the specified port profile is applied.
-
RADIUS-Based Policy—Uses a RADIUS based filter to filter traffic. The enforcement of each policy happens via the RADIUS server. These filters are supported on all EX Series switches that authenticate users through your RADIUS server. After adding your RADIUS firewall filters, make note of the IDs. You'll need them to create the switch policies in the Juniper Mist portal.
Create Switch Policies
First you'll create labels to categorize and classify users (as sources) and resources (as destinations). Then you'll use these labels in switch policies to specify which users are allowed to access specific resources within the network. You can define the labels at the organization, site, or switch level.
Before You Begin
-
For port-profile based switch policies, first set up your port profiles.
-
For RADIUS-based switch policies, first set your firewall filters on your RADIUS server. Add them by using filter-id attribute in the Juniper dictionary on your RADIUS server. For help with RADIUS filters, see Configuring Firewall Filters on the RADIUS Server in the User Access and Authentication Administration Guide for Junos OS.
To create switch policies:
-
To configure labels, scroll down to the Switch Policy
Labels section, and add your source and destination tags as
described below.
Source—Click Add Source, and then refer to the on-screen text to enter the information. Click Add to save the new source.
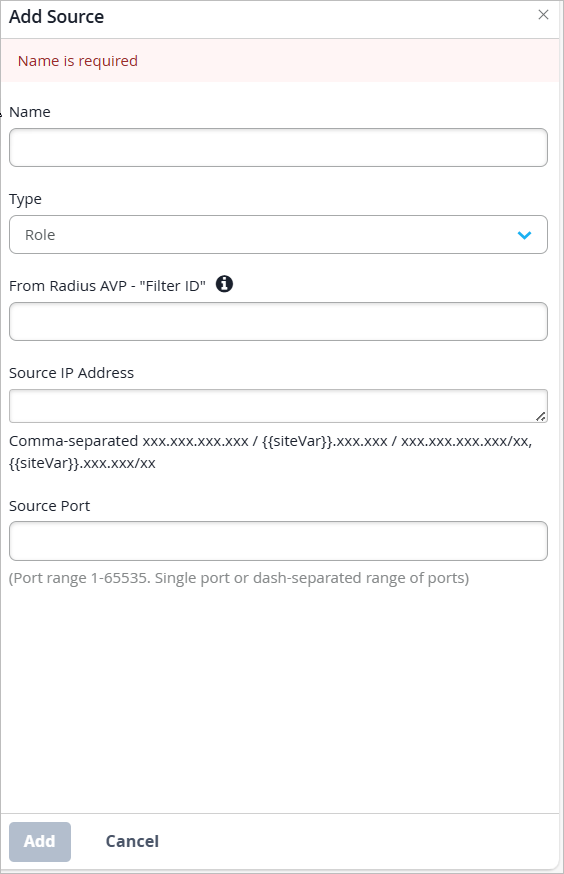
Table 1: Source Settings Field Description Name Enter a name to identify this source. Type Select the source type.
Port Profile If you selected Port Profile as the Type, select a profile from this drop-down menu. This menu includes system-defined profiles and others that you've added to the configuration.
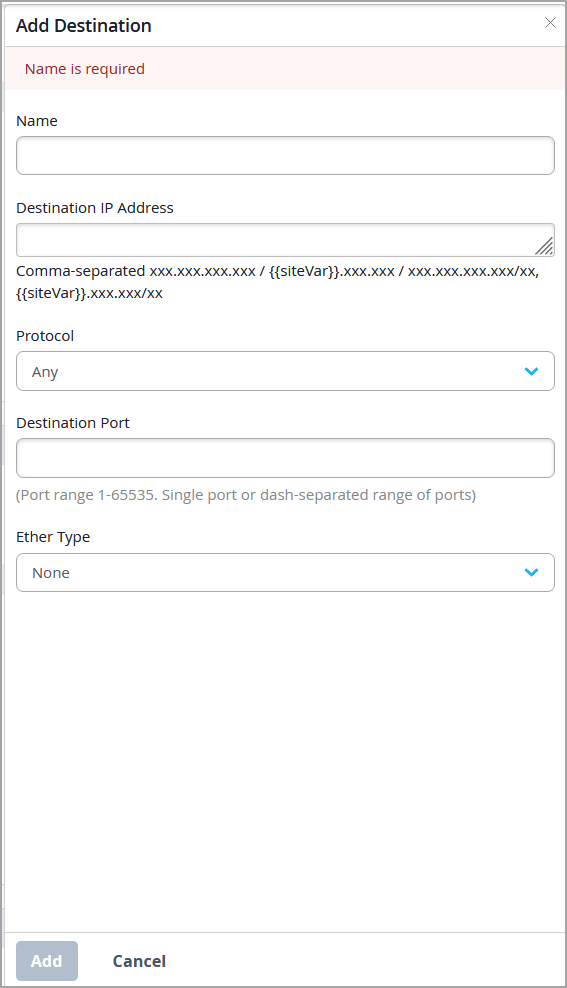
From Radius AVP - "Filter ID" For a RADIUS-based filter, enter the filter. For more information, hover over the i button next to this field. Source IP Address (Optional) Enter a single IP address or multiple addresses separated by commas. Source Port (Optional) Enter a port number or a range of numbers. Valid numbers are 1 to 65535. For a range, enter the start number, a dash, and the end number, such as 50-60. Destination—Click Add Destination, and then refer to the on-screen text to enter the information. Click Add to save the new destination.
-
To configure a policy, scroll down to the Switch
Policy section and add a policy that uses your new
labels:
-
If you want this policy to block access to the specified
destination, click the destination button, and then click
Deny.
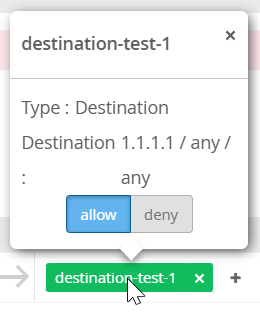 When you change the policy to deny, the destination button turns red.Note:
-
The default action for a new rule is allow (green button).
-
Junous processes the policies in the listed order. After the final policy is processed, Junos defaults to deny. You don't need to add an explicit deny policy at the end of the list.
-
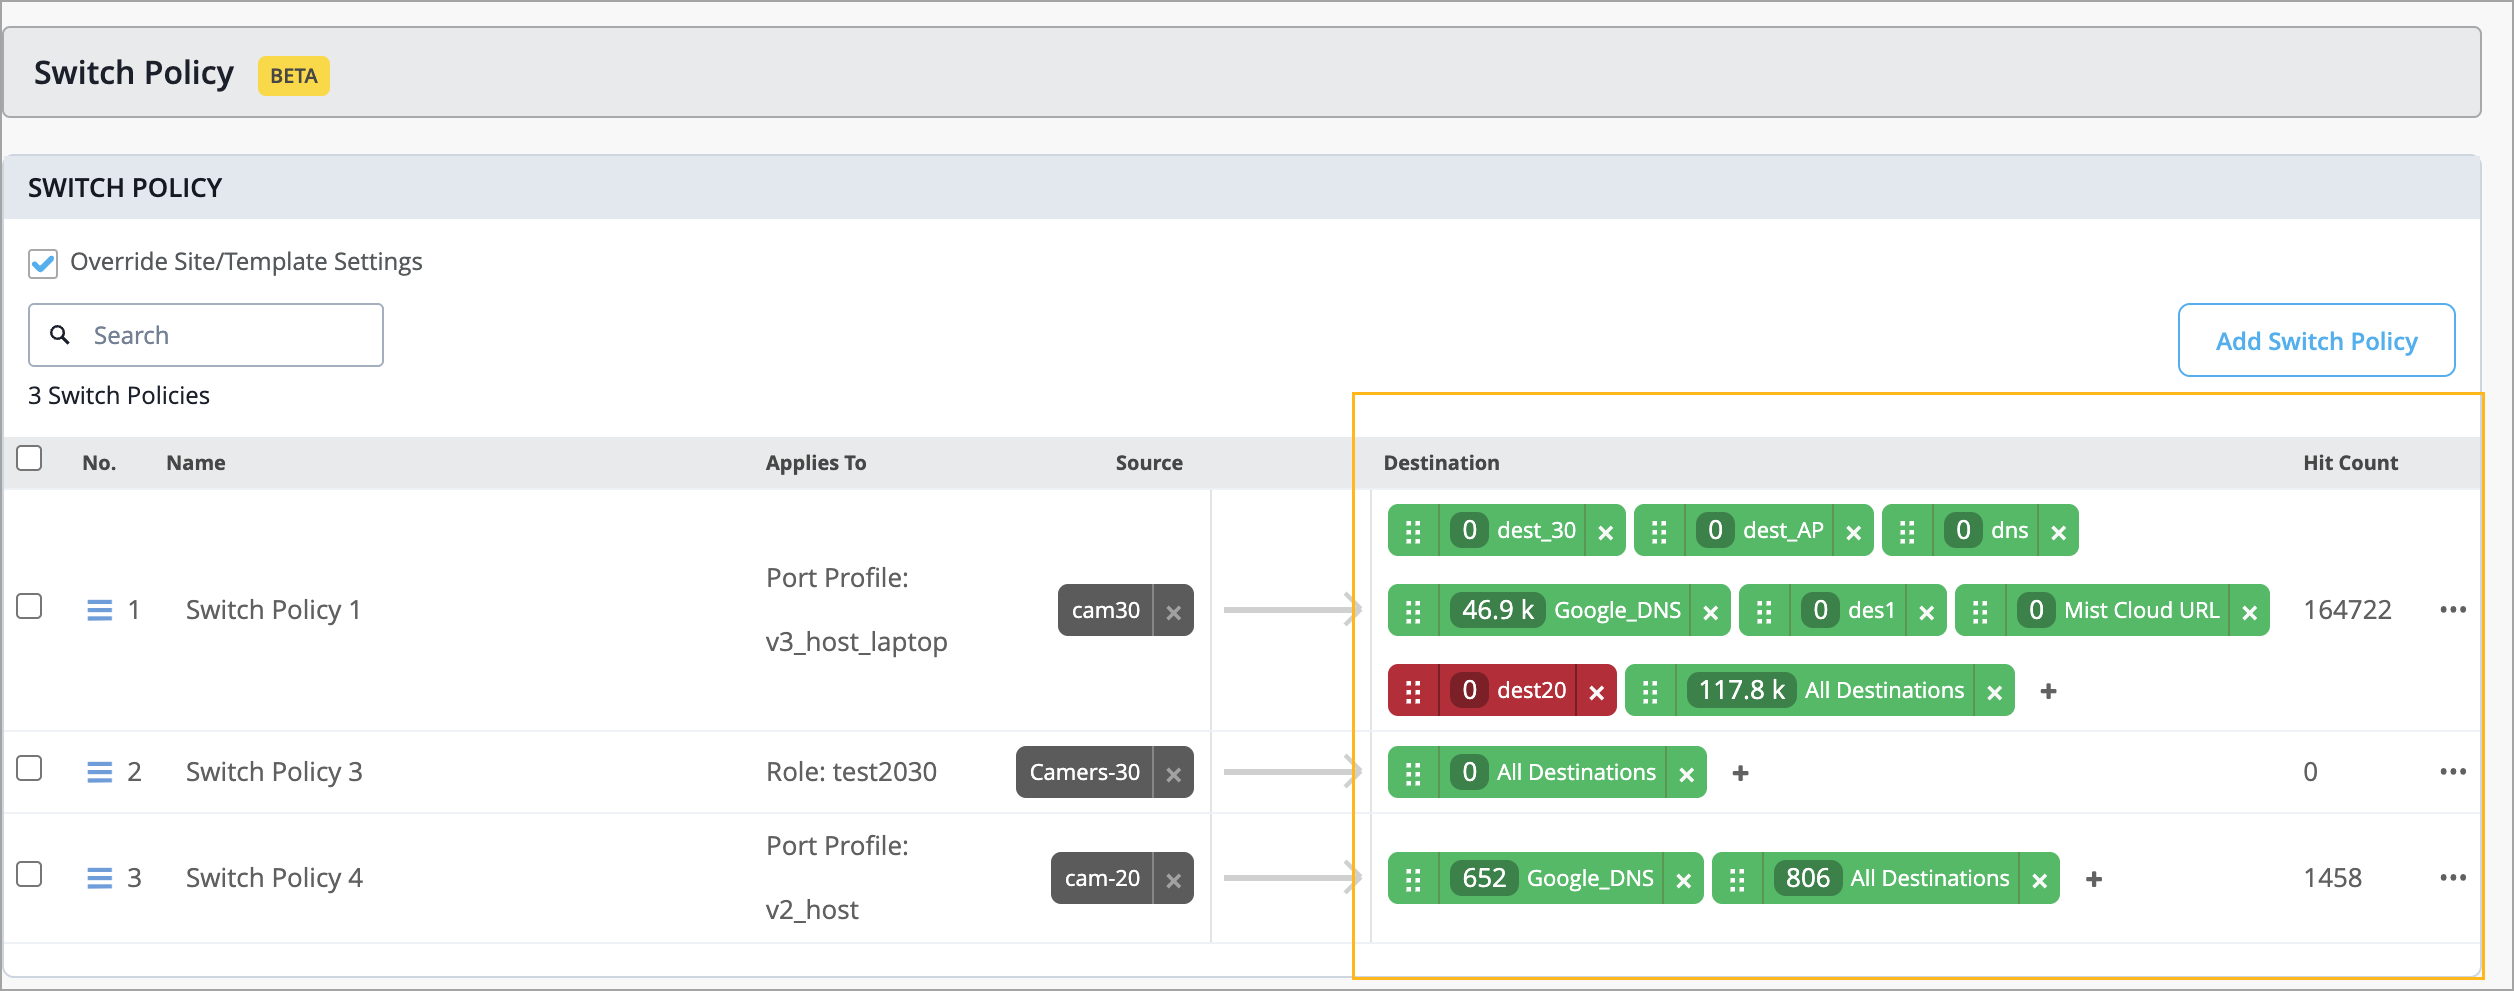
This example shows how your configuration might look after you add source labels, destination labels, and policies.
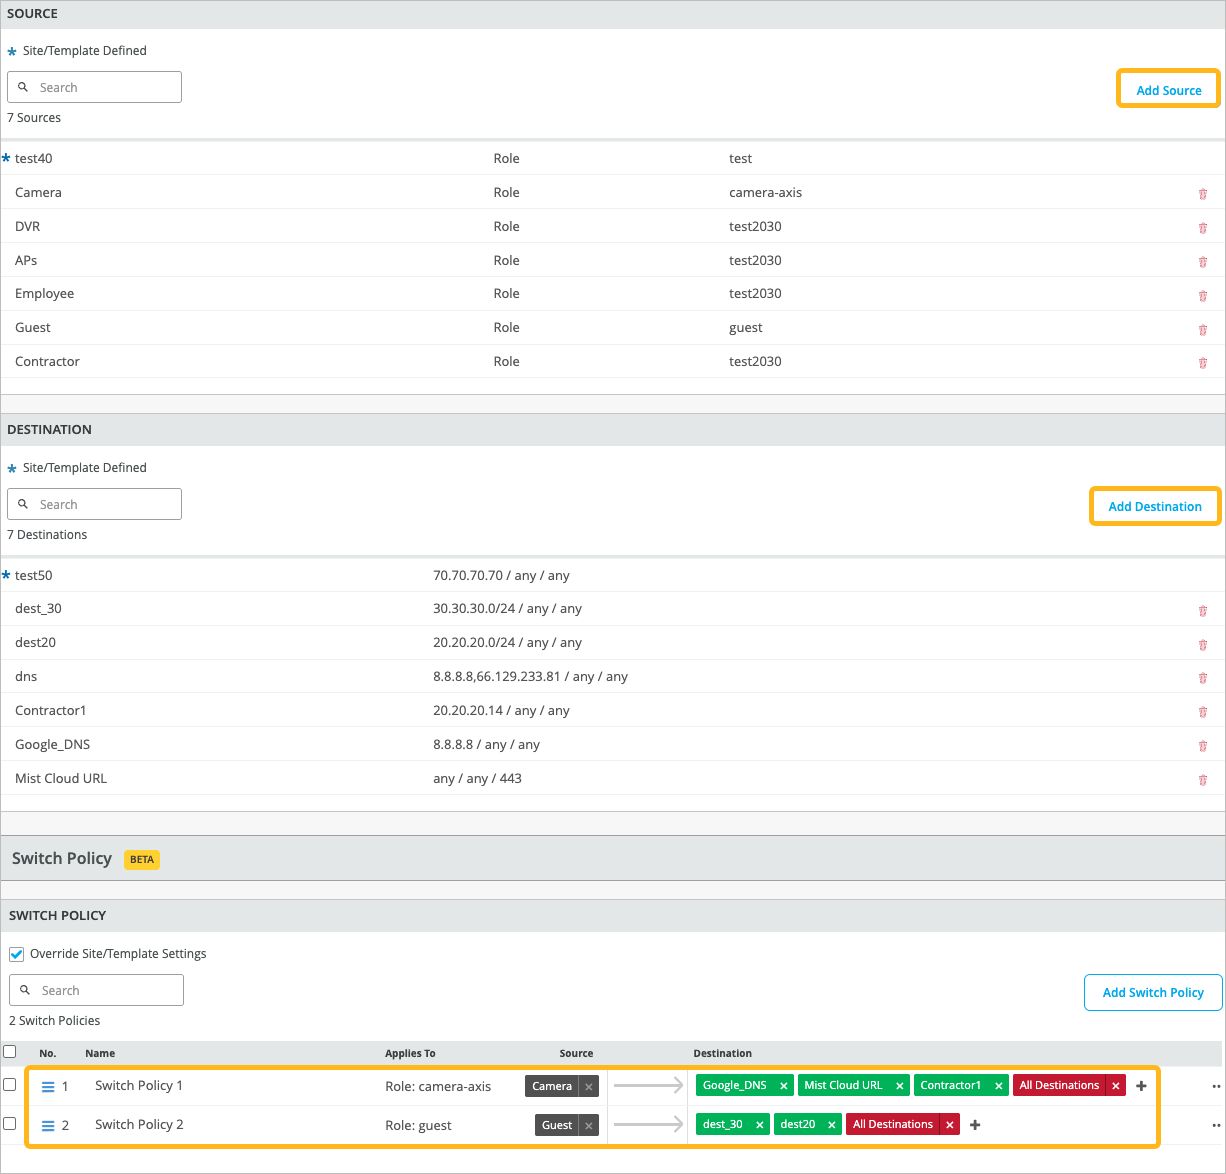
-
If you want this policy to block access to the specified
destination, click the destination button, and then click
Deny.
You can also find information about the number of times a switch policy rule was triggered (that is, matched by network traffic) at the switch level. The Switch Policy section on the switch details page provides the following details:
-
Overall hit count for a switch policy. This information is displayed in the Hit Count column.
-
Per-destination hit count for more granular insights. You can click each destination tag to view the hit count for that tag along with a policy trigger event time series.
Manage Switch Policies
Use the instructions below to clear switch policy hit count, clone, delete, reorder, disable, and enable switch policies.
You can perform the following operations on switch policies:
-
Clear policy hit count information—Lets you reset the policy hit count and start from a clean slate when diagnosing issues. After making configuration changes, you can reset the counters and observe only the new policy hits, making it easier to confirm whether a rule is still being triggered. A hit count represents the number of times a switch policy rule has been triggered (that is, matched by network traffic).
Note: This option is available only at the switch level (switch details).
-
Clone switch policies—Lets you use the parameters (source and destination) of an existing policy to quickly create a new policy with a single click.
-
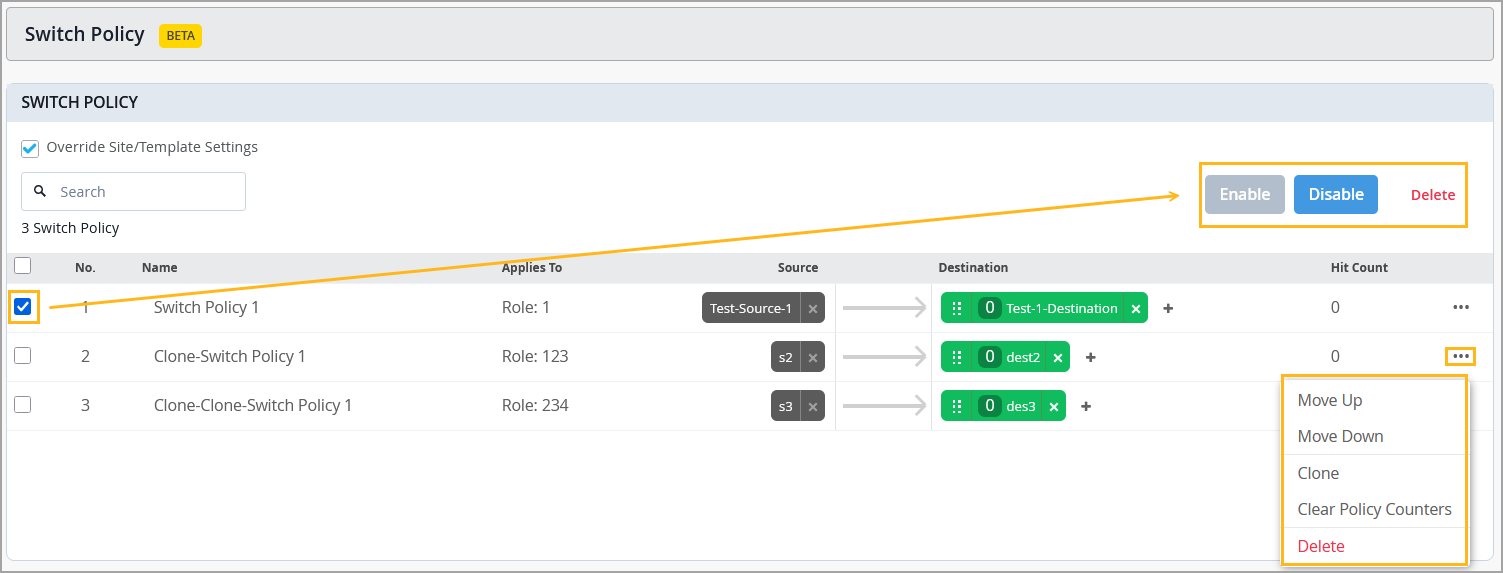
Move Up/Move Down—Lets you reorder switch policies.
-
Enable or Disable—Lets you disable a policy without deleting it and re-enable it when needed.
To clear policy hit count:
From the left menu, click Switches.
Select a switch to go to the switch details page.
Navigate to the Switch Policy section in the switch details page.
Open the three‑dots menu (…) displayed on the extreme right of the policy record.
Select Clear Policy Counters.
To enable or disable a policy:
Navigate to the Switch Policy section in the switch configuration:
If you are working on a switch level configuration, navigate to the Switch Policy section in the switch details page (Switches > Switch Name).
If you are working on an organization-level switch configuration, navigate to the Switch Policy section in the organization template (Organization > Wired Switch Template > Template Name).
If you are working on a site-level switch configuration, navigate to the Switch Policy section in the site template (Site > Wired > Switch Configuration > Site Template).
Select the policy which needs to be enabled or disabled:
Select:
Disable to disable a policy without removing it.
Enable to re-enable a policy.
To clone, reorder, or delete switch policies:
Navigate to the Switch Policy section in the switch configuration:
If you are working on a switch level configuration, navigate to the Switch Policy section in the switch details page (Switches > Switch Name).
If you are working on an organization-level switch configuration, navigate to the Switch Policy section in the organization template (Organization > Wired Switch Template > Template Name).
If you are working on a site-level switch configuration, navigate to the Switch Policy section in the site template (Site > Wired > Switch Configuration > Site Template).
Open the three‑dots menu (…) displayed on the extreme right of the policy record.
Select:
Move Up or Move Down to reorder policies.
Clone to make a copy of a policy.
Delete to remove the policy record.
Set Up Filters with Aruba ClearPass
-
On the Enforcement Profiles page, add a profile, or edit an existing
one.
Profile tab—Select Filter ID Based Enforcement as the template. Specify the required parameters.
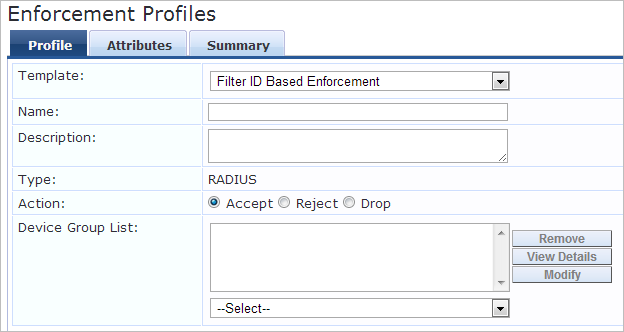
Attributes tab—Add your RADIUS attributes.

For help with the parameters, see your Aruba ClearPass documentation, such as Filter ID Based Enforcement Profile.
Set Up Filters with Cisco ISE
In Cisco ISE, navigate to Policy > Policy Elements > Results > Authorization > Authorization Profiles. Enter the required parameters.
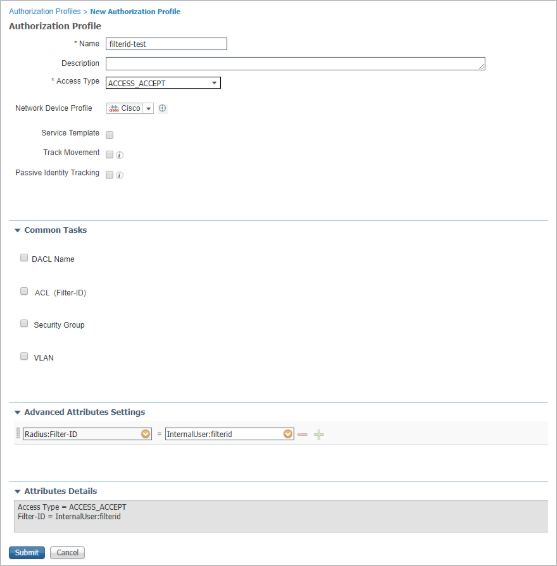
For help with the parameters, see your Cisco ISE documentation, such as Authorization Profile Window.
Set Up Labels (Filters) with Juniper Mist Access Assurance
Navigate to Organization > Auth Policy Labels > Add Label.
Enter the parameters to create a role. Creating a role in Access Assurance is equivalent to a filter-id.
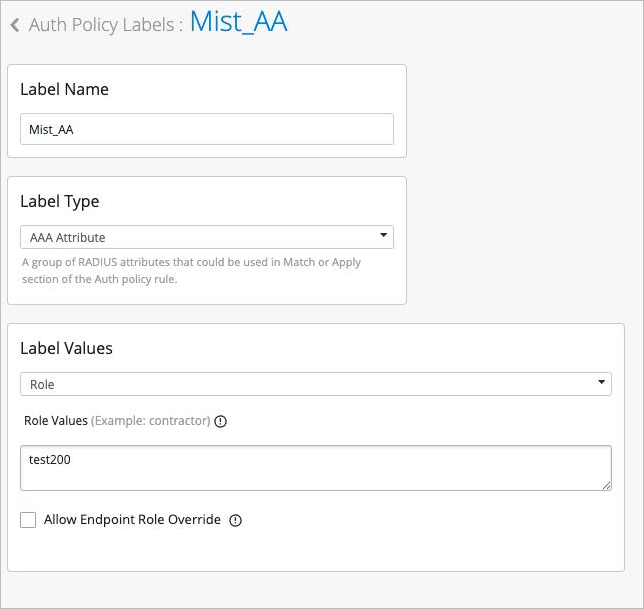
For help with the parameters, see Configure Authentication Policy Labels in the Juniper Mist Access Assurance Guide.