Static and Dynamic Port Profiles
Port profiles provide a convenient way to manually or automatically provision switch interfaces. Mist supports the following categories of port profiles:
- System-defined—Preconfigured port profiles that are built into the Mist portal. Available profiles: ap, iot, uplink, default, and disabled.
-
User-defined—Custom port profiles that you create if the system-defined profiles do not meet your requirements.
At a high level, a port profile configuration involves two steps—defining a port profile (or using an existing system-defined profile) and assigning it to switch ports.
Based on how a profile is assigned to a switch port, Mist supports static and dynamic port profiles.
-
Static port profiles—A static port profile is manually assigned to a specific switch port. These profiles are used for static provisioning of switch ports.
-
Dynamic port profiles—Dynamic port profiles allow a switch port to automatically identify the connected device using configured port‑assignment rules. The switch then dynamically applies the appropriate profile. This enables autoprovisioning of 'colorless' switch ports, where the port’s behavior adapts based on the detected device.
Define Port Profiles
You can either use an existing profile or define one that meets your requirements. Mist supports creating port profiles at the switch template level or at the individual switch level.
To define a port profile:
-
Specify the profile settings as described in Shared Elements—Port Profiles.
Assign Port Profiles Manually
This topic describes how to assign static port profiles to switch ports.
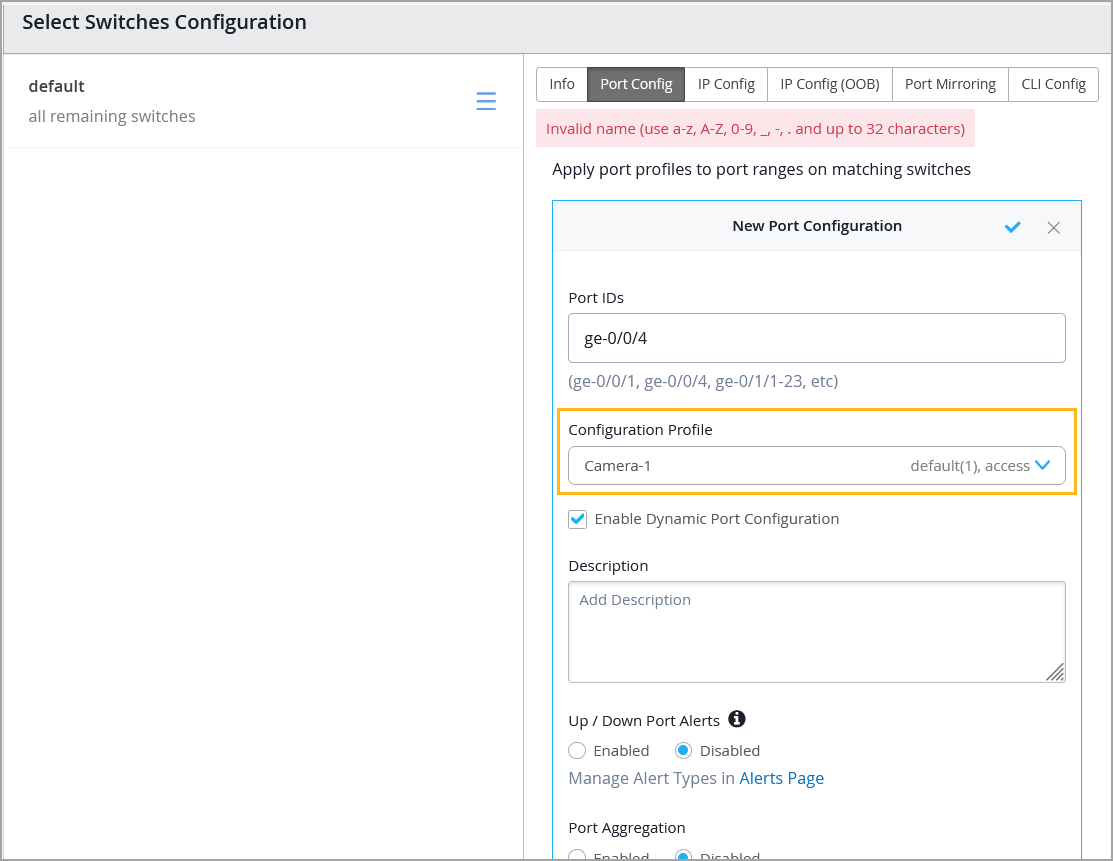
After you define a port profile, you can assign it manually to a specific switch port from the Port Config tab in the Select Switches section of the switch template, or from the Port Configuration section on the switch details page.
To manually assign a port profile to a port via a switch template:
-
From the Configuration Profile drop-down list,
select a port profile which you want to assign to the specified ports.
You can also assign port profiles to switch ports at the switch level. You can do that from the Port tile in the Device section on the switch details page. Click Add Port Configuration on the Port tile and specify the settings. Watch the following video for more information:
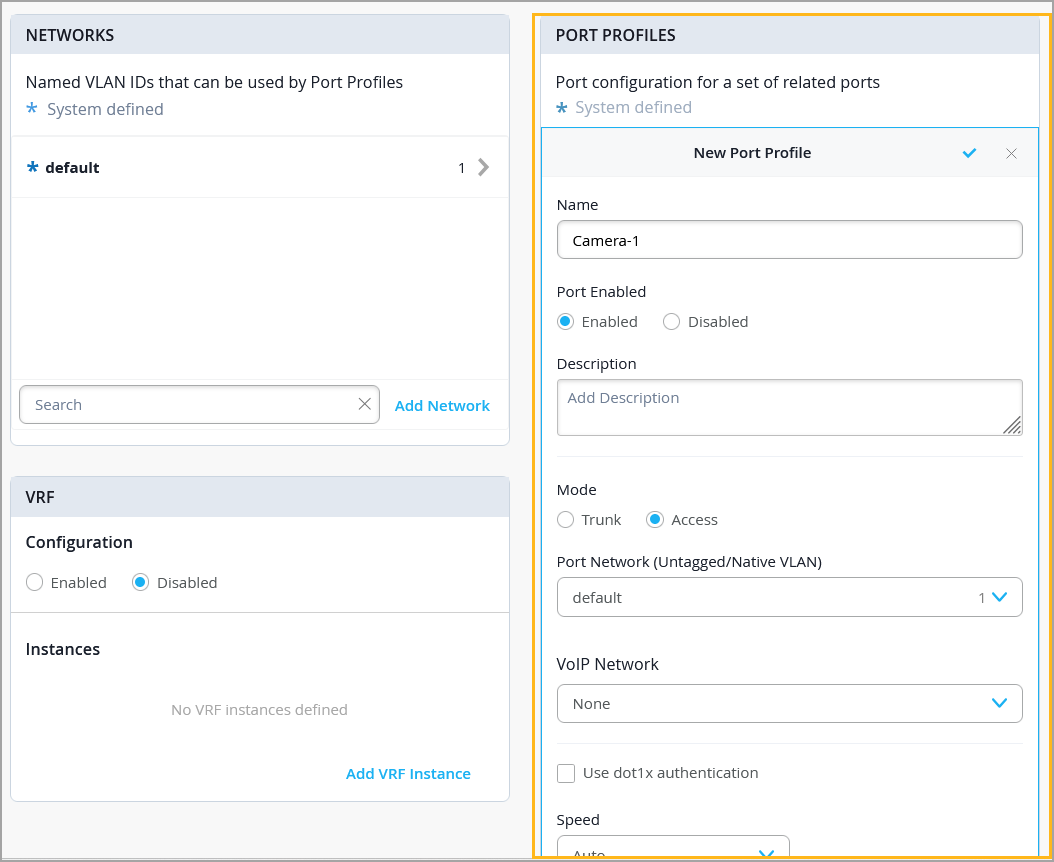
Port profiles provide a convenient way to manually or automatically provision EX switch interfaces. Going into the EX4300, we'll first create VLANs. We'll make a camera network with VLAN ID 30 and an IoT network with VLAN ID 29.
You can create as many networks as needed. You can create the profiles, for example, a camera, and map it to the camera network that we just created. Customize the settings as desired, such as PoE and STP.
We'll repeat this process to create profiles for a corporate device enabling 802.1x authentication, an IoT device configured with PoE, and an access point configured as a trunk port. It's very simple to modify profiles to meet your specific requirements. Then we go into the port configuration section to associate the configurations with port profiles.
Here we map ports 1 through 5 to be with an AP profile, ports 6 through 10 with a corporate device profile, ports 11 through 15 with IoT profiles, and ports 16 to 20 with the camera profile. This is how to create port profiles. We can also create port aggregation uplinks to be associated with the appropriate profiles.
When you save all of your changes, this pushes the configuration to the particular switch. This covers how EX switches are manually provisioned with port profiles from the Juniper MIST Cloud.
Configure Dynamic Port Profile Assignment
Use the steps in this section to configure rules to assign port profiles to an interface dynamically. When a user connects a client device to a switch port with dynamic profile configuration, the switch identifies the device and assigns a suitable port profile to the port. Dynamic port profiling utilizes a set of device properties of the client device to automatically associate a preconfigured port and network setting to the interface. You can configure a dynamic port profile based on the various parameters such as LLDP name and MAC address.
You can configure dynamic port profile assignment at the template level or at the switch level.
To set up dynamic assignment of port profiles at the template level:
-
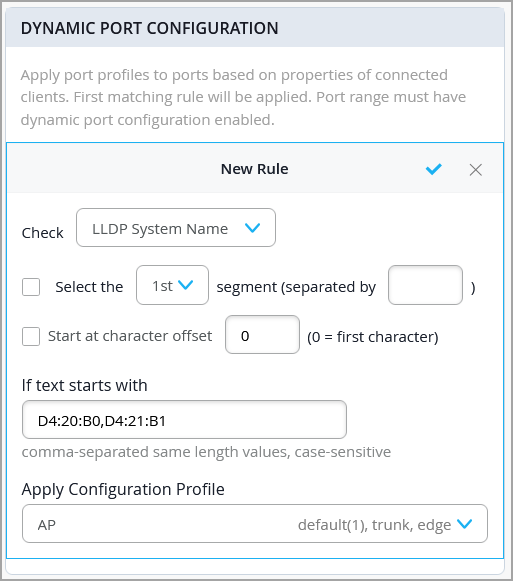
Set up dynamic port configuration (DPC) rules for automatically assigning port
profiles. Here's an example of a rule that automatically assigns the port profile 'AP' to
a Mist AP. As per this rule, when the port identifies a device with a chassis ID that
starts with D4:20:B0 or D4:21:B1, it assigns the 'AP' profile to the connected
device.
For more information, refer to Shared Elements—Dynamic Port Configuration on the Switch Configuration Options page.
Note: If you use multiple values in the If text starts with field in a DPC rule, separate them with commas and ensure that they all have the same length. If any value differs in length, you must create a separate rule for it. -
From the Configuration Profile drop-down list, select a port
profile. This profile is applied to ports when the connected device does not meet the
dynamic assignment rules.
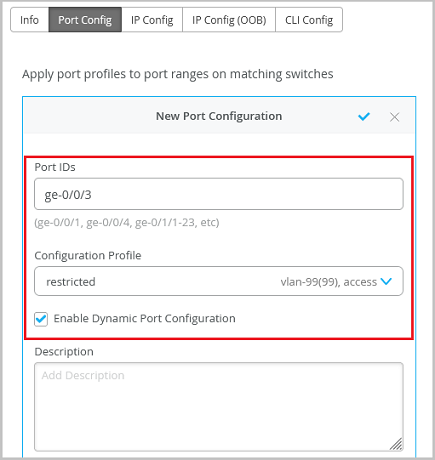
We recommend that you create a restricted network profile that can be assigned to unknown devices when connected to the switch ports enabled with dynamic port configuration. In the above example, the port is enabled with dynamic port configuration and is assigned with a restricted VLAN. In this case, if the connected device does not match the dynamic profiling attributes, it will be placed into a restricted VLAN such as a non-routable VLAN or a guest VLAN.
It takes a couple of minutes for a port profile to be applied a port after a client is recognized, and a couple of minutes after that for the port profile assignment status to appear on the Mist portal.
In case of switch reboots or a mass link up or down event affecting all ports on a switch, it takes approximately 20 minutes for all the ports to be assigned to the right profile (assuming that dynamic port configuration is enabled on all the ports).
You can also set up dynamic port profile assignment at the switch level. You can do that from the switch details page. Watch the following video for more information:
Wired Assurance offers dynamic port profiles, so you can simply plug in your device and it will automatically be assigned the appropriate profile. This is also referred to as the provisioning of colorless ports. In this example, we have a Juniper AP assigned to port 5. We also created a port profile called Minimal Access that has access to a guest network on VLAN 99.
Based on what the devices identify themselves as, we can create rules to assign profiles. We'll use the LLDP chassis ID to identify the device, and if it starts with the octet D420B0, it will be given the AP12 profile. So what we just did is set the dynamic profile assignment for port 5. If the wired device does not register as an AP12, then it will get the Minimal Access profile.
If it shows as an AP12, then it gets the AP12 profile. To verify that the port was assigned the right profile, take a look at the switch events log. You can see that the AP12 profile was correctly identified and automatically applied to port 5. Dynamic port profiles are not just limited to Juniper devices alone.
Anything based on LLDP or RADIUS name also falls under the domain of dynamic port profiles. This means that the days of manually assigning profiles to ports or even a range of ports are no longer necessary.
-
Ensure that the default or restricted VLAN used in dynamic port configuration does not have an active DHCP server running. Otherwise, you might encounter stale IP address issue on certain legacy devices.
-
A switch with port-based network access control (NAC) authentication does not require dynamic port configuration as VLAN assignments are handled by the RADIUS server. Also, we do not recommend using dynamic port profiles when RADIUS server with MAC Authentication Bypass (MAB) is used.
-
Prefer LLDP-based matching over MAC-based matching when the device supports LLDP.
-
Do not use MAC-based matching on ports enabled with 802.1X authentication.
-
Avoid using
Filter-IDattributes. When 802.1X is enabled on the ports, VLAN assignment should be handled via RADIUS without relying onFilter-ID. -
Dynamic port configuration on a switch is meant for establishing connection to IoT devices, APs, and user port endpoints. You should not use it to create connection between switches, switches and routers, and switches and firewalls. You should not enable Dynamic Port Configuration on the uplink port.
When a port profile is assigned to a switch port dynamically based on the connected device, this event is displayed in the Switch Events section on the Switch Insights page. You can also see the dynamic port profile details on a switch port by hovering over the port in the Front Panel section on the switch details page.
Junos requires that each interface-range in a port profile contains at least one member interface. When dynamic port configuration is enabled, Junos includes a dummy interface (ge-168/5/X) as a placeholder in the port profile configuration so that the configuration remains valid even when it is not assigned to an actual interface. For instance, if an interface is currently assigned to Port Profile A, but Port Profile B is expected to be dynamically applied later, a placeholder like ge-168/5/0 is used to keep Profile B's interface-range valid.
You can also configure and verify the dynamic port configuration details using the below API:
GET – https://api.mistsys.com/api/v1/sites/c3b8f61c-c5a2-495d-9a5c-9b129624e9bf/devices/00000000-0000-0000-1000-<device mac addr>
"dynamic": {
            "mode": "dynamic",
            "rules": [
                {
                    "src": "lldp_chassis_id",
                    "usage": "wireless",
                    "equals": "5c:5b:35",
                    "expression": "[0:8]"
                }
            ]
        }

"port_config": {
       "ge-0/0/2-3": {
           "usage": "restricted_access",
           "dynamic_usage": "dynamic"
       }
Modify Port Profiles
You can modify port profiles at both the switch template level and the individual switch level.
-
You can modify the system defined port profiles only from switch templates. However, Mist does not allow modification of the following system-defined port profiles: default and disabled.
-
If you modify a system-defined port profile from a switch template, that modified version of the profile is available only to that template.
To modify a port profile:
Delete Port Profiles
You can delete port profiles at the template level or the individual switch level.
To delete a port profile:
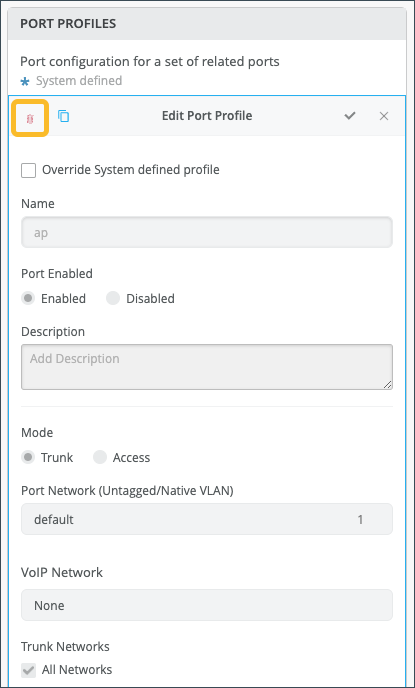
-
Click the trashcan icon in the top left corner of the Edit Port
Profile configuration.
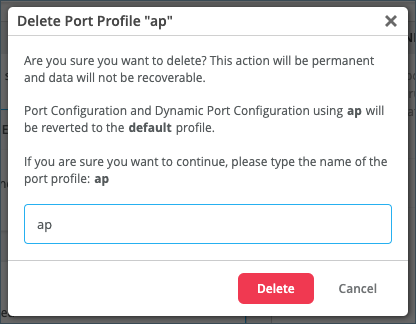
-
A warning will appear letting you know that the delete action is permanent.
You will not be able to recover the port profile once deleted. Enter the
name of the port profile, then click Delete.
 Note:
Note:-
If you delete the ap, iot, or uplink system-defined port profiles, any reference to these profiles at the Site or device level will revert to the default profile (port configurations or Dynamic Port profiles).
-
If you were to create your own port profile and name it “ap”, “iot”, or “uplink” (after having deleted the system-defined port profiles) it will be treated as any other user-defined port profile.
-
Best Practices in Port Configuration
Here are a few recommendations for your switch ports to work seamlessly with the Mist APs:
-
On a trunk port, prune all the unwanted VLANs. Only the required VLANs (based on the WLAN configuration) should be on the port. Since the APs do not save the configuration by default, APs should be able to get the IP address on the native VLAN to get connected to the cloud and get configured.
-
We do not recommend port security (MAC address limit), except in the case where all WLANs are tunneled.
-
Feel free to enable BPDU guard, as BPDUs are typically not bridged from wireless to wired connection on an AP unless it is a mesh base. BPDUs are data messages that are exchanged across the switches within an extended LAN that uses a spanning tree protocol topology. BPDU packets contain information on ports, addresses, priorities, and costs and ensure that the data ends up where it was intended to go.