Help us improve your experience.

Let us know what you think.

Do you have time for a two-minute survey?


Enable Port Mirroring

Port mirroring copies source traffic traversing one or more interfaces and forwards it at line rate to a specified destination. It is useful for monitoring network traffic, enforcing network policies, identifying network issues, and as a part of intrusion detection.

You can set up port mirroring for ingress and/or egress traffic on any interface on the switch (except those identified below), as well as for ingress traffic on a VLAN (network, in the terminology of Mist dashboard), private VLAN, or bridge domain. You can apply it to all traffic on the port, or a filtered subset of the traffic, as defined in a firewall policy. Mirrored traffic is sent to a local interface, VLAN, or bridge domain for remote monitoring or analysis.

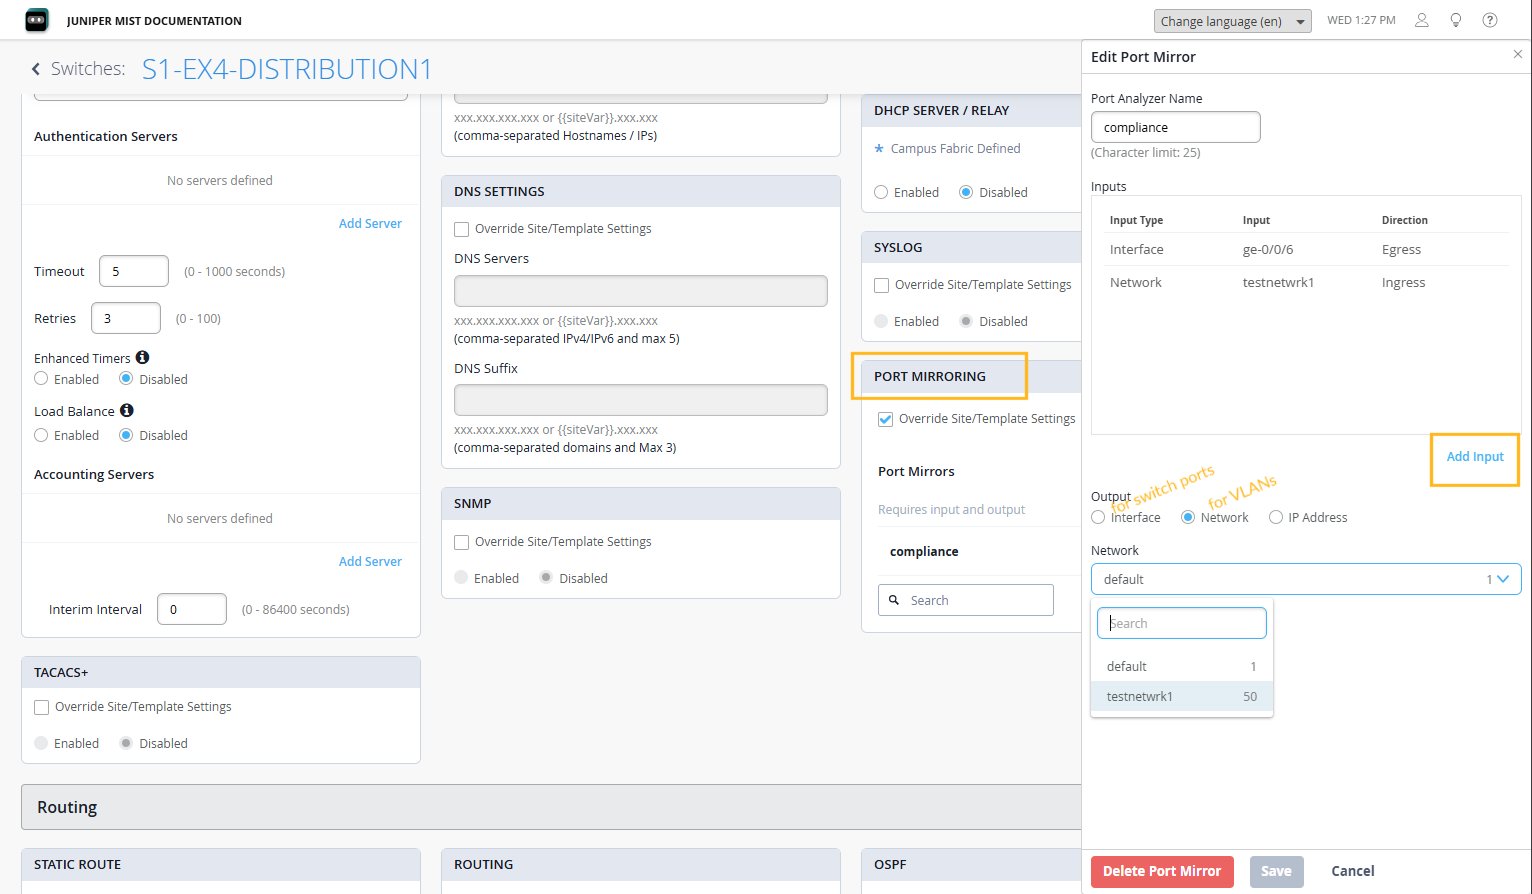
From the Mist dashboard, you can configure port mirroring for managed switches that are part of a switch template, as well as for independent switches. To do so, you'll need to have an input, that is, the source of the traffic, and an output, that is, the destination mirrored traffic will be forwarded to. For switch ports, you can specify whether you want to mirror traffic in the ingress direction or egress. If you select a VLAN as the source, ingress mirroring is assumed.

Mirroring is not supported for management interfaces (such as me0 or vme0), fiber channel interfaces, or integrated routing and bridging (IRB) interfaces (which are also known as routed VLAN interfaces or RVIs). A maximum of four port mirroring configurations is allowed.

Note: To specify a VLAN in the port mirroring configuration, select network and choose from the list of VLANs available in Mist. To specify a bridge domain, select the IP address option.

To set up port mirroring on a managed switch that is part of a switch template:

  1. Select Switches from the main menu and then select the switch you want to configure from the list of switches that appears.
  2. In the switch configuration page that opens, scroll down to find the Port Mirroring section.
  3. Since we are configuring a switch that belongs to a template in this example, select Override Site/Template Settings to enable the Add Port Mirror option. (If you are setting up port mirroring in a switch template or on an unmanaged switch, Add Port Mirror is already enabled.)
  4. Click Add Port Mirror to open the Edit Port Mirror screen, as shown in the figure below.
    Figure 1: Configure Port Mirroring in Mist Screenshot of a Juniper Mist switch configuration interface for S1-EX4-DISTRIBUTION1. Port mirroring is highlighted, with an input interface ge-0/0/6 set to Egress, a network testnetwrk1 set to Ingress, and the output network default selected. Options to add inputs and configure other settings like authentication servers, DNS, SNMP, TACACS, and routing are visible. Buttons to save, cancel, or delete the configuration are provided.
  5. Give the port mirroring instance a name in the Port Analyzer Name field.
  6. Click Add Input and then choose from the following:
    • Interface--to specify a local port on the switch as the source of the traffic to mirror. You can also click the icon to see the which ports are configured on the switch and select one, or multiple, ports from the interactive map that pops up.
      • Ingress-to mirror traffic that is inbound to the switch interface.

        Egress--to mirror traffic that is outbound from the switch interface.

    • Network-to specify a VLAN as the traffic source (inbound traffic only).

  7. Click the blue check box to accept your input configuration, before moving on to add a destination for the mirrored traffic under Output. Choose from the following:
    • Interface--to specify a local port on the switch as the destination of the mirrored traffic. You can also click the icon to see the which ports are configured on the switch and select one of those.
    • Network-to specify an existing VLAN as the destination for the mirrored traffic.

    • IP address-to specify the IP address as the destination for the mirrored traffic.

  8. Click the blue check box to accept your configuration, then Add post your configuration changes, and Save, in the upper right corner of the page, to actually commit your changes on the switch.
To confirm that port mirroring is enabled on the switch, click Switches in the main menu and then Switch Insights for the switch you just configured. The update should appear within a few minutes under Switch Events section of the dashboard.