Help us improve your experience.

Let us know what you think.

Do you have time for a two-minute survey?


Configure Path Selection from Hub-to-Spoke with Traffic Steering

Follow these steps to set up traffic steering by identifying hub-to-spoke paths.

Juniper Mist™ allows you to influence path selection for traffic going from hub-to-spoke. This comes in handy when you have multiple spokes that the hub is trying to reach and you want to have granular control over which spoke interface traffic will arrive on. This configuration gives you full path control in both directions.

Before You Begin

Configure your hub profiles.

To configure hub-to-spoke traffic steering:

  1. From the left menu, select Organization > WAN > Hub Profiles.
  2. Select the profile that you want to modify.
  3. In the WAN section of the Hub Profile page, click the WAN interface that you want to define the logical spoke endpoints for.
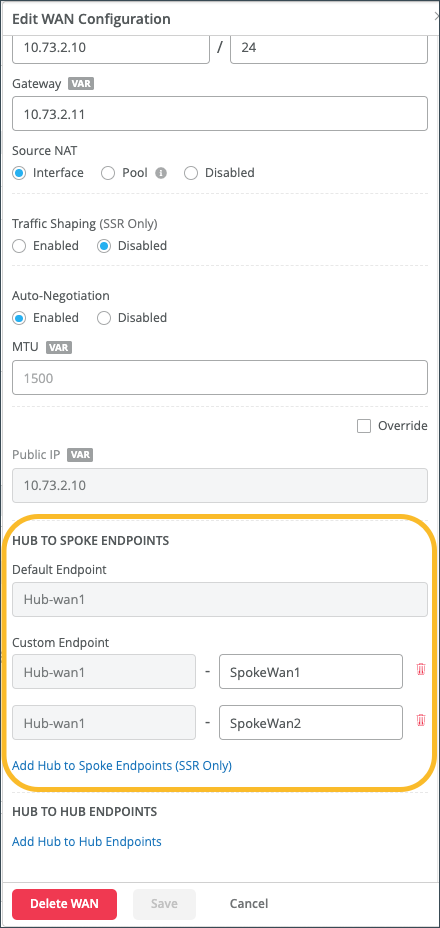
  4. In the Edit WAN Configuration panel, under HUB TO SPOKE ENDPOINTS, complete these steps:
    1. Notice that the Default Endpoint has automatically been defined for you. This represents the endpoints you are connecting to on the hub.
    2. To specify the spokes that you want traffic to arrive on, click Add Hub to Spoke Endpoints (SSR Only).
    3. Specify the endpoints.

    4. Click Save at the bottom of the window.
  5. In the TRAFFIC STEERING section of the Hub Profile page, click Add Traffic Steering.
  6. Enter a Name and Strategy, and then click Add Paths.
  7. Keep the defaulted Type as Overlay.
  8. For Name, select the name of the first hub-to-spoke endpoint you created.

    1. Click the blue check mark to save the path.
    2. Select Add Paths again and keep the defaulted Type as Overlay.
    3. In the Name field, select the name of the second hub-to-spoke endpoint you created.
    4. Click Save at the bottom of the panel.
    5. Click Save at the top-right corner of the hub profile.

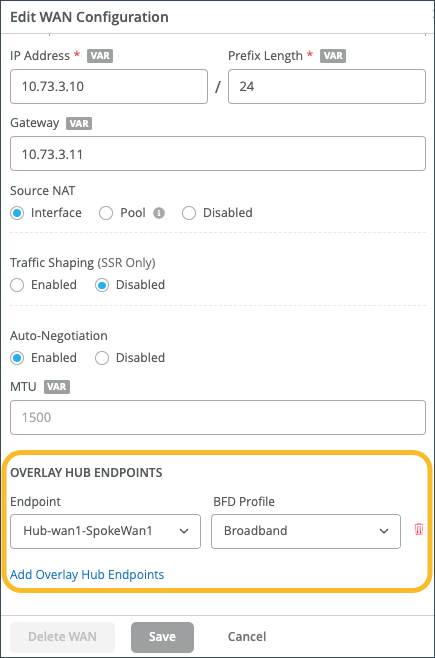
    You must now configure this on the spoke in order to accomplish hub-to-spoke traffic steering from end to end.

  9. From the left menu, select Organization > WAN > WAN Edge Templates.
  10. Select your spoke template.
  11. Click the WAN configuration that you want to modify.
  12. In the settings panel, under OVERLAY HUB ENDPOINTS, click the endpoint for the selected WAN configuration (Example: Hub-wan1-SpokeWan1).
    You're selecting the overlay endpoint to make the connection between hub and spoke.
  13. Click Save.

  14. Select the second WAN configuration (Example: WAN2) and then set the corresponding endpoint (Example: Hub-wan1-SpokeWan2). Click Save.

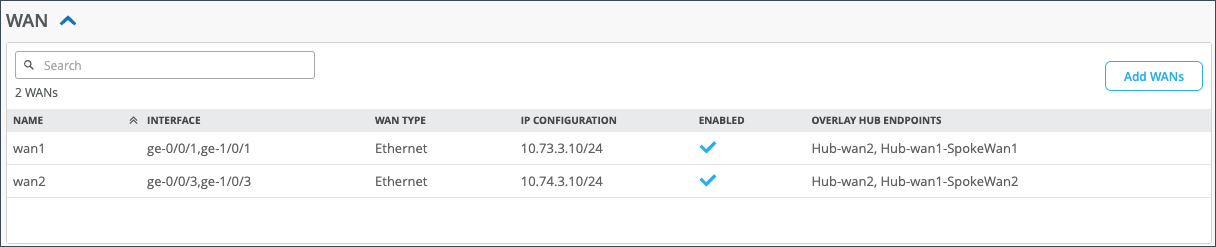
    In the WAN section, in the Overlay Hub Endpoints column, you can see the endpoints you configured which indicate how you want your spokes to connect to the hub.

  15. In the TRAFFIC STEERING section, click the overlay traffic steering policy that you want to configure.
  16. In the Edit Traffic Steering panel, select Add Paths.
  17. Keep Overlay as the Type.
  18. Under Name, click the name of the first hub-to-spoke endpoint you created (Example: Hub-wan1-SpokeWan1).
    1. Click the blue check mark to save the path.
    2. Click Add Paths again.
    3. Keep Overlay as the Type.
    4. In the Name field, select the name of the second hub-to-spoke endpoint you created (Example: Hub-wan1-SpokeWan2).
    5. Continue to add paths as needed.
      Note:

      The order of path preference depends on what you configure for a Traffic Steering Strategy. You can configure a Strategy of Ordered, Weighted, or Equal-cost Multipath (ECMP). For help, see Traffic Steering Rules.

    6. Click Save at the bottom of the panel.
    7. Click Save at the top-right corner of the WAN Edge Template.
Note:

To accomplish the above behavior for spoke to hub traffic, configure Traffic Steering on the spoke.