Manipulate Source Strings for Auto-Provisioning
For certain auto-provisioning options, you can add or remove characters from the source string to identify the site, device name, or device profile that you want to assign to a device.
When adding auto-provisioning rules, you can transform a device attribute into a device name, site name, or profile name by extracting characters, ignoring characters, selecting characters, or adding characters.
You also can use multiple transformation options together.
Use these examples to experiment with the various options and understand how to transform your source strings into the desired result.
Different options are available for different device attributes.
Divide a String into Segments
-
- (dash)
-
_ (underscore)
-
. (period)
-
/ (forward slash)
-
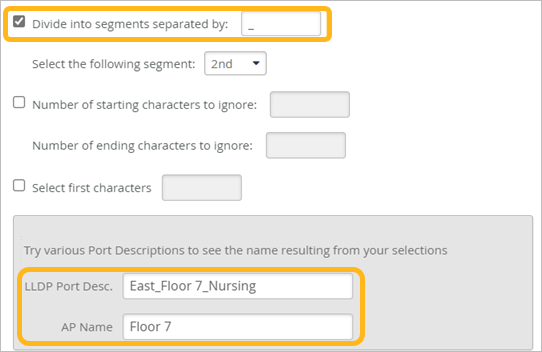
Verify your selections by entering sample strings in the gray box at the
bottom of the Auto-Provisioning window.
In this example, the administrator wants Juniper Mist to use only the characters in the second segment of the AP name. To verify that this will enable Juniper Mist to generate the desired name, the administrator enters a sample AP name. Juniper Mist responds with the resulting name.
Ignore Starting or Ending Characters
-
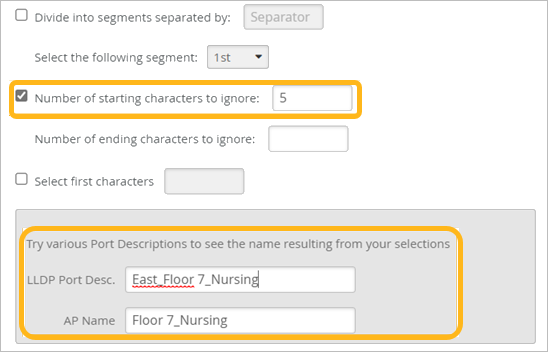
Verify your selections by entering sample strings in the gray box at the
bottom of the Auto-Provisioning window.
In this example, the administrator wants Juniper Mist to ignore the first five characters of the AP name. To verify that this will enable Juniper Mist to generate the desired name, the administrator enters a sample AP name. Juniper Mist responds with the resulting name.
Select the First Characters
-
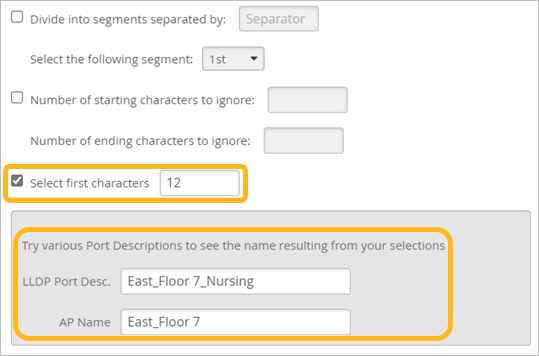
Verify your selections by entering sample strings in the gray box at the
bottom of the Auto-Provisioning window.
In this example, the administrator wants Juniper Mist to select the first 12 characters of the AP name. To verify that this will enable Juniper Mist to generate the desired name, the administrator enters a sample AP name. Juniper Mist responds with the resulting name.
Add a Prefix or Suffix
-
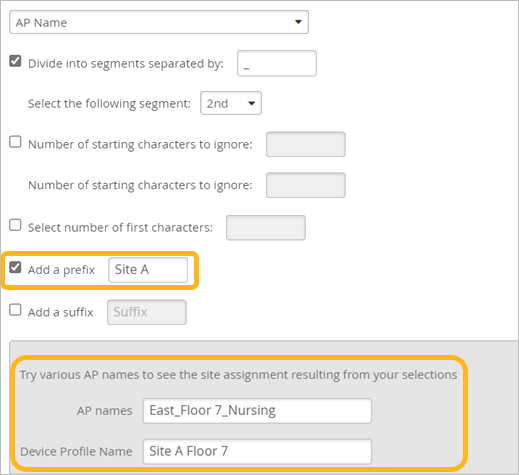
Verify your selections by entering sample strings in the gray box at the
bottom of the Auto-Provisioning window.
In this example, the administrator wants Juniper Mist to use only the characters in the second segment of the AP name.
In this example, the administrator wants Juniper Mist to add a prefix consisting of these characters: Site A. To verify that these selections will enable Juniper Mist to find the corresponding device profile, the administrator enters a sample AP name. Juniper Mist responds with the resulting device profile name.
Using Multiple Transformation Options Together
When you use multiple options together, the string is transformed by the first selected option. Then the resulting characters are transformed by the next option, and so on until all options are applied.
Let's look at this example, where five options are selected.
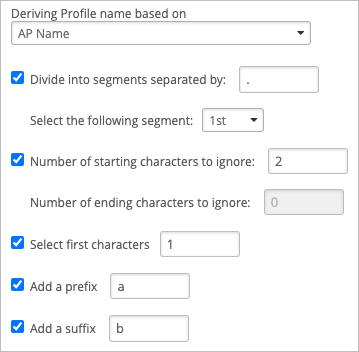
Let's say that the source string is 1234.5678.
-
With the first option, the source string is segmented a the dot (.), and the first segment is selected. The result is 1234. Only these characters are processed by the next option.
-
Next, the first two characters are ignored, resulting in 34. Only these characters are processed by the next option.
-
Next, only the first character, 3, is selected. Only this character is processed by the next option.
-
Now the letter a is added as a prefix, resulting in a3.
-
Finally, the letter b is added as a suffix, resulting in a3b.