Help us improve your experience.

Let us know what you think.

Do you have time for a two-minute survey?


Firmware Upgrades

Upgrade firmware for APs, switches, WAN Edges, and Mist Edges at specific sites or across your entire organization.

Upgrade Options

You can manage and monitor upgrades on the Organization > Firmware Upgrades page.

  • To upgrade automatically as new firmware is available—Click Auto Upgrade Settings at the top-right corner of the page. For help with this feature, see Enable Automatic Upgrades.

  • To do a one-time upgrade—Click Schedule Upgrade at the top-right corner of the page. For help with this feature, see Set Up an Ad Hoc Upgrade.

  • To view upcoming and completed upgrades—Click a device tab at the top of the page: Access Points, Switches, WAN Edges, or Mist Edges. For help with this feature, see View the Status or Modify a Scheduled Upgrade.

Enable Automatic Upgrades

Enable Mist to regularly check for available firmware and to automatically upgrade devices that match your criteria. You specify the device types, the sites, and the firmware that you want. You can even set it up to select a different firmware version for different AP models.

You can set up this automation to run daily or weekly.

Note: If you want to perform a one-time upgrade instead, see Set Up an Ad Hoc Upgrade.
To enable automatic upgrades:
  1. From the left menu, select Organization > Firmware Upgrades.
  2. Click Auto Upgrade Settings near the top-right corner of the page.
  3. Select the device type.
  4. Enable the automatic upgrade.
  5. Select the firmware type:
    • Production—Official production release; first major release of this version.

    • RC2—Second major release of this version; can include new features, enhancements, and bug fixes. Typically is more stable than the first release.

    • Custom—Specify the models to upgrade automatically and the firmware version for each model.

  6. Select the day and time when you want Mist to automatically check for new firmare.
    You can set up this automation to run daily or weekly.
  7. Under Scope:
    • To include your entire organization—Turn on Entire Org.

    • To specify sites—Turn off Entire Org. Then use the Add Site option to add one or more sites.

  8. Complete additional steps that might appear, based on the device type:
    • End User Licence Agreement—If the EULA check box appears, use the link to read the information, and then select the check box.

    • Recovery Snapshot—If this check box appears, select or clear it, based on your preference. This option is selected by default and is recommended so that you can restore from the backup if needed.

  9. Click Review.
    If the Review button is unavailable, check all fields to see if you've completed the requirements. For example, certain device types require you to select a EULA check box.
    The screen summarizes the settings. If needed, you can click Back to make changes.
  10. Click Configure to enable the automation.

Notifications of upcoming upgrades will appear on device list views and site configuration pages.

At the specified day and time, Mist checks for new firmware matching your criteria. If new firmware is available, Mist upgrades the specified devices.

If needed, repeat this procedure to enable automatic upgrades for other device types.

Review, Disable, or Modify an Automatic Upgrade

From the left menu, select Organization > Firmware Upgrades. Then click Auto Upgrade Settings.

  • To review the settings—Click the device type for the automation that you want to review. View the on-screen information. When finished, click Cancel.

  • To disable an automation—Click the device type for the automation that you want to disable. Turn off Enable Auto Upgrade. Click Review. Then click Configure.

  • To modify the settings—See Enable Automatic Upgrades.

Set Up an Ad Hoc Upgrade

With this approach, you can run an upgrade whenever you need to. Maybe you have a few new devices that you want to upgrade right away. Maybe you want to install a specific firmware version on a few devices for testing purposes. You can set up this upgrade to run immediately or in a specified maintenance window.

Note:

Keep in mind, although the scheduling option is a form of automation, this approach is not the same as "auto upgrades." The auto upgrade process runs repeatedly, on a set date and time, to regularly check for new firmware. See Enable Automatic Upgrades.

To set up an ad hoc upgrade:
  1. From the left menu, select Organization > Firmware Upgrades.
  2. Click Schedule Upgrade near the top-right corner of the page.
  3. At the top of the pop-up window, set the Scope:
    • To include your entire organization—Turn on Entire Org.

    • To specify sites—Turn off Entire Org. Then use the Add Site option to add one or more sites.

  4. Click a Device Type.
    The screen displays the models present in the selected organization or sites.
  5. Enter the device-specific upgrade options:
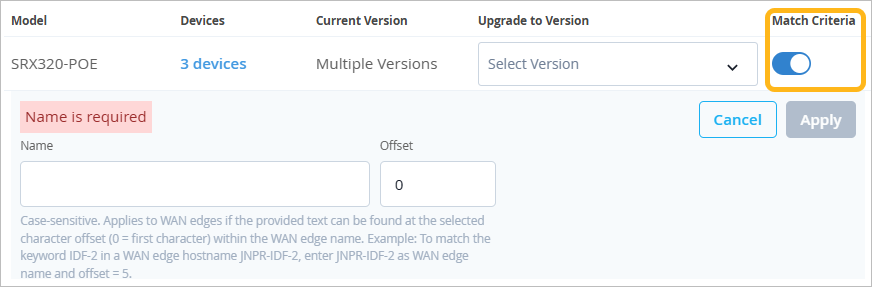
    • Version (all devices)—Select the firmware version for each model that you want to upgrade. Or select None to omit a model from the upgrade.

      Note: To see a list of the devices for each model, hover your mouse over the devices link.
    • Reboot without upgrade (switches only)—Turn on this feature to reboot, not upgrade, switches.

      Reboot without upgrade
    • Match Criteria (switches and WAN edges)—Turn on this feature to identify specific devices. Then enter a name, role, or campus fabric role to use to find the devices. Also specify an offset number, which indicates where to look for these characters in the specified name or role. For example, let's say your device names follow the pattern site-usage-device, such as SiteA-IOT-device1. You want to find all your IOT devices. You enter the characters IOT as the match criteria and 7 as the offset. (Look for matching characters in the device name, starting with the 7th character.) To save these options, click Apply.

      Match Criteria
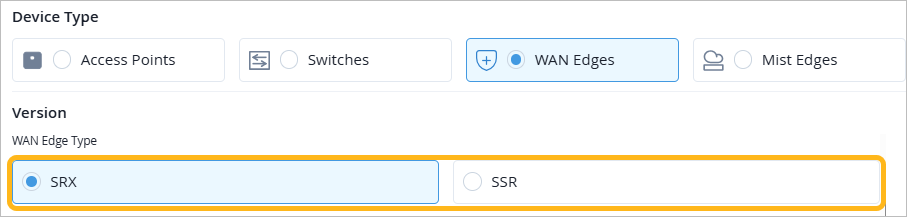
    • SRX or SSR (WAN edges)—If you have both SRX and SSR devices, complete the firmware version sections for all devices by using the SRX and SSR buttons.

      SRX/SSR buttons
    • OS and Service Upgrade or Service Upgrade (Mist Edges only)—Choose whether to do a complete upgrade or to update the tunnel service only.

  6. Select the Scheduling options:
    • Upgrade Now—Runs the upgrade immediately after you complete the steps in this pop-up window.

    • Schedule upgrade—Runs the upgrade at a date and time that you specify.

      • If your scope includes the entire organization or multiple sites, the upgrade will run at the specified time in each site's own time zone.

      • If you want to reboot at a specific time, rather than immediately after the firmware is installed, click Set a different reboot time, and then select the date and time. This option is available for all device types except Mist Edges.

  7. (Optional) Click Advanced Settings to consider these device-specific options:

    AP Advanced Settings

    • Direct or Peer-to-peer—Direct is fastest and the most common approach. The peer-to-peer option uses less bandwidth.

    • How should devices reboot?

      • Simultaneous—Upgrades occur at the same time on all devices.

      • RRM Based, Phased, or Optimized—Upgrades occur in a phased manner to reduce impact. Read the on-screen info tips to understand these terms as they apply to the selected device type. (For example RRM Based is available for APs. Optimized is available for Mist Edges.)

      • Serial—Upgrades occur one device at a time. This is the default option for all device types and has less impact than the Simultaneous option.

    Switches and WAN Edges Advanced Settings

    • How should devices download firmware?Simultaneous handles all devices at once and is the fastest and most common approach. Phasedprovides balance. Serial has the least impact.
    • How should devices reboot?Simultaneous is the fastest and most common approach. Phased provides balance. Serial handles one device at a time and has the least impact.

    Mist Edges Advanced Settings

    How should devices reboot?Simultaneous reboots all devices at once. It's the fastest and most common approach. Optimized groups the devices by cluster or site and uses the tunnel count to determine the device order. Serial reboots devices one at a time and has the least impact.

  8. Complete additional steps that might appear, based on the device type:
    • End User Licence Agreement—If the EULA check box appears, use the link to read the information, and then select the check box.

    • Recovery Snapshot—If this check box appears, select or clear it, based on your preference. This option is selected by default and is recommended so that you can restore from the backup if needed.

  9. Click Review.
    If the Review button is unavailable, check all fields to see if you've completed the requirements. For example, certain device types require you to select a EULA check box.
    The screen summarizes the settings. You can click the Show Models link for more information. If needed, you can click Back to change your settings.
  10. Click Schedule to proceed.

The selected actions are performed according to the schedule that you set (now or at a specified date and time).

Notifications of upcoming upgrades will appear on device list views and site configuration pages, alerting administrators.

If needed, repeat this procedure to schedule other upgrades.

View the Status or Modify a Scheduled Upgrade

From the left menu, select Organization > Firmware Upgrades. Then click a device tab at the top of the page.

In the main area of the page, click the tab for Scheduled (upcoming upgrades) or Past(completed upgrades). You'll see high-level information for each upgrade.

  • To see more details—At the left side of the row, click the arrow button to see more details.

  • To change the settings—(not available for past upgrades) At the left side of the row, click the arrow button. On the right side of the screen, click Edit. Make your changes, and then click Save.

  • To cancel—(not available for past upgrades) At the left side of the row, click the arrow button. On the right side of the screen, click Cancel Upgrade. When the confirmation message appears, click Cancel Upgrade.