
How to Configure a Virtual Mist Edge Appliance
This chapter provides information about the overview and various tasks that you perform to configure a virtual Mist edge appliance.
Virtual Mist Edge Overview
You can run Juniper Mist Edge as a virtual machine on VMware or Proxmox (KVM) to implement a virtual Mist Edge architecture.
- Hardware Specifications for a Mist Edge Virtual Machine
- Virtual Network Interfaces
- Firewall Port Requirements
- Mist Edge VM Deployment Process
Hardware Specifications for a Mist Edge Virtual Machine
The following are the minimum hardware requirements to implement a Mist Edge VM.
| Hardware Component | Quantity or Capacity |
|---|---|
| CPU |
4 vCPUs |
| RAM |
32 GB |
| Hard disk |
100 GB (thick provisioned) |
| NIC |
Three virtual NICs |
-
Supported VMware hypervisors:
-
VMware ESXi, tested versions - 6.7.0, 7.0
-
Proxmox, tested version - 8.3.0
-
-
CPU support—Juniper Mist Edge requires 1G HugePages support from the CPU. Hence, the minimum supported CPU is Intel Haswell family and above. Juniper Mist Edge does not work on older Intel CPUs or on AMD CPUs.
-
NIC Support—Juniper Mist Edge requires Data Plane Development Kit (DPDK) support. Please refer to https://core.dpdk.org/supported/nics/intel/ to see if your NIC is supported.
-
Preferred NICs—Intel x520 Dual Port 10GbE SFP+, Intel i350 Dual Port 1GbE, Broadcom 57414 Dual Port 10/25GbE SFP28 Adapter, Nvidia ConnectX-6 Lx Dual Port 10/25GbE SFP28, and rNDC Intel i350
Virtual Network Interfaces
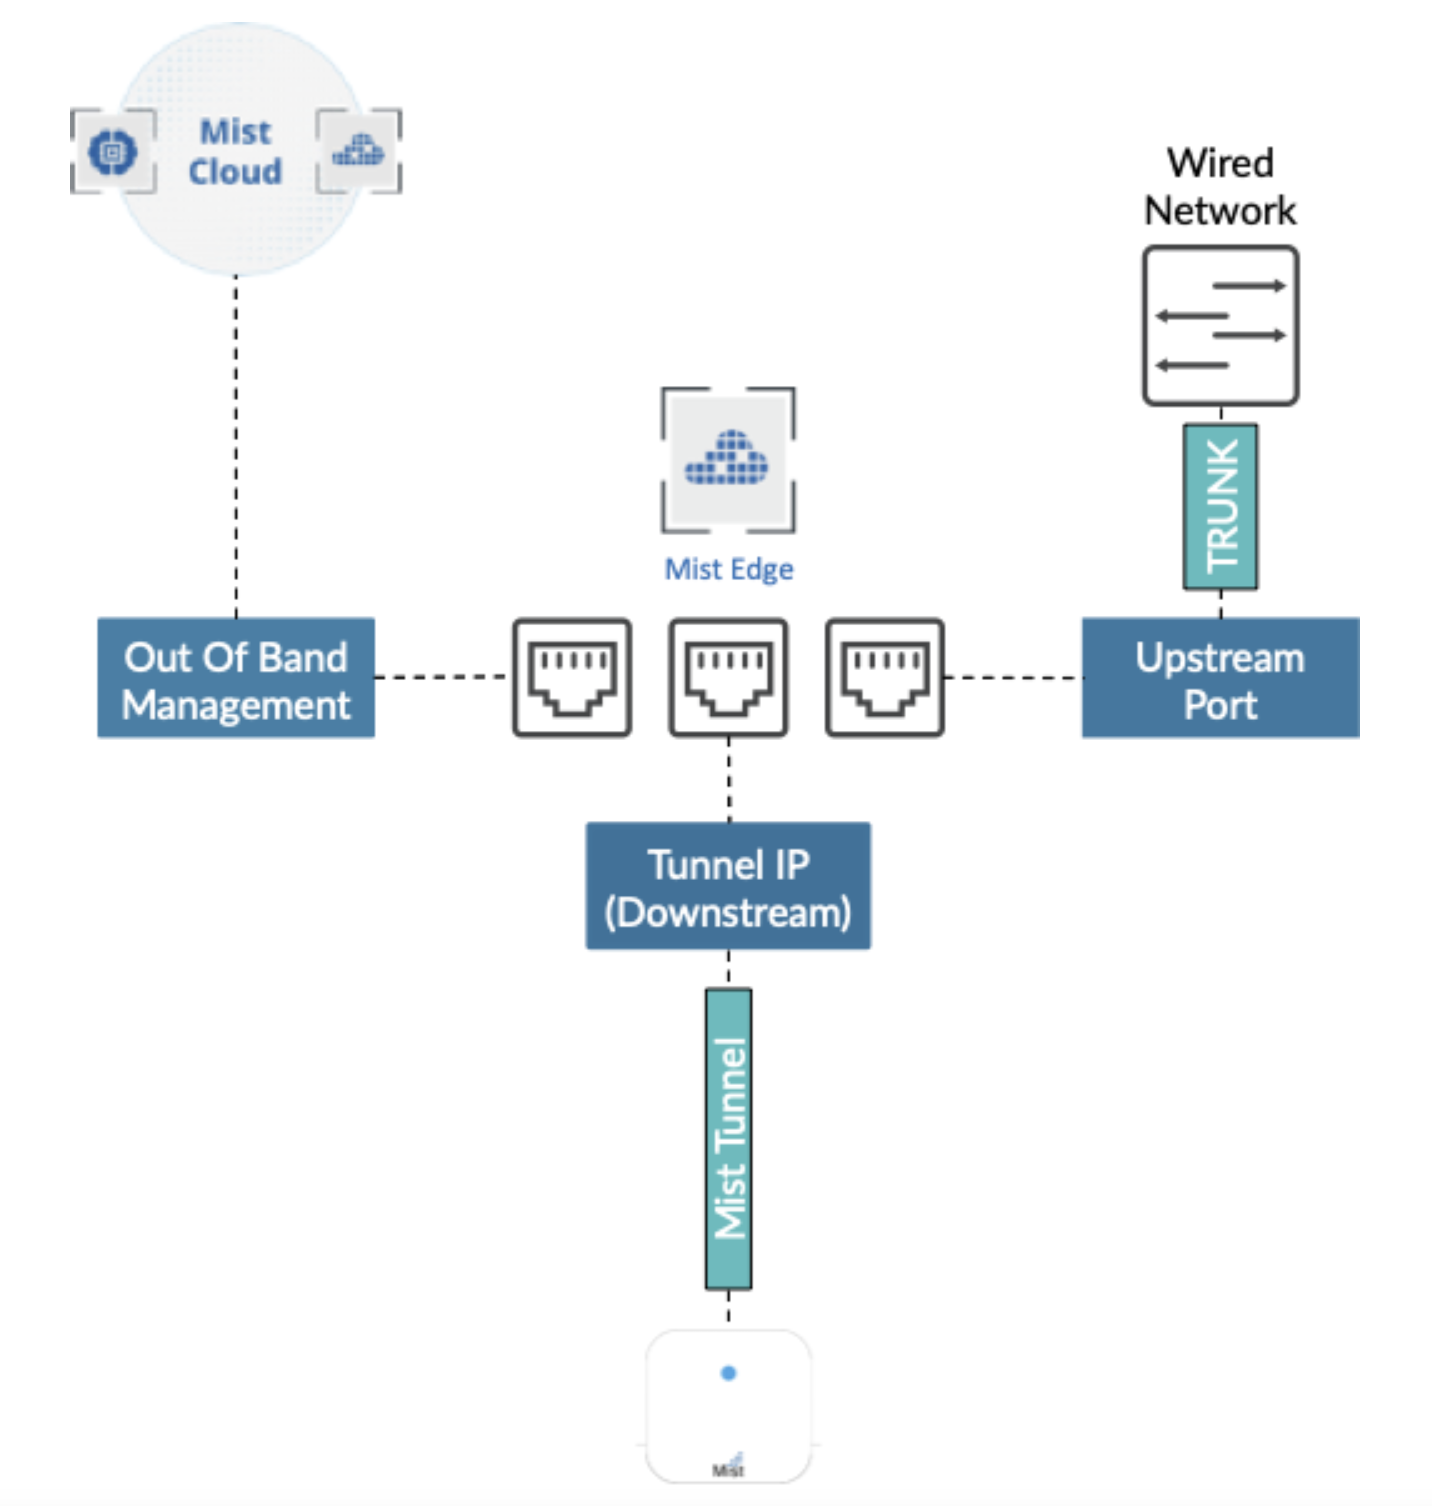
Juniper Mist Edge requires the following three virtual NIC interfaces:
-
Out-of-Band Management (OOBM) Port Group—To connect Juniper Mist Edge to the Juniper Mist™ cloud and RADIUS Proxy service.
-
Downstream (Tunnel IP) Port Group—To allow Mist Tunnel (L2TPv3 or IPsec) establishment from a Mist access point (AP).
-
Upstream Port Group—To uplink to the wired network with all the VLANs that need to be extended for clients.
The following image illustrates the virtual NIC interfaces.
Firewall Port Requirements
Configure the firewall to allow the following connections:
-
Ensure the following domains are accessible through your firewall for proper installation and functionality:
-
*.mistsys.net
-
*.debian.org
-
-
The OOBM interface must have outbound access to ep-terminator.mistsys.net or ep-terminator.eu.mistsys.net (for the EU AWS environment) on TCP port 443.
-
If the tunnel interface is behind the firewall, the firewall must allow incoming traffic on UDP Port 1701 (for the non IPsec campus or the branch use case).
-
For remote teleworker use cases with IPsec encryption, the tunnel IP interface must allow incoming traffic on UDP port 500 and UDP port 4500. Also, the firewall needs to execute port translation from outside to the tunnel IP address.
-
For remote teleworker use cases with dot1x RadSec Proxy implementation, the OOBM interface should be able to access the RADIUS server. Also, the firewall needs to execute port translation from the outside on TCP port 2083 to the tunnel IP address.
Mist Edge VM Deployment Process
The Mist Edge VM can be deployed using ESXi or Proxmox. The deployment process involves deploying the VM first on the hypervisor and then creating and provisioning the virtual Mist Edge on the Mist portal. Here are the steps:
Create Juniper Mist Edge VM on the Mist Portal and Download the ISO File
Deploy Mist Edge VM on the hypervisor
Create tunnels
For a Mist Edge deployed at the organization level, see Create a Mist Tunnel (Organization Level)
For a Mist Edge deployed at the site level, see Create a Mist Tunnel (Site Level)
Create Juniper Mist Edge VM on the Mist Portal and Download the ISO File
When you want to implement a virtual Mist Edge architecture using a Juniper Mist Edge appliance as the virtual machine (VM), you have to create a Juniper Mist Edge from the Juniper Mist Portal.
To download the installation image and to create a Juniper Mist Edge VM:
-
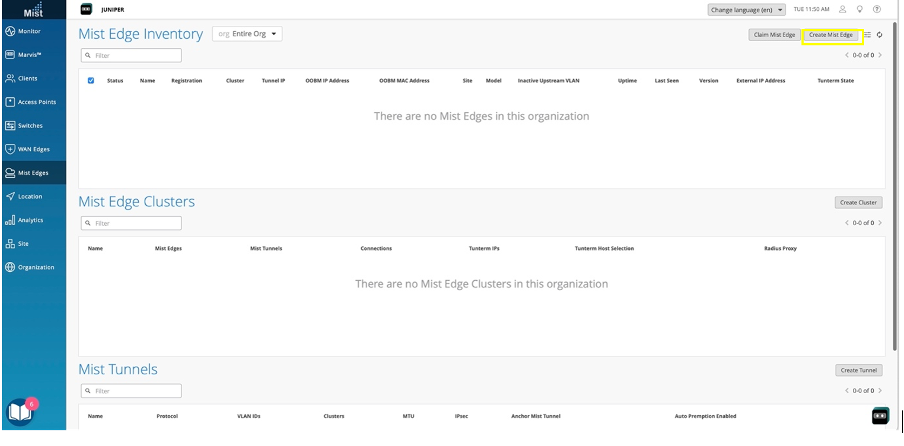
On the Mist Edge Inventory pane, click Create Mist Edge.
-
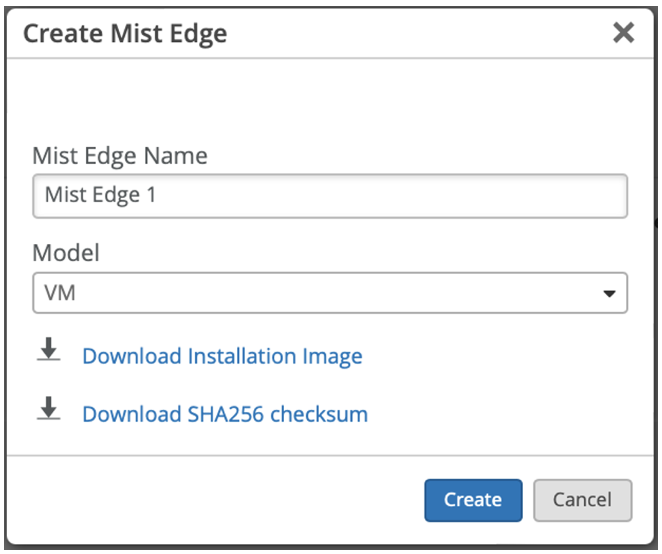
In the Create Mist Edge page, enter a name in the add Mist Edge
Name field and select
VM as the model.
-
Verify the checksum.
On a Mac, you can use the inbuilt SHASUM to generate the SHA256 checksum of the downloaded installation image.

You can match the generated checksum with the content in the downloaded checksum file.

On a Windows PC, you can use the inbuilt tool, certutil with the MD5 or SHA256 hash algorithms (amongst others) to establish the unique checksum of any file.

-
In the Mist Edge Inventory page, select the newly created Juniper Mist Edge. The page
displays the configuration options available for the Juniper Mist Edge.
Settings for the Mist Edge Configuration page:
-
Port Panel section
This section displays an interactive port panel that provides a visual representation of the out-of-band management (OOBM) port (labeled Mist port on the Mist Edge hardware), available tunnel ports, and power supply units (PSUs). This layout automatically adapts to the specific Mist Edge model.
The panel offers a quick status overview: active ports are shown in green, and disconnected ports are shown as disabled. To troubleshoot or bounce a port, select the port. A new sub-section appears with the options Packet Capture and Bounce Ports. For more information, see Packet Capture Streaming for a Mist Edge Tunnel Interface.
Note: For VM and models X1 and X1-M, the PSU section is not displayed.This section also displays CPU and memory usage, device temperature, and the status of the PSUs and fans.

-
Properties section
This section shows the configured Mist Edge ID and serial number details. It also displays the configured OOBM IPv4 address, OOBM IPv6 address, OOBM MAC address, OOBM netmask, OOBM IPv6 prefix, and OOBM gateway.
-
Status section
This section shows the current status of Mist Edge, registration, last configuration, tunnel service, RADIUS proxy, MXOC proxy, and Upstream Resource Monitoring (URM). You can also start, stop, or restart services such as tunnel service, RADIUS proxy, and MXOC proxy.
-
Statistics section
This section displays a timeline for last seen and last configured, along with uptime, version, connections, external IP address, and inactive upstream VLAN details. Click Mist Edge Insights to view additional insights.

Device section:
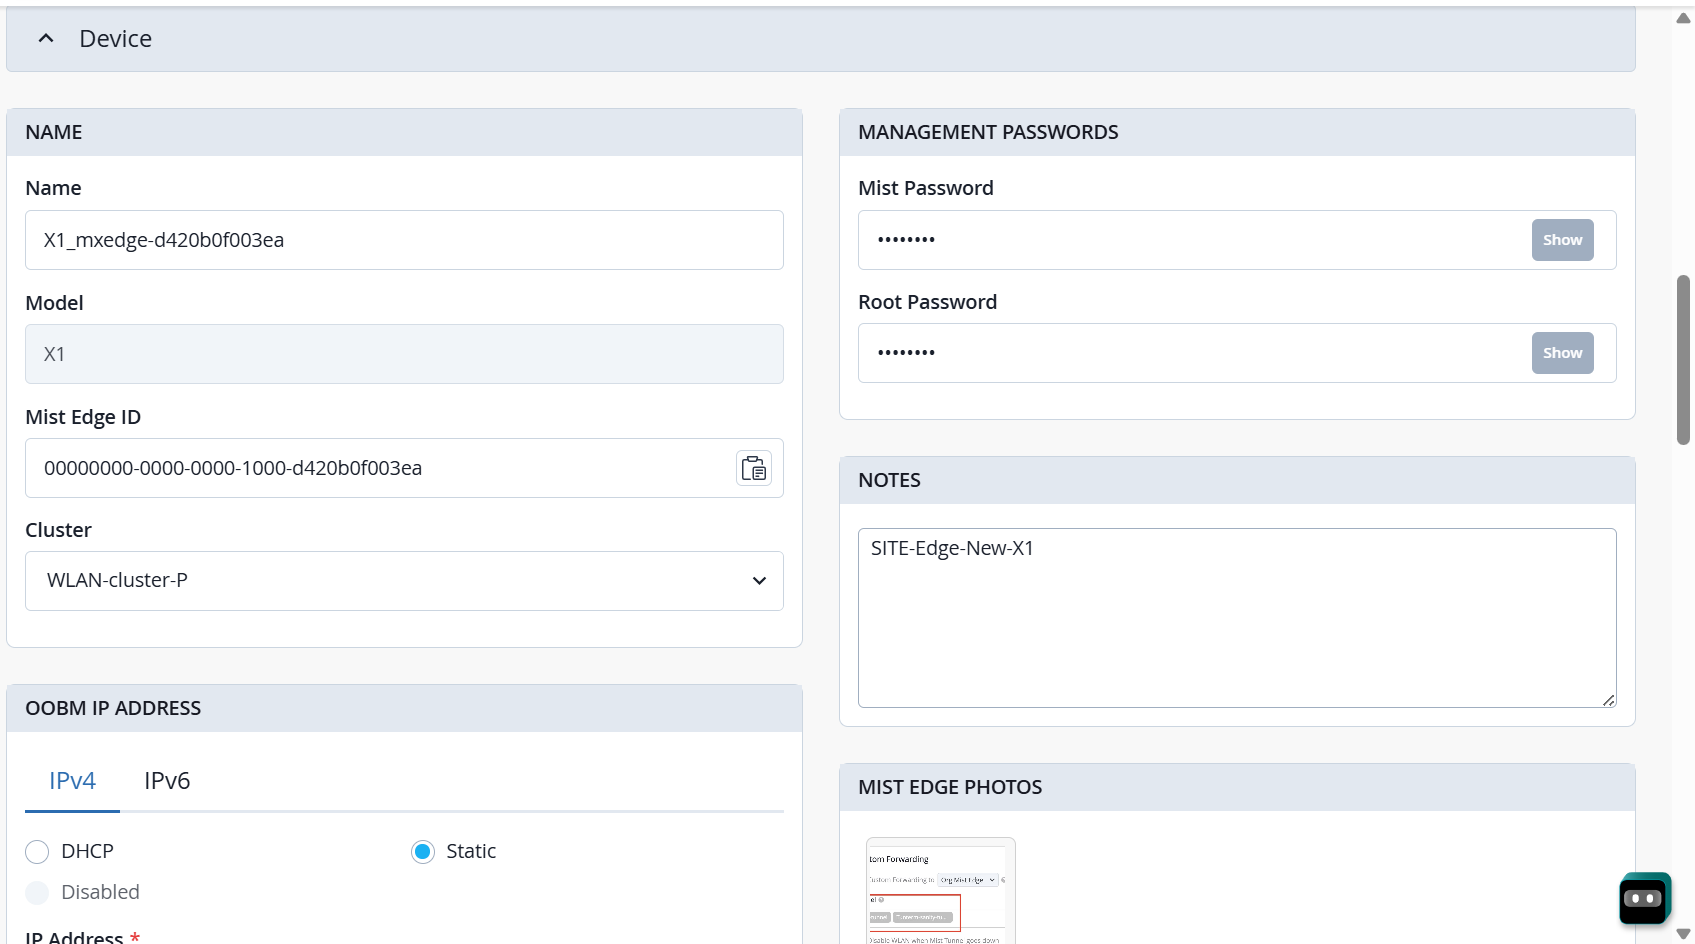
In this section, enter details as needed. Use Mist Edge Photos to save screen captures of Mist Edge initial mounting configuration. You can upload and manage up to three photos per Mist Edge appliance.
In the Management Passwords sub-section, the Mist and Root accounts are user-configurable and should be set. If they are not set, default values are applied.
In the OOBM IP Address sub-section, the OOBM IP address is directly managed by the Mist Edge device. To configure OOBM IP Address, see Port and IP Address Configuration Requirements.-
For cloud-managed IPv4 configuration, set the OOBM IP Address to DHCP or Static.
-
For IPv6, set the OOBM IP Address to DHCP or Static or SLAAC. By default, DHCP provides the OOBM IP. You can also configure static OOBM IP address in the portal and it is different from the Tunnel IP.
-
If the OOBM IP address is set to Unmanaged, the IP configuration (Static or DHCP) is obtained directly from the device and is not managed by the cloud. When you change the OOBM IP address setting from Unmanaged to DHCP or Static, the cloud begins managing the OOBM interface. If the OOBM IP address is set to Disabled or Unmanaged, create a new VLAN and then specify a valid IP address that is available in that VLAN and use that as the source IP address.
-
Tunnel Management section:
In this section, enter details as needed. To configure Tunnel IP configuration, see Port and IP Address Configuration Requirements.
In the Tunnel Interface Configuration, you can configure the tunnel port as either a single-arm or dual-arm port. For more information, see Tunnel Port—Single-Arm and Dual-Arm Configuration. This section allows you to select the ports used for downstream and upstream traffic. Tunnel IP configuration always uses a static IP address, which the APs use as the tunnel endpoint for L2TPv3 or IPsec connections. When using a dual-arm port topology, fill in the Upstream Port VLAN ID field. This field specifies the default VLAN ID for upstream traffic. In a dual-arm port topology, all client VLANs and tunnel VLANs are typically configured as trunk VLANs. The port also has a native VLAN, if you want the native VLAN traffic to be tagged, configure the Upstream Port VLAN ID field.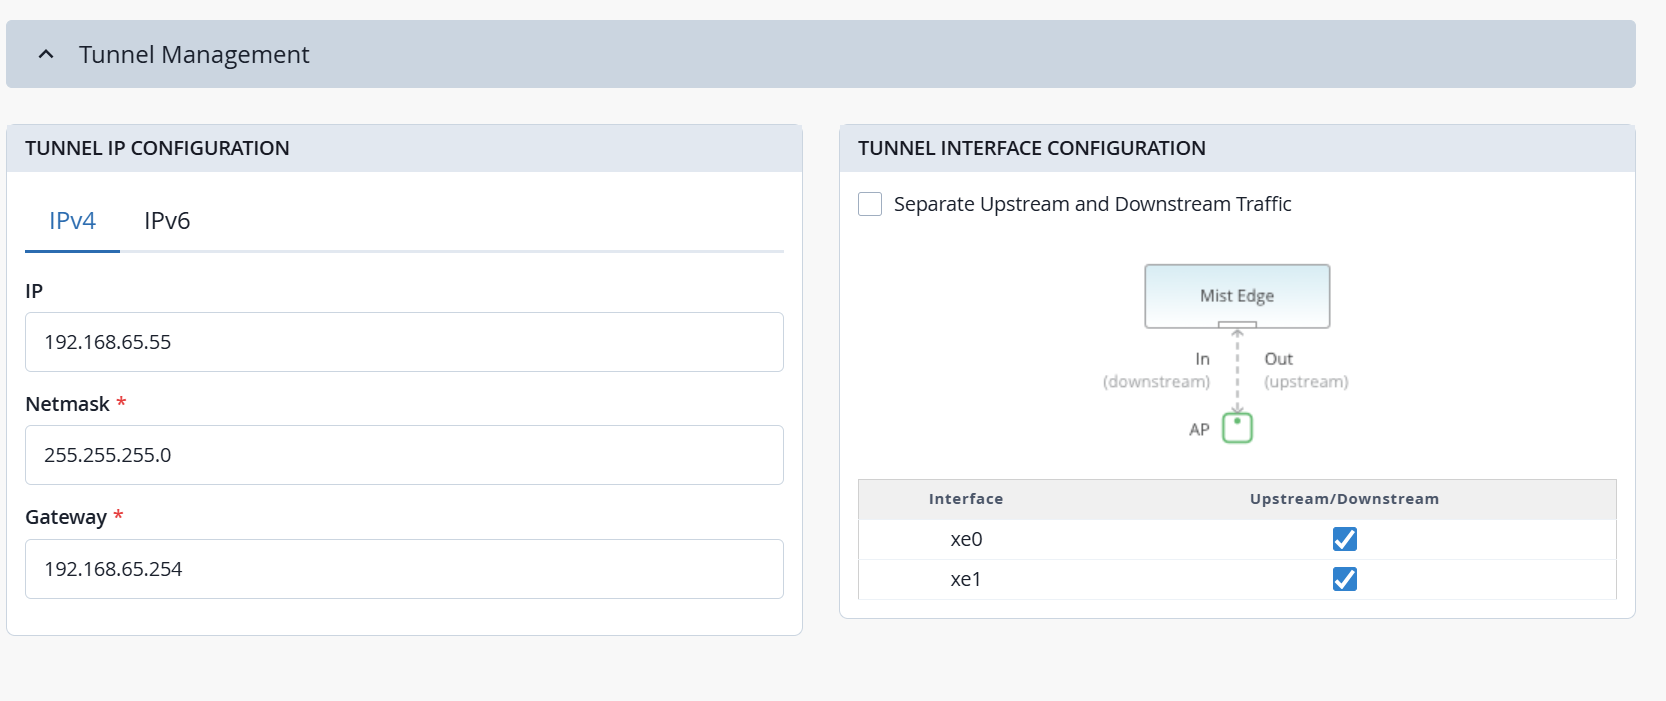
-
Advanced section:
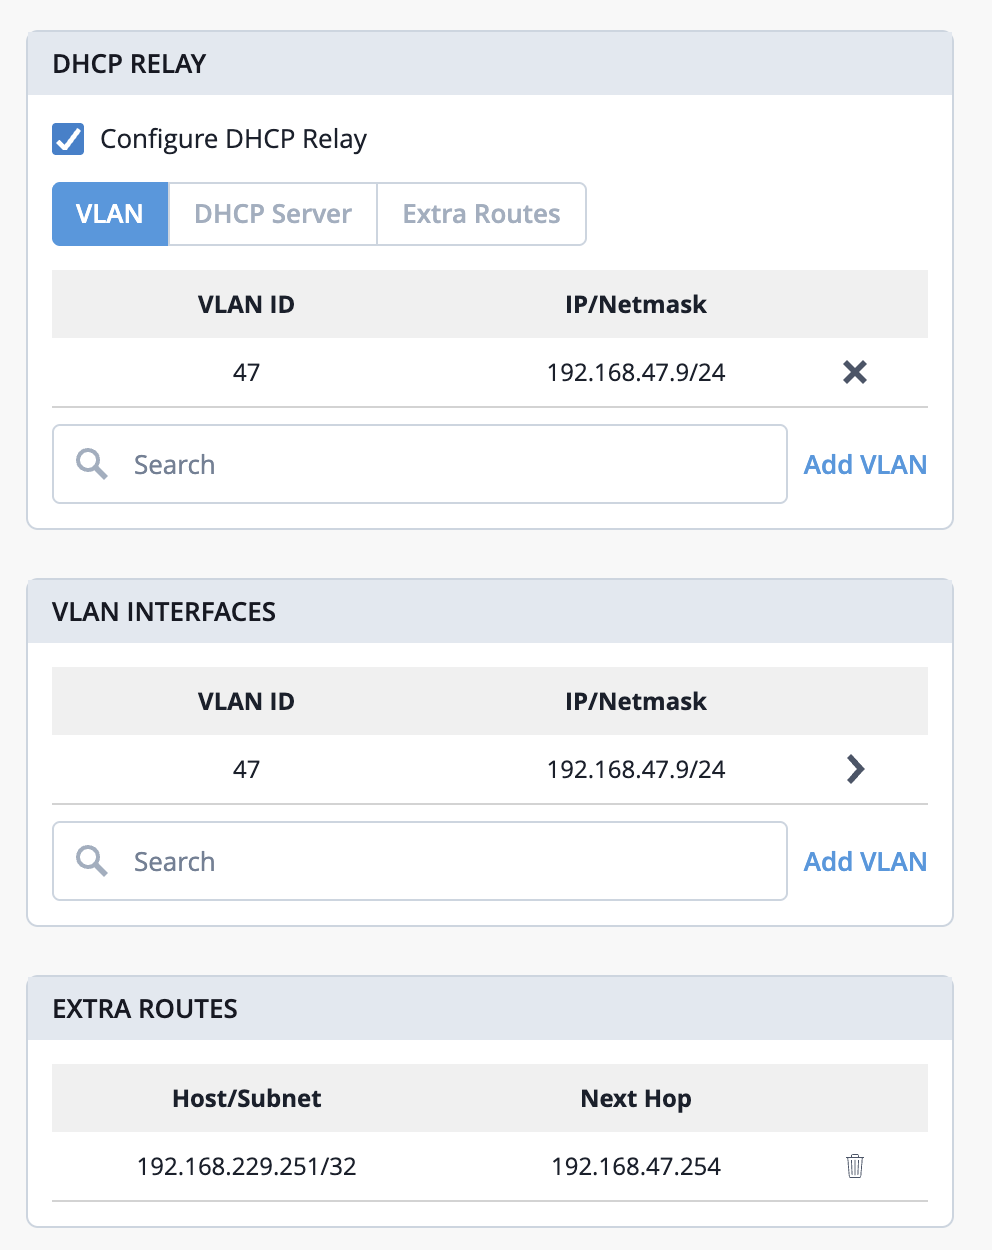
To configure the DHCP Relay and Extra Routes sub-section, see Configure a DHCP Relay. In the VLAN Interfaces sub-section, add the VLAN interface details. Typically, VLAN interfaces and extra routes are applicable only when:
- DHCP Relay is enabled, or
- URM is configured.
Note: If you're not using DHCP relay or URM, you don't need to configure VLAN interfaces or extra routes.To configure the URM sub-section, see Configure Upstream Resource Monitoring. To configure IGMP Snooping sub-section, see Configure IGMP Snooping.
-
-
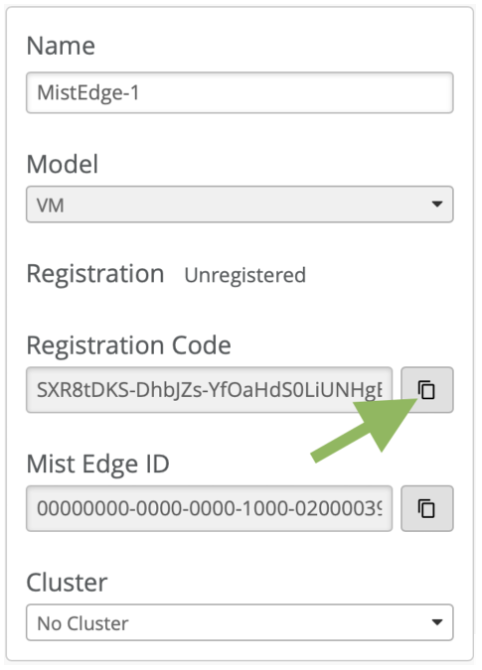
Copy and save the Registration Code.
Example: Mist Edge VM Deployment (VMWare ESXi)
This section describes how to deploy a Mist Edge VM on VMware ESXi.
Configure a VMware Port Group
This topic provides information about a Juniper Mist port group configuration, with examples.
- Port Groups for VMWare
- OOBM Port Group
- Tunnel IP Port Group
- Upstream Port Group
- Multiple Uplinks and LAG Configuration
Port Groups for VMWare
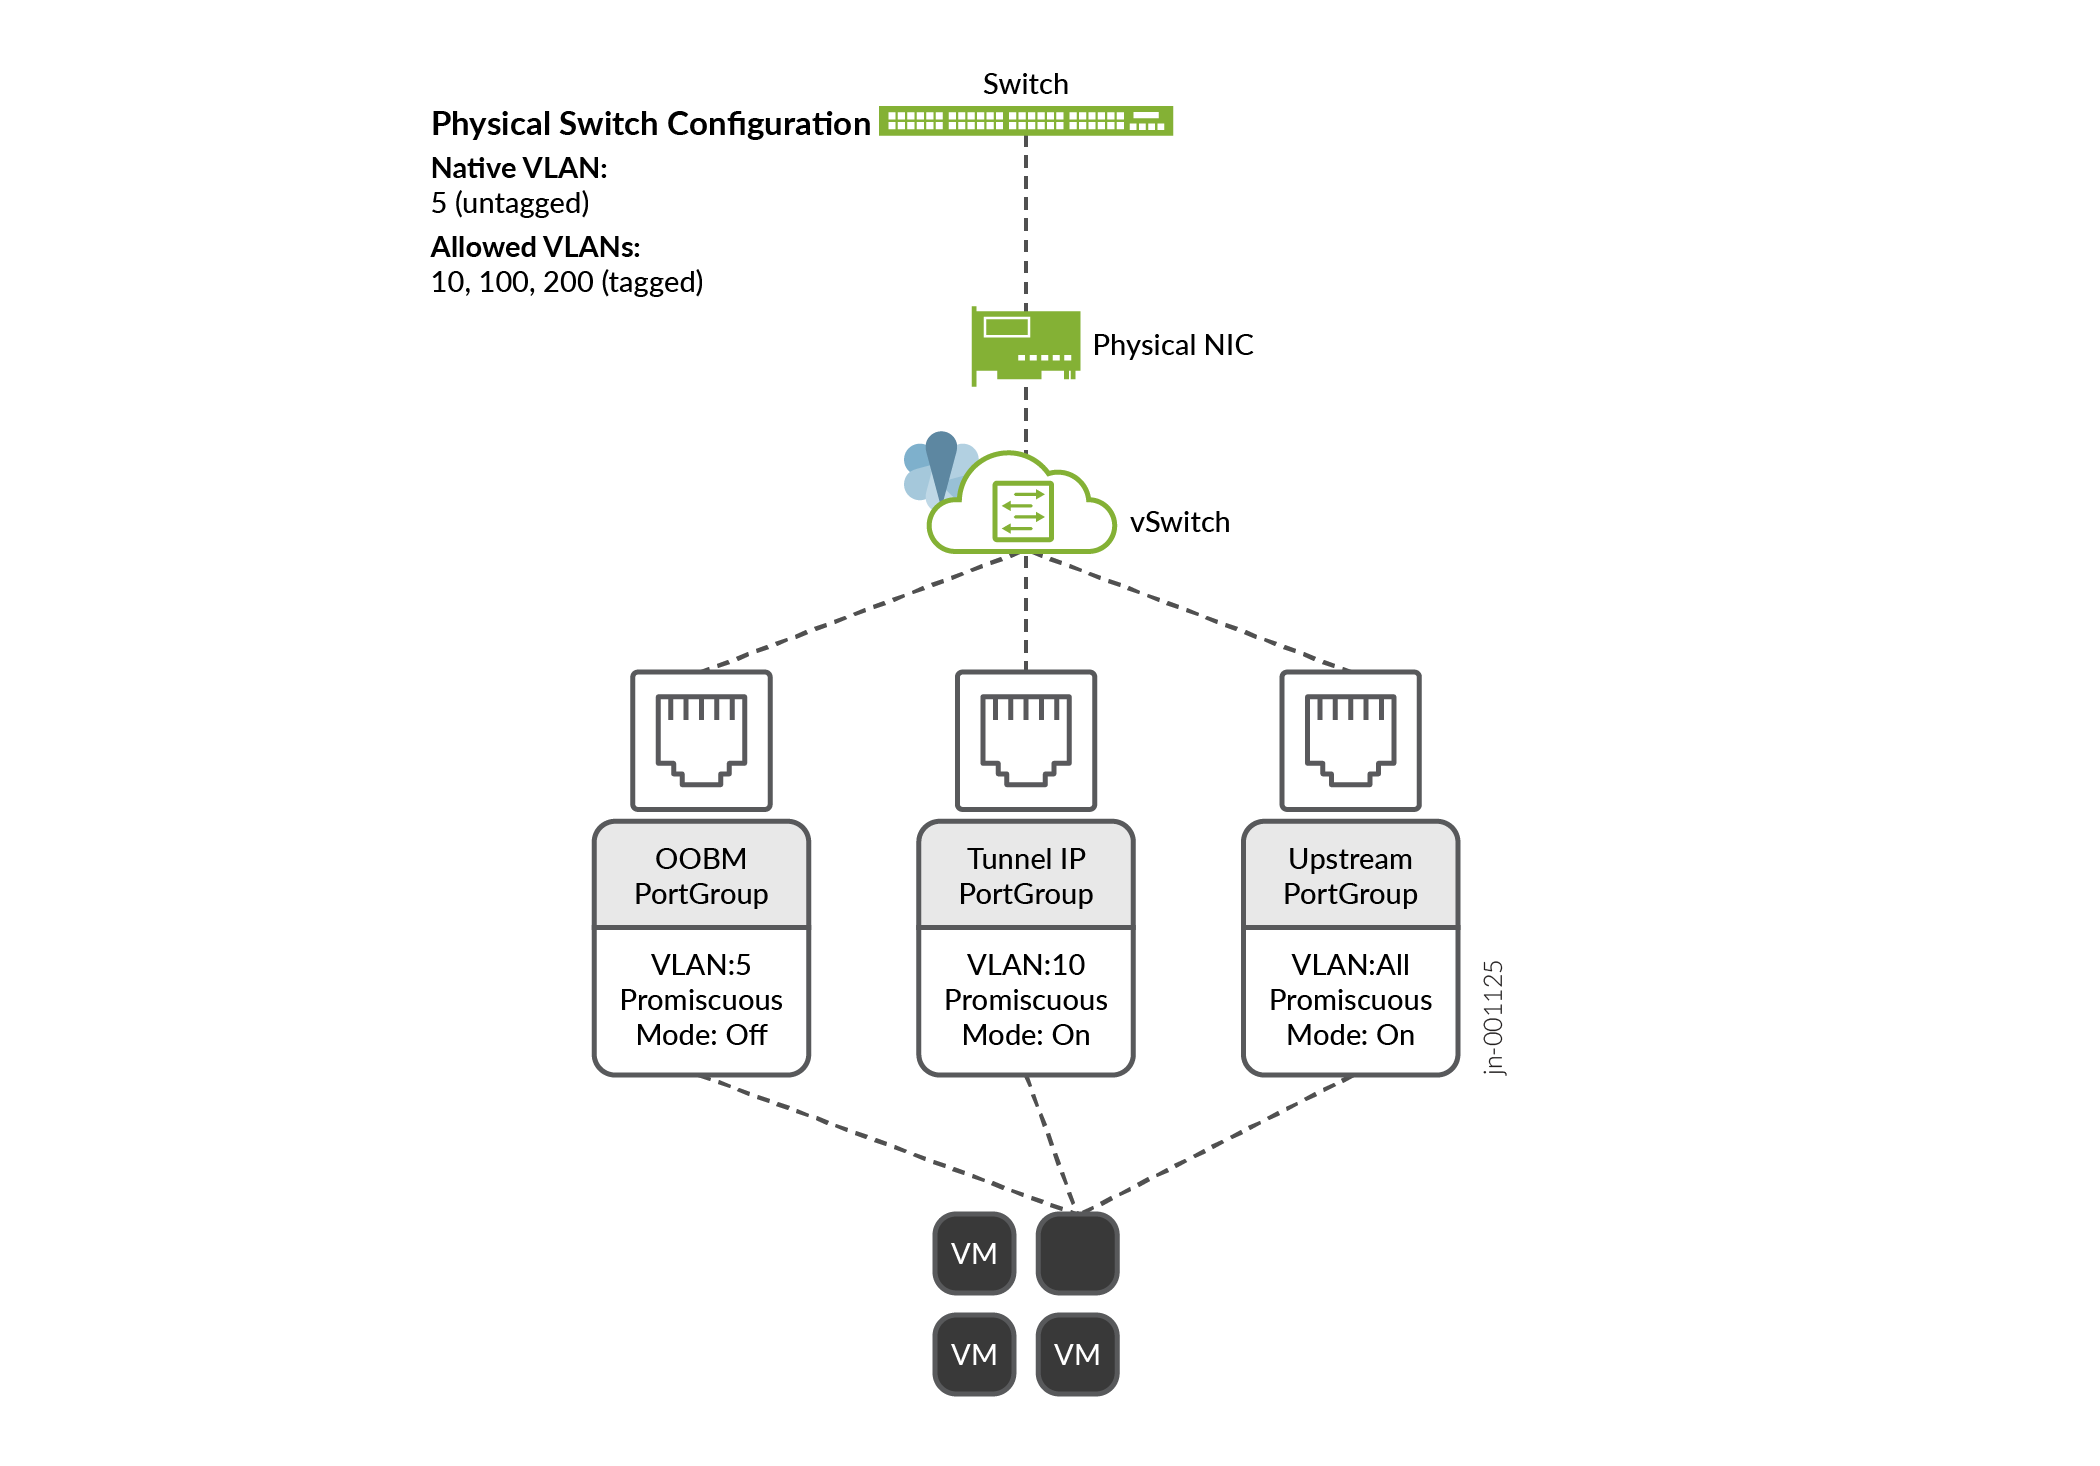
You can configure three port groups for Juniper Mist Edge on VMware. Actual binding of port groups to individual vSwitches or dvSwitches or to physical NICs does not matter. You can adapt the binding of port groups to individual vSwitches or dvSwitches or to physical NICs based on customer and network requirements.
The following image depicts the port groups for virtual Mist Edge:
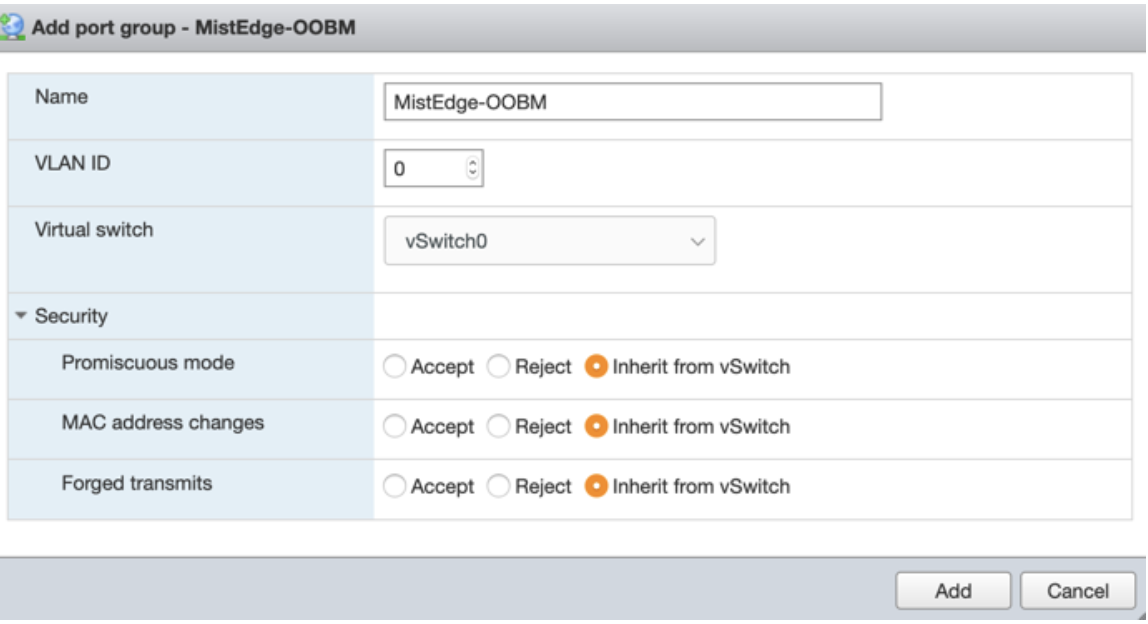
OOBM Port Group
In this example VLAN ID is set to 0 on the VMware side, while the actual untagged VLAN on the switchport is set to 5. .
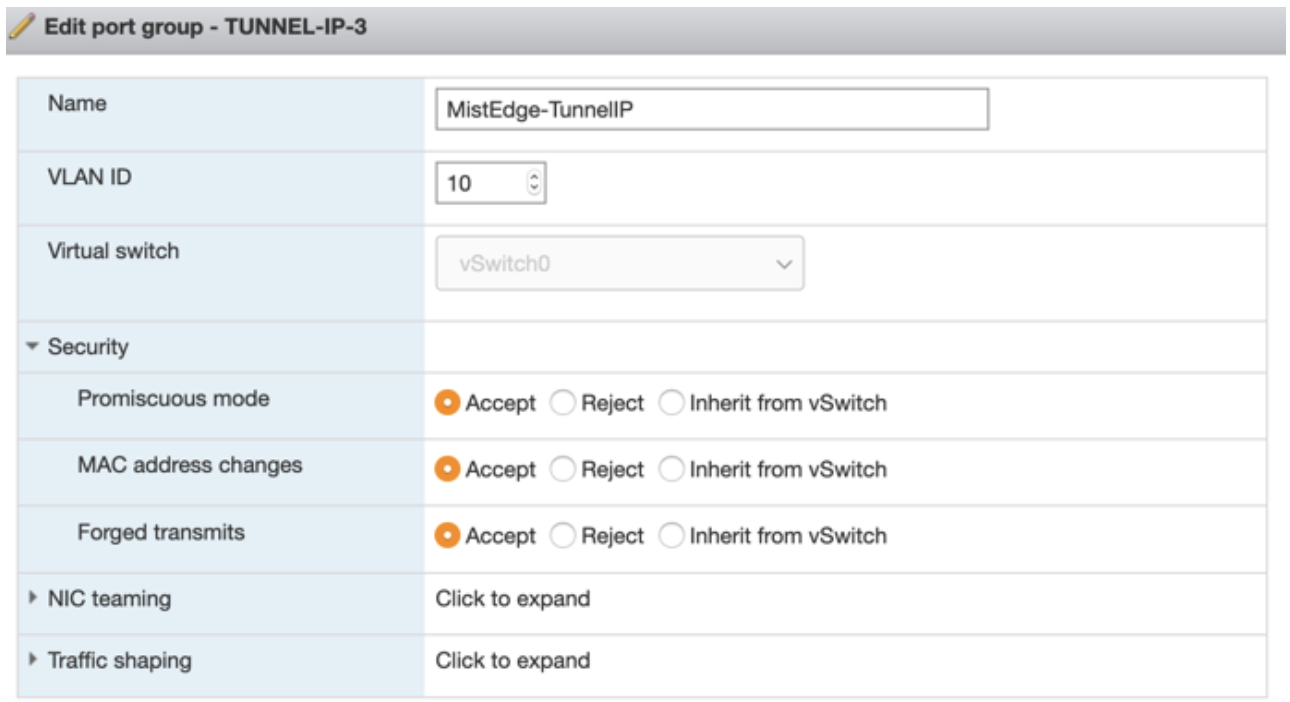
Tunnel IP Port Group
In this example, incoming tunnel connections from the access point (AP) land in this tunnel IP port group.
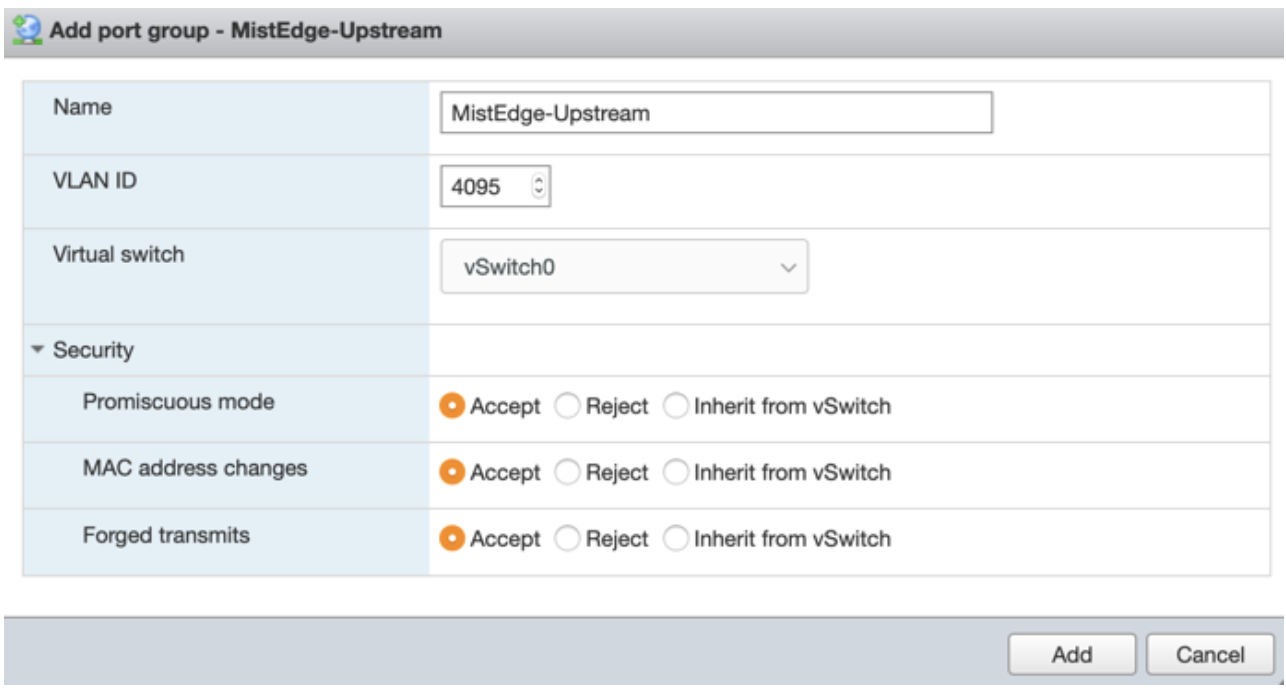
Upstream Port Group
You can configure the upstream port as trunk to tag all VLANs. The ESXi running a basic vSwitch has a 4095 VLAN ID that tags all VLANs automatically. The dvSwitch on a large-scale vCenter deployment enables you to configure VLAN range.
Multiple Uplinks and LAG Configuration
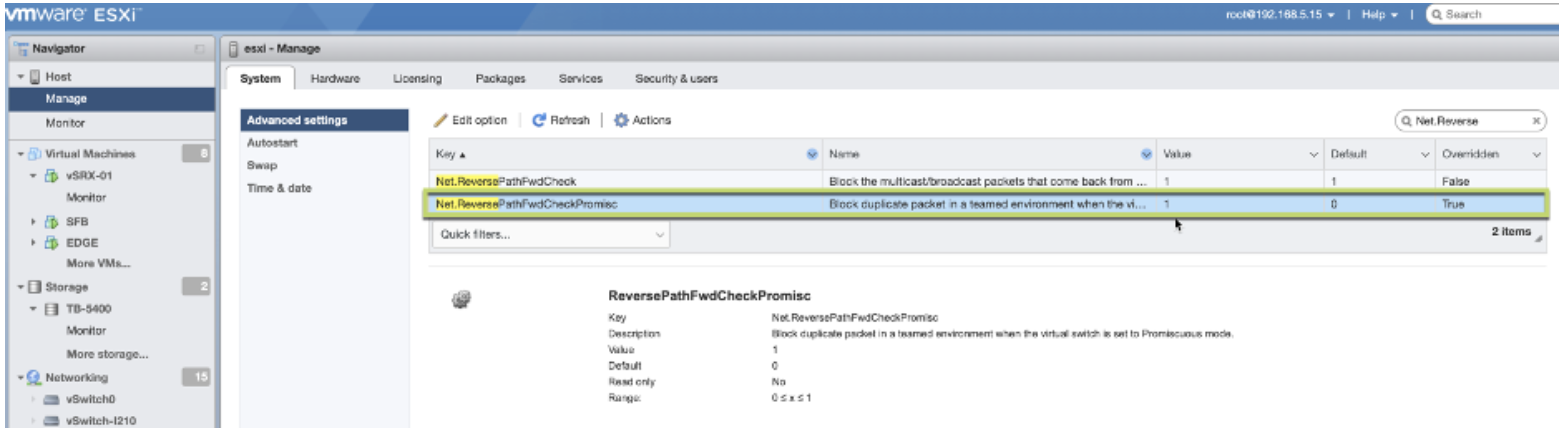
While VMware supports multiple uplinks with static or dynamic link aggregation, the default behavior for port groups in Promiscuous mode causes issues with any broadcast or Layer 2 (L2) multicast traffic.
By default, VMware vSwitch or dvSwitch copies any outgoing broadcast or multicast frame to all the uplinks, including the one it came in from. You must disable this behavior to allow client traffic to be tunneled without causing any loops on the network. This change is mandatory whenever using multiple uplinks with VMware (ESXi or vCenter).
For more information about disabling this behavior, see VMware KB article
Enabling ReversePathFwdCheckPromisc on VMware ESXi Portal
-
In the Edit option Net.ReversePathFwdCheckPromisc window, update
the New value field to 1 and click
Save.
Note:
For the settings to take effect, the guest OS must toggle the Promiscuous mode off and on. An operation such as a guest OS reboot or a vMotion to another ESXi host with the /Net/ReversePathFwdCheckPromisc setting enabled is sufficient. The setting does not require a reboot of the ESXi host to take effect.
Create a Juniper Mist Edge VM Using the VMWare ESXi Portal
This topic describes how to download installation image from Juniper Mist portal and create a Juniper Mist Edge VM.
-
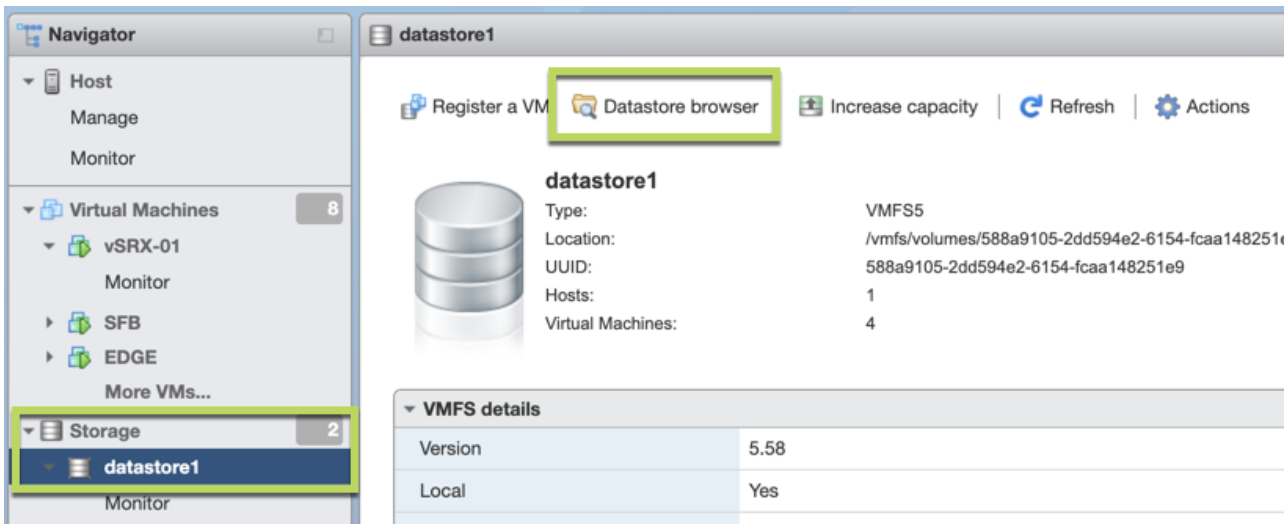
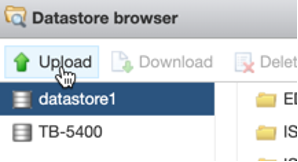
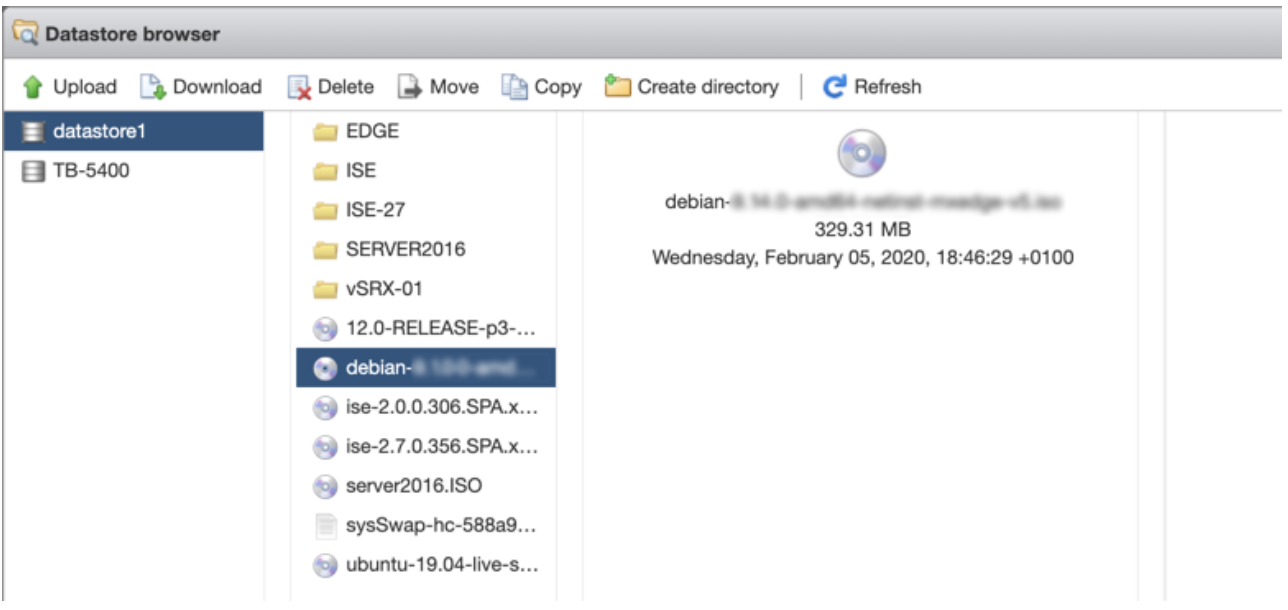
In the VMWare ESXi Portal, upload the ISO to the VMware storage, as the following
screenshot shows:
-
Create a VM with the following settings:
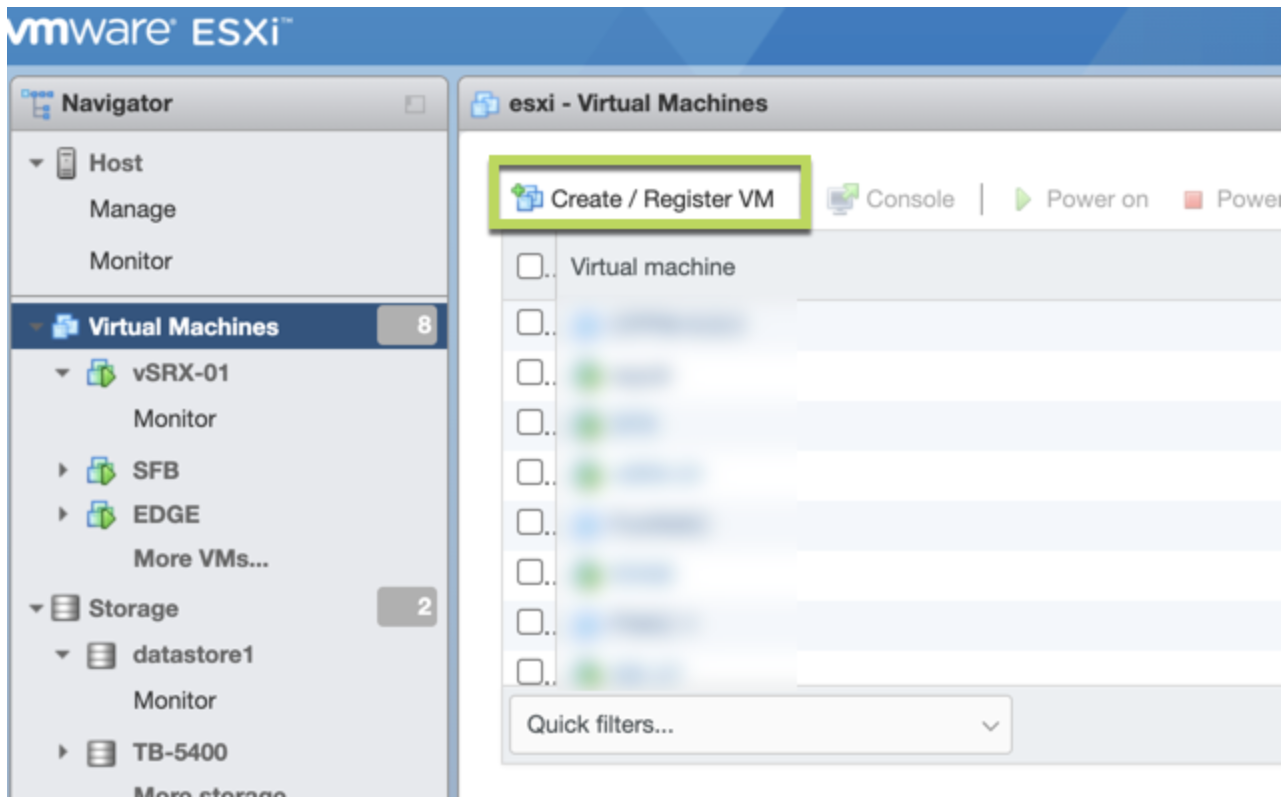

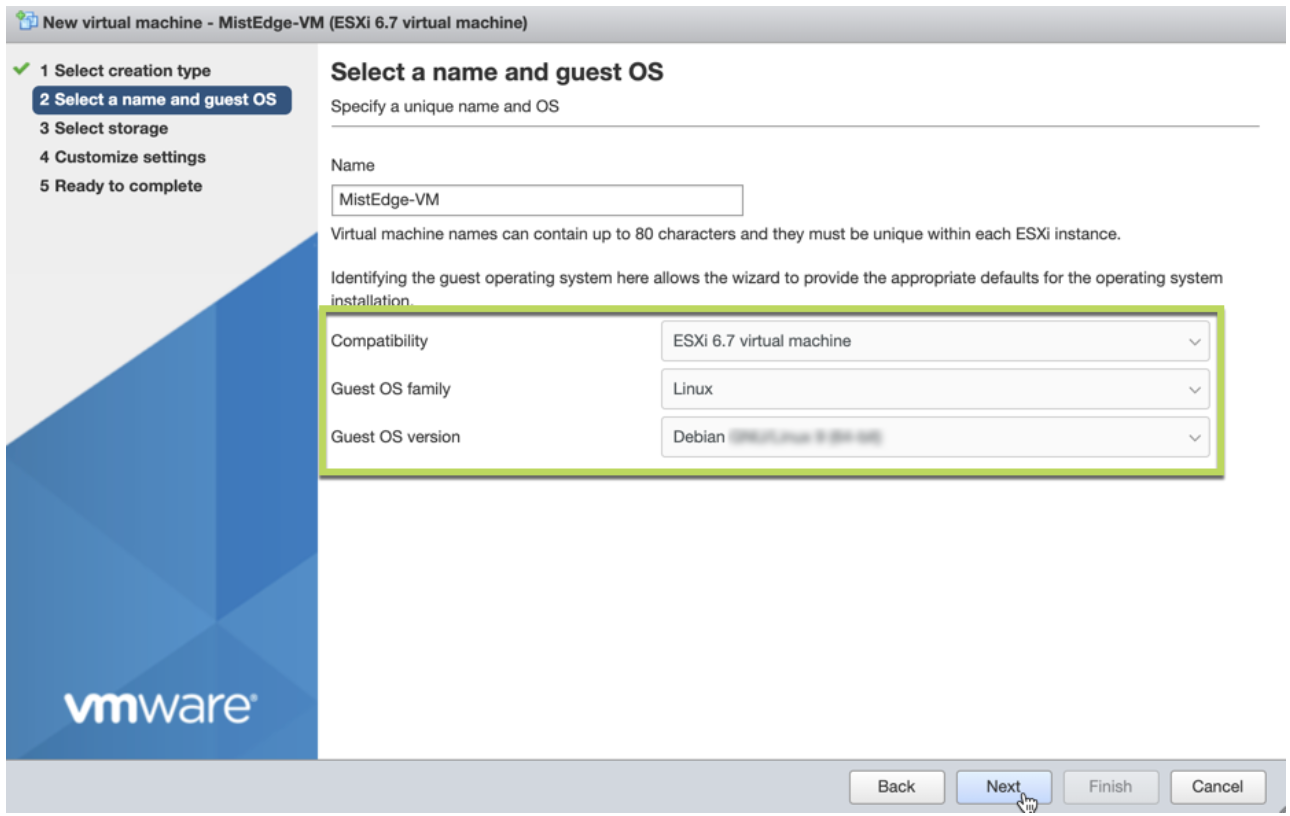
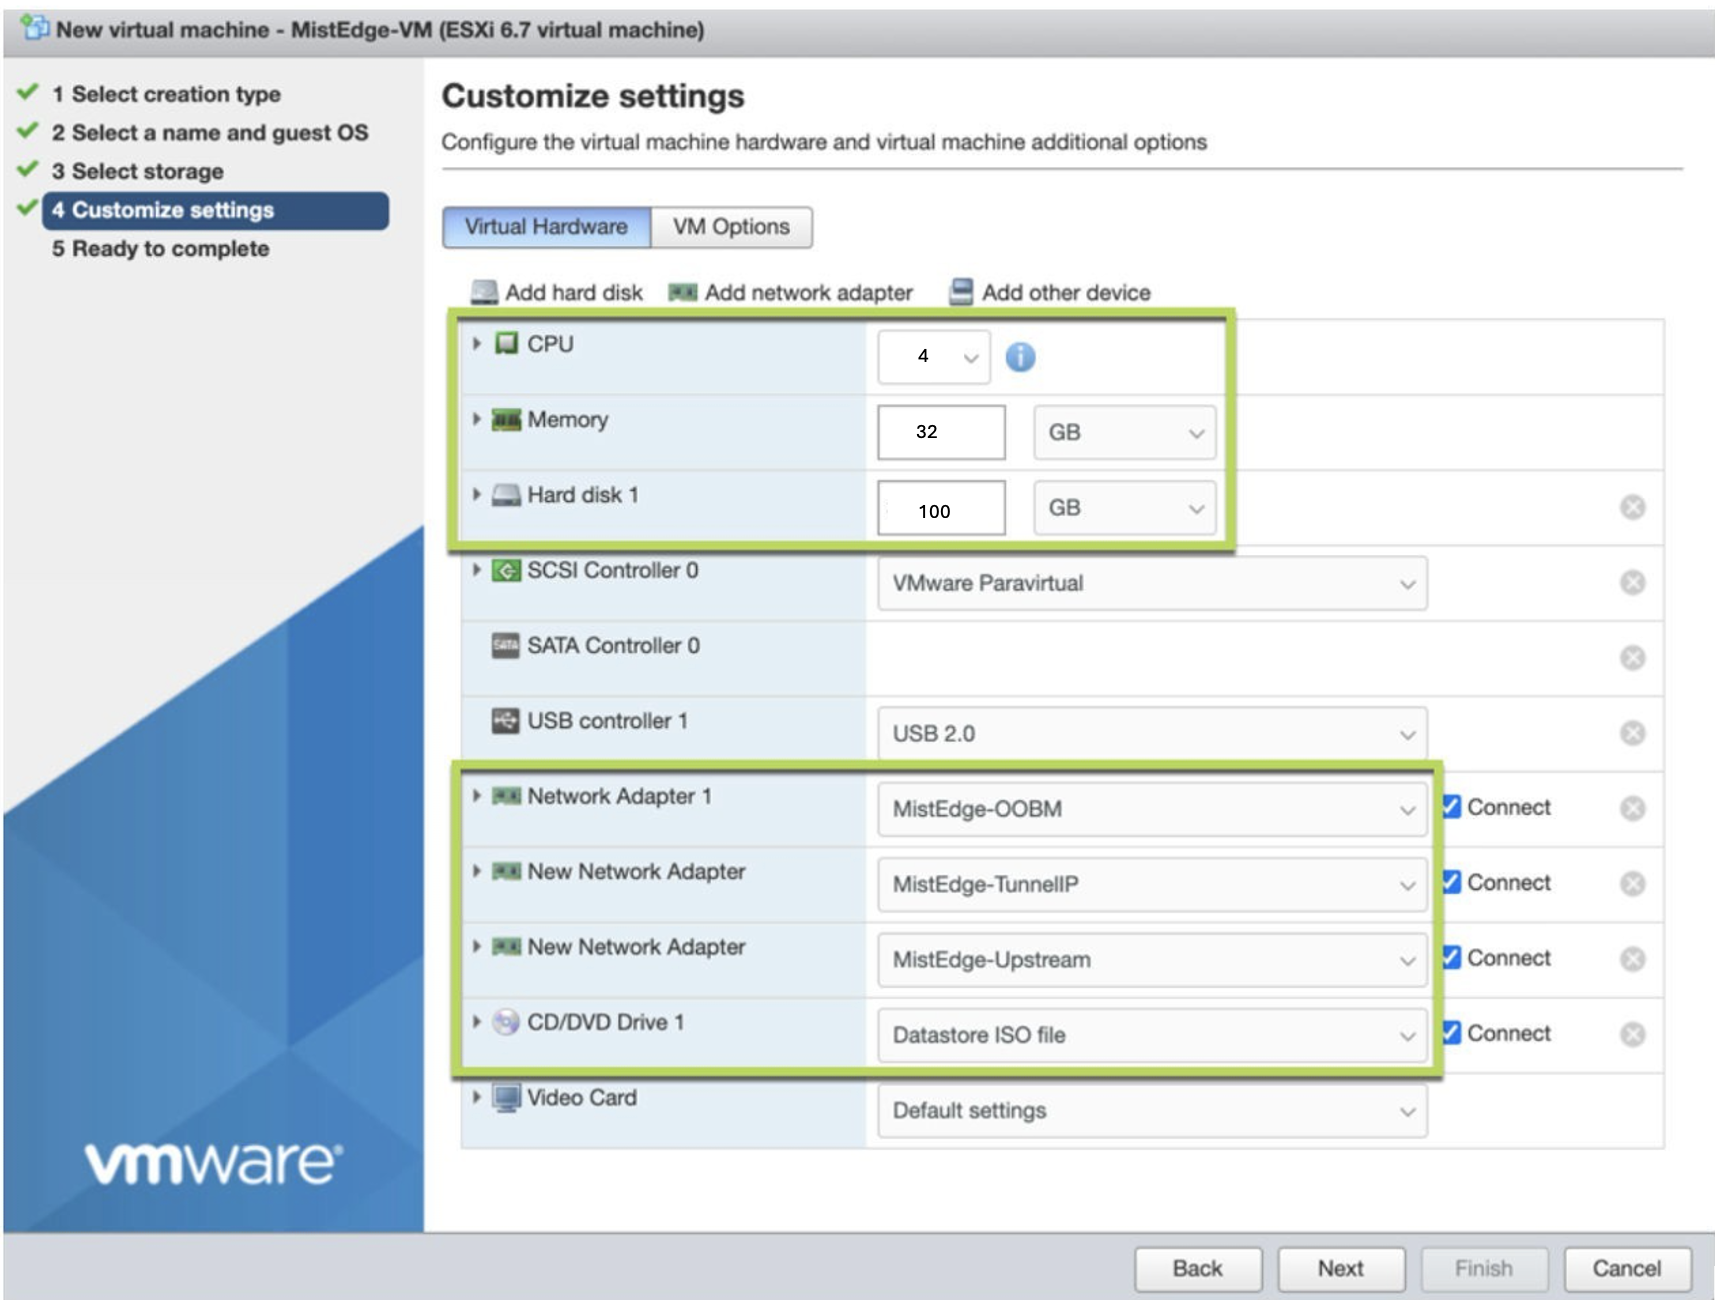

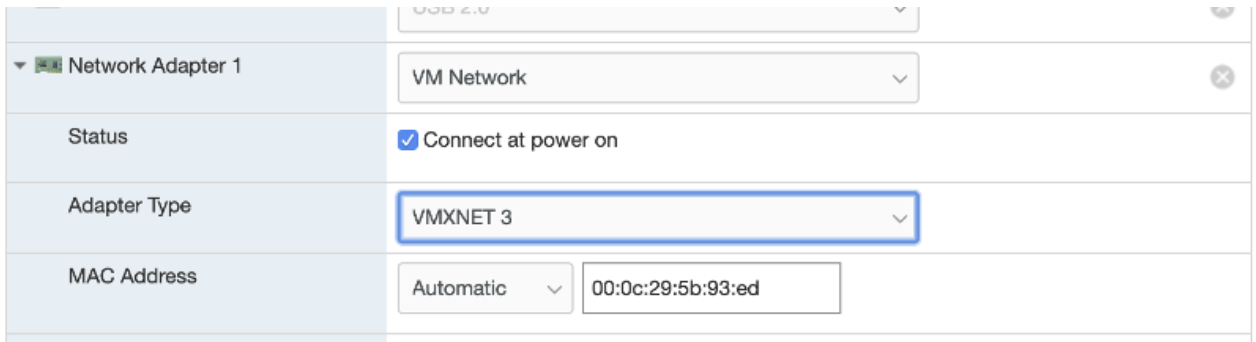
Ensure that you add all the network interfaces at this stage. Use the VMXNET3 adapter type and not E1000/E1000E, and add the network interfaces in the following order:
Out of Band management (OOBM)
Tunnel IP interface
Upstream Port
Set two IP addresses for Juniper Mist Edge—one for OOBM and other for Tunnel IP, from different subnets. The OOBM IP address is different from Tunnel IP that you enter in the Mist Edge details on Juniper Mist portal. This is true whether you receive the OOBM IP address through the Dynamic Host Control Protocol (DHCP) or the static IP address you assign while bringing up the Mist Edge VM.
-
When the Mist Edge VM is powered on, select Install.
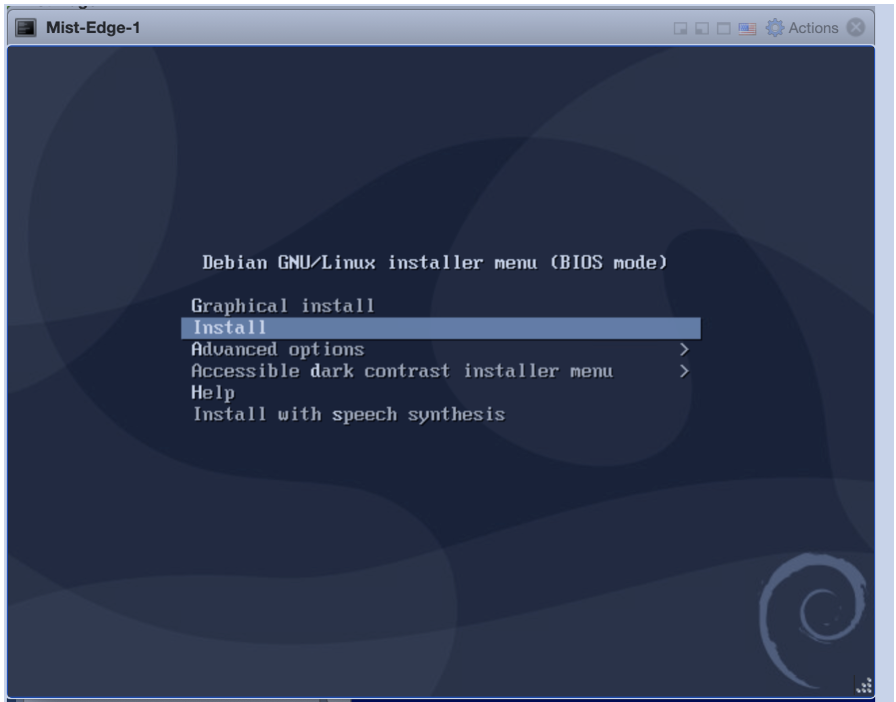 Note: The default selection on the Mist Edge VM installation screen is Graphical install. If you want to install a Mist Edge VM, change the selection to Install and press the Enter key.
The Mist Edge VM is installed in a minute or two and prompts for a mxedge login.
The VM installation is automated. You do not need to intervene after you select the Install option.
Log in to the Mist Edge VM and claim it to the Juniper Mist™ cloud.
Example: Mist Edge VM Deployment (Proxmox)
This section describes how to deploy a Mist Edge VM on Proxmox.
Proxmox Port Group Configuration
Port Groups for Proxmox (KVM)
The Mist Edge VM is mapped to the following network interfaces:
-
OOBM (net0)
-
Tunnel Interface (net1)
-
Upstream interface (net2)
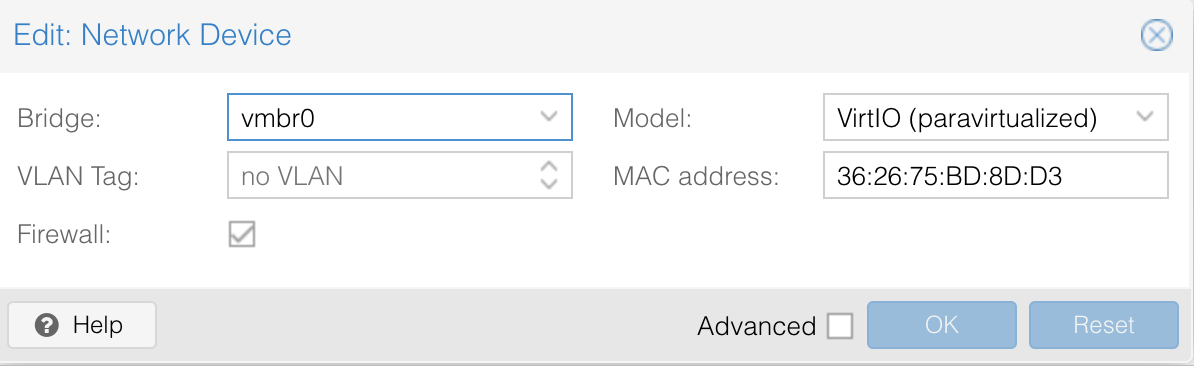
OOBM Interface
In this example, VLAN Tag is set as no VLAN on the KVM side, while the actual untagged VLAN on the switch port is 1.
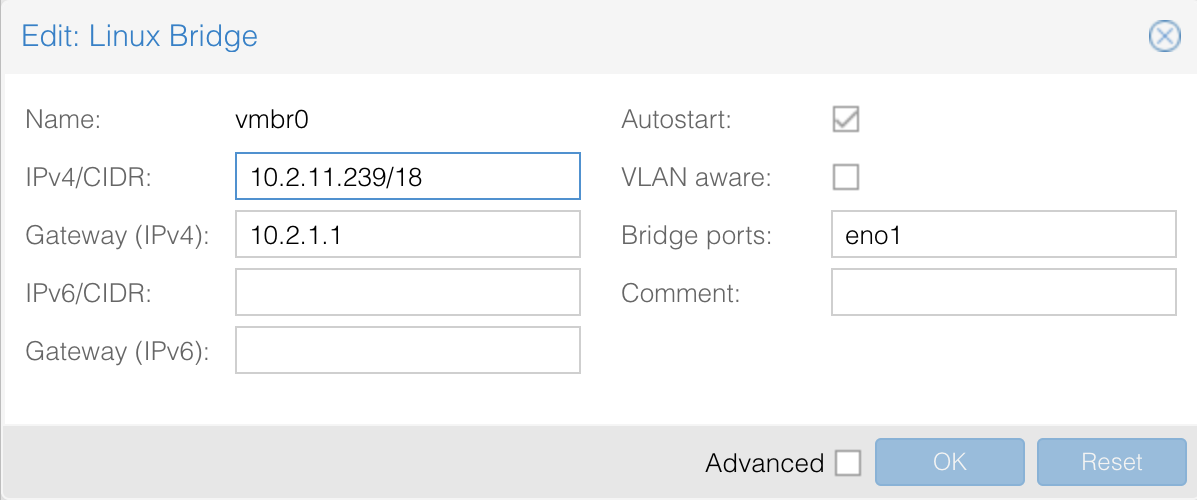
vmbr0 is the Linux bridge with the following configuration:
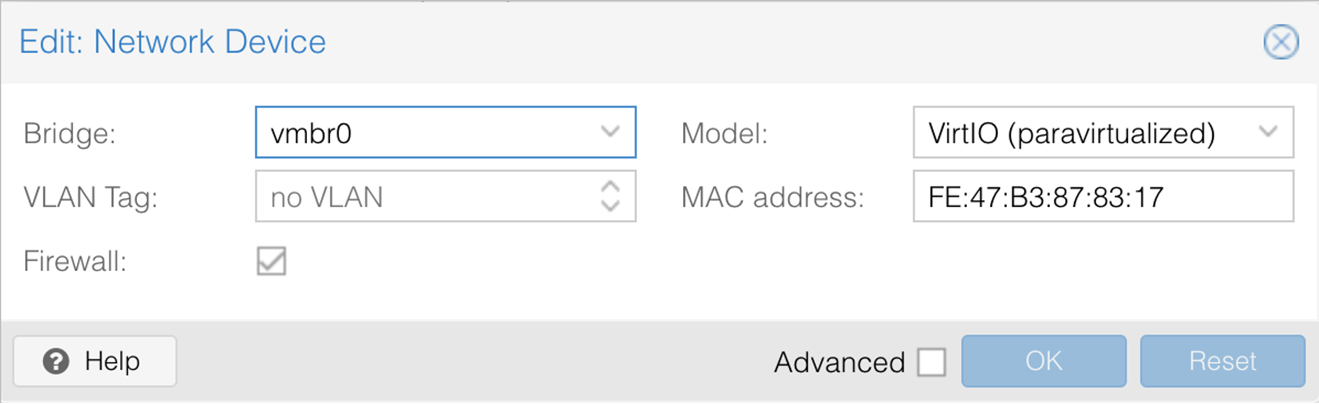
Tunnel Interface
In this example, the tunnel interface uses vmbr0. The tunnel IP is specified on the Mist Edge page in the Mist portal.
Upstream Interface
In this example, the VLAN Tag is set as no VLAN on the KVM side, while the actual bridge is mapped to port eno2, which is connected to the switch trunk port.
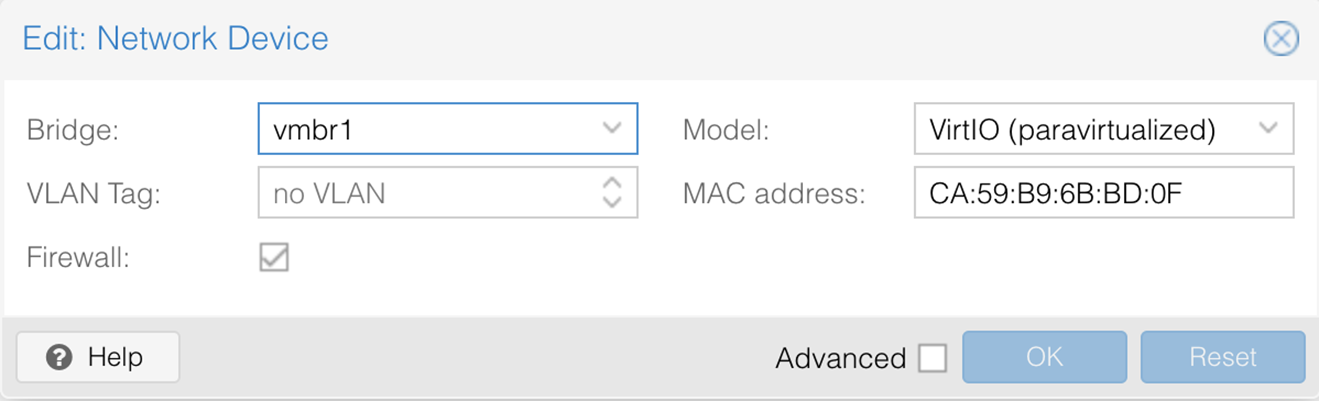
The bridge vmbr1 is marked as VLAN aware.
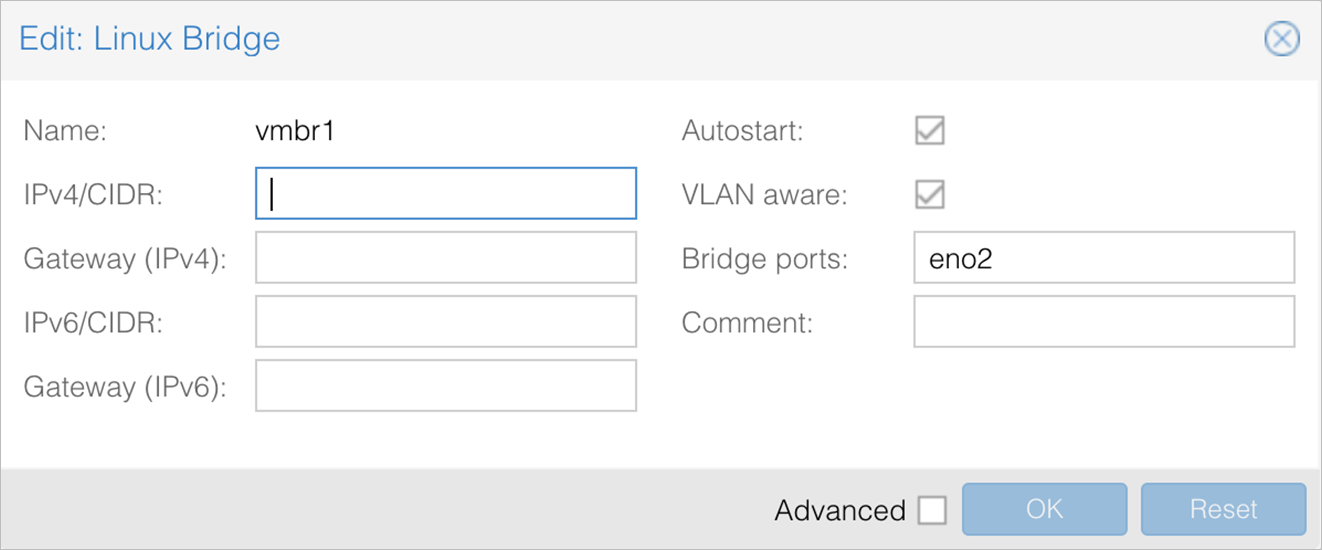
Create a Mist Edge VM on Proxmox
To create a Juniper Mist Edge VM on Proxmox:
-
Click Create VM on the top-right corner and
configure the following settings:
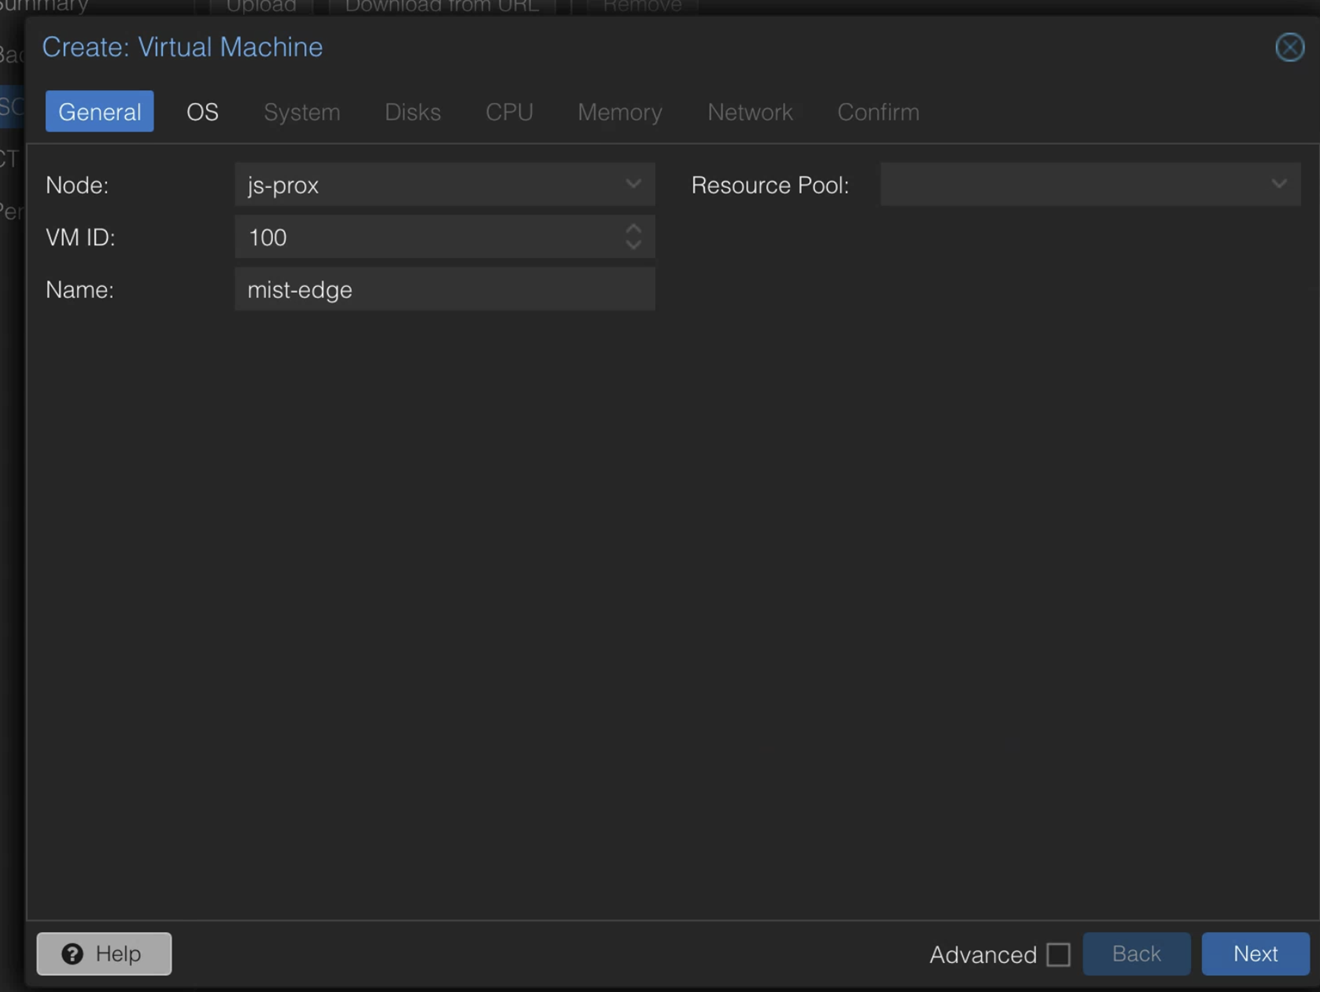
General—Provide a name for the VM. You can use the system-generated VM ID or you can enter an ID.
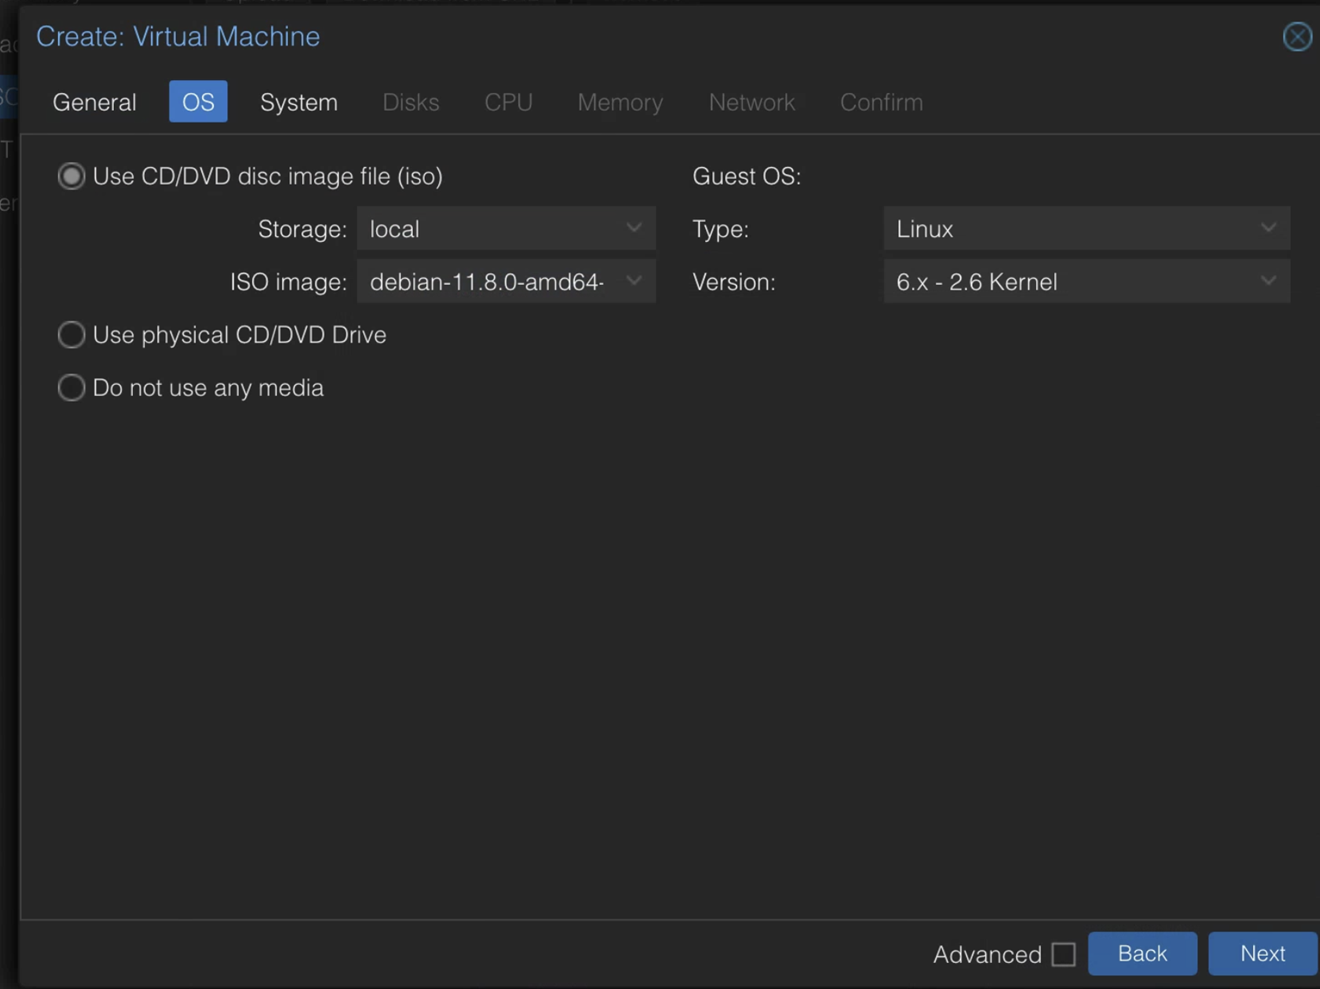
OS—Select the ISO file that you uploaded. The values for the Guest OS type and version are populated automatically.
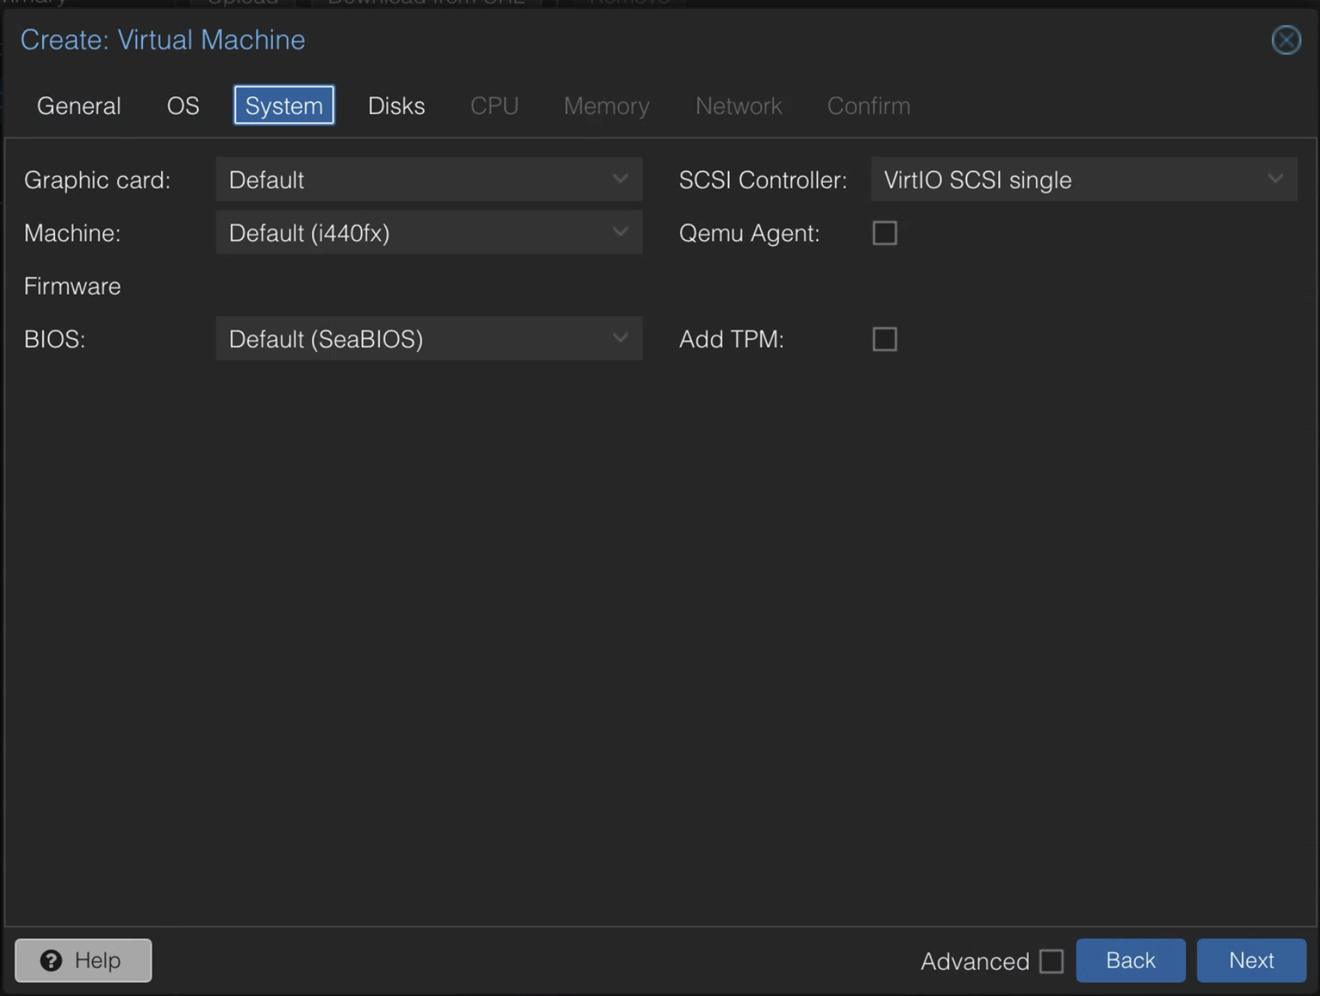
System—Keep the default settings.
Disks—Set the disk size to 100.
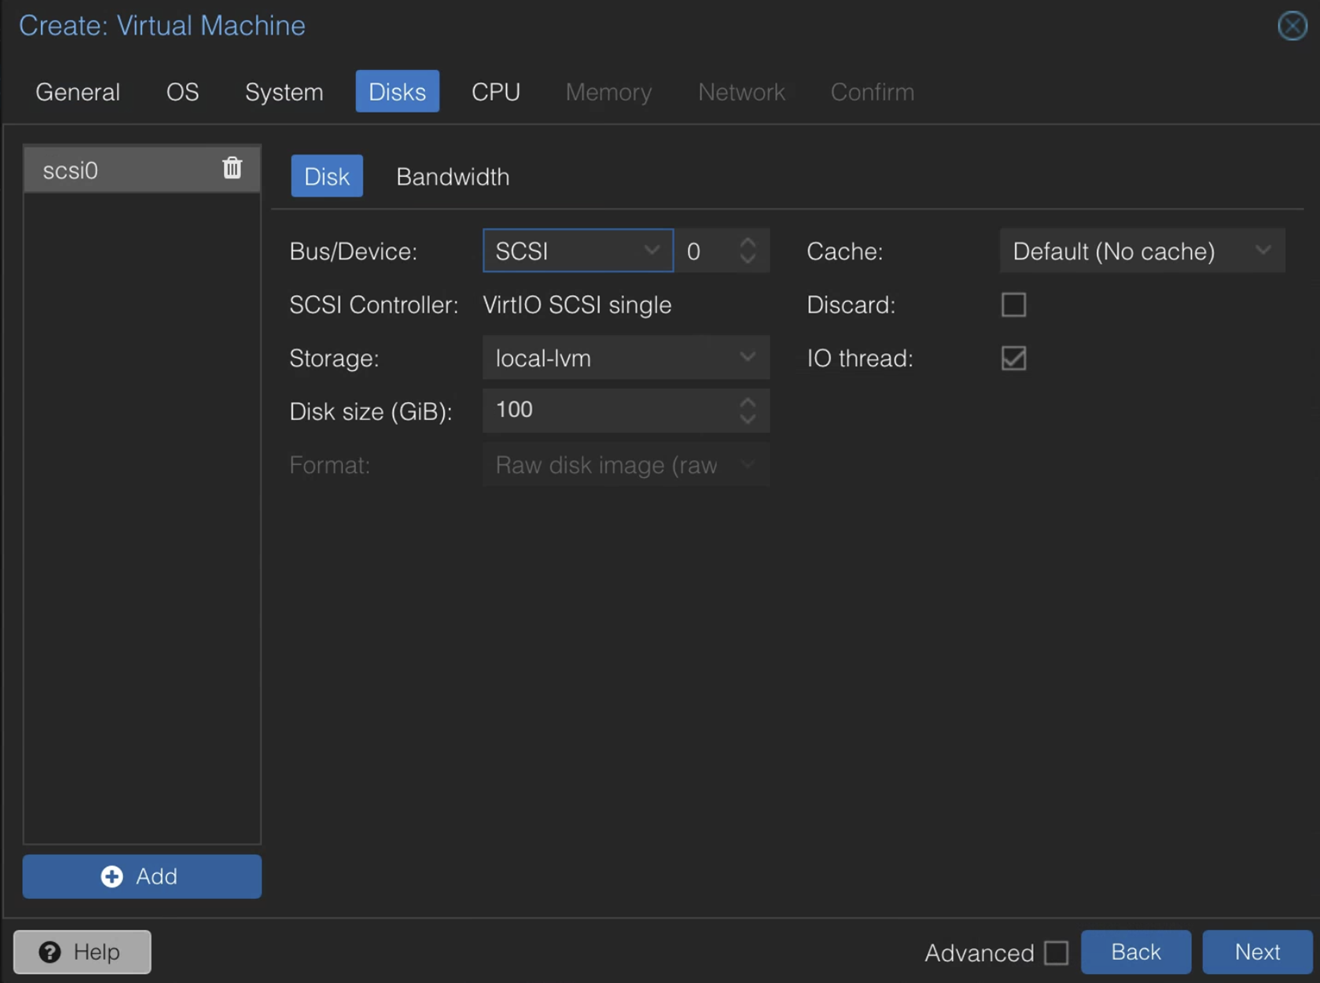
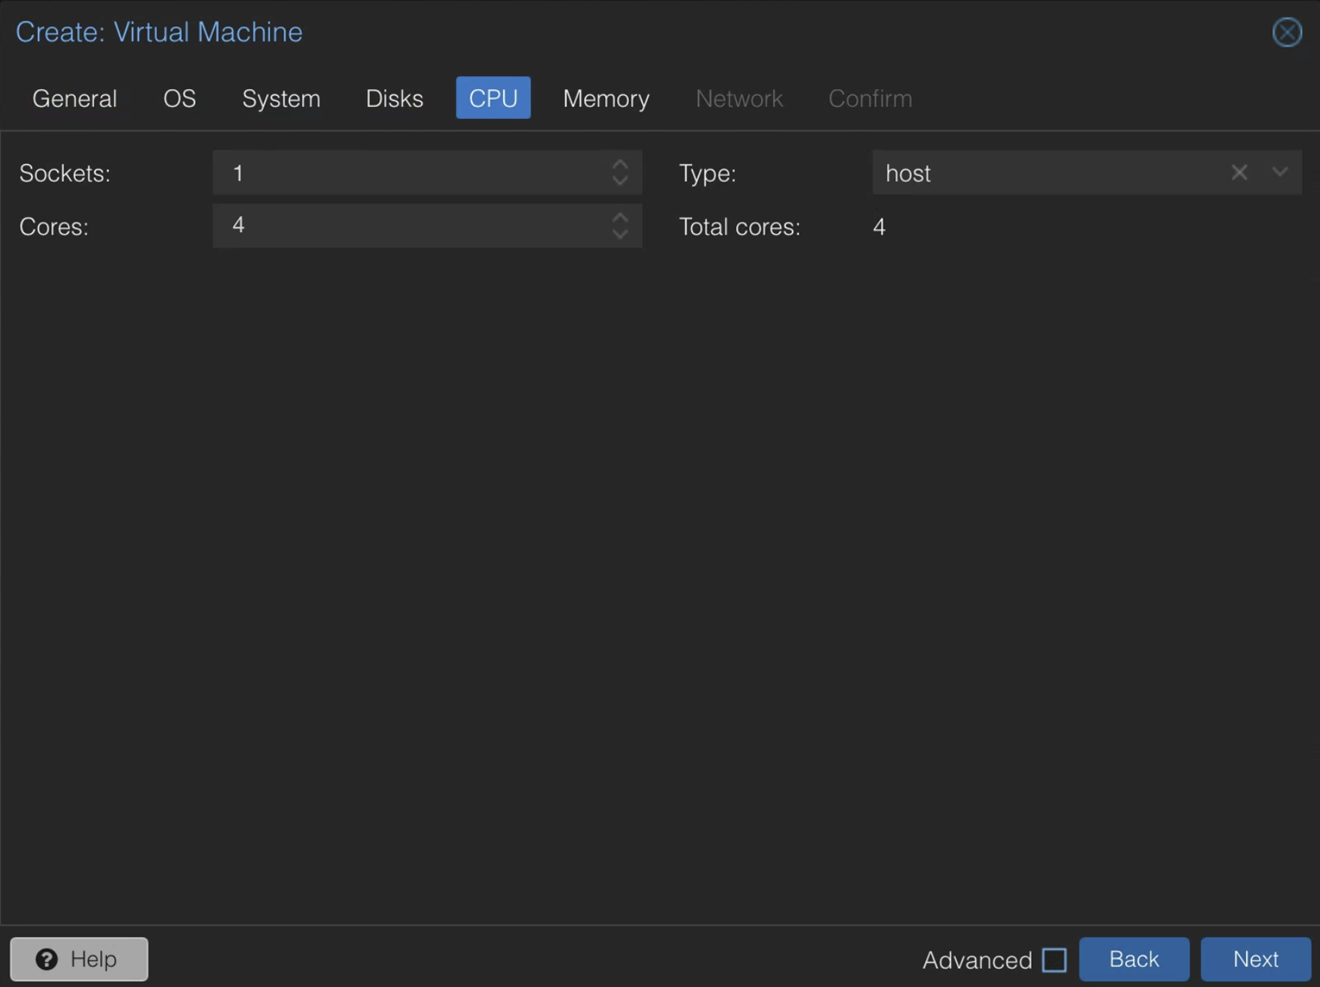
CPU—Set the following values:
Sockets—1
Cores—4
Type—host
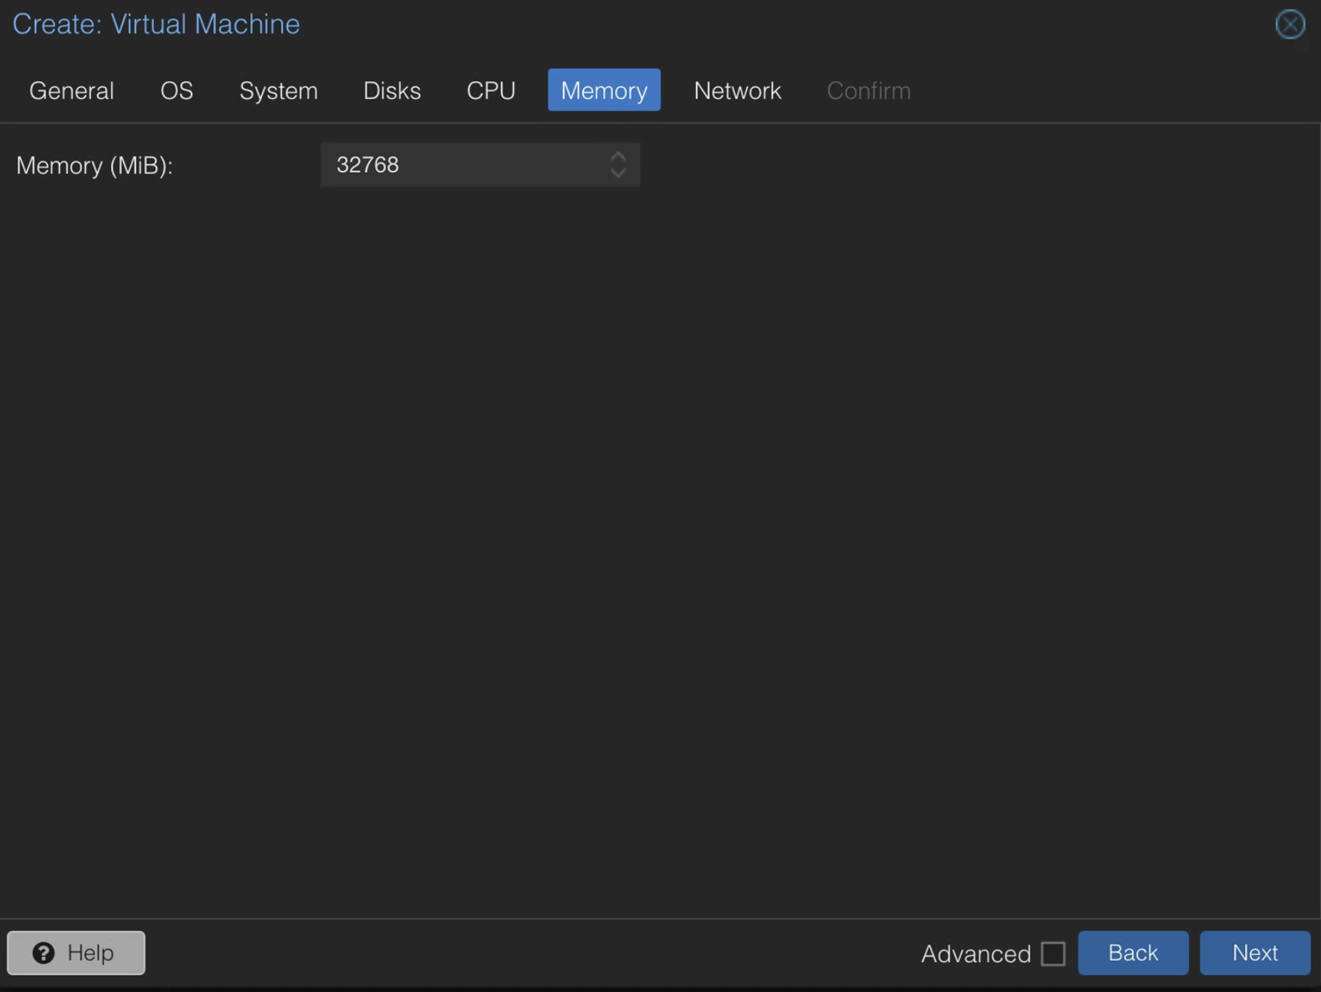
Memory—Set the value to 32768.
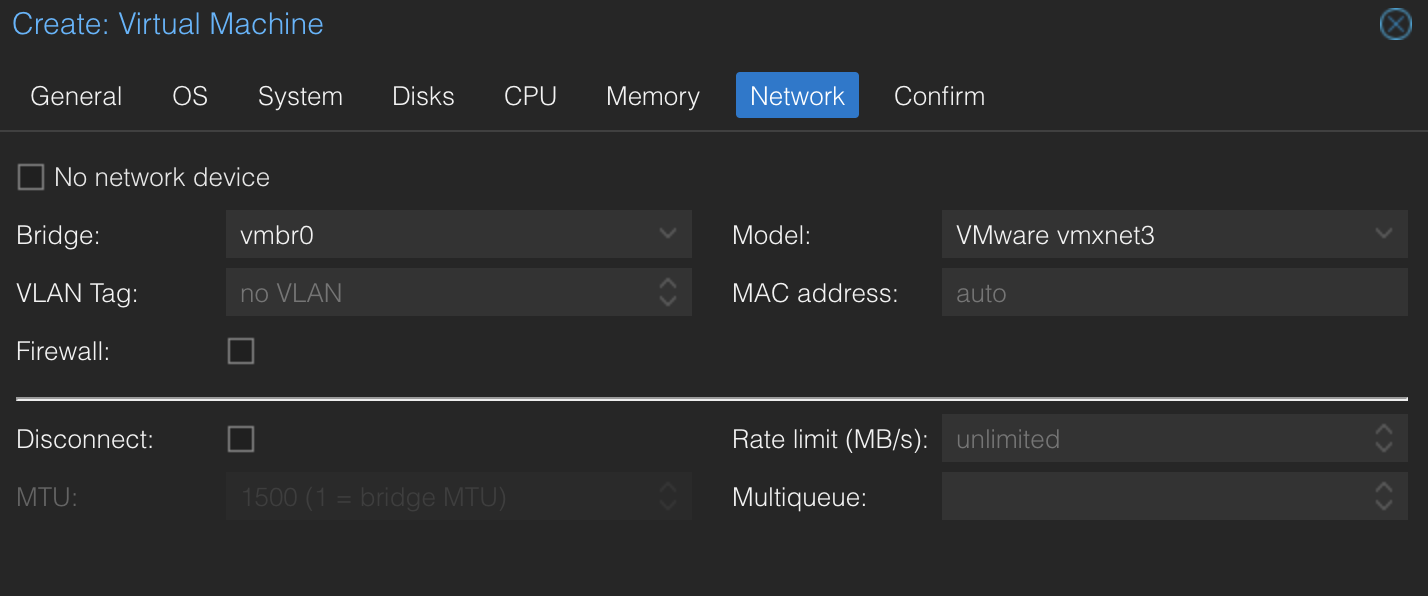
Network—This is the configuration for the OOBM interface. Disable Firewall and select vmnext3 as the interface.
Confirm—Verify the information and click Finish to create the VM.
Once the VM is created, you'll see it listed under the node
Tunnel Port Configuration
The tunnel ports can be configured either as a single-arm or dual-arm.
In a single‑arm deployment, the Mist Edge uses one physical interface on the Proxmox host to transport all VLAN traffic as tagged traffic. Proxmox presents these VLANs to the Mist Edge VM as distinct logical interfaces.
In a dual‑arm deployment, the Mist Edge VM uses two separate data interfaces in addition to the OOBM interface: one for downstream traffic (toward the APs/access networks) and one for upstream traffic (towards the WAN). In Proxmox, each of these is presented as a separate Linux bridge, each tied to a different physical NIC on the host.
Configure Single-Arm Tunnel Port
To configure a single-arm tunnel port:
Configure the switch port as a trunk port.
Connect the switch port to the port on the Proxmox host.
Create a Linux Bridge and map it to the physical NIC that is connected to the switch port. The Linux bridge is the single physical uplink that carries all the VLAN traffic to and from the switch.
Do not select the VLAN aware check box. This ensures that the bridge only forwards the traffic and the VLAN tagging or untagging is managed by the logical VLAN interfaces.
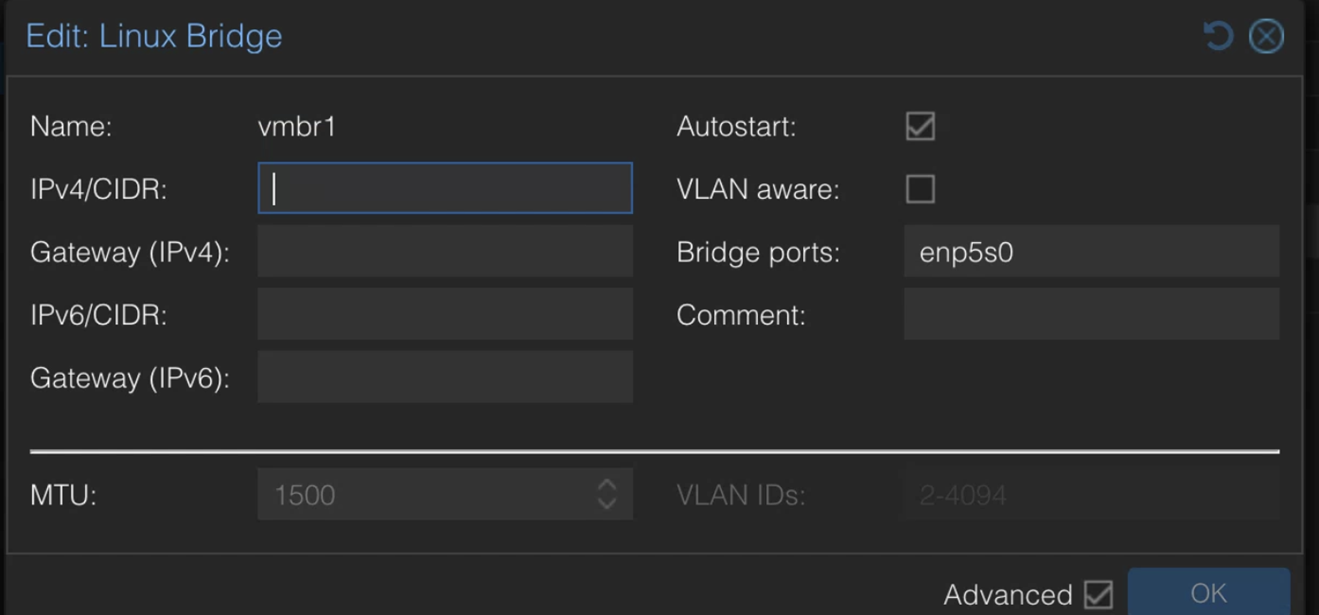
Create one Linux VLAN interface for each VLAN on the bridge. For each VLAN you want to use (for example, VLAN10 = Corp, VLAN20 = Guest, VLAN30 = IoT), create a Linux VLAN interface derived from the bridge—for example, vmbr1.10 for VLAN10, This enables the Mist Edge VM to treat each VLAN as a separate NIC, so you can map Mist Edge interfaces to specific SSIDs or traffic types, while still using only a single physical NIC on the Proxmox host.
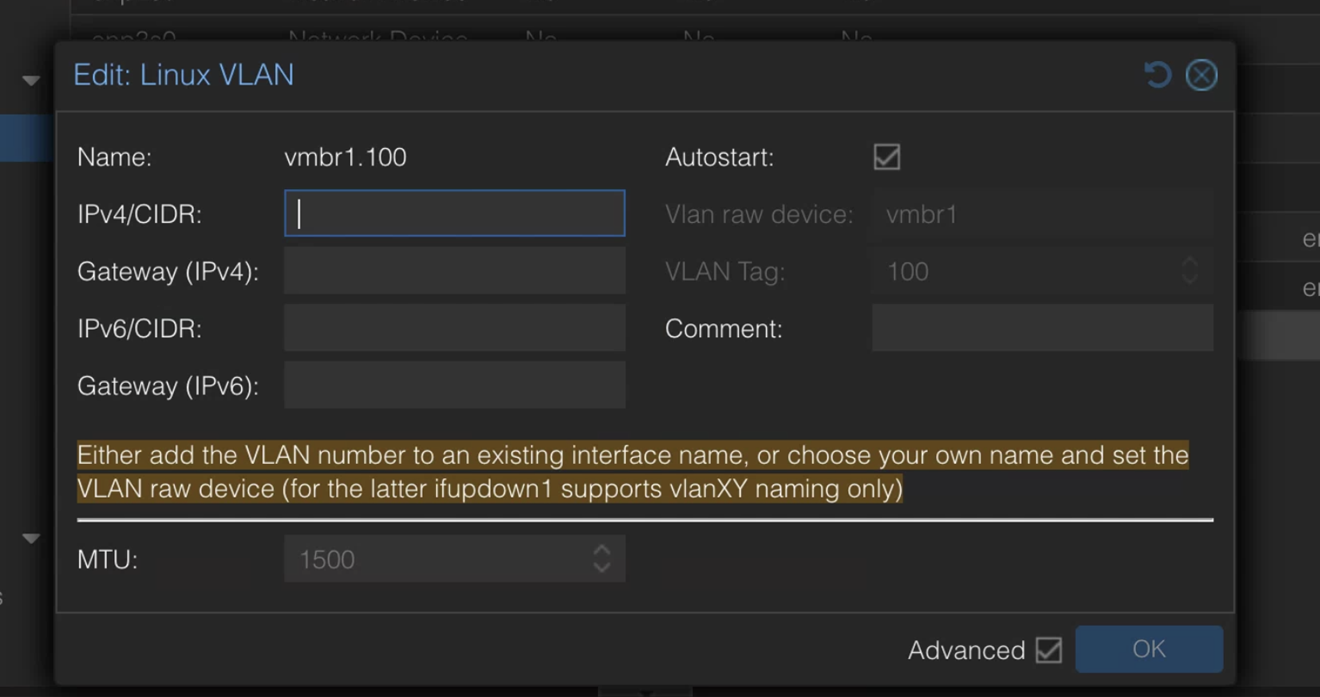
Click OK to apply the network configuration.
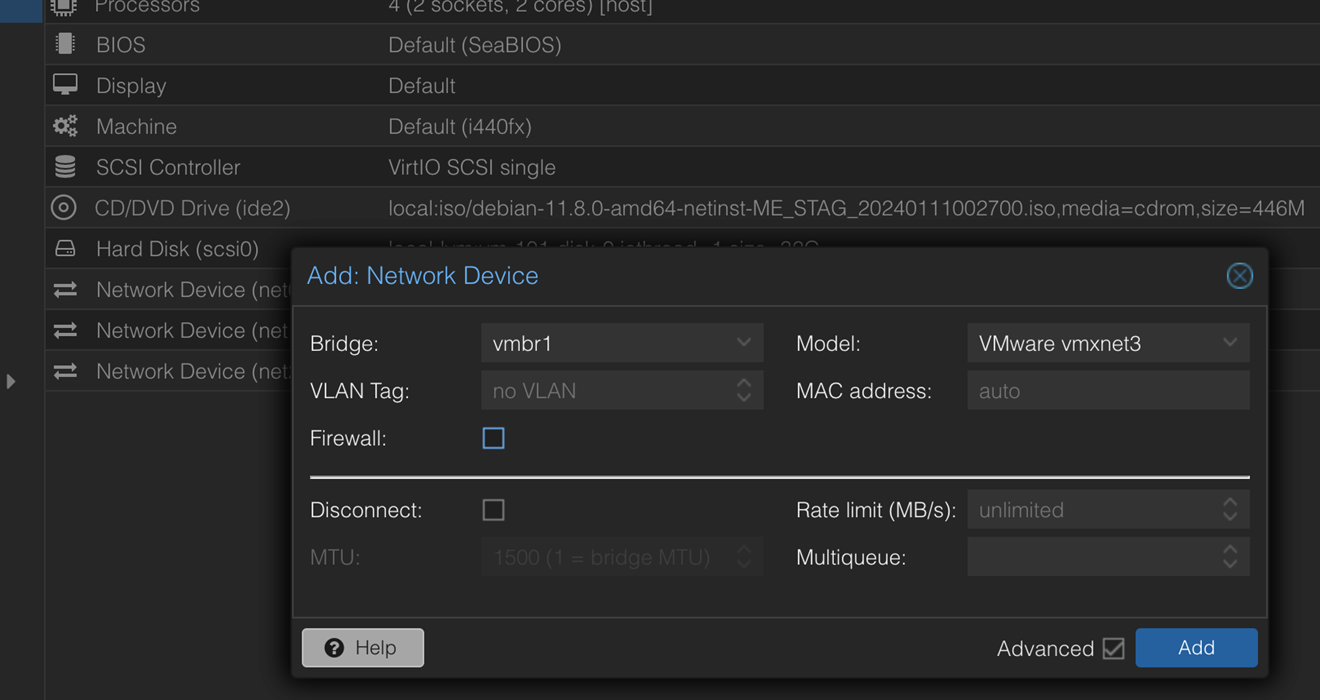
Select the VM>Hardware>Add>Network Device to add the upstream or downstream interfaces as separate network devices to the VM. Ensure that you select vmxnet3 and disable the firewall.
Configure Dual-Arm Tunnel Port (Recommended)
To configure a dual-arm tunnel port:
Create Linux bridges for upstream and downstream traffic. vmbr0 is the default bridge that is used for OOBM.
Map the bridge ports to the physical ports on the host. For the upstream bridge only, enable the VLAN aware check box and add your planned tunneled VLANs.
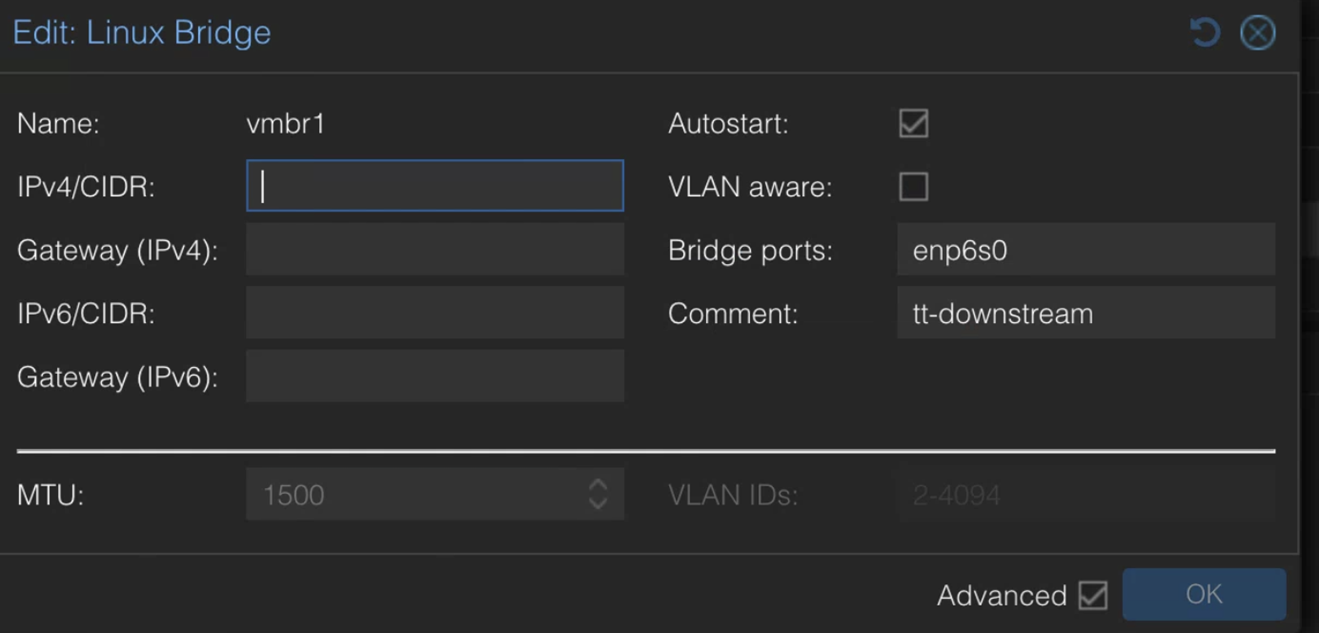
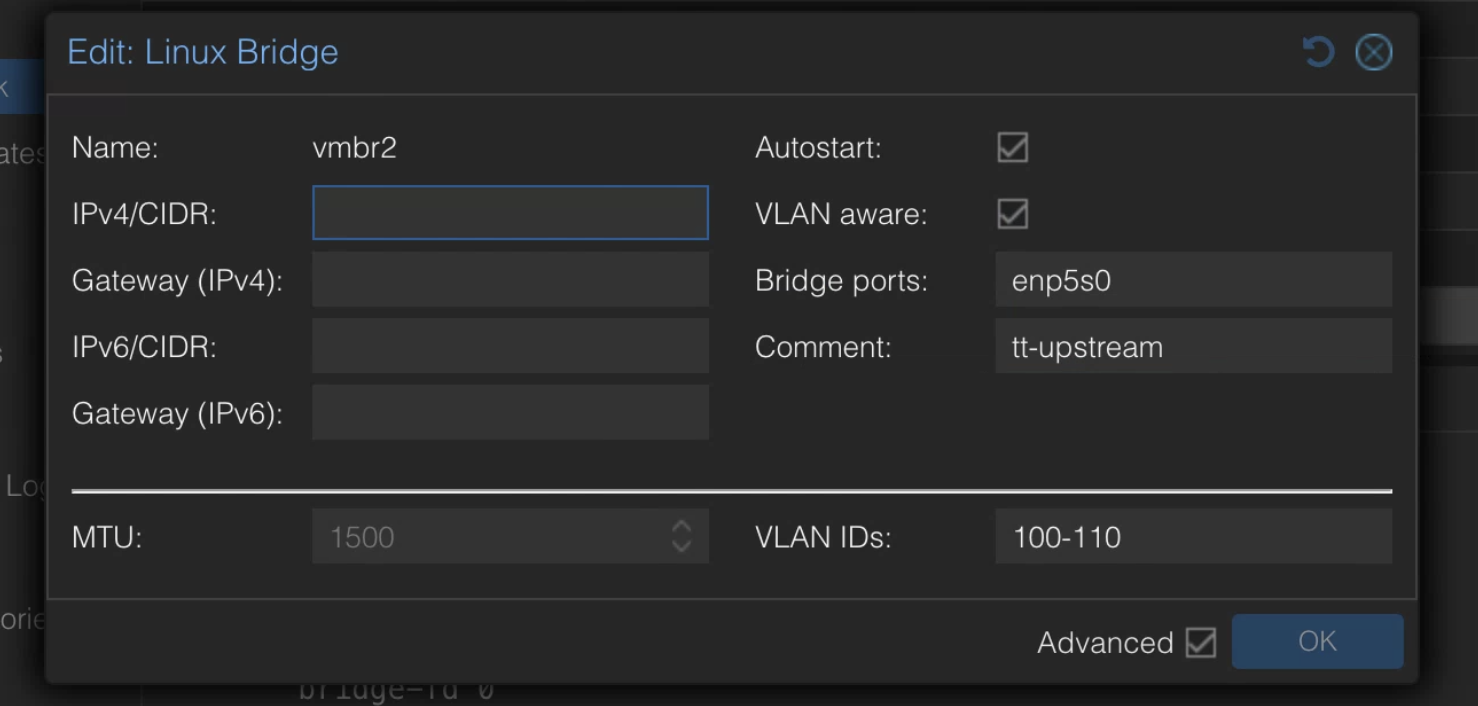
Click OK to apply the network configuration.
Select the VM and then select Hardware>Add>Network Device to add the upstream, and downstream interfaces as separate network devices to the VM. Ensure that you select vmxnet3 and disable the firewall.
Provision the Virtual Mist Edge
After you configure the Mist Edge on the Mist portal, and it boots up for the first time, you’ll need to register your device. By default, the OOBM interface is enabled for DHCP.
The registration steps vary based on the following scenarios:
-
Scenario 1—You have a DHCP server on your network and the OOBM IP address is already known.
You can proceed with the registration procedure below.
-
Scenario 2—You have a DHCP server on your network but do not know the OOBM IP address.
You must first connect to the console to determine the IP address, then proceed with the registration procedure:
Log in to the console. The default username is mist and the password is Mist@1234. The default root (su-) password is mist.
Obtain the current management IP address by issuing the following command. This IP address is required for the SSH process.
mxagent oob-ip show
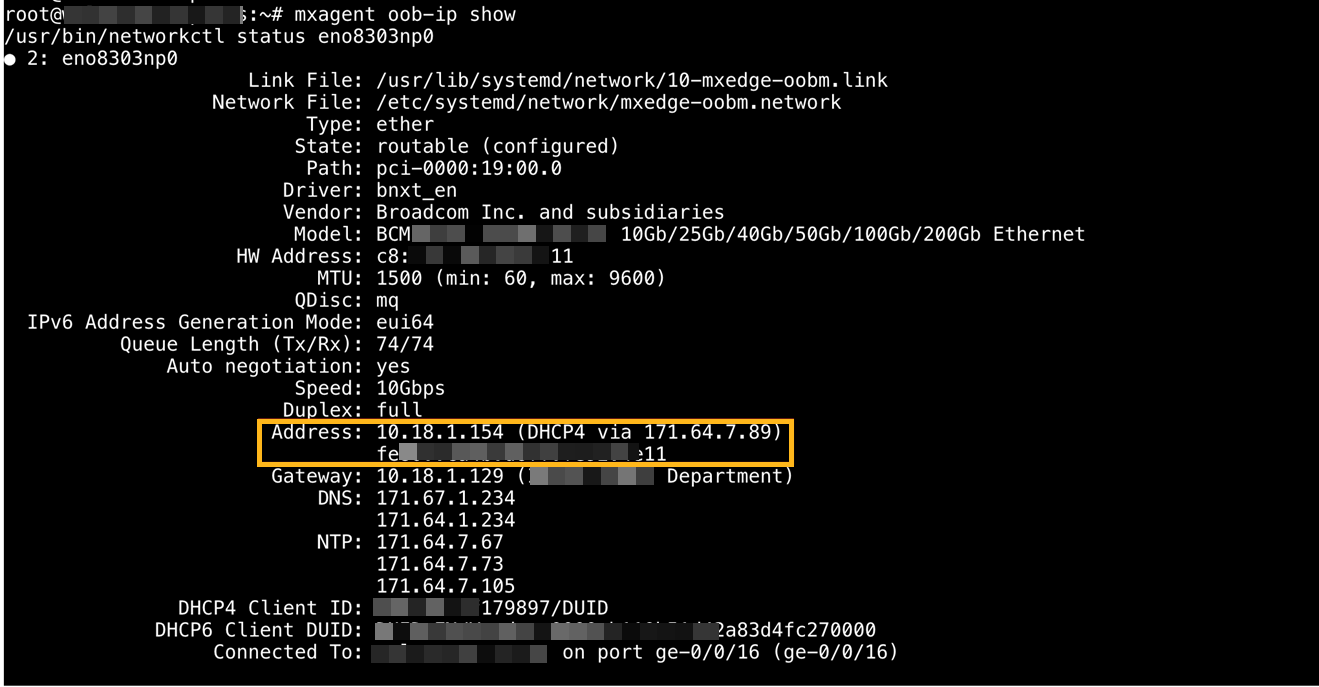
Typically, the OOBM interface for a VM is ens192.
-
Scenario 3—Your network does not have a DHCP server.
In this case, you’ll need to log into the console and configure a static IP address for the OOBM interface first before registering the device.
Log in to the console. The default username is mist and the password is Mist@1234. The default root (su-) password is mist.
Configure a static IP address by using the following command:
mxagent oob-ip configure -–address ip-address -–gateway gateway-ip-address -–netmask netmask - nameservers nameservers
If the Mist Edge is located behind a proxy server, configure the proxy URL by using the following command:
mxagent proxy configure proxy url
To register the Mist Edge:
-
Register
the device and onboard it to the Mist cloud
by
using the following command:
mxagent register --registration-code registration-code-copied-from-dashboard
At the end of the process, you will see the following message:
registration finished successfully. (regfile at
              /var/lib/mxagent/mxagent.reg
After the process is complete, the Juniper Mist Edge reboots automatically. At this point, you do not need SSH to connect to the Juniper Mist Edge. The device pulls the configuration from the Juniper Mist cloud.
After the reboot, the Juniper Mist Edge appears as connected on the Mist Edge Inventory page. An orange dot also indicates the connected status of the device.

Create a Mist Cluster and Assign a Mist Edge
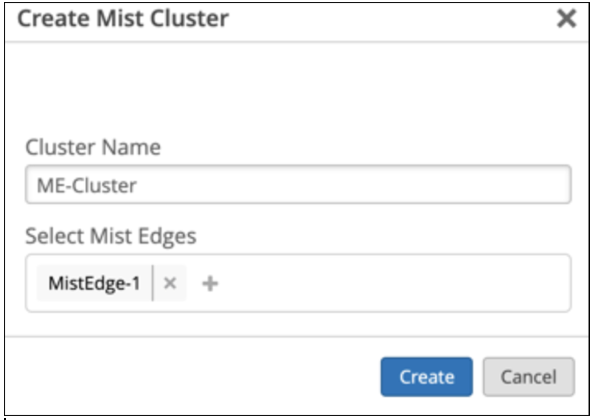
After you create a Juniper Mist Edge on the Juniper Mist portal, you must add the device to a Mist Cluster. A cluster can comprise a single edge device or multiple edge devices. You can skip this step for Mist Edges at Site level.
To create a cluster:
-
On the Create Mist Cluster page, enter a name in the Cluster
Name field and in the Select Mist Edges field,
select the edge devices to add to the cluster.
Create a Mist Tunnel (Organization Level)
After you create a cluster, you must configure a tunnel and bind the tunnel to the cluster. Typically, the tunnel is where you list all your user VLANs (client VLANs) that you want to extend from your corporate network to the APs. If the Mist Edge is deployed at the organization level, the tunnel must be configured at the organization level.
To create a Mist Tunnel at the organization level:
-
In the Cluster pane, assign the tunnel to a primary or a
secondary Mist Edge Cluster created using the steps described in
Create a Mist
Cluster
earlier.
In either the Primary Cluster or the Secondary
Cluster field, select the required cluster from the drop-down list.
You can
retain the default entry or selection in the other fields on the page.
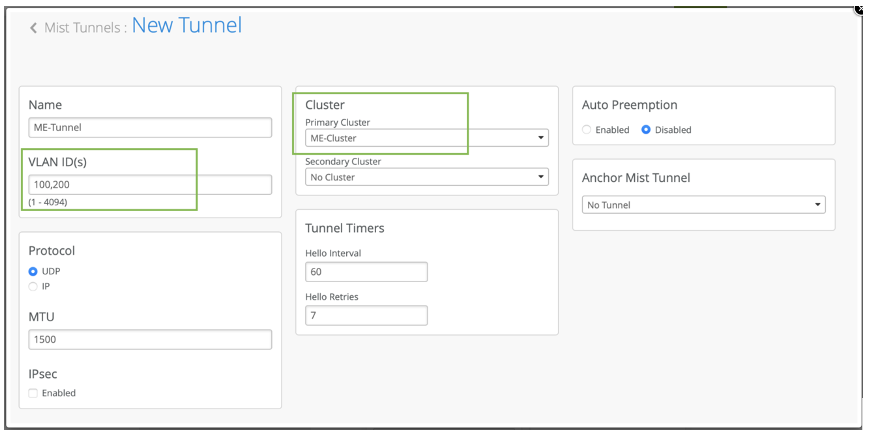 After you map the Mist Edge and tunnel to a cluster, the tunnel termination service is instantiated from the cloud on the Mist Edge.
Create A Mist Tunnel (Site Level)
After you claim the Juniper Mist Edge, you can assign it to a site.
If the Mist Edge is
deployed at the site level, the tunnel must be configured at the site
level.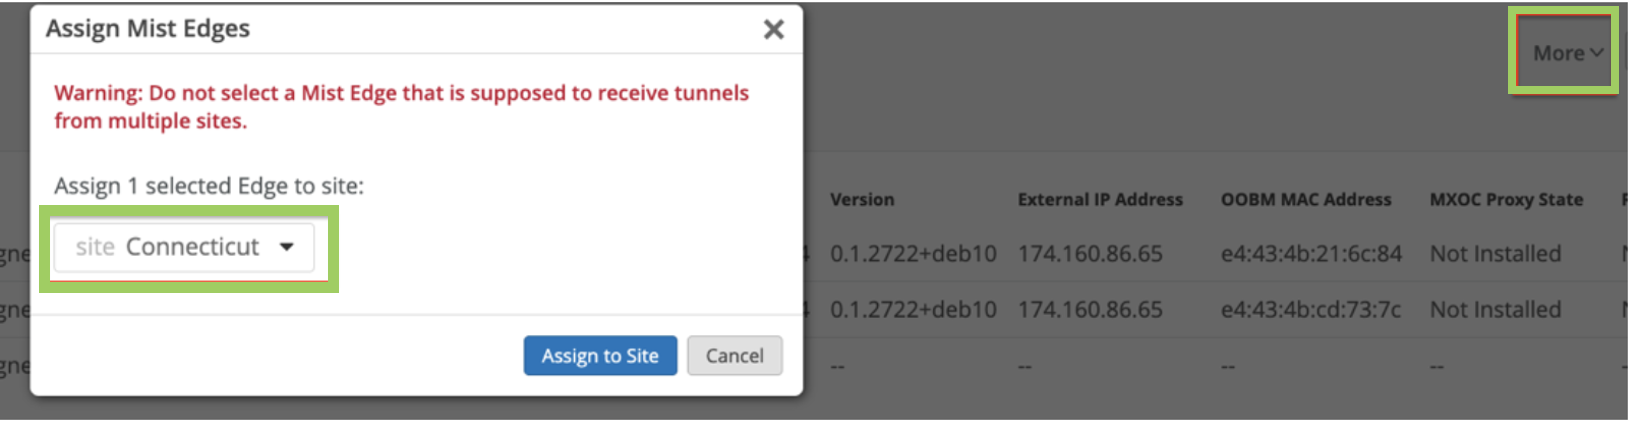
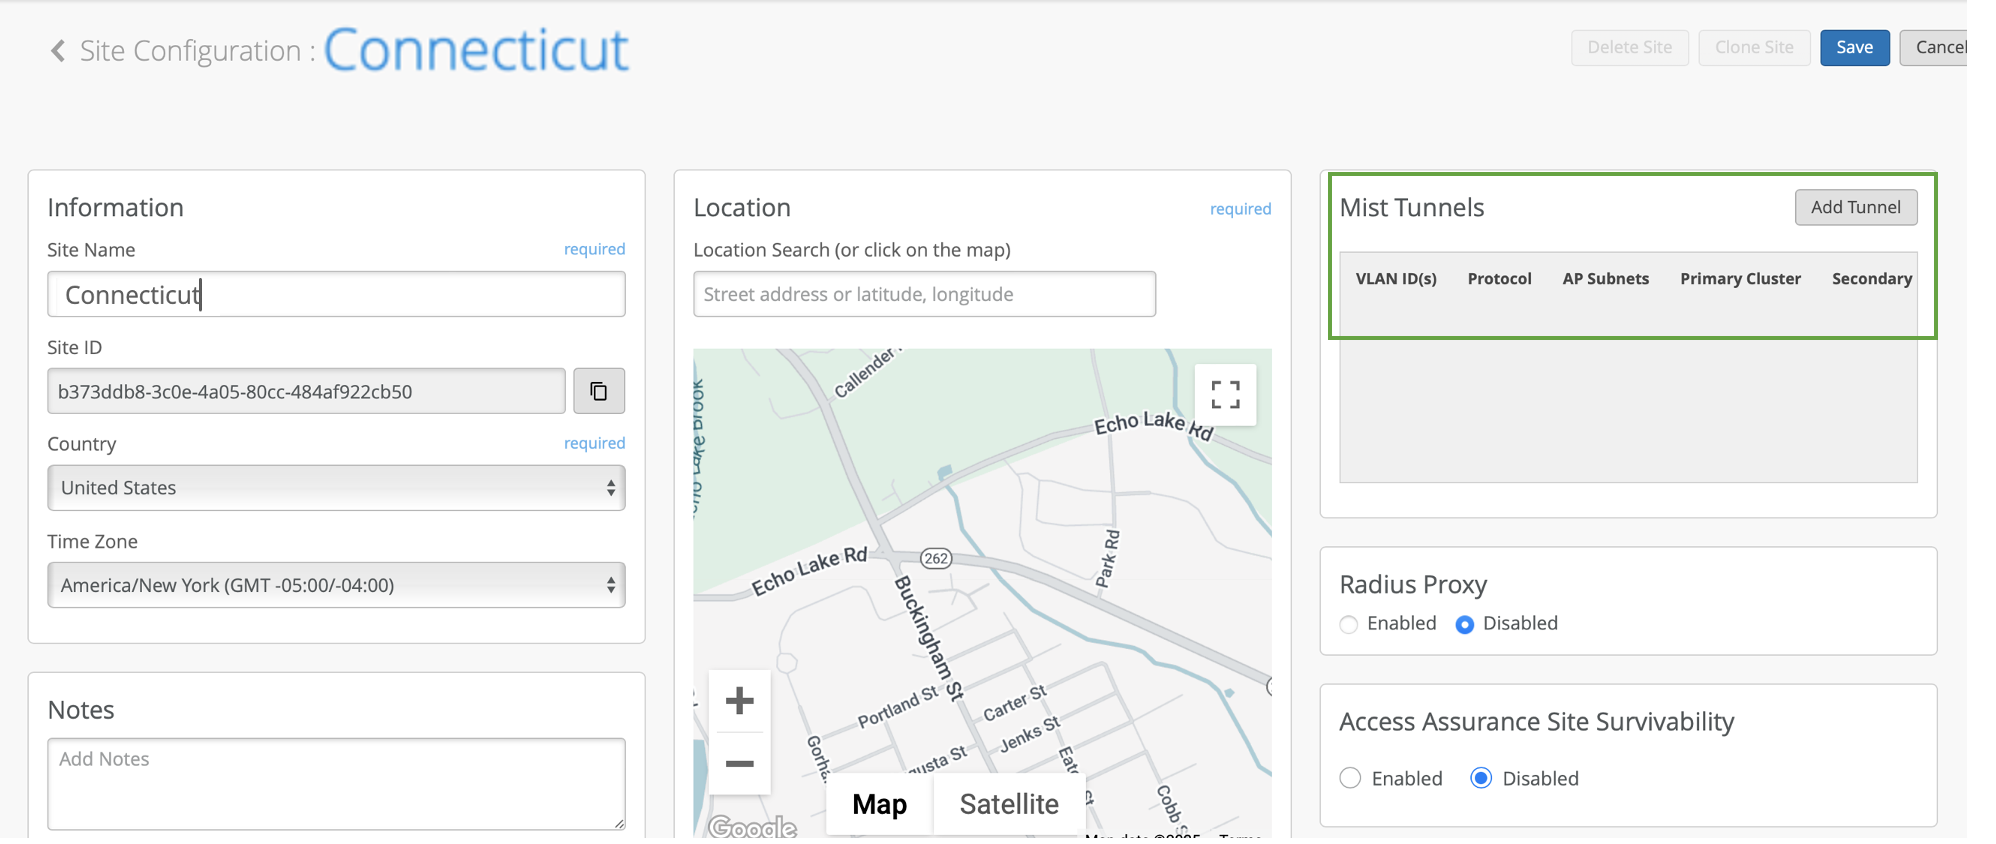
To create a Mist Tunnel at the site level:
-
On the Site Configuration page,
to
add a tunnel for
the
desired
site,
click Add
Tunnel.
-
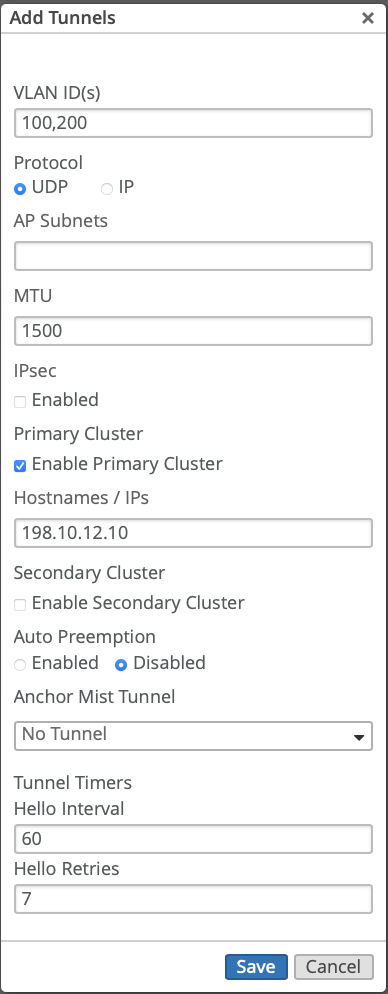
On the Add Tunnels page, in the
VLAN
ID(s) field, enter all the user VLANs that you want to extend from your
corporate network to the APs. Separate the
VLAN
IDs in the list with commas.
Configure Tunnel MTU Settings
MTU settings are configured by default. If you want to update the MTU values, see Troubleshooting Juniper Mist Edge.
Configure a WLAN Template
A WLAN template is a collection of WLAN policies, tunneling policies and WxLAN policies. Instead of repeating a given configuration across multiple service set identifiers (SSIDs), with WLAN templates you can set it once and then attach APs to the template to automatically inherit the setting. Both the APs and WLAN must belong to the same site.
You must use the WLAN Templates to enable the corporate SSID. You can create a WLAN template and use the template assignment for:
-
Specific sites or a collection of individual sites that are mapped to a
Site-Group. -
Entire organization with actual office sites added as exceptions.
To configure a WLAN template:
-
On
the
new template page,
select Entire Org or
Sites
and Site Groups to assign the
template to an
organization or to Sites and Site groups.
Figure 4: WLAN Template Assigned to Sites and Site Groups
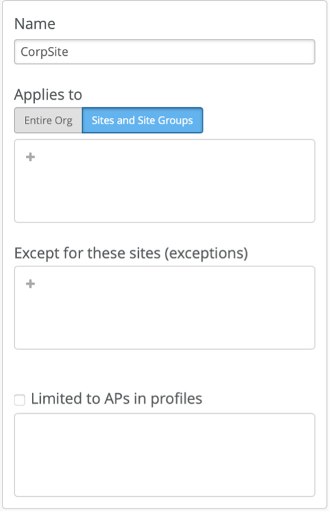 Figure 5: WLAN Template Assigned to Entire Organization with Some Exceptions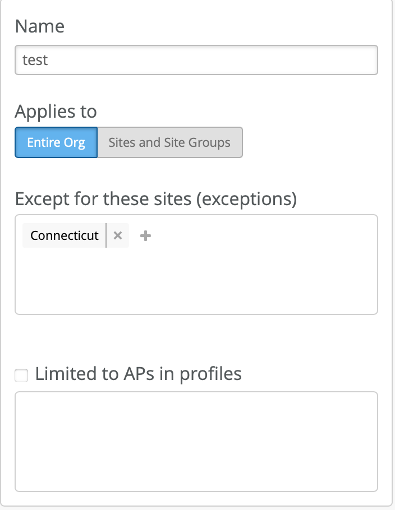
-
On
the WLAN templates page,
in the WLANs pane,
select Add WLAN
.
The Create WLAN page appears.
-
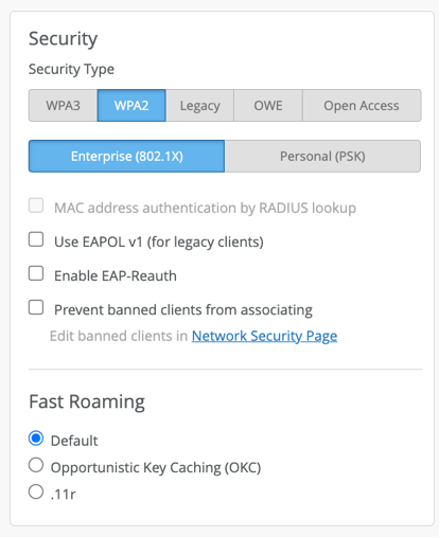
In the Create WLAN page, you can specify the security
settings.
-
In the Create WLAN page, specify the number of VLANs to be
tunneled through the Juniper Mist Edge in the VLAN ID
field.
 Note that Juniper® Series of High-Performance Access Points do not tunnel any WLAN configured with an untagged VLAN. You can choose the APs that are tunneled as per the deployment type.
 -
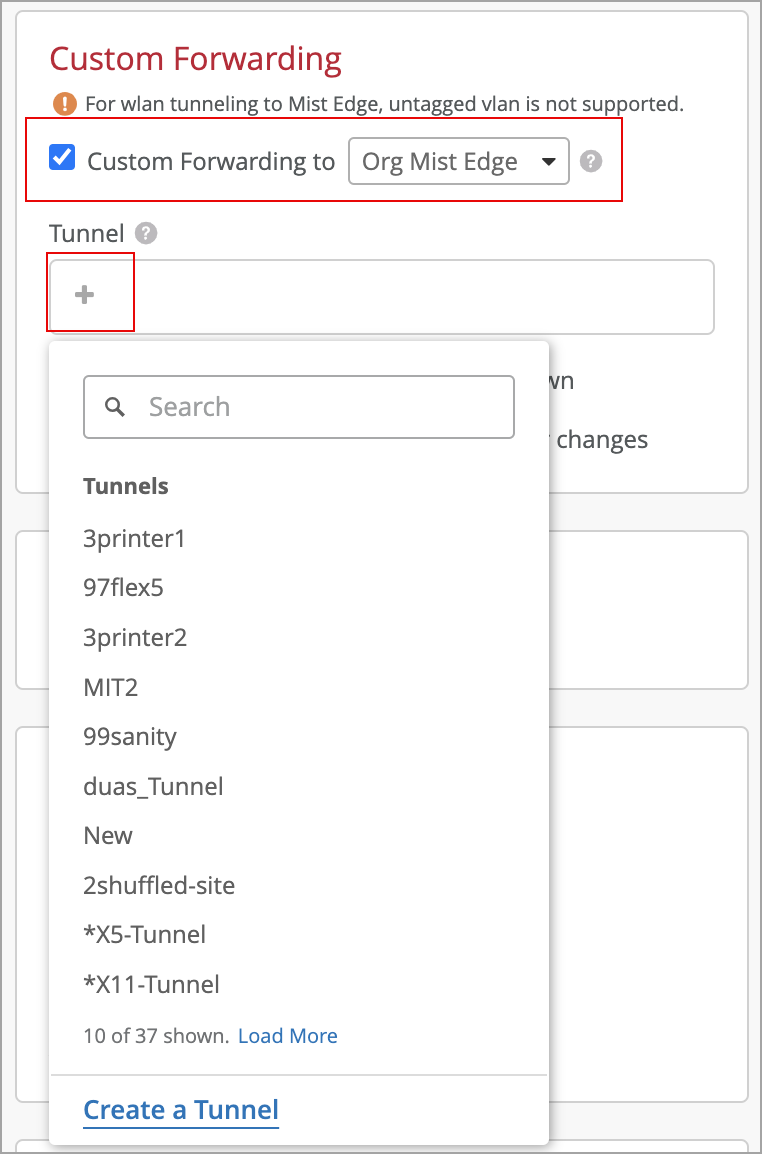
In the Create WLAN page, for organization-level deployment,
select Custom Forwarding to and then select
Mist from the drop-down list. Next, select tunnel profile
from the Tunnel drop-down list. Note that this Mist tunnel
must be the same VLAN that you want to
tunnel.
-
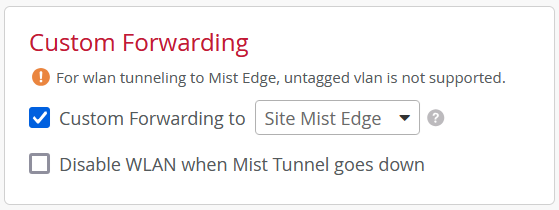
In the Create WLAN page, for site-level deployment, select
Custom Forwarding to and then select Site
Edge from the drop-down list.
-
In the Create WLAN page, you can specify the security
settings.