Configure Upstream Resource Monitoring
Upstream Resource Monitoring
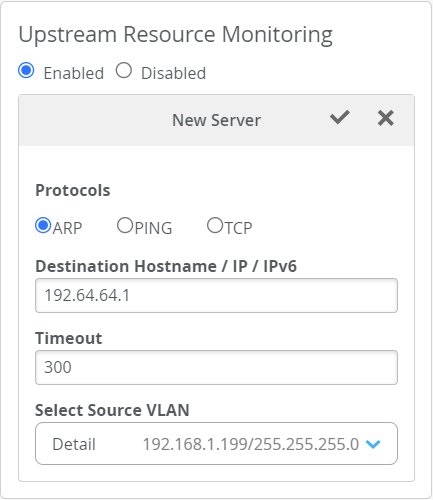
Upstream resource monitoring (URM) lets you monitor Mist Edge clusters so that if a service disruptions is detected, the system can automatically fail-over to the backup. URM supports ARP, PING, and TCP for monitoring, and you can engage any one, two, or all three (although we recommend that you only set up what you need to prevent duplication).
Monitor the upstream connections in the Monitor > Insights > Mist Edge | service dashboard, or by looking at the Mist Edge cluster configuration page under Upstream Resource Monitoring. A green icon indicates a healthy connection, and a red icon means the connection is down.
Note that when creating a Mist Edge cluster from individual Mist Edge members, the cluster will inherit the URM configuration from the member. If you move a Mist Edge or claim it elsewhere, the previous URM settings will stay with the Mist Edge.
Source and Destination IP Addresses
When setting up URM to monitor a given service or device, you need to provide an IP address to act as the source address for the monitoring service (TCP, ARP, or PING). The IP address you use must be unique, and it must be valid (available) on VLAN from which it will be sent. The destination IP address is that of the device or service you are monitoring. For tunnel interfaces, the source VLAN is automatically assumed to be VLAN1.
By default, Mist Edge assumes that these source and destination IP addresses are on the same subnet. If they are not, you need to set up a next hop to resolve it. See below for instructions on configuring a next hop to bridge different source and destination subnets.
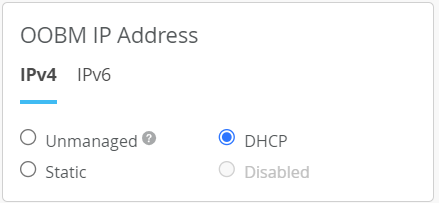
Using an Out-of-Band Management Interface
If you have configured out-of-band management (OOBM) for DHCP or Static IP addresses, Mist Edge can get the IP source address directly from the VLAN. On the other hand, if OOBM IP Address is Disabled or Unmanaged, you need to create a new VLAN and then specify a valid IP address that is available in that VLAN and use that as the source IP address.
Enabling URM
To configure URM on a Mist Edge,
Setting Up A Next Hop for Different Subnets
If the source and destination are in different subnets, you'll need to set up a next hop to bridge them.
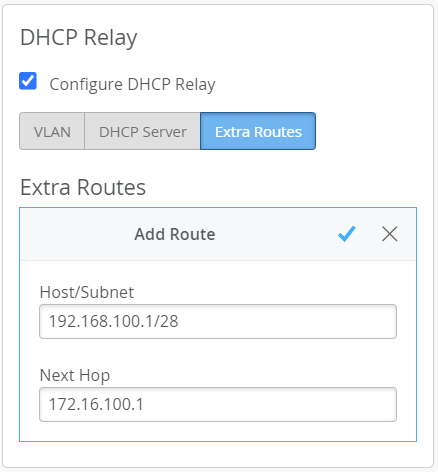
Under the DHCP relay section of the Mist Edge configuration page, select Configure DHCP Relay .
Click the Extra Routes tab and then Add Route.
In the Host/Subnet field that appears, specify the IP address and subnet for the network you are using as the source VLAN (that is, the client) in your URM configuration.
In the Next Hop field, specify the IP address of a gateway that can reach the destination service that you are monitoring (this is the service or device specified in the destination field of the URM configuration).
Click the check mark icon to keep your changes, and then click Save at the top of the page to save the new configuration.