Temporarily Pause Your Alerts
You'll specify the time period and the scope. For example:
-
Pause alerts for all devices across your entire organization.
-
Pause alerts only for your organization-level devices like Mist Edge.
-
Pause alerts for specific sites.
-
Pause alerts for one site only.
During the specified time period, all alerts are paused for the specified devices and sites. You'll continue to get the normal alerts for any out-of-scope devices and sites. When the time period elapses, all enabled alerts resume as usual.
To temporarily pause your alerts:
-
In the Pause Alerts window, use the Create Rules tab and the
Existing Rules tab to create and manage your pause rules.
Table 1: Create a New Pause Rule Scope of New Rule Instructions Pause all alerts across your entire organization. This approach covers your entire organization, though you can specify the types of devices to include. Click the Create Rules tab.
Click Entire Org.
Select one or both check boxes to specify the types of devices to include:
Organization—Check this box to include devices like Mist Edge that are assigned to an organization, not to a specific site. If the box is unchecked, you'll receive the normal alerts for organization-level devices.
Site—Check this box to include devices that are assigned to specific sites. This option includes most devices in your Mist organization, since onboarding typically involves assigning devices to sites. If this box is unchecked, you'll receive the normal alerts for site-assigned devices.
Select the Start Time and End Time.
Click Create to save your rule.
The Existing Rules tab appears. If you selected organization devices only, you'll see one new rule. If you selected site devices, you'll see a separate rule for each site in your organization.
Pause alerts for specific sites. This approach covers only the sites that you specify. You'll continue to get alerts for other sites as you normally do.
Click the Create Rules tab.
Click Site Group + Sites.
Click the + button, and then select a group or site.
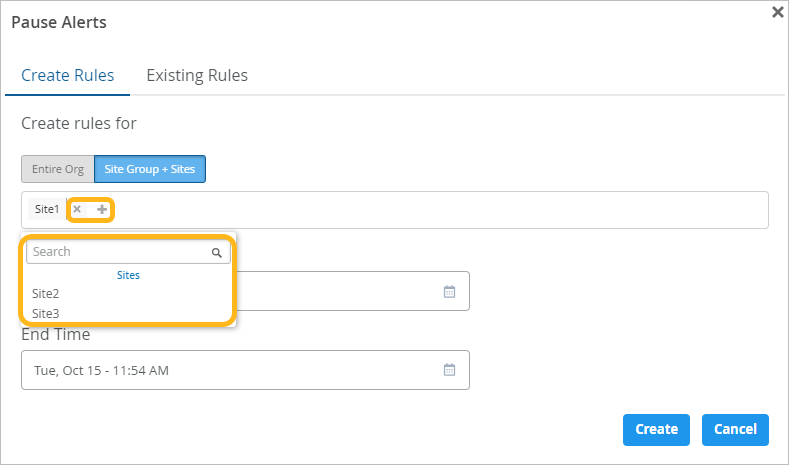
Repeat as needed to add all applicable sites.
Note: If you add an site by mistake, click X to remove it.Select the Start Time and End Time.
Click Create to save your rule.
The Existing Rules tab appears. You'll see one rule for each site that you selected.
Note: A site can have only one active pause rule. If your new rule includes a site that already has a pause enabled, a message pops up. Follow the on-screen instructions to override the old rule or to remove the specified site from the new rule.Table 2: Manage Existing Rules Task Options View the status of a pause. On the Existing Rules tab, look in the Active column. Green indicates an active rule.
Cancel a pause. On the Existing Rules tab, select the check box for each rule to delete. Then click Delete.
Filter the list of pause rules. On the Existing Rules tab, start typing in the Filter box. Matching rules appear.
Organize the pause rules by date. On the Existing Rules tab, select Group by Start/End Times. You can expand or collapse each dated section to show or hide the rules.
