APPENDIX: Example DHCP Relay in IP Clos Fabric
Following is an example lab design to test DHCP relay in an IP Clos anycast fabric with the following configuration:
- Fabric type = IP Clos
- Overlay loopback pool configured = 172.16.192.0/19
- WAN router integration = eBGP peering with the fabric
- DHCP server location = External to the fabric
- DHCP server reachability = via WAN router for all VLANs and VRFs
- Third-party DHCP server used = Linux-based KEA V2.0.2 as VM
.png)
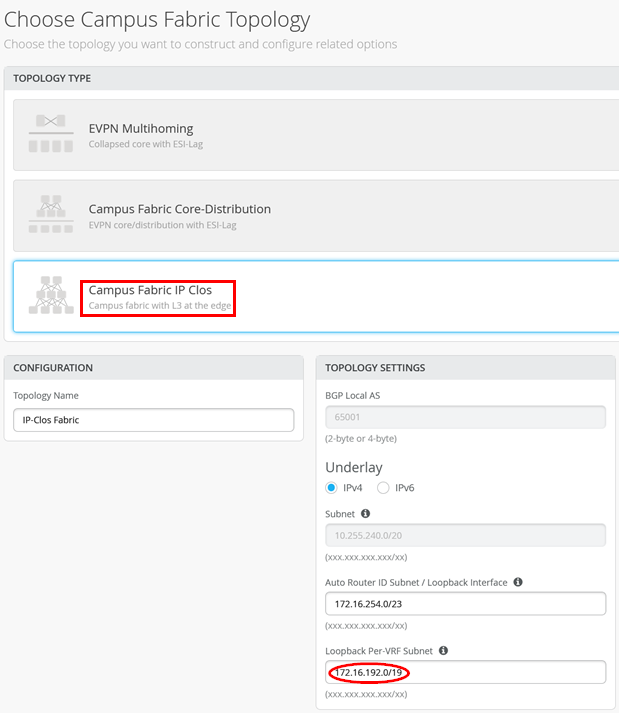
Campus Fabric Dialogue Configuration
In the campus fabric dialogue configuration, it is important to configure the following:
- The correct fabric type = IP Clos
- The overlay loopback pool = 172.16.192.0/19 (as we expected some future growth)
Then, in the “Networks” fabric dialogue, configure the following:
- DHCP Relay = Enabled
- vlan1033:
- Network = vlan1033
- DHCP Servers = 192.168.122.12
- vlan1088:
- Network = vlan1088
- DHCP Servers = 192.168.122.12
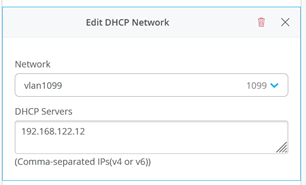
- vlan1099:
- Network = vlan1099
- DHCP Servers = 192.168.122.12
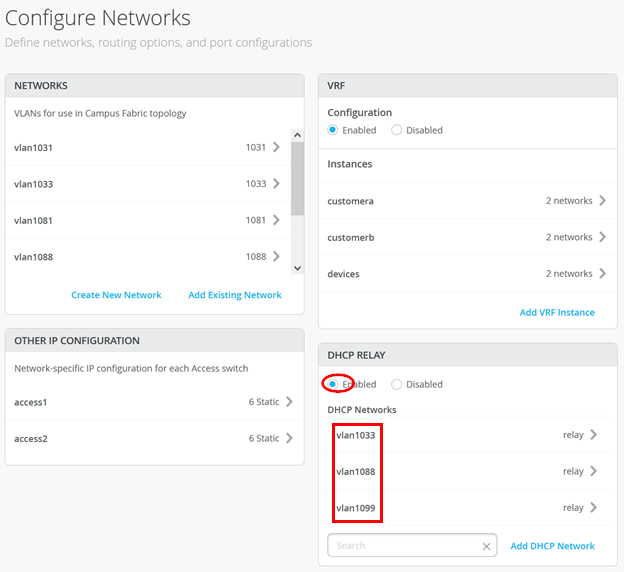
Ensure you always use this dialogue to configure DHCP relay in all campus fabric designs.
Access Switch Configuration
Our Desktop1 client is attached to the ge-0/0/3 interface on the Access1 switch through the following port configuration:
.png)
Based on this configuration, Juniper Mist cloud configures the following on the switch:
set groups top routing-instances customera instance-type vrf
set groups top routing-instances customera interface irb.1091
set groups top routing-instances customera interface irb.1099
set groups top routing-instances customera forwarding-options dhcp-relay server-group vlan1099 192.168.122.12
              set groups top routing-instances customera forwarding-options dhcp-relay group vlan1099 interface irb.1099
              set groups top routing-instances customera forwarding-options dhcp-relay group vlan1099 active-server-group vlan1099
              set groups top routing-instances customera forwarding-options dhcp-relay group vlan1099 relay-option-82 circuit-id vlan-id-only
              set groups top routing-instances customera forwarding-options dhcp-relay group vlan1099 relay-option-82 server-id-override
              set groups top routing-instances customera forwarding-options dhcp-relay group vlan1099 route-suppression destination
              set groups top routing-instances customera forwarding-options dhcp-relay group vlan1099 overrides relay-source lo0.1
              set groups top routing-instances customera forwarding-options dhcp-relay forward-only
set groups top routing-instances customera route-distinguisher 172.16.254.8:101
set groups top routing-instances customera vrf-target target:65000:101
set groups top routing-instances customera vrf-table-label
set groups top routing-instances customera routing-options auto-export
set groups top routing-instances customera routing-options multipath
set groups top routing-instances customera protocols evpn ip-prefix-routes advertise direct-nexthop
set groups top routing-instances customera protocols evpn ip-prefix-routes encapsulation vxlan
set groups top routing-instances customera protocols evpn ip-prefix-routes vni 11299807
set groups top routing-instances customera protocols evpn ip-prefix-routes export evpn_export_type5
              set groups top routing-instances customera interface lo0.1
.
set interfaces irb unit 1099 family inet address 10.99.99.1/24
set interfaces irb unit 1099 family inet mtu 9000
set interfaces irb unit 1099 description vlan1099
set interfaces irb unit 1099 no-dhcp-flood
set interfaces irb unit 1099 mac 00:00:5e:e4:31:57
.
set groups top interfaces lo0 unit 1 family inet address 172.16.192.1/32
.
set groups top policy-options policy-statement evpn_export_type5 term 01_ipv4 from protocol evpn
set groups top policy-options policy-statement evpn_export_type5 term 01_ipv4 from route-filter 0.0.0.0/0 prefix-length-range /32-/32
set groups top policy-options policy-statement evpn_export_type5 term 01_ipv4 then accept
set groups top policy-options policy-statement evpn_export_type5 term 02_direct from protocol direct
set groups top policy-options policy-statement evpn_export_type5 term 02_direct then accept
The important item to verify on the access switch is which overlay loopback IP addresses have been assigned for each local VRF (Layer 3 is on the access switch in IP Clos):
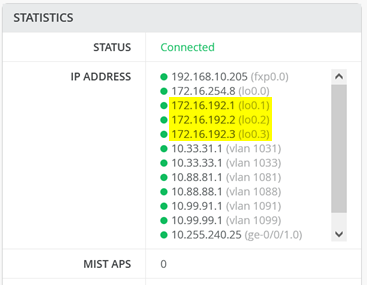
You must ensure these local overlay loopback IP addresses are exchanged as host routes with the WAN router.
WAN Router Integration on the Service Block Switch
Now, check the BGP configuration on the two service block switches. Here, it is important to check the export filters (which are shared in our case):
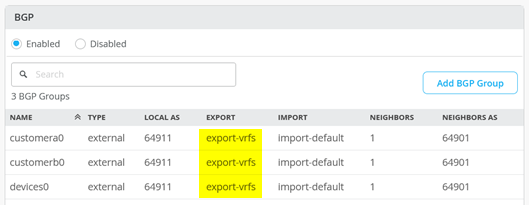
It is important to also export the overlay loopback IP address range as well as the usual VLANs of the fabric.
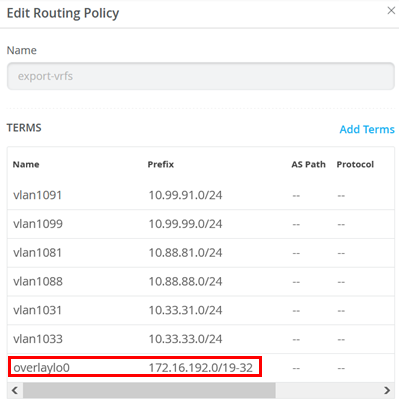
You must ensure that you append “-32” to the IP prefix that you have defined in the campus fabric dialogue. Otherwise, the WAN router does not know the individual host routes which are spread across your VRFs.
WAN Router Integration Checks
Next, login to the WAN router and verify the received overlay loopback IP addresses. First, check the established BGP peering:
root@wanrouter> show bgp summary
Threading mode: BGP I/O
Default eBGP mode: advertise - accept, receive - accept
Groups: 3 Peers: 6 Down peers: 0
Peer                     AS      InPkt     OutPkt    OutQ   Flaps Last Up/Dwn State|#Active/Received/Accepted/Damped...
10.255.224.1          64911       5685       5650       0       0 1d 19:02:18 Establ
  public-int.inet.0: 5/6/6/0
10.255.224.3          64911       5680       5649       0       0 1d 19:02:12 Establ
  public-int.inet.0: 5/6/6/0
10.255.224.5          64911       5685       5649       0       0 1d 19:02:16 Establ
  public-int.inet.0: 5/6/6/0
10.255.226.1          64911       5686       5648       0       0 1d 19:02:14 Establ
  public-int.inet.0: 5/6/6/0
10.255.226.3          64911       5683       5649       0       0 1d 19:02:19 Establ
  public-int.inet.0: 5/6/6/0
10.255.226.5          64911       5686       5649       0       0 1d 19:02:22 Establ
  public-int.inet.0: 5/6/6/0
Then, check the routing table for the three IP addresses (172.16.192.1-3) that we validated on the local switch shown above:
root@wanrouter> show route table public-int.inet.0
public-int.inet.0: 35 destinations, 53 routes (35 active, 0 holddown, 0 hidden)
+ = Active Route, - = Last Active, * = Both
0.0.0.0/0          *[Static/5] 1d 18:59:15
                    >  to 192.168.10.1 via ge-0/0/6.0
.
10.99.99.0/24      *[BGP/170] 00:50:33, localpref 100
                      AS path: 64911 65002 65004 65006 65007 I, validation-state: unverified
                       to 10.255.224.1 via ge-0/0/4.1091
                    >  to 10.255.226.1 via ge-0/0/5.1091
                    [BGP/170] 00:50:32, localpref 100
                      AS path: 64911 65001 65004 65006 65007 I, validation-state: unverified
                    >  to 10.255.224.1 via ge-0/0/4.1091
.
172.16.192.1/32    *[BGP/170] 00:50:36, localpref 100
                      AS path: 64911 65002 65004 65005 65008 I, validation-state: unverified
                       to 10.255.224.1 via ge-0/0/4.1091
                    >  to 10.255.226.1 via ge-0/0/5.1091
                    [BGP/170] 00:50:36, localpref 100
                      AS path: 64911 65001 65004 65005 65008 I, validation-state: unverified
                    >  to 10.255.224.1 via ge-0/0/4.1091
172.16.192.2/32    *[BGP/170] 00:50:36, localpref 100
                      AS path: 64911 65002 65004 65005 65008 I, validation-state: unverified
                       to 10.255.224.3 via ge-0/0/4.1081
                    >  to 10.255.226.3 via ge-0/0/5.1081
                    [BGP/170] 00:50:36, localpref 100
                      AS path: 64911 65001 65004 65005 65008 I, validation-state: unverified
                    >  to 10.255.224.3 via ge-0/0/4.1081
172.16.192.3/32    *[BGP/170] 00:50:36, localpref 100
                      AS path: 64911 65002 65004 65005 65008 I, validation-state: unverified
                       to 10.255.224.5 via ge-0/0/4.1031
                    >  to 10.255.226.5 via ge-0/0/5.1031
                    [BGP/170] 00:50:36, localpref 100
                      AS path: 64911 65001 65004 65005 65008 I, validation-state: unverified
                    >  to 10.255.224.5 via ge-0/0/4.1031
.
192.168.10.0/24    *[Direct/0] 1d 18:59:15
                    >  via ge-0/0/6.0
192.168.10.59/32   *[Local/0] 1d 18:59:15
                       Local via ge-0/0/6.0
192.168.122.0/24   *[Direct/0] 1d 18:59:15
                    >  via ge-0/0/3.0
192.168.122.23/32  *[Local/0] 1d 18:59:15
                       Local via ge-0/0/3.0
DHCP Server Check
Next, check the DHCP server itself:
root@kea1:~# ip a
1: lo: <LOOPBACK,UP,LOWER_UP> mtu 65536 qdisc noqueue state UNKNOWN group default qlen 1000
    link/loopback 00:00:00:00:00:00 brd 00:00:00:00:00:00
    inet 127.0.0.1/8 scope host lo
       valid_lft forever preferred_lft forever
    inet6 ::1/128 scope host
       valid_lft forever preferred_lft forever
2: ens3: <BROADCAST,MULTICAST,UP,LOWER_UP> mtu 1500 qdisc fq_codel state UP group default qlen 1000
    link/ether 52:54:00:18:ee:80 brd ff:ff:ff:ff:ff:ff
    altname enp0s3
    inet 192.168.122.12/24 brd 192.168.122.255 scope global ens3
       valid_lft forever preferred_lft forever
    inet6 fe80::5054:ff:fe18:ee80/64 scope link
       valid_lft forever preferred_lft forever
root@kea1:~# ip r
default via 192.168.122.1 dev ens3 proto static
10.0.0.0/8 via 192.168.122.23 dev ens3 proto static
172.16.192.0/19 via 192.168.122.23 dev ens3 proto static
192.168.122.0/24 dev ens3 proto kernel scope link src 192.168.122.12
root@kea1:~# netstat -tunap | grep 67
udp        0      0 192.168.122.12:67       0.0.0.0:*                           747/kea-dhcp4
root@kea1:~# systemctl status kea-dhcp4-server.service
* kea-dhcp4-server.service - Kea IPv4 DHCP daemon
     Loaded: loaded (/lib/systemd/system/kea-dhcp4-server.service; enabled; ven>
     Active: active (running) since Mon 2024-06-24 15:52:41 UTC; 1 day 19h ago
       Docs: man:kea-dhcp4(8)
   Main PID: 747 (kea-dhcp4)
      Tasks: 5 (limit: 1012)
     Memory: 13.6M
        CPU: 8.078s
     CGroup: /system.slice/kea-dhcp4-server.service
             └─747 /usr/sbin/kea-dhcp4 -c /etc/kea/kea-dhcp4.conf
Final Test with a Wired Client
To complete the installation, perform a final test with a wired client. The initial state of our client is that it has a static IP address assigned and can communicate towards the internet:
root@lab2-desktop1:~# ifconfig ens5
ens5: flags=4163<UP,BROADCAST,RUNNING,MULTICAST> mtu 1500
inet 10.99.99.99 netmask 255.255.255.0 broadcast 10.99.99.255
inet6 fe80::5054:ff:fe0a:fac7 prefixlen 64 scopeid 0x20<link>
ether 52:54:00:0a:fa:c7 txqueuelen 1000 (Ethernet)
RX packets 23 bytes 11662 (11.6 KB)
RX errors 0 dropped 0 overruns 0 frame 0
TX packets 65 bytes 7564 (7.5 KB)
TX errors 0 dropped 0 overruns 0 carrier 0 collisions 0
root@lab2-desktop1:~# ping -c3 8.8.8.8
PING 8.8.8.8 (8.8.8.8) 56(84) bytes of data.
64 bytes from 8.8.8.8: icmp_seq=1 ttl=55 time=26.0 ms
64 bytes from 8.8.8.8: icmp_seq=2 ttl=55 time=36.5 ms
64 bytes from 8.8.8.8: icmp_seq=3 ttl=55 time=39.6 ms
--- 8.8.8.8 ping statistics ---
3 packets transmitted, 3 received, 0% packet loss, time 2004ms
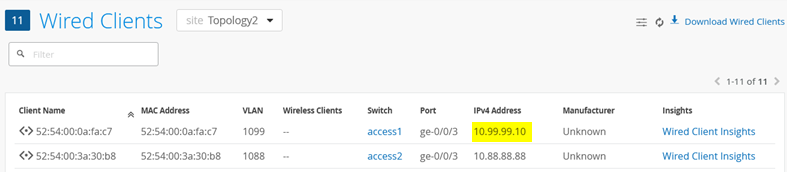
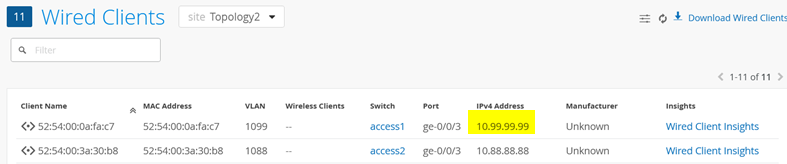
rtt min/avg/max/mdev = 26.044/34.028/39.584/5.788 msWe can see this client and its IP address in the Wired Client overview in the Juniper Mist portal:
Next, we unconfigure the static IP address and try to obtain a DHCP lease instead. The additional configuration below ensures that the client loses the static configuration and any prior knowledge of a DHCP lease. We then start up the DHCP client in the foreground to see a bit more of the debugging messages:
root@lab2-desktop1:~# ip link set ens5 up
root@lab2-desktop1:~# ip addr del 10.99.99.99 dev ens5
root@lab2-desktop1:~# pkill dhclient
root@lab2-desktop1:~# rm -f /var/lib/dhcp/*.leases
root@lab2-desktop1:~# dhclient -v ens5
Internet Systems Consortium DHCP Client 4.4.1
Copyright 2004-2018 Internet Systems Consortium.
All rights reserved.
For info, please visit https://www.isc.org/software/dhcp/
Listening on LPF/ens5/52:54:00:0a:fa:c7
Sending on   LPF/ens5/52:54:00:0a:fa:c7
Sending on   Socket/fallback
DHCPDISCOVER on ens5 to 255.255.255.255 port 67 interval 3 (xid=0x9778d1e)
DHCPOFFER of 10.99.99.10 from 172.16.192.1
DHCPREQUEST for 10.99.99.10 on ens5 to 255.255.255.255 port 67 (xid=0x1e8d7709)
DHCPACK of 10.99.99.10 from 172.16.192.1 (xid=0x9778d1e)
bound to 10.99.99.10 -- renewal in 747 seconds.
After a while (depending on local ARP age-outs), this change becomes visible in the Wired Client overview: