GRE Tunnels for Layer 3 VPNs
Configuring GRE Tunnels for Layer 3 VPNs
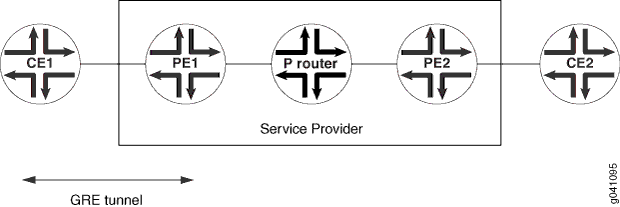
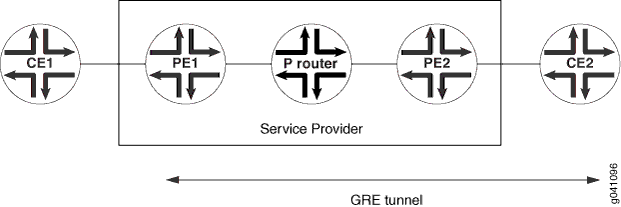
Junos OS allows you to configure a generic routing encapsulation (GRE) tunnel between the PE and CE routers for a Layer 3 VPN. The GRE tunnel can have one or more hops. You can configure the tunnel from the PE router to a local CE router (as shown in Figure 1) or to a remote CE router (as shown in Figure 2).
For more information about how to configure tunnel interfaces, see the Junos OS Services Interfaces Library for Routing Devices.
You can configure the GRE tunnels manually or configure the Junos OS to instantiate GRE tunnels dynamically.
The following sections describe how to configure GRE tunnels manually and dynamically:
Configuring GRE Tunnels Manually Between PE and CE Routers
You can manually configure a GRE tunnel between a PE router and either a local CE router or a remote CE router for a Layer 3 VPN as explained in the following sections:
- Configuring the GRE Tunnel Interface on the PE Router
- Configuring the GRE Tunnel Interface on the CE Router
Configuring the GRE Tunnel Interface on the PE Router
You configure the GRE tunnel as a logical interface on the PE
router. To configure the GRE tunnel interface, include the unit statement:
unit logical-unit-number {
    tunnel {
        source source-address;
        destination destination-address;
        routing-instance {
            destination routing-instance-name;
        }
    }
    family inet {
        address address;
    }
}
You can include this statement at the following hierarchy levels:
[edit interfaces interface-name][edit logical-systems logical-system-name interfaces interface-name]
As part of the GRE tunnel interface configuration, you need to include the following statements:
source source-address—Specify the source or origin of the GRE tunnel, typically the PE router.destination destination-address—Specify the destination or end point of the GRE tunnel. The destination can be a Provider router, the local CE router, or the remote CE router.
By default, the tunnel destination address is assumed to be
in the default Internet routing table, inet.0. If the tunnel destination
address is not in inet.0, you need to specify which routing table
to search for the tunnel destination address by configuring the routing-instance statement. This is the case if the tunnel
encapsulating interface is also configured under the routing instance.
destinationrouting-instance-name—Specify the name of the routing instance when configuring the GRE tunnel interface on the PE router.
To complete the GRE tunnel interface configuration, include
the interface statement for the GRE interface under the
appropriate routing instance:
interface interface-name;
You can include this statement at the following hierarchy levels:
[edit routing-instances routing-instance-name][edit logical-systems logical-system-name routing-instances routing-instance-name]
Configuring the GRE Tunnel Interface on the CE Router
You can configure either the local or the remote CE router to act as the endpoint for the GRE tunnel.
To configure the GRE tunnel interface on the CE router, include
the unit statement:
unit logical-unit-number {
    tunnel {
        source address;
        destination address;
    }
    family inet {
        address address;
    }
}
You can include this statement at the following hierarchy levels:
[edit interfaces interface-name][edit logical-systems logical-system-name interfaces interface-name]
Configuring GRE Tunnels Dynamically
When the router receives a VPN route to a BGP next hop address, but no MPLS path is available, a GRE tunnel can be dynamically generated to carry the VPN traffic across the BGP network. The GRE tunnel is generated and then its routing information is copied into the inet.3 routing table. IPv4 routes are the only type of routes supported for dynamic GRE tunnels. Also, the routing platform must have a tunnel PIC.
When configuring a dynamic GRE tunnel to a remote CE router, do not configure OSPF over the tunnel interface. It creates a routing loop forcing the router to take the GRE tunnel down. The router attempts to reestablish the GRE tunnel, but will be forced to take it down again when OSPF becomes active on the tunnel interface and discovers a route to the tunnel endpoint. This is not an issue when configuring static GRE tunnels to a remote CE router.
To generate GRE tunnels dynamically, include the dynamic-tunnels
statement:
dynamic-tunnels tunnel-name {
    destination-networks prefix;
    source-address address;
}
You can include this statement at the following hierarchy levels:
-
[edit routing-options] -
[edit routing-instances routing-instance-name routing-options] -
[edit logical-systems logical-system-name routing-options] -
[edit logical-systems logical-system-name
                            routing-instances routing-instance-name
                            routing-options ]
Specify the IPv4 prefix range (for example, 10/8 or 11.1/16) for the destination
network by including the destination-networks statement. Only
tunnels within the specified IPv4 prefix range are allowed to be
initiated.
destination-networks prefix;
You can include this statement at the following hierarchy levels:
-
[edit routing-options] -
[edit routing-instances routing-instance-name routing-options] -
[edit logical-systems logical-system-name routing-options] -
[edit logical-systems logical-system-name
                            routing-instances routing-instance-name
                            routing-options ]
Specify the source address for the GRE tunnels by including the
source-address statement. The source address specifies the
address used as the source for the local tunnel endpoint. This could be any local
address on the router (typically the router ID or the loopback address).
source-address address;
You can include this statement at the following hierarchy levels:
-
[edit routing-options] -
[edit routing-instances routing-instance-name routing-options] -
[edit logical-systems logical-system-name routing-options] -
[edit logical-systems logical-system-name
                            routing-instances routing-instance-name
                            routing-options ]
See Also
Configuring a GRE Tunnel Interface Between PE Routers
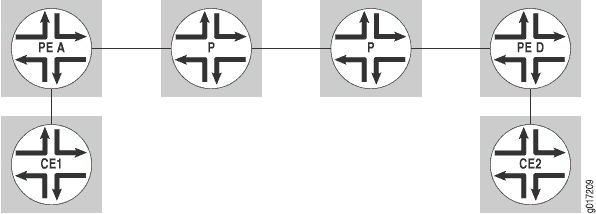
This example shows how to configure a generic routing encapsulation (GRE) tunnel interface between PE routers to provide VPN connectivity. You can use this configuration to tunnel VPN traffic across a non-MPLS core network. The network topology used in this example is shown in Figure 3. The P routers shown in this illustration do not run MPLS.
For configuration information, see the following sections:
- Configuring the Routing Instance on Router A
- Configuring the Routing Instance on Router D
- Configuring MPLS, BGP, and OSPF on Router A
- Configuring MPLS, BGP, and OSPF on Router D
- Configuring the Tunnel Interface on Router A
- Configuring the Tunnel Interface on Router D
- Configuring the Routing Options on Router A
- Configuring the Routing Options on Router D
- Configuration Summary for Router A
- Configuration Summary for Router D
Configuring the Routing Instance on Router A
Configure a routing instance on Router A:
[edit routing-instances]
gre-config {
    instance-type vrf;
    interface fe-1/0/0.0;
    route-distinguisher 10.255.14.176:69;
    vrf-import import-config;
    vrf-export export-config;
    protocols {
        ospf {
            export import-config;
            area 0.0.0.0 {
                interface all;
            }
        }
    }
}
Configuring the Routing Instance on Router D
Configure a routing instance on Router D:
[edit routing-instances]
gre-config {
    instance-type vrf;
    interface fe-1/0/1.0;
    route-distinguisher 10.255.14.178:69;
    vrf-import import-config;
    vrf-export export-config;
    protocols {
        ospf {
            export import-config;
            area 0.0.0.0 {
                interface all;
            }
        }
    }
}
Configuring MPLS, BGP, and OSPF on Router A
Although you do not need to configure MPLS on the P routers
in this example, it is needed on the PE routers for the interface
between the PE and CE routers and on the GRE interface (gr-1/1/0.0) linking the PE routers (Router A and Router D). Configure MPLS,
BGP, and OSPF on Router A:
[edit protocols]
mpls {
    interface all;
}
bgp {
    group pe-to-pe {
        type internal;
        neighbor 10.255.14.178 {
            family inet-vpn {
                unicast;
            }
        }
    }
}
ospf {
    area 0.0.0.0 {
        interface all;
        interface gr-1/1/0.0 {
            disable;
        }
    }
}
Configuring MPLS, BGP, and OSPF on Router D
Although you do not need to configure MPLS on the P routers
in this example, it is needed on the PE routers for the interface
between the PE and CE routers and on the GRE interface (gr-1/1/0.0) linking the PE routers (Router D and Router A). Configure MPLS,
BGP, and OSPF on Router D:
[edit protocols]
mpls {
    interface all;
}
bgp {
    group pe-to-pe {
        type internal;
        neighbor 10.255.14.176 {
            family inet-vpn {
                unicast;
            }
        }
    }
}
ospf {
    traffic-engineering;
    area 0.0.0.0 {
        interface all;
        interface fxp0.0 {
            disable;
        }
        interface gr-1/1/0.0 {
            disable;
        }
    }
}
Configuring the Tunnel Interface on Router A
Configure the tunnel interface on Router A (the tunnel is unnumbered):
[edit interfaces interface-name]
unit 0 {
    tunnel {
        source 10.255.14.176;
        destination 10.255.14.178;
    }
    family inet;
    family mpls;
}
Configuring the Tunnel Interface on Router D
Configure the tunnel interface on Router D (the tunnel is unnumbered):
[edit interfaces interface-name]
unit 0 {
    tunnel {
        source 10.255.14.178;
        destination 10.255.14.176;
    }
    family inet;
    family mpls;
}
Configuring the Routing Options on Router A
As part of the routing options configuration for Router A, you need to configure routing table groups to enable VPN route resolution in the inet.3 routing table.
Configure the routing options on Router A:
[edit routing-options]
interface-routes {
    rib-group inet if-rib;
}
rib inet.3 {
    static {
        route 10.255.14.178/32 next-hop gr-1/1/0.0;
    }
}
rib-groups {
    if-rib {
        import-rib [ inet.0 inet.3 ];
    }
}
Configuring the Routing Options on Router D
As part of the routing options configuration for Router D, you need to configure routing table groups to enable VPN route resolution in the inet.3 routing table.
Configure the routing options on Router D:
[edit routing-options]
interface-routes {
    rib-group inet if-rib;
}
rib inet.3 {
    static {
        route 10.255.14.176/32 next-hop gr-1/1/0.0;
    }
}
rib-groups {
    if-rib {
        import-rib [ inet.0 inet.3 ];
    }
}
Configuration Summary for Router A
Configure the Routing Instance
gre-config {
    instance-type vrf;
    interface fe-1/0/0.0;
    route-distinguisher 10.255.14.176:69;
    vrf-import import-config;
    vrf-export export-config;
    protocols {
        ospf {
            export import-config;
            area 0.0.0.0 {
                interface all;
            }
        }
    }
}
Configure MPLS
mpls {
    interface all;
}
Configure BGP
bgp {
    traceoptions {
        file bgp.trace world-readable;
        flag update detail;
    }
    group pe-to-pe {
        type internal;
        neighbor 10.255.14.178 {
            family inet-vpn {
                unicast;
            }
        }
    }
}
Configure OSPF
ospf {
    area 0.0.0.0 {
        interface all;
        interface gr-1/1/0.0 {
            disable;
        }
    }
}
Configure the Tunnel Interface
            interface-name {
    unit 0 {
        tunnel {
            source 10.255.14.176;
            destination 10.255.14.178;
        }
        family inet;
        family mpls;
    }
}
Configure Routing Options
interface-routes {
    rib-group inet if-rib;
}
rib inet.3 {
    static {
        route 10.255.14.178/32 next-hop gr-1/1/0.0;
    }
}
rib-groups {
    if-rib {
        import-rib [ inet.0 inet.3 ];
    }
}
Configuration Summary for Router D
Configure the Routing Instance
gre-config {
    instance-type vrf;
    interface fe-1/0/1.0;
    route-distinguisher 10.255.14.178:69;
    vrf-import import-config;
    vrf-export export-config;
    protocols {
        ospf {
            export import-config;
            area 0.0.0.0 {
                interface all;
            }
        }
    }
}
Configure MPLS
mpls {
    interface all;
}
Configure BGP
bgp {
    group pe-to-pe {
        type internal;
        neighbor 10.255.14.176 {
            family inet-vpn {
                unicast;
            }
        }
    }
}
Configure OSPF
ospf {
    traffic-engineering;
    area 0.0.0.0 {
        interface all;
        interface fxp0.0 {
            disable;
        }
        interface gr-1/1/0.0 {
            disable;
        }
    }
}
Configure the Tunnel Interface
            interface-name {
    unit 0 {
        tunnel {
            source 10.255.14.178;
            destination 10.255.14.176;
        }
        family inet;
        family mpls;
    }
}
Configure the Routing Options
interface-routes {
    rib-group inet if-rib;
}
rib inet.3 {
    static {
        route 10.255.14.176/32 next-hop gr-1/1/0.0;
    }
}
rib-groups {
    if-rib {
        import-rib [ inet.0 inet.3 ];
    }
}
Configuring a GRE Tunnel Interface Between a PE and CE Router
This example shows how to configure a GRE tunnel interface between a PE router and a CE router. You can use this configuration to tunnel VPN traffic across a non-MPLS core network. The network topology used in this example is shown in Figure 4.

For this example, complete the procedures described in the following sections:
- Configuring the Routing Instance Without the Encapsulating Interface
- Configuring the Routing Instance with the Encapsulating Interface
- Configuring the GRE Tunnel Interface on Router CE1
Configuring the Routing Instance Without the Encapsulating Interface
You can configure the routing instance either with or without the encapsulating interface. The following sections explain how to configure the routing instance without it:
- Configuring the Routing Instance on Router PE1
- Configuring the GRE Tunnel Interface on Router PE1
- Configuring the Encapsulation Interface on Router PE1
Configuring the Routing Instance on Router PE1
Configure the routing instance on Router PE1:
[edit routing-instances]
vpna {
    instance-type vrf;
    interface gr-1/2/0.0;
    route-distinguisher 10.255.14.174:1;
    vrf-import vpna-import;
    vrf-export vpna-export;
    protocols {
        bgp {
            group vpna {
                type external;
                peer-as 100;
                as-override;
                neighbor 10.49.2.1;
            }
        }
    }
}
Configuring the GRE Tunnel Interface on Router PE1
Configure the GRE tunnel interface on Router PE1:
[edit interfaces gr-1/2/0]
unit 0 {
    tunnel {
        source 192.168.197.249;
        destination 192.168.197.250;
    }
    family inet {
        address 10.49.2.2/30;
    }
}
In this example, interface t3-0/1/3 acts as the encapsulating
interface for the GRE tunnel.
When you configure the clear-dont-fragment-bit statement on an interface with the MPLS protocol family enabled,
you must specify an MTU value. This MTU value must not be greater
than the maximum supported value, which is 9192.
For example:
user@host# show interfaces gr-1/2/0
unit 0 {
    clear-dont-fragment-bit;
    family inet {
        mtu 9100;
        address 10.10.1.1/32;
    }
    family mpls {
        mtu 9100;
    }
}
Configuring the Encapsulation Interface on Router PE1
Configure the encapsulation interface on Router PE1:
[edit interfaces t3-0/1/3]
unit 0 {
    family inet {
        address 192.168.197.249/30;
    }
}
Configuring the Routing Instance with the Encapsulating Interface
If the tunnel-encapsulating interface, t3-0/1/3,
is also configured under the routing instance, then you need to specify
the name of that routing instance under the interface definition.
The system uses this routing instance to search for the tunnel destination
address.
To configure the routing instance with the encapsulating interface, you perform the steps in the following sections:
- Configuring the Routing Instance on Router PE1
- Configuring the GRE Tunnel Interface on Router PE1
- Configuring the Encapsulation Interface on Router PE1
Configuring the Routing Instance on Router PE1
If you configure the tunnel-encapsulating interface under the routing instance, then configure the routing instance on Router PE1:
[edit routing-instances]
vpna {
    instance-type vrf;
    interface gr-1/2/0.0;
    interface t3-0/1/3.0;
    route-distinguisher 10.255.14.174:1;
    vrf-import vpna-import;
    vrf-export vpna-export;
    protocols {
        bgp {
            group vpna {
                type external;
                peer-as 100;
                as-override;
                neighbor 10.49.2.1;
            }
        }
    }
}
Configuring the GRE Tunnel Interface on Router PE1
Configure the GRE tunnel interface on Router PE1:
[edit interfaces gr-1/2/0]
unit 0 {
    tunnel {
        source 192.168.197.249;
        destination 192.168.197.250;
        routing-instance {
            destination vpna;
        }
    }
    family inet {
        address 10.49.2.2/30;
    }
}
When you configure the clear-dont-fragment-bit statement on an interface with the MPLS protocol family enabled,
you must specify an MTU value. This MTU value must not be greater
than the maximum supported value, which is 9192.
For example:
user@host# show interfaces gr-1/2/0
unit 0 {
    clear-dont-fragment-bit;
    family inet {
        mtu 9100;
        address 10.10.1.1/32;
    }
    family mpls {
        mtu 9100;
    }
}
Configuring the Encapsulation Interface on Router PE1
Configure the encapsulation interface on Router PE1:
[edit interfaces t3-0/1/3]
unit 0 {
    family inet {
        address 192.168.197.249/30;
    }
}
Configuring the GRE Tunnel Interface on Router CE1
Configure the GRE tunnel interface on Router CE1:
[edit interfaces gr-1/2/0]
unit 0 {
    tunnel {
        source 192.168.197.250;
        destination 192.168.197.249;
    }
    family inet {
        address 10.49.2.1/30;
    }
}