Redirect Web Filtering
The redirect Web filtering solution intercepts HTTP requests and sends them to an external URL filtering server, provided by Websense, to determine whether to block the requests. For more information, see the following topics:
Understanding Redirect Web Filtering
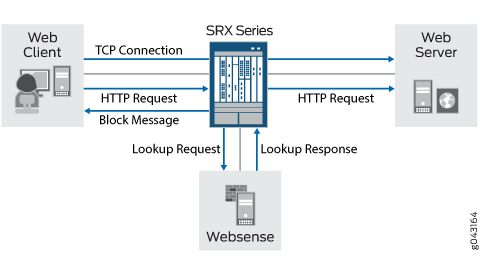
With redirect Web filtering, the Web filtering module intercepts an HTTP request. The URL in the request is then sent to the external Websense server, which makes a permit or a deny decision. If access is permitted to the URL in question, the original HTTP request and all the subsequent requests are sent to the intended HTTP server. But if access is denied to the URL in question, a blocking message is sent to the client.
This is a general description of how Web traffic is intercepted, redirected, and acted upon by the Web filtering module:
A Web client establishes a TCP connection with the webserver.
The Web client then sends an HTTP request.
The device intercepts the requests and extracts the URL. The URL is checked against global Web filtering allowlists and blocklists. If no match is made, the Websense server configuration parameters are utilized. Otherwise the process continues with step 6.
The URL is sent to the Websense server for checking,
The Websense server returns a response indicating whether or not the URL is to be permitted or blocked.
If access is allowed, the original HTTP request is sent to the webserver. If access is denied, the device sends a blocking message to the client and tears down the TCP connection.
Web filtering is performed on all the methods defined in HTTP 1.0 and HTTP 1.1. However, redirect Web filtering uses destination IP as URL when it is checking HTTPS traffic.
Decision making from real-time options provides a higher level of accuracy, therefore caching for redirect Web filtering is not supported.
Redirect Web filtering does not require a subscription license.
User Messages and Redirect URLs for Web Filtering
Starting with Junos
OS Release 17.4R1, a new option, custom-message, is added
for the custom-objects statement that enables you to configure
user messages and redirect URLs to notify users when a URL is blocked
or quarantined for each EWF category. The custom-message option has the following mandatory attributes:
Name: Name of the custom message; maximum length is 59 ASCII characters.
Type: Type of custom message:
user-messageorredirect-url.Content: Content of the custom message; maximum length is 1024 ASCII characters.
You configure a user message or redirect URL as a custom object and assign the custom object to an EWF category.
User messages indicate that website access has been blocked by an organization's access policy. To configure a user message, include the
type user-message content message-textstatement at the[edit security utm custom-objects custom-message message]hierarchy level.Redirect URLs redirect a blocked or quarantined URL to a user-defined URL. To configure a redirect URL, include the
type redirect-url content redirect-urlstatement at the[edit security utm custom-objects custom-message message]hierarchy level.
The custom-message option provides the following
benefits:
You can configure a separate custom message or redirect URL for each EWF category.
The
custom-messageoption enables you to fine-tune messages to support your polices to know which URL is blocked or quarantined.
Dynamic Support for New Websense EWF Categories
Starting with Junos OS Release 17.4R1, you can download and dynamically load new Enhanced Web Filtering (EWF) categories. The downloading and dynamic loading of the new EWF categories do not require a software upgrade. Websense occasionally releases new EWF categories. EWF classifies websites into categories according to host, URL, or IP address and performs filtering based on the categories. Users can leverage new categories as soon as they are available rather than waiting for a patch release.
Existing configurations are not affected by the new categories but can be modified to make use of the new categories.
See Also
Example: Enhancing Security by Configuring Redirect Web Filtering Using Custom Objects
This example shows how to manage Internet usage by configuring redirect Web filtering using custom objects and preventing access to inappropriate Web content.
Requirements
Before you begin, learn more about Web filtering. See Web Filtering Overview.
Overview
The benefit of using Web filtering is that it extracts the URLs from HTTP request messages and performs filtering according to the requirements. The advantage of configuring redirect Web filtering is that it extracts the URLs from the HTTP requests and sends them to an external URL filtering server to determine whether to allow or deny access.
In this example you configure redirect Web filtering custom objects, redirect Web filtering feature profiles, and redirect Web filtering Content Security policies. You also attach redirect Web filtering Content Security policies to security policies.
The default websense-redirect server port number is 15868.
You select fallback settings (block or log-and-permit) for this profile, in case errors occur in each configured category. This example sets fallback settings to block the profile. You enter the number of sockets used for communicating between the client and the server. The default is 32 for SRX Series Firewalls.
Finally, you enter a timeout value in seconds. Once this limit is reached, fail mode settings are applied. The default is 15 seconds, and you can enter a value from 1 to 1800 seconds. This example sets the timeout value to 10.
Topology
Figure 1 shows the overall architecture for the Websense redirect feature.
Configuration
- Configuring Redirect Web Filtering Custom Objects
- Configuring the Redirect Web Filtering Feature Profiles
- Configuring Redirect Web Filtering Content Security Policies and Attaching the Redirect Web Filtering Content Security Policies to Security Policies
Configuring Redirect Web Filtering Custom Objects
CLI Quick Configuration
To quickly configure this section of the example,
copy the following commands, paste them into a text file, remove any
line breaks, change any details necessary to match your network configuration,
copy and paste the commands into the CLI at the [edit] hierarchy
level, and then enter commit from configuration mode.
set security utm custom-objects url-pattern urllist4 value 1.2.3.4
set security utm custom-objects url-pattern urllistblack value http://www.untrusted.com
set security utm custom-objects url-pattern urllistblack value 13.13.13.13
set security utm custom-objects url-pattern urllistwhite value http://www.trusted.com
set security utm custom-objects url-pattern urllistwhite value 7.7.7.7
set security utm custom-objects custom-url-category custurl4 value urllist4
set security utm custom-objects custom-url-category custblacklist value urllistblack
set security utm custom-objects custom-url-category custwhitelist value urllistwhite
Step-by-Step Procedure
To configure redirect Web filtering custom objects:
Create custom objects and create the URL pattern list.
[edit security utm]
user@host# set custom-objects url-pattern urllist4 value [http://www.example.net 1.2.3.4]
Configure the custom URL category list custom object using the URL pattern list.
[edit security utm]
user@host# set custom-objects custom-url-category custurl4 value urllist4
Create a list of untrusted sites
[edit security utm]
user@host# set custom-objects url-pattern urllistblack value [http://www.untrusted.com 13.13.13.13]
Configure the custom URL category list custom object using the URL pattern list of untrusted sites.
[edit security utm]
user@host# set custom-objects custom-url-category custblacklist value urllistblack
Create a list of trusted sites.
[edit security utm]
user@host# set custom-objects url-pattern urllistwhite value [http://www.trusted.com 7.7.7.7]
Configure the custom URL category list custom object using the URL pattern list of trusted sites.
[edit security utm]
user@host# set custom-objects custom-url-category custwhitelist value urllistwhite
Results
From configuration mode, confirm your configuration
by entering the show security utm custom-objects command.
If the output does not display the intended configuration, repeat
the configuration instructions in this example to correct it.
    [edit]
    userhost# show security utm custom-objects
    url-pattern {

        urllist4 {
            value [ http://www.example.net 1.2.3.4 ];
        }
        urllistblack {
            value [ http://www.untrusted.com 13.13.13.13 ];
        }
        urllistwhite {
            value [ http://www.trusted.com 7.7.7.7 ];
        }
    }
        custom-url-category {
            custurl4 {
                value urllist4;
            }
            custblacklist {
                value urllistblack;
            }
            custwhitelist {
                value urllistwhite;
            }
        }
If you are done configuring the device, enter commit from configuration mode.
Configuring the Redirect Web Filtering Feature Profiles
CLI Quick Configuration
To quickly configure this section of the example,
copy the following commands, paste them into a text file, remove any
line breaks, change any details necessary to match your network configuration,
copy and paste the commands into the CLI at the [edit] hierarchy
level, and then enter commit from configuration mode.
set security utm feature-profile web-filtering url-whitelist custwhitelist
set security utm feature-profile web-filtering url-blacklist custblacklist
set security utm feature-profile web-filtering type websense-redirect
set security utm feature-profile web-filtering websense-redirect profile websenseprofile1 server host Websenseserver
set security utm feature-profile web-filtering websense-redirect profile p1 category cust-white-list  action log-and-permit
set security utm feature-profile web-filtering websense-redirect profile p1 category cust-list2  action permit
set security utm feature-profile web-filtering websense-redirect profile websenseprofile1 server port 15868
set security utm feature-profile web-filtering websense-redirect profile websenseprofile1 fallback-settings server-connectivity block
set security utm feature-profile web-filtering websense-redirect profile websenseprofile1 fallback-settings timeout block
set security utm feature-profile web-filtering websense-redirect profile websenseprofile1 fallback-settings too-many-requests block
set security utm feature-profile web-filtering websense-redirect profile websenseprofile1 timeout 10
set security utm feature-profile web-filtering websense-redirect profile websenseprofile1 sockets 1
Step-by-Step Procedure
The following example requires you to navigate various levels in the configuration hierarchy. For instructions on how to do that, see Using the CLI Editor in Configuration Mode in the CLI User Guide.
To configure redirect Web filtering feature profiles:
Configure the Web filtering URL blocklist.
[edit security utm feature-profile web-filtering]
user@host# set url-blacklist custblacklist
Configure the Web filtering URL allowlist.
[edit security utm feature-profile web-filtering]
user@host# set url-whitelist custwhitelist
Specify the Web filtering type, create a profile name, and set the server name or IP address.
[edit security utm feature-profile web-filtering]
user@host# set websense-redirect profile websenseprofile1 server host Websenseserver
Configure the custom category action
log-and-permitandpermitfor the URL allowlist and cust-list2, respectively.[edit security utm feature-profile web-filtering] user@host# set websense-redirect profile websenseprofile1 category cust-white-list action log-and-permit user@host# set websense-redirect profile websenseprofile1 category cust-list2 action permit
Enter the port number for communicating with the server.
[edit security utm feature-profile web-filtering]
user@host# set websense-redirect profile websenseprofile1 server port 15868
Configure the fallback settings action
blockfor this profile.[edit security utm feature-profile web-filtering] user@host# set websense-redirect profile websenseprofile1 fallback-settings default block
user@host# set websense-redirect profile websenseprofile1 fallback-settings server-connectivity block
user@host# set websense-redirect profile websenseprofile1 fallback-settings timeout block
user@host# set websense-redirect profile websenseprofile1 fallback-settings too-many-requests block
Enter the number of sockets used for communicating between the client and the server.
[edit security utm feature-profile web-filtering]
user@host# set websense-redirect profile websenseprofile1 sockets 1
Enter a timeout value, in seconds.
[edit security utm feature-profile web-filtering]
user@host# set .websense-redirect profile websenseprofile1 timeout 10
Results
From configuration mode, confirm your configuration
by entering the show security utm feature-profile command.
If the output does not display the intended configuration, repeat
the configuration instructions in this example to correct it.
[edit]
userhost# show security utm feature-profile
    web-filtering {
        url-whitelist custwhitelist;
        url-blacklist custblacklist;
        type websense-redirect {
            profile websenseprofile1 {
                server {
                    host Websenseserver;
                    port 15868;
                    }
                    category {
                    cust-white-list {
                    action log-and-permit ;
                    cust-list2 {
                     action permit;
                    }
                    }
                }
                fallback-settings {
                    server-connectivity block;
                    timeout block;
                    too-many-requests block;
                }
                timeout 10;
                sockets 1;
            }
        }
    }
        content-filtering {
            profile contentfilter1;
        }
If you are done configuring the device, enter commit from configuration mode.
Configuring Redirect Web Filtering Content Security Policies and Attaching the Redirect Web Filtering Content Security Policies to Security Policies
CLI Quick Configuration
To quickly configure this section of the example,
copy the following commands, paste them into a text file, remove any
line breaks, change any details necessary to match your network configuration,
copy and paste the commands into the CLI at the [edit] hierarchy
level, and then enter commit from configuration mode.
set security utm utm-policy utmp6 web-filtering http-profile websenseprofile1
set security policies from-zone trust to-zone untrust policy p6 match source-address any
set security policies from-zone trust to-zone untrust policy p6 match destination-address any
set security policies from-zone trust to-zone untrust policy p6 match application junos-http
set security policies from-zone trust to-zone untrust policy p6 then permit application-services utm-policy utmp6
Step-by-Step Procedure
To configure a Content Security policy and attach it to a security policy:
-
Create the Content Security policy referencing a profile.
[edit security utm]
user@host# set utm-policy utmp6 web-filtering http-profile websenseprofile1
Create and configure the security policy.
[edit security policies from-zone trust to-zone untrust policy p6]
user@host# set match source-address any
user@host#  set match destination-address any
user@host# set match application junos-http
-
Attach the Content Security policy to the security policy.
[edit security policies from-zone trust to-zone untrust policy p6]
user@host# set then permit application-services utm-policy utmp6
Results
From configuration mode, confirm your configuration
by entering the show security utm command. If the output
does not display the intended configuration, repeat the configuration
instructions in this example to correct it.
[edit]
userhost# show security utm
utm-policy utmp6 {
    web-filtering {
        http-profile websenseprofile1;
    }
}
From configuration mode, confirm your configuration by entering
the show security policies command. If the output does
not display the intended configuration, repeat the configuration instructions
in this example to correct it.
[edit]
userhost# show security policies
    from-zone trust to-zone untrust {
        policy p6 {
            match {
                source-address any;
                destination-address any;
                application junos-http;
            }
            then {
                permit {
                    application-services {
                        utm-policy utmp6;
                    }
                }
            }
        }
    }
If you are done configuring the device, enter commit from configuration mode.
Verification
To confirm that the configuration is working properly, perform these tasks:
- Verifying the Configuration of Redirect Web Filtering Custom Objects
- Verifying the Configuration of Redirect Web Filtering Feature Profiles
- Verifying the Attachment of Redirect Web Filtering Content Security Policies to Security Policies
Verifying the Configuration of Redirect Web Filtering Custom Objects
Purpose
Verify the configuration of redirect Web filtering custom objects.
Action
From the top of the configuration in configuration mode,
enter the show security utm custom-objects command.
    [edit]
    userhost# show security utm custom-objects
    url-pattern {

        urllist4 {
            value [ http://www.example.net 1.2.3.4 ];
        }
        urllistblack {
            value [ http://www.untrusted.com 13.13.13.13 ];
        }
        urllistwhite {
            value [ http://www.trusted.com 7.7.7.7 ];
        }
    }
        custom-url-category {
            custurl4 {
                value urllist4;
            }
            custblacklist {
                value urllistblack;
            }
            custwhitelist {
                value urllistwhite;
            }
        }
Meaning
The sample output shows the list of custom objects created.
Verifying the Configuration of Redirect Web Filtering Feature Profiles
Purpose
Verify the configuration of redirect Web filtering feature profiles.
Action
From the top of the configuration in configuration mode,
enter the show security utm feature-profile command.
[edit]
userhost# show security utm feature-profile
    web-filtering {
        url-whitelist custwhitelist;
        url-blacklist custblacklist;
        type websense-redirect {
            profile websenseprofile1 {
                server {
                    host Websenseserver;
                    port 15868;
                }
                fallback-settings {
                    server-connectivity block;
                    timeout block;
                    too-many-requests block;
                }
                timeout 10;
                sockets 1;
            }
        }
    }
        content-filtering {
            profile contentfilter1;
        }
Meaning
The sample output shows the feature profile configured for a Websense redirect server.
Verifying the Attachment of Redirect Web Filtering Content Security Policies to Security Policies
Purpose
Verify the attachment of the newly created redirect Web filtering Content Security policies to the security policies.
Action
From the top of the configuration in configuration mode,
enter the show security utm and show security policies commands.
[edit]
userhost# show security utm
utm-policy utmp6 {
    web-filtering {
        http-profile websenseprofile1;
    }
}
[edit]
userhost# show security policies
    from-zone trust to-zone untrust {
        policy p6 {
            match {
                source-address any;
                destination-address any;
                application junos-http;
            }
            then {
                permit {
                    application-services {
                        utm-policy utmp6;
                    }
                }
            }
        }
    }
Meaning
The sample output shows the security policies to which the newly created redirect Web filtering Content Security policies are attached.
Change History Table
Feature support is determined by the platform and release you are using. Use Feature Explorer to determine if a feature is supported on your platform.
custom-message, is added
for the custom-objects statement that enables you to configure
user messages and redirect URLs to notify users when a URL is blocked
or quarantined for each EWF category.