Designing a Captive Portal Authentication Login Page on an MX Series Router
You can set up captive portal authentication on your switch to redirect all Web browser requests to a login page that requires the user to input a username and password before they are allowed access.Upon successful authentication, the user is allowed access to the network and redirected to the original page requested.
Junos OS provides a customizable template for the captive portal window that allows you to easily design and modify the look of the captive portal login page. You can modify the design elements of the template to change the look of your captive portal login page and to add instructions or information to the page. You can also modify any of the design elements of a captive portal login page.
The first screen displayed before the captive login page requires the user to read the “Terms and Conditions of Use”. By clicking the Agree button, the user can access the captive portal login page.
Figure 1 shows an example of a captive portal login page:
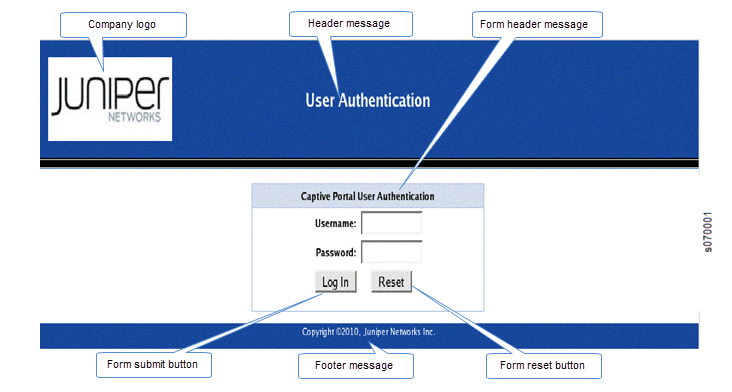
Table 1 summarizes the configurable elements of a captive portal login page.
| Element | CLI Statement | Description |
|---|---|---|
Footer background color |
footer-bgcolor hex-color |
The HTML hexadecimal code for the background color of the captive portal login page footer. |
Footer message |
footer-message text-string |
Text displayed in the footer of the captive portal login page. You can include copyright information, links, and additional information such as help instructions, legal notices, or a privacy policy The default text shown in the footer is Copyright @2010, Juniper Networks Inc. |
Footer text color |
footer- text-color color |
Color of the text in the footer. The default color is white. |
Form header background color |
form-header-bgcolor hex-color |
The HTML hexadecimal code for the background color of the header bar across the top of the form area of the captive portal login page. |
Form header message |
form-header-message text-string |
Text displayed in the header of the captive portal login page. The default text is Captive Portal User Authentication |
Form header text color |
form-header- text- color color |
Color of the text in the form header. The default color is black. |
Form reset button label |
form-reset-label label-name |
Using the Reset button, the user can clear the username and password fields on the form. |
Form submit button label |
form-submit-label label-name |
Using the Login button, the user can submit the login information. |
Header background color |
header-bgcolor hex-color |
The HTML hexadecimal code for the background color of the captive portal login page header. |
Header logo |
header-logo filename |
Filename of the file containing the image of the logo that you want to appear in the header of the captive portal login page. The image file can be in GIF, JPEG, or PNG format You can upload a logo image file to the switch. Copy the logo to the /var/tmp directory on the switch (during commit, the files are saved to persistent locations). If you do not specify a logo image, the Juniper Networks logo is displayed. |
Header message |
header-message text-string |
Text displayed in the page header. The default text is User Authentication. |
Header text color |
header-text- colorcolor |
Color of the text in the header. The default color is white. |
Post-authentication URL |
post-authentication-url url |
URL to which the users are directed on successful authentication. By default, users are directed to the page they had originally requested. |
To design the captive portal login page:
Now you can commit the configuration.
For the custom options that you do not specify, the default value is used.