Root Protection for VPLS Multihome Environments
Understanding VPLS Multihoming
Redundancy is built into many networks through the use of alternate links and paths, which often take the shape of rings. When multiple hosts are attached to customer edge (CE) routers and provider edge (PE) routers to secure virtual private LAN service (VPLS), this technique is often called multihoming.
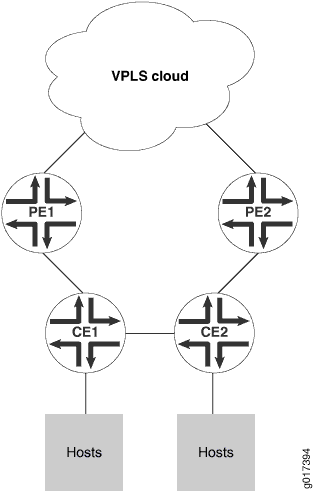
Figure 1 shows hosts connected to CE routers and to a VPLS network through two PE routers. The CE routers are also connected, forming a kind of ring structure.
- Benefits of Multihoming
- How Does Multihoming Work?
- VPLS Multihoming Hold Time Before Switching to Primary Priority
- VPLS Multihoming Bridge Flush of MAC Cache on Topology Change
- VPLS Multihoming System Identifiers for Bridges in the Ring
- VPLS Multihoming Priority of the Backup Bridge
Benefits of Multihoming
Multihoming multihoming is basically giving your computing device or network a presence on more than one network. When both links are up, both links are fully utilized, increasing overall throughput. If one of the links fails, the other still carries traffic so you have redundancy.
Multihoming is used in network bridges, repeaters, range extenders, firewalls, proxy servers, gateways, and when using a virtual machine, configured to use network address translation (NAT).
How Does Multihoming Work?
The two PE routers have their own links to a VPLS network service as shown in Figure 1, but are not directly connected to each other. All four edge routers run some type of spanning-tree protocol with root protection enabled, and only one PE interface will be in the forwarding state, the other being blocked.
Assume this forwarding interface is through PE1. If the link between CE1 and CE2 fails, then the blocking PE2 interface must detect a root protection switch and move to the forwarding state. All of the MAC addresses learned by CE2 that connect to the VPLS network service through PE1 need to be flushed. In the same way, when the link between CE1 and CE2 is restored, PE2 again detects the root protection switch and begins blocking again. Now all of the MAC addresses learned by CE2 that connect through PE2 need to be flushed. All of this is controlled by configuring VPLS root protection topology change actions on the CE routers.
The Layer 2 ring connects to the multiprotocol link switching (MPLS) infrastructure through two PE routers. Link breaks on the ring are protected by running a version of the spanning-tree protocol with the root-protect option enabled.
The virtual private network (VPN) protocols at Layer 3, however, are not aware of the blocking state that results from this root protection setup (rings or loops are not permitted at Layer 2 because the Layer 2 protocols will not function properly).
Multiple hosts attach to CE routers, which are attached to each other as well as to the PE routers that access the VPLS network cloud. Any single link between the edge routers can fail without impacting the hosts’ access to the VPLS services.
VPLS Multihoming Hold Time Before Switching to Primary Priority
At a global level, each type of spanning-tree protocol has a priority hold time associated with it. This is the number of seconds, in the range from 1 through 255 seconds, that the system waits to switch to the primary priority when the first core domain comes up. The default is 2 seconds. This allows the maximum number of core domains to come up, and some might be slower than others.
The default number of seconds to hold before switching to the primary priority when the first core domain comes up is 2 seconds.
When an MX Series router or an EX Series switch in a VPLS multihomed Layer 2 ring is running a spanning-tree protocol with root protection enabled, you can modify the default actions taken by the router or switch when the topology changes. To do this, configure the VPLS root protection topology change actions.
You can include the statement at the [edit protocols (mstp
| rstp | vstp)] hierarchy level (to control global spanning-tree
protocol behavior) or at the [edit protocols vstp vlan vlan-id] hierarchy level (to control a particular
VLAN).
VPLS root topology change actions are configured independently of VPLS, the spanning-tree protocol, or the spanning-tree protocol root protect option.
VPLS Multihoming Bridge Flush of MAC Cache on Topology Change
By default, if root protect is enabled and then the topology changes, the bridges do not flush the media access control (MAC) address cache of the MAC addresses learned when other interface ports were blocked.
To change the default behavior, you can use the statement vpls-flush-on-topology-change.
You can include the statement at the [edit protocols (mstp
| rstp | vstp)] hierarchy level (to control global spanning-tree
protocol behavior) or at the [edit protocols vstp vlan vlan-id] hierarchy level (to control a particular
VLAN).
Specifically, MAC flush messages are sent from the blocked
PE to LDP peers based on the mapping of system identifier to IP addresses
as specified using the system-id statement.
VPLS root topology change actions are configured independently of VPLS, the spanning-tree protocol, or the spanning-tree protocol root protect option.
However, to keep the Layer 2 ring functioning in a multihomed environment with link failures, the spanning-tree protocol running on the MX Series routers requires the following additional configuration:
The VPN protocols have to act on the blocking and unblocking of interfaces by the spanning-tree protocol. Specifically, media access control (MAC) flush messages need to be sent by the blocking PE router to LDP peers in order to flush the MAC addresses learned when other interface ports were blocked.
Also, if an active PE router with VPLS root protection bridging enabled loses VPLS connectivity, root protection requires that the bridge switch to the other PE router to maintain connectivity. The spanning-tree protocol needs to be aware of the status of the VPLS connectivity on the PE router. If the MAC address cache is not flushed when the topology changes, frames could be sent to the wrong device.
You can control the actions taken by the MX Series router when the topology changes in a multihomed Layer 2 ring VPLS environment using VPLS root protection.
VPLS Multihoming System Identifiers for Bridges in the Ring
When an MX Series router or an EX Series switch in a VPLS multihomed Layer 2 ring is running a spanning-tree protocol with root protection enabled, you can modify the default actions taken by the router or switch when the topology changes. To do this, configure the VPLS root protection topology change actions.
The system identifier for bridges in the ring is not configured by default.
You can include the statement at the [edit protocols (mstp
| rstp | vstp)] hierarchy level (to control global spanning-tree
protocol behavior) or at the [edit protocols vstp vlan vlan-id] hierarchy level (to control a particular
VLAN).
VPLS root topology change actions are configured independently of VPLS, the spanning-tree protocol, or the spanning-tree protocol root protect option.
VPLS Multihoming Priority of the Backup Bridge
When an MX Series router or EX Series switch in a VPLS multihomed Layer 2 ring is running a spanning-tree protocol with root protection enabled, you can modify the default actions taken by the router or switch when the topology changes. To do this, configure the VPLS root protection topology change actions.
The default value of the backup bridge is 32,768. You can set the backup bridge priority to a value from 0 through 61440, in increments of 4096.
To change the default value, you can use the following statement backup-bridge-priority vpls-ring-backup-bridge-priority
You can include the statement at the [edit protocols (mstp
| rstp | vstp)] hierarchy level (to control global spanning-tree
protocol behavior) or at the [edit protocols vstp vlan vlan-id] hierarchy level (to control a particular
VLAN).
VPLS root topology change actions are configured independently of VPLS, the spanning-tree protocol, or the spanning-tree protocol root protect option.
Understanding Bridge Priority for Election of Root Bridge and Designated Bridge
Use the bridge priority to control which bridge is elected as the root bridge and also to control which bridge is elected the root bridge when the initial root bridge fails.
The root bridge for each spanning-tree protocol instance is determined by the bridge ID. The bridge ID consists of a configurable bridge priority and the MAC address of the bridge. The bridge with the lowest bridge ID is elected as the root bridge. If the bridge priorities are equal or if the bridge priority is not configured, the bridge with the lowest MAC address is elected the root bridge.
The bridge priority can also be used to determine which bridge becomes the designated bridge for a LAN segment. If two bridges have the same path cost to the root bridge, the bridge with the lowest bridge ID becomes the designated bridge.
The bridge priority can be set only in increments of 4096.
Consider a sample scenario in which a dual-homed customer edge (CE)
router is connected to two other provider edge (PE) routers, which
function as the VPLS PE routers, with MSTP enabled on all these routers,
and with the CE router operating as the root bridge. Integrated Routing
and Bridging (IRB) interface is configured for the VPLS routing instances
on the routers. In such a network, the MAC addresses that are learned
in the VPLS domain continuously move between the LSI or virtual tunnel
(VT) interfaces and the VPLS interfaces on both the PE routers. To
avoid the continuous movement of the MAC addresses, you must configure
root protection by including the no-root-port statement
at the [edit routing-instances routing-instance-name protocols mstp interface interface-name] hierarchy level and configure the bridge priority as zero by including
the bridge priority 0 statement at the [edit routing-instances routing-instance-name protocols mstp] hierarchy
level on the PE routers. This configuration on the PE routers is required
to prevent the CE-side facing interfaces from becoming the root bridge.
Understanding Root Protection for Spanning-Tree Instance Interfaces in a Layer 2 Switched Network
Peer STP applications running on interfaces use BPDUs to communicate. Ultimately, the exchange of BPDUs determines which interfaces block traffic and which interfaces become root ports and forward traffic.
A root port elected through this process has the possibility of being wrongly elected. A user bridge application running on a PC can generate BPDUs, too, and interfere with root port election. This is when root protection is useful.
- Benefits of Spanning Tree Protocol Root Protection
- How Root Protection Works
- Where Should I Enable Root Protection?
Benefits of Spanning Tree Protocol Root Protection
Root protection allows network administrators to manually enforce the root bridge placement in a Layer 2 switched network.
How Root Protection Works
When root protection is enabled on an interface, it is enabled for all the STP instances on that interface. If the bridge receives superior BPDUs on a port that has root protect enabled, that port transitions to a root-prevented STP state and the interface is blocked. This prevents a bridge that should not be the root bridge from being elected the root bridge. The interface is blocked only for instances for which it receives superior BPDUs. Otherwise, it participates in the spanning-tree topology.
After the bridge stops receiving superior BPDUs on the port with root protect enabled and the received BPDUs time out, that port transitions back to the STP-designated port state.
By default, root protect is disabled.
An interface can be configured for either root protection or loop protection, but not for both.
Where Should I Enable Root Protection?
Enable root protection on interfaces that should not receive superior bridge protocol data units (BPDUs) from the root bridge and must not be elected as the root port.
Interfaces that become designated ports are typically located on an administrative boundary. If the bridge receives superior STP BPDUs on a port that has root protection enabled, that port transitions to a root-prevented STP state (inconsistency state) and the interface is blocked. This blocking prevents a bridge that should not be the root bridge from being elected the root bridge. After the bridge stops receiving superior STP BPDUs on the interface with root protection, the interface returns to a listening state, followed by a learning state, and ultimately back to a forwarding state. Recovery back to the forwarding state is automatic.
Example: Configuring VPLS Root Topology Change Actions
This example configures a bridge priority of 36k, a backup bridge priority of 44k, a priority hold time value of 60 seconds, a system identifier of 000203:040506 for IP address 10.1.1.1/32, and sets the bridge to flush the MAC cache on a topology change for MSTP only.
[edit]
protocols {
    mstp {
        bridge-priority 36k;
        backup-bridge-priority 44k;
        priority-hold-time 60;
        system-id 000203:040506 {
            10.1.1.1/32;
        }
        vpls-flush-on-topology-change;
    }
}
This is not a complete configuration.
Enabling Root Protection for a Spanning-Tree Instance Interface
To enable root protect for a spanning-tree instance interface:
Configuring VPLS Root Protection Topology Change Actions to Control Individual VLAN Spanning-Tree Behavior
To configure VPLS root protection topology change actions to control a particular VLAN:
Example: Configuring Root Protection to Enforce Root Bridge Placement in Spanning Trees on non-ELS EX Series Switches
EX Series switches provide Layer 2 loop prevention through Spanning Tree Protocol (STP), Rapid Spanning Tree protocol (RSTP), and Multiple Spanning Tree Protocol (MSTP). Root protection increases the efficiency of STP, RSTP, and MSTP by allowing network administrators to manually enforce the root bridge placement in the network.
This example describes how to configure root protection on an interface on an EX Series switch:
Requirements
This example uses the following hardware and software components:
Junos OS Release 9.1 or later for EX Series switches
Four EX Series switches in an RSTP topology
Before you configure the interface for root protection, be sure you have:
RSTP operating on the switches.
By default, RSTP is enabled on all EX Series switches.
Overview and Topology
Peer STP applications running on switch interfaces exchange a special type of frame called a bridge protocol data unit (BPDU). Switches communicate interface information using BPDUs to create a loop-free topology that ultimately determines the root bridge and which interfaces block or forward traffic in the spanning tree.
However, a root port elected through this process has the possibility of being wrongly elected. A user bridge application running on a PC can generate BPDUs, too, and interfere with root port election.
To prevent this from happening, enable root protection on interfaces that should not receive superior BPDUs from the root bridge and should not be elected as the root port. These interfaces are typically located on an administrative boundary and are designated ports.
When root protection is enabled on an interface:
The interface is blocked from becoming the root port.
Root protection is enabled for all STP instances on that interface.
The interface is blocked only for instances for which it receives superior BPDUs. Otherwise, it participates in the spanning-tree topology.
An interface can be configured for either root protection or loop protection, but not for both.
Four EX Series switches are displayed in Figure 2. In this example, they are configured for RSTP and create a loop-free topology. Interface ge-0/0/7 on Switch 1 is a designated port on an administrative boundary. It connects to Switch 4. Switch 3 is the root bridge. Interface ge-0/0/6 on Switch 1 is the root port.
This example shows how to configure root protection on interface ge-0/0/7 to prevent it from transitioning to become the root port.
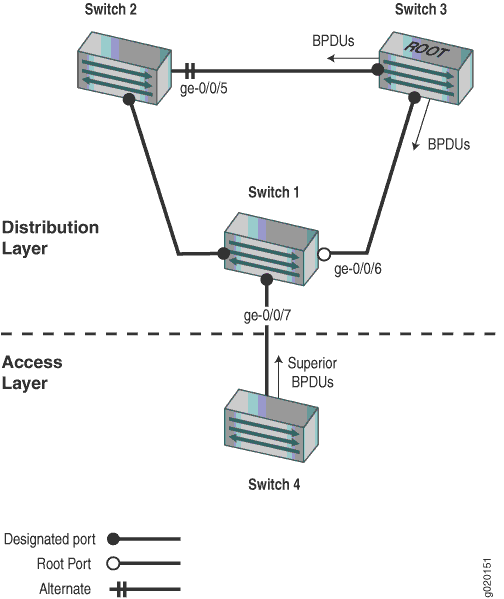
Table 1 shows the components that will be configured for root protection.
Property |
Settings |
|---|---|
Switch 1 |
Switch 1 is connected to Switch 4 through interface ge-0/0/7. |
Switch 2 |
Switch 2 is connected to Switch 1 and Switch 3. Interface ge-0/0/4 is the alternate port in the RSTP topology. |
Switch 3 |
Switch 3 is the root bridge and is connected to Switch 1 and Switch 2. |
Switch 4 |
Switch 4 is connected to Switch 1. After root protection is configured on interface ge-0/0/7, Switch 4 will send superior BPDUs that will trigger root protection on interface ge-0/0/7. |
A spanning tree topology contains ports that have specific roles:
The root port is responsible for forwarding data to the root bridge.
The alternate port is a standby port for the root port. When a root port goes down, the alternate port becomes the active root port.
The designated port forwards data to the downstream network segment or device.
This configuration example uses an RSTP topology. However, you also can configure root protection for STP or MSTP topologies at the [edit protocols (mstp | stp)] hierarchy level.
Topology
Configuration
To configure root protection on an interface:
Procedure
CLI Quick Configuration
To quickly configure root protection on interface ge-0/0/7, copy the following command and paste it into the switch terminal window:
[edit]
                         set protocols rstp interface ge-0/0/7 no-root-port
Step-by-Step Procedure
To configure root protection:
Configure interface ge-0/0/7:
[edit protocols rstp]
user@switch#
                              set interface ge-0/0/7 no-root-port
Results
Check the results of the configuration:
user@switch> show configuration protocols rstp
interface ge-0/0/7.0 {
    no-root-port;
}
Verification
To confirm that the configuration is working properly:
- Displaying the Interface State Before Root Protection Is Triggered
- Verifying That Root Protection Is Working on the Interface
Displaying the Interface State Before Root Protection Is Triggered
Purpose
Before root protection is triggered on interface ge-0/0/7, confirm the interface state.
Action
Use the operational mode command:
user@switch>                              show spanning-tree interface

Spanning tree interface parameters for instance 0

Interface    Port ID    Designated      Designated         Port    State  Role
                         port ID        bridge ID          Cost
ge-0/0/0.0     128:513      128:513  32768.0019e2503f00     20000  BLK    DIS
ge-0/0/1.0     128:514      128:514  32768.0019e2503f00     20000  BLK    DIS
ge-0/0/2.0     128:515      128:515  32768.0019e2503f00     20000  BLK    DIS
ge-0/0/3.0     128:516      128:516  32768.0019e2503f00     20000  FWD    DESG
ge-0/0/4.0     128:517      128:517  32768.0019e2503f00     20000  FWD    DESG
ge-0/0/5.0     128:518        128:2  16384.00aabbcc0348     20000  BLK    ALT
ge-0/0/6.0     128:519        128:1  16384.00aabbcc0348     20000  FWD    ROOT
ge-0/0/7.0     128:520      128:520  32768.0019e2503f00     20000  FWD    DESG
[output truncated]
Meaning
The output from the operational mode command show
spanning-tree interface shows that ge-0/0/7.0 is a
designated port in a forwarding state.
Verifying That Root Protection Is Working on the Interface
Purpose
A configuration change takes place on Switch 4. A smaller bridge priority on the Switch 4 causes it to send superior BPDUs to interface ge-0/0/7. Receipt of superior BPDUs on interface ge-0/0/7 will trigger root protection. Verify that root protection is operating on interface ge-0/0/7.
Action
Use the operational mode command:
user@switch>                              show spanning-tree interface

Spanning tree interface parameters for instance 0

Interface    Port ID    Designated      Designated         Port    State  Role
                         port ID        bridge ID          Cost
ge-0/0/0.0     128:513      128:513  32768.0019e2503f00     20000  BLK    DIS
ge-0/0/1.0     128:514      128:514  32768.0019e2503f00     20000  BLK    DIS
ge-0/0/2.0     128:515      128:515  32768.0019e2503f00     20000  BLK    DIS
ge-0/0/3.0     128:516      128:516  32768.0019e2503f00     20000  FWD    DESG
ge-0/0/4.0     128:517      128:517  32768.0019e2503f00     20000  FWD    DESG
ge-0/0/5.0     128:518        128:2  16384.00aabbcc0348     20000  BLK    ALT
ge-0/0/6.0     128:519        128:1  16384.00aabbcc0348     20000  FWD    ROOT
ge-0/0/7.0     128:520      128:520  32768.0019e2503f00     20000  BLK    DIS (Root—Incon)
[output truncated]
Meaning
The operational mode command show spanning-tree interface shows that interface ge-0/0/7.0 has transitioned to a root inconsistent state. The root inconsistent state makes the interface block, discarding any received BPDUs, and prevents the interface from becoming a candidate for the root port. When the root bridge no longer receives superior STP BPDUs from the interface, the interface will recover and transition back to a forwarding state. Recovery is automatic.
Example: Configuring Root Protection to Enforce Root Bridge Placement in Spanning Trees on EX Series Switches With ELS
This example uses Junos OS for EX Series switches with support for the Enhanced Layer 2 Software (ELS) configuration style. For ELS details, see Using the Enhanced Layer 2 Software CLI.
EX Series switches provide Layer 2 loop prevention through Spanning Tree Protocol (STP), Rapid Spanning Tree protocol (RSTP), and Multiple Spanning Tree Protocol (MSTP). Root protection increases the efficiency of STP, RSTP, and MSTP by allowing network administrators to manually enforce the root bridge placement in the network.
This example describes how to configure root protection on an interface on an EX Series switch:
Requirements
This example uses the following software and hardware components:
Junos OS Release 13.2X50-D10 or later or later for EX Series switches
Four EX Series switches in an RSTP topology
Before you configure the interface for root protection, be sure you have:
RSTP operating on the switches.
By default, RSTP is enabled on all EX Series switches.
Overview and Topology
Peer STP applications running on switch interfaces exchange a special type of frame called a bridge protocol data unit (BPDU). Switches communicate interface information using BPDUs to create a loop-free topology that ultimately determines the root bridge and which interfaces block or forward traffic in the spanning tree.
However, a root port elected through this process has the possibility of being wrongly elected. A user bridge application running on a PC can generate BPDUs, too, and interfere with root port election.
To prevent this from happening, enable root protection on interfaces that must not receive superior BPDUs from the root bridge and must not be elected as the root port. These interfaces are typically located on an administrative boundary and are designated ports.
When root protection is enabled on an interface:
The interface is blocked from becoming the root port.
Root protection is enabled for all STP instances on that interface.
The interface is blocked only for instances for which it receives superior BPDUs. Otherwise, it participates in the spanning-tree topology.
An interface can be configured for either root protection or loop protection, but not for both.
Four EX Series switches are displayed in Figure 3. In this example, they are configured
for RSTP and create a loop-free topology. Interface ge-0/0/7 on Switch 1 is a designated port on an administrative
boundary. It connects to Switch 4. Switch 3 is the
root bridge. Interface ge-0/0/6 on Switch 1 is the root
port.
This example shows how to configure root protection on interface ge-0/0/7 to prevent it from transitioning to become the root
port.
Table 2 shows the components that will be configured for root protection.
Property |
Settings |
|---|---|
Switch 1 |
Switch 1 is connected to Switch 4 through interface |
Switch 2 |
Switch 2 is connected to Switch 1 and Switch 3. Interface |
Switch 3 |
Switch 3 is the root bridge and is connected to Switch 1 and Switch 2. |
Switch 4 |
Switch 4 is connected to Switch 1. After root protection
is configured on interface |
A spanning tree topology contains ports that have specific roles:
The root port is responsible for forwarding data to the root bridge.
The alternate port is a standby port for the root port. When a root port goes down, the alternate port becomes the active root port.
The designated port forwards data to the downstream network segment or device.
This configuration example uses an RSTP topology. However, you
also can configure root protection for STP or MSTP
topologies at the [edit protocols mstp ]
hierarchy level.
Topology
Configuration
To configure root protection on an interface:
Procedure
CLI Quick Configuration
To quickly configure root protection on interface ge-0/0/7, copy the following command and paste it into the
switch terminal window:
[edit]
                         set protocols rstp interface ge-0/0/7 no-root-port
Step-by-Step Procedure
To configure root protection:
Configure interface
ge-0/0/7:[edit protocols rstp] user@switch# set interface ge-0/0/7 no-root-port
Results
Check the results of the configuration:
user@switch> show configuration protocols                   rstp
interface ge-0/0/7 {
    no-root-port;
}
Verification
To confirm that the configuration is working properly:
- Displaying the Interface State Before Root Protection Is Triggered
- Verifying That Root Protection Is Working on the Interface
Displaying the Interface State Before Root Protection Is Triggered
Purpose
Before root protection is triggered on interface ge-0/0/7, confirm the interface state.
Action
Use the operational mode command:
user@switch>                              show spanning-tree interface

                        Spanning tree interface parameters for instance 0
                      Interface    Port ID    Designated      Designated         Port    State  Role
                      port ID        bridge ID          Cost
                      ge-0/0/0     128:513      128:513  32768.0019e2503f00     20000  BLK    DIS
                      ge-0/0/1     128:514      128:514  32768.0019e2503f00     20000  BLK    DIS
                      ge-0/0/2     128:515      128:515  32768.0019e2503f00     20000  BLK    DIS
                      ge-0/0/3     128:516      128:516  32768.0019e2503f00     20000  FWD    DESG
                      ge-0/0/4     128:517      128:517  32768.0019e2503f00     20000  FWD    DESG
                      ge-0/0/5     128:518        128:2  16384.00aabbcc0348     20000  BLK    ALT
                      ge-0/0/6     128:519        128:1  16384.00aabbcc0348     20000  FWD    ROOT
                      ge-0/0/7     128:520      128:520  32768.0019e2503f00     20000  FWD    DESG
                      [output truncated]
Meaning
The output from the operational mode command show
spanning-tree interface shows that ge-0/0/7 is a designated port in a forwarding
state.
Verifying That Root Protection Is Working on the Interface
Purpose
A configuration change takes place on Switch 4. A smaller
bridge priority on the Switch 4 causes it to
send superior BPDUs to interface ge-0/0/7. Receipt of superior BPDUs on interface ge-0/0/7 will
trigger root protection. Verify that root protection
is operating on interface ge-0/0/7.
Action
Use the operational mode command:
user@switch>                              show spanning-tree interface

                        Spanning tree interface parameters for instance 0
                      Interface    Port ID    Designated      Designated         Port    State  Role
                      port ID        bridge ID          Cost
                      ge-0/0/0     128:513      128:513  32768.0019e2503f00     20000  BLK    DIS
                      ge-0/0/1     128:514      128:514  32768.0019e2503f00     20000  BLK    DIS
                      ge-0/0/2     128:515      128:515  32768.0019e2503f00     20000  BLK    DIS
                      ge-0/0/3     128:516      128:516  32768.0019e2503f00     20000  FWD    DESG
                      ge-0/0/4     128:517      128:517  32768.0019e2503f00     20000  FWD    DESG
                      ge-0/0/5     128:518        128:2  16384.00aabbcc0348     20000  BLK    ALT
                      ge-0/0/6     128:519        128:1  16384.00aabbcc0348     20000  FWD    ROOT
                      ge-0/0/7     128:520      128:520  32768.0019e2503f00     20000  BLK    DIS (Root—Incon)
                      [output truncated]
Meaning
The operational mode command show spanning-tree interface shows
that interface ge-0/0/7 has transitioned
to a root inconsistent state. The root inconsistent
state makes the interface block, discarding
any received BPDUs, and prevents the interface from becoming a candidate
for the root port. When the root bridge no longer
receives superior STP BPDUs from the interface,
the interface will recover and transition back
to a forwarding state. Recovery is automatic.