Configuring Packet Forwarding Behavior
Understanding Indirect Next Hops
Junos OS supports the concept of an indirect next hop for all routing protocols that support indirectly connected next hops, also known as third-party next hops.
Because routing protocols such as internal BGP (IBGP) can send routing information about indirectly connected routes, Junos OS relies on routes from intra-AS routing protocols (OSPF, IS-IS, RIP, and static) to resolve the best directly connected next hop. The Routing Engine performs route resolution to determine the best directly connected next hop and installs the route to the Packet Forwarding Engine.
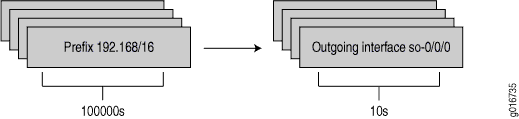
By default, Junos OS does not maintain the route for indirect next hop to forwarding next-hop binding on the Packet Forwarding Engine forwarding table. As a result, when a rerouting event occurs, potentially thousands of route to forwarding next-hop bindings must be updated, which increases the route convergence time. Figure 1 illustrates the route to forwarding next-hop bindings with indirect next hop disabled.
You can enable Junos OS to maintain the indirect next hop to forwarding next-hop binding on the Packet Forwarding Engine forwarding table. As a result, fewer route to forwarding next-hop bindings need to be updated, which improves the route convergence time. Figure 2 illustrates the route to forwarding next-hop bindings with indirect next hop enabled.

Example: Optimizing Route Reconvergence by Enabling Indirect Next Hops on the Packet Forwarding Engine
This example shows how to use indirect next hops to promote faster network convergence (for example, in BGP networks) by decreasing the number of forwarding table changes required when a change in the network topology occurs.
Requirements
No special configuration beyond device initialization is required before configuring this example.
Overview
In this example, several devices are connected over unequal-cost paths. From Device R1 to Device R2, the path through Device R3 has a higher IGP metric than the path through Device R4. Device R1 has an internal BGP connection to Device R2. Device R0 injects multiple routes into the network, and Device R1 advertises those routes to Device R2. Because Device R2 is not directly connected to Device R1, Device R2’s forwarding table contains indirect next hops. An interior gateway protocol, in this case OSPF, is running on the internal links among Devices R1, R2, R3, and R4. Each router is advertising its loopback interface IPv4 address.
On Device R2, the
indirect-next-hop
statement enables Junos OS to maintain the indirect next hop to forwarding
next-hop binding on the Packet Forwarding Engine forwarding table. As a result,
fewer route to forwarding next-hop bindings need to be updated, which improves the
route convergence time if a path fails.
Topology
Figure 3 shows the sample network.
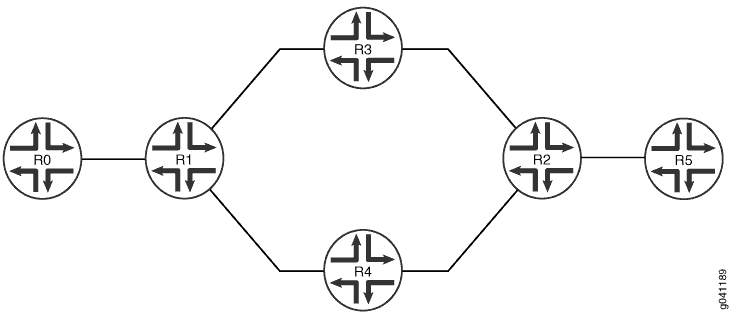
The CLI Quick Configuration section shows the full configuration on all of the devices in Figure 3. Otherwise, the example focuses on Device R0, Device R1, and Device R2.
Configuration
CLI Quick Configuration
To quickly configure this example, copy the following commands, paste them into a
text file, remove any line breaks, change any details necessary to match your
network configuration, and then copy and paste the commands into the CLI at the
[edit] hierarchy level.
Device R0
set interfaces fe-1/2/0 unit 1 family inet address 10.0.0.1/30
set interfaces lo0 unit 1 family inet address 10.1.0.1/32
set interfaces lo0 unit 1 family inet address 10.1.0.2/32
set interfaces lo0 unit 1 family inet address 10.1.0.3/32
set interfaces lo0 unit 1 family inet address 10.1.0.4/32
set interfaces lo0 unit 1 family inet address 10.1.0.5/32
set interfaces lo0 unit 1 family inet address 10.1.0.6/32
set interfaces lo0 unit 1 family inet address 10.1.0.7/32
set interfaces lo0 unit 1 family inet address 10.1.0.8/32
set interfaces lo0 unit 1 family inet address 10.1.0.9/32
set routing-options static route 0.0.0.0/0 next-hop 10.0.0.2
Device R1
set interfaces fe-1/2/0 unit 2 family inet address 10.0.0.2/30
set interfaces fe-1/2/1 unit 5 family inet address 10.0.0.5/30
set interfaces fe-1/2/2 unit 9 family inet address 10.0.0.9/30
set interfaces lo0 unit 2 family inet address 10.1.1.1/32
set protocols bgp export send-local
set protocols bgp export send-static
set protocols bgp group int type internal
set protocols bgp group int local-address 10.1.1.1
set protocols bgp group int neighbor 10.2.2.2
set protocols ospf area 0.0.0.0 interface fe-1/2/1.5
set protocols ospf area 0.0.0.0 interface fe-1/2/2.9
set protocols ospf area 0.0.0.0 interface lo0.2
set policy-options policy-statement send-local from protocol local
set policy-options policy-statement send-local from protocol direct
set policy-options policy-statement send-local then accept
set policy-options policy-statement send-static from protocol static
set policy-options policy-statement send-static then accept
set routing-options static route 10.1.0.2/32 next-hop 10.0.0.1
set routing-options static route 10.1.0.1/32 next-hop 10.0.0.1
set routing-options static route 10.1.0.3/32 next-hop 10.0.0.1
set routing-options static route 10.1.0.4/32 next-hop 10.0.0.1
set routing-options static route 10.1.0.5/32 next-hop 10.0.0.1
set routing-options static route 10.1.0.6/32 next-hop 10.0.0.1
set routing-options static route 10.1.0.7/32 next-hop 10.0.0.1
set routing-options static route 10.1.0.8/32 next-hop 10.0.0.1
set routing-options static route 10.1.0.9/32 next-hop 10.0.0.1
set routing-options autonomous-system 65500
Device R2
set interfaces fe-1/2/0 unit 14 family inet address 10.0.0.14/30
set interfaces fe-1/2/1 unit 18 family inet address 10.0.0.18/30
set interfaces fe-1/2/2 unit 21 family inet
set interfaces lo0 unit 3 family inet address 10.2.2.2/32
set protocols bgp export send-local
set protocols bgp group int type internal
set protocols bgp group int local-address 10.2.2.2
set protocols bgp group int family inet unicast
set protocols bgp group int family inet-vpn unicast
set protocols bgp group int neighbor 10.1.1.1
set protocols ospf area 0.0.0.0 interface fe-1/2/0.14
set protocols ospf area 0.0.0.0 interface fe-1/2/1.18
set protocols ospf area 0.0.0.0 interface lo0.3
set policy-options policy-statement send-local from protocol local
set policy-options policy-statement send-local from protocol direct
set policy-options policy-statement send-local then accept
set routing-options autonomous-system 65500
set routing-options forwarding-table indirect-next-hop
Device R3
set interfaces fe-1/2/0 unit 6 family inet address 10.0.0.6/30
set interfaces fe-1/2/1 unit 13 family inet address 10.0.0.13/30
set interfaces lo0 unit 4 family inet address 10.3.3.3/32
set protocols ospf area 0.0.0.0 interface fe-1/2/0.6 metric 5000
set protocols ospf area 0.0.0.0 interface fe-1/2/1.13 metric 5000
set protocols ospf area 0.0.0.0 interface lo0.4
Device R4
set interfaces fe-1/2/0 unit 10 family inet address 10.0.0.10/30
set interfaces fe-1/2/1 unit 17 family inet address 10.0.0.17/30
set interfaces lo0 unit 5 family inet address 10.4.4.4/32
set protocols ospf area 0.0.0.0 interface fe-1/2/0.10
set protocols ospf area 0.0.0.0 interface fe-1/2/1.17
set protocols ospf area 0.0.0.0 interface lo0.5
Device R5
set interfaces fe-1/2/0 unit 22 family inet address 10.0.0.22/30
set interfaces lo0 unit 6 family inet address 10.5.5.5/32
Configuring Device R0
Step-by-Step Procedure
The following example requires you to navigate various levels in the configuration hierarchy. For information about navigating the CLI, see Using the CLI Editor in Configuration Mode in the Junos OS CLI User Guide.
To configure Device R0:
-
Configure the interfaces, including multiple routes that can be injected into the network for demonstration purposes.
[edit interfaces]
user@R0# set fe-1/2/0 unit 1 family inet address 10.0.0.1/30
user@R0# set lo0 unit 1 family inet address 10.1.0.1/32
user@R0# set lo0 unit 1 family inet address 10.1.0.2/32
user@R0# set lo0 unit 1 family inet address 10.1.0.3/32
user@R0# set lo0 unit 1 family inet address 10.1.0.4/32
user@R0# set lo0 unit 1 family inet address 10.1.0.5/32
user@R0# set lo0 unit 1 family inet address 10.1.0.6/32
user@R0# set lo0 unit 1 family inet address 10.1.0.7/32
user@R0# set lo0 unit 1 family inet address 10.1.0.8/32
user@R0# set lo0 unit 1 family inet address 10.1.0.9/32
-
Configure a static default route for network reachability.
[edit routing-options]
user@R0# set static route 0.0.0.0/0 next-hop 10.0.0.2
-
If you are done configuring the device, commit the configuration.
[edit]
user@R0# commit
Configuring Device R1
Step-by-Step Procedure
The following example requires you to navigate various levels in the configuration hierarchy. For information about navigating the CLI, see Using the CLI Editor in Configuration Mode in the Junos OS CLI User Guide.
To configure Device R1:
-
Configure the interfaces, including multiple routes that can be injected into the network for demonstration purposes.
[edit interfaces]
user@R1# set fe-1/2/0 unit 2 family inet address 10.0.0.2/30
user@R1# set fe-1/2/1 unit 5 family inet address 10.0.0.5/30
user@R1# set fe-1/2/2 unit 9 family inet address 10.0.0.9/30
user@R1# set lo0 unit 2 family inet address 10.1.1.1/32
-
Configure BGP.
[edit protocols]
user@R1# set bgp export send-local
user@R1# set bgp export send-static
user@R1# set bgp group int type internal
user@R1# set bgp group int local-address 10.1.1.1
user@R1# set bgp group int neighbor 10.2.2.2
-
Configure OSPF.
[edit protocols]
user@R1# set ospf area 0.0.0.0 interface fe-1/2/1.5
user@R1# set ospf area 0.0.0.0 interface fe-1/2/2.9
user@R1# set ospf area 0.0.0.0 interface lo0.2
-
Configure the routing policies.
[edit]
user@R1# set policy-options policy-statement send-local from protocol local
user@R1# set policy-options policy-statement send-local from protocol direct
user@R1# set policy-options policy-statement send-local then accept
user@R1# set policy-options policy-statement send-static from protocol static
user@R1# set policy-options policy-statement send-static then accept
-
Configure a set of static routes to the set of interfaces configured on Device R0.
[edit]
user@R1# set routing-options static route 10.1.0.2/32 next-hop 10.0.0.1
user@R1# set routing-options static route 10.1.0.1/32 next-hop 10.0.0.1
user@R1# set routing-options static route 10.1.0.3/32 next-hop 10.0.0.1
user@R1# set routing-options static route 10.1.0.4/32 next-hop 10.0.0.1
user@R1# set routing-options static route 10.1.0.5/32 next-hop 10.0.0.1
user@R1# set routing-options static route 10.1.0.6/32 next-hop 10.0.0.1
user@R1# set routing-options static route 10.1.0.7/32 next-hop 10.0.0.1
user@R1# set routing-options static route 10.1.0.8/32 next-hop 10.0.0.1
user@R1# set routing-options static route 10.1.0.9/32 next-hop 10.0.0.1
-
Configure the autonomous system (AS) identifier.
[edit]
user@R1# set routing-options autonomous-system 65500
-
If you are done configuring the device, commit the configuration.
[edit]
user@R1# commit
Configuring Device R2
Step-by-Step Procedure
The following example requires you to navigate various levels in the configuration hierarchy. For information about navigating the CLI, see Using the CLI Editor in Configuration Mode in the Junos OS CLI User Guide.
To configure Device R2:
-
Configure the interfaces, including multiple routes that can be injected into the network for demonstration purposes.
[edit interfaces]
user@R2# set fe-1/2/0 unit 14 family inet address 10.0.0.14/30
user@R2# set fe-1/2/1 unit 18 family inet address 10.0.0.18/30
user@R2# set fe-1/2/2 unit 21 family inet address 10.0.0.21/30;
user@R2# set lo0 unit 3 family inet address 10.2.2.2/32
-
Configure BGP.
[edit]
user@R2# set protocols bgp export send-local
user@R2# set protocols bgp group int type internal
user@R2# set protocols bgp group int local-address 10.2.2.2
user@R2# set protocols bgp group int family inet unicast
user@R2# set protocols bgp group int family inet-vpn unicast
user@R2# set protocols bgp group int neighbor 10.1.1.1
-
Configure OSPF.
[edit]
user@R2# set protocols ospf area 0.0.0.0 interface fe-1/2/0.14
user@R2# set protocols ospf area 0.0.0.0 interface fe-1/2/1.18
user@R2# set protocols ospf area 0.0.0.0 interface lo0.3
-
Configure the routing policies.
[edit]
user@R2# set policy-options policy-statement send-local from protocol local
user@R2# set policy-options policy-statement send-local from protocol direct
user@R2# set policy-options policy-statement send-local then accept
-
Configure the AS identifier.
[edit]
user@R2# set routing-options autonomous-system 65500
-
Enable indirect next hops in the forwarding plane.
[edit]
user@R2# set routing-options forwarding-table indirect-next-hop
-
If you are done configuring the device, commit the configuration.
[edit]
user@R2# commit
Results
Confirm your configuration by issuing the show interfaces,
show protocols, show policy-options, and
show routing-options commands. If the output does not
display the intended configuration, repeat the instructions in this example to
correct the configuration.
Device R0
user@R0# show interfaces
fe-1/2/0 {
    unit 1 {
        family inet {
            address 10.0.0.1/30;
        }
    }
}
lo0 {
    unit 1 {
        family inet {
            address 10.1.0.1/32;
            address 10.1.0.2/32;
            address 10.1.0.3/32;
            address 10.1.0.4/32;
            address 10.1.0.5/32;
            address 10.1.0.6/32;
            address 10.1.0.7/32;
            address 10.1.0.8/32;
            address 10.1.0.9/32;
        }
    }
}
user@R0# show routing-options
static {
    route 0.0.0.0/0 next-hop 10.0.0.2;
}
Device R1
user@R1# show interfaces
fe-1/2/0 {
    unit 2 {
        family inet {
            address 10.0.0.2/30;
        }
    }
}
fe-1/2/1 {
    unit 5 {
        family inet {
            address 10.0.0.5/30;
        }
    }
}
fe-1/2/2 {
    unit 9 {
        family inet {
            address 10.0.0.9/30;
        }
    }
}
lo0 {
    unit 2 {
        family inet {
            address 10.1.1.1/32;
        }
    }
}
user@R1# show protocols
bgp {
    export [ send-local send-static ];
    group int {
        type internal;
        local-address 10.1.1.1;
        neighbor 10.2.2.2;
    }
}
ospf {
    area 0.0.0.0 {
        interface fe-1/2/1.5;
        interface fe-1/2/2.9;
        interface lo0.2;
    }
}
user@R1# show policy-options
policy-statement send-local {
    from protocol [ local direct ];
    then accept;
}
policy-statement send-static {
    from protocol static;
    then accept;
}
user@R1# show routing-options
static {
    route 10.1.0.2/32 next-hop 10.0.0.1;
    route 10.1.0.1/32 next-hop 10.0.0.1;
    route 10.1.0.3/32 next-hop 10.0.0.1;
    route 10.1.0.4/32 next-hop 10.0.0.1;
    route 10.1.0.5/32 next-hop 10.0.0.1;
    route 10.1.0.6/32 next-hop 10.0.0.1;
    route 10.1.0.7/32 next-hop 10.0.0.1;
    route 10.1.0.8/32 next-hop 10.0.0.1;
    route 10.1.0.9/32 next-hop 10.0.0.1;
}
autonomous-system 65500;
Device R2
user@R2# show interfaces
fe-1/2/0 {
    unit 14 {
        family inet {
            address 10.0.0.14/30;
        }
    }
}
fe-1/2/1 {
    unit 18 {
        family inet {
            address 10.0.0.18/30;
        }
    }
}
fe-1/2/2 {
    unit 21 {
        family inet {
            address 10.0.0.21/30
        }
    }
}
lo0 {
    unit 3 {
        family inet {
            address 10.2.2.2/32;
        }
    }
}
user@R2# show protocols
bgp {
    export send-local;
    group int {
        type internal;
        local-address 10.2.2.2;
        family inet {
            unicast;
        }
        family inet-vpn {
            unicast;
        }
        neighbor 10.1.1.1;
    }
}
ospf {
    area 0.0.0.0 {
        interface fe-1/2/0.14;
        interface fe-1/2/1.18;
        interface lo0.3;
    }
}
user@R2# show policy-options
policy-statement send-local {
    from protocol [ local direct ];
    then accept;
}
user@R2# show routing-options
autonomous-system 65500;
forwarding-table {
    indirect-next-hop;
}
Configure Device R3, Device R4, and Device R5, as shown in CLI Quick Configuration.
Verification
Confirm that the configuration is working properly.
Verifying That the Routes Have the Expected Indirect-Next-Hop Flag
Purpose
Make sure that Device R2 is configured to maintain the indirect next hop to forwarding next-hop binding on the Packet Forwarding Engine forwarding table.
Action
user@R2> show krt indirect-next-hop
show krt indirect-next-hop
Indirect Nexthop:
Index: 1048575 Protocol next-hop address: 10.255.3.1
  RIB Table: __mpls-oam__.mpls.0
  Label: Swap 299968
  Policy Version: 0                     References: 1
  Locks: 2                              0x95bc514
  Flags: 0x3
  INH Session ID: 0xa
  INH Version ID: 1
  Ref RIB Table: unknown
        Next hop: 10.50.244.9 via ge-2/0/2.0
        Label operation: Swap 299968, Push 299792(top)
        Label TTL action: no-prop-ttl, no-prop-ttl(top)
        Session Id: 0x9
      IGP FRR Interesting proto count : 0
Meaning
The 0x3 flag in the output indicates that Device R2 is
configured to maintain the indirect next hop to forwarding next-hop binding
on the Packet Forwarding Engine forwarding table. When the
indirect-next-hop statement is deleted or deactivated
from the configuration, this flag changes to 0x2. Junos MX
series routers with Trio Modular Port Concentrator (MPC) chipset supports
indirect-next-hop by default and can not be disabled. Thus, even if
indirect-next-hop is not configured under
forwarding-options, the feature will work by default.
Thus, 0x3 flag is not applicable for Trio Modular Port
Concentrator (MPCs).
The show krt indirect-next-hop command is hidden and is
therefore undocumented. The show krt indirect-next-hop
command is shown here because this is the only command that verifies the
indirect next-hop feature. The best verification method is, of course,
monitoring network performance during reconvergence after a path
failure.