Example: AS PIC Manual SA Configuration
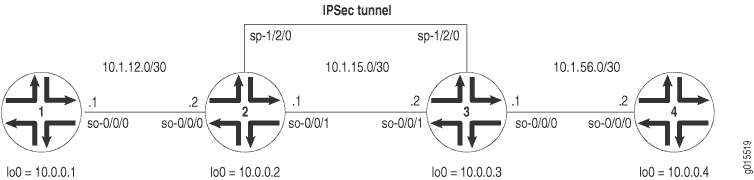
Figure 1 shows a similar IPSec topology to the one used in the ES PIC manual SA example. The difference is that Routers 2 and 3 establish an IPSec tunnel using an AS PIC and use slightly modified manual SA settings. Routers 1 and 4 again provide basic connectivity and are used to verify that the IPSec tunnel is operational.
On Router 1, provide basic OSPF connectivity to Router 2.
Router 1
[edit]
interfaces {
    so-0/0/0 {
        description "To R2 so-0/0/0";
        unit 0 {
            family inet {
                address 10.1.12.2/30;
            }
        }
    }
    lo0 {
        unit 0 {
            family inet {
                address 10.0.0.1/32;
            }
        }
    }
}
routing-options {
    router-id 10.0.0.1;
}
protocols {
    ospf {
        area 0.0.0.0 {
            interface so-0/0/0.0;
            interface lo0.0;
        }
    }
}
On Router 2, enable OSPF as the underlying routing protocol to connect to Routers 1 and 3. Configure a bidirectional manual SA in a rule called rule-manual-SA-BiEspshades
at the [edit ipsec-vpn rule] hierarchy level. Reference this rule in a service set called service-set-manual-BiEspshades at the [edit services
service-set] hierarchy level.
Configure all specifications for your manual SA. Use ESP for the protocol, 261 for the SPI, HMAC-SHA1-96 for authentication, DES-CBC for encryption, a 20-bit ASCII authentication key for the SHA-1 authentication key, and an 8-bit ASCII encryption key for the DES-CBC authentication key. (For more information about key lengths, see Authentication and Encryption Key Lengths.)
To direct traffic into the AS PIC and the IPSec tunnel, configure a next-hop style service set and add the adaptive services logical interface used as the IPSec inside interface into the OSPF configuration.
Router 2
[edit]
interfaces {
    so-0/0/0 {
        description "To R1 so-0/0/0";
        unit 0 {
            family inet {
                address 10.1.12.1/30;
            }
        }
    }
    so-0/0/1 {
        description "To R3 so-0/0/1";
        unit 0 {
            family inet {
                address 10.1.15.1/30;
            }
        }
    }
    sp-1/2/0 {
        services-options {
            syslog {
                host local {
                    services info;
                }
            }
        }
        unit 0 {
            family inet {
            }
                                 unit 1 { # sp-1/2/0.1 is the IPSec inside interface.
                family inet;
                service-domain inside;
            }
                                 unit 2 { # sp-1/2/0.2 is the IPSec outside interface.
                family inet;
                service-domain outside;
            }
        }
        lo0 {
            unit 0 {
                family inet {
                    address 10.0.0.2/32;
                }
            }
        }
    }
    routing-options {
        router-id 10.0.0.2;
    }
    protocols {
        ospf {
            area 0.0.0.0 {
                interface so-0/0/0.0;
                interface lo0.0;
                                     interface sp-1/2/0.1; # This sends OSPF traffic over the IPSec tunnel.
            }
        }
    }
    services {
                           service-set service-set-manual-BiEspshades { # Define your service set here.
                                 next-hop-service { # Required for dynamic routing protocols such as OSPF.
                inside-service-interface sp-1/2/0.1;
                outside-service-interface sp-1/2/0.2;
            }
            ipsec-vpn-options {
                                     local-gateway 10.1.15.1; # Specify the local IP address of the IPSec tunnel.
            }
                               ipsec-vpn-rules rule-manual-SA-BiEspshades; # Reference the IPSec rule here.
        }
        ipsec-vpn {
                                 rule rule-manual-SA-BiEspshades { # Define your IPSec VPN rule here.
                term term-manual-SA-BiEspshades {
                    then {
                                                 remote-gateway 10.1.15.2; # The remote IP address of the IPSec tunnel.
                                                   manual { # Define the manual SA specifications here.
                                                         direction bidirectional {
                                protocol esp;
                                spi 261;
                                authentication {
                                    algorithm hmac-sha1-96;
                                    key ascii-text "$ABC123";
                                    ## The unencrypted key is juniperjuniperjunipe (20 characters for HMAC-SHA-1-96).
                                }
                                                               encryption {
                                    algorithm des-cbc;
                                    key ascii-text "$ABC123";
                                    ## The unencrypted key is juniperj (8 characters for DES-CBC).
                                }
                            }
                        }
                    }
                }
                                     match-direction input; # Correct match direction for next-hop service sets.
            }
        }
    }
    }
security {
    pki {
        auto-re-enrollment {
            certificate-id certificate-name {
                ca-profile ca-profile-name;
                challenge-password password;
                re-enroll-trigger-time-percentage percentage; #Percentage of validity-period
# (specified in certificate) when automatic
# reenrollment should be initiated.
                re-generate-keypair;
                validity-period number-of-days;
            }
        }
    }
On Router 3, enable OSPF as the underlying routing protocol to connect to Routers 2 and 4. Configure a bidirectional manual SA in a rule called
rule-manual-SA-BiEspshades at the [edit ipsec-vpn rule] hierarchy level. Reference this rule in a service set called service-set-manual-BiEspshades
at the [edit services service-set] hierarchy level.
Configure the same specifications for your manual SA that you specified on Router 2. Use ESP for the protocol, 261 for the SPI, HMAC-SHA1-96 for authentication, DES-CBC for encryption, a 20-bit ASCII authentication key for the SHA-1 authentication key, and an 8-bit ASCII encryption key for the DES-CBC authentication key. (For more information about key lengths, see Authentication and Encryption Key Lengths.)
To direct traffic into the AS PIC and the IPSec tunnel, configure a next-hop style service set and add the adaptive services logical interface used as the IPSec inside interface into the OSPF configuration.
Router 3
[edit]
interfaces {
    so-0/0/0 {
        description "To R4 so-0/0/0";
        unit 0 {
            family inet {
                address 10.1.56.1/30;
            }
        }
    }
    so-0/0/1 {
        description "To R2 so-0/0/1";
        unit 0 {
            family inet {
                address 10.1.15.2/30;
            }
        }
    }
    sp-1/2/0 {
        services-options {
            syslog {
                host local {
                    services info;
                }
            }
        }
        unit 0 {
            family inet {
            }
                                 unit 1 { # sp-1/2/0.1 is the IPSec inside interface.
                family inet;
                service-domain inside;
            }
                                 unit 2 { # sp-1/2/0.2 is the IPSec outside interface.
                family inet;
                service-domain outside;
            }
        }
        lo0 {
            unit 0 {
                family inet {
                    address 10.0.0.3/32;
                }
            }
        }
    }
    routing-options {
        router-id 10.0.0.3;
    }
    protocols {
        ospf {
            area 0.0.0.0 {
                interface so-0/0/0.0;
                interface lo0.0;
                                     interface sp-1/2/0.1; # This sends OSPF traffic over the IPSec tunnel.
            }
        }
    }
    services {
                           service-set service-set-manual-BiEspshades { # Define your service set here.
                                 next-hop-service { # Required for dynamic routing protocols such as OSPF.
                inside-service-interface sp-1/2/0.1;
                outside-service-interface sp-1/2/0.2;
            }
            ipsec-vpn-options {
                                     local-gateway 10.1.15.2; # Specify the local IP address of the IPSec tunnel.
            }
                               ipsec-vpn-rules rule-manual-SA-BiEspshades; # Reference the IPSec rule here.
        }
        ipsec-vpn {
                                 rule rule-manual-SA-BiEspshades { # Define your IPSec VPN rule here.
                term term-manual-SA-BiEspshades {
                    then {
                                                 remote-gateway 10.1.15.1; # The remote IP address of the IPSec tunnel.
                                                   manual { # Define the manual SA specifications here.
                                                         direction bidirectional {
                                protocol esp;
                                spi 261;
                                authentication {
                                    algorithm hmac-sha1-96;
                                    key ascii-text "$ABC123";
                                    ## The unencrypted key is juniperjuniperjunipe (20 characters for HMAC-SHA-1-96).
                                }
                                                               encryption {
                                    algorithm des-cbc;
                                    key ascii-text "$ABC123";
                                    ## The unencrypted key is juniperj (8 characters for DES-CBC).
                                }
                            }
                        }
                    }
                }
                                     match-direction input; # Specify in which direction the rule should match.
            }
        }
    }
}
On Router 4, provide basic OSPF connectivity to Router 3.
Router 4
[edit]
interfaces {
    so-0/0/0 {
        description "To R3 so-0/0/0";
        unit 0 {
            family inet {
                address 10.1.56.2/30;
            }
        }
    }
    lo0 {
        unit 0 {
            family inet {
                address 10.0.0.4/32;
            }
        }
    }
}
routing-options {
        router-id 10.0.0.4;
}
protocols {
    ospf {
        area 0.0.0.0 {
            interface so-0/0/0.0;
            interface lo0.0;
        }
    }
}
Verifying Your Work
To verify proper operation of a manual IPSec SA on the AS PIC, use the following commands:
-
ping
-
show services ipsec-vpn ipsec security-associations(detail) -
show services ipsec-vpn ipsec statistics
The following sections show the output of these commands used with the configuration example:
Router 1
On Router 1, issue a ping command to the
lo0 interface on Router 4 to send traffic across the
IPsec tunnel.
user@R1> ping 10.0.0.4
PING 10.0.0.4 (10.0.0.4): 56 data bytes
64 bytes from 10.0.0.4: icmp_seq=0 ttl=254 time=1.375 ms
64 bytes from 10.0.0.4: icmp_seq=1 ttl=254 time=18.375 ms
64 bytes from 10.0.0.4: icmp_seq=2 ttl=254 time=1.120 ms
^C
--- 10.0.0.4 ping statistics ---
3 packets transmitted, 3 packets received, 0% packet loss
round-trip min/avg/max/stddev = 1.120/6.957/18.375/8.075 ms
Router 2
To verify that the IPSec security association is active, issue the show services ipsec-vpn ipsec security-associations detail command. Notice that the SA contains the settings you specified, such as ESP for the protocol and HMAC-SHA1-96 for the authentication algorithm.
user@R2> show services ipsec-vpn ipsec security-associations detail
Service set: service-set-manual-BiEspshades
  Rule: rule-manual-SA-BiEspshades, Term: term-manual-SA-BiEspshades,
  Tunnel index: 1
  Local gateway: 10.1.15.1, Remote gateway: 10.1.15.2
  Local identity: ipv4_subnet(any:0,[0..7]=10.0.0.0/8)
  Remote identity: ipv4_subnet(any:0,[0..7]=0.0.0.0/0)

    Direction: inbound, SPI: 261, AUX-SPI: 0
    Mode: tunnel, Type: manual, State: Installed
    Protocol: ESP, Authentication: hmac-sha1-96, Encryption: des-cbc
    Anti-replay service: Disabled

    Direction: outbound, SPI: 261, AUX-SPI: 0
    Mode: tunnel, Type: manual, State: Installed
    Protocol: ESP, Authentication: hmac-sha1-96, Encryption: des-cbc
    Anti-replay service: Disabled
To verify that traffic is traveling over the bidirectional IPsec tunnel, issue
the show services ipsec-vpn statistics command:
user@R2> show services ipsec-vpn ipsec statistics

PIC: sp-1/2/0, Service set: service-set-manual-BiEspshades

ESP Statistics:
  Encrypted bytes:             1616
  Decrypted bytes:             1560
  Encrypted packets:             20
  Decrypted packets:             19
AH Statistics:
  Input bytes:                    0
  Output bytes:                   0
  Input packets:                  0
  Output packets:                 0
Errors:
  AH authentication failures: 0, Replay errors: 0
  ESP authentication failures: 0, ESP decryption failures: 0
  Bad headers: 0, Bad trailers: 0
Router 3
To verify that the IPsec security association is active, issue the show
services ipsec-vpn ipsec security-associations detail command. To
be successful, the SA on Router 3 must contain the same settings you specified
on Router 2.
user@R3> show services ipsec-vpn ipsec security-associations detail
Service set: service-set-manual-BiEspshades
  Rule: rule-manual-SA-BiEspshades, Term: term-manual-SA-BiEspshades,
  Tunnel index: 1
  Local gateway: 10.1.15.2, Remote gateway: 10.1.15.1
  Local identity: ipv4_subnet(any:0,[0..7]=10.0.0.0/8)
  Remote identity: ipv4_subnet(any:0,[0..7]=0.0.0.0/0)

    Direction: inbound, SPI: 261, AUX-SPI: 0
    Mode: tunnel, Type: manual, State: Installed
    Protocol: ESP, Authentication: hmac-sha1-96, Encryption: des-cbc
    Anti-replay service: Disabled

    Direction: outbound, SPI: 261, AUX-SPI: 0
    Mode: tunnel, Type: manual, State: Installed
    Protocol: ESP, Authentication: hmac-sha1-96, Encryption: des-cbc
    Anti-replay service: Disabled
To verify that traffic is traveling over the bidirectional IPsec tunnel, issue
the show services ipsec-vpn statistics command:
user@R3> show services ipsec-vpn ipsec statistics
PIC: sp-1/2/0, Service set: service-set-manual-BiEspshades
ESP Statistics:
  Encrypted bytes:             1560
  Decrypted bytes:             1616
  Encrypted packets:             19
  Decrypted packets:             20
AH Statistics:
  Input bytes:                    0
  Output bytes:                   0
  Input packets:                  0
  Output packets:                 0
Errors:
  AH authentication failures: 0, Replay errors: 0
  ESP authentication failures: 0, ESP decryption failures: 0
  Bad headers: 0, Bad trailers: 0