Example: Configure DNS Snooping
Read this topic to understand how to configure DNS snooping on SRX Series Firewalls to update DNS cache with mappings of FQDN and IP addresses.
SRX Series Firewalls support DNS snooping feature. The DNS snooping feature offers a mechanism for dynamically inspecting and caching DNS responses in real time. When you enable DNS snooping, the system captures DNS response packets as traffic traverse the network, extracting the relevant DNS records and build mapping of FQDN and IP address in a local cache. This cache provides accurate and timely DNS mappings by ensuring that IP addresses associated with Fully Qualified Domain Names (FQDNs) remain current.
|
Reading Time |
15 minutes |
|
Configuration Time |
30 minutes |
Example Prerequisites
Table 2 lists the hardware and software components that support the configuration.
|
Hardware requirements |
SRX Series Firewalls and vSRX Virtual Firewalls |
|
Software requirements |
All SRX Series support this feature from Junos OS Release 25.2R1. We’ve tested this example using vSRX instances. Install and configure Application Identification. For details, see Predefined Application Signatures for Application Identification. |
Before You Begin
|
Know more |
|
|
Learn more |
Functional Overview
Table 3 provides a quick summary of the configuration components deployed in this example.
|
Technologies used |
|
|
Primary verification tasks |
|
Topology Illustration
Following figure shows the topology used in this configuration example.
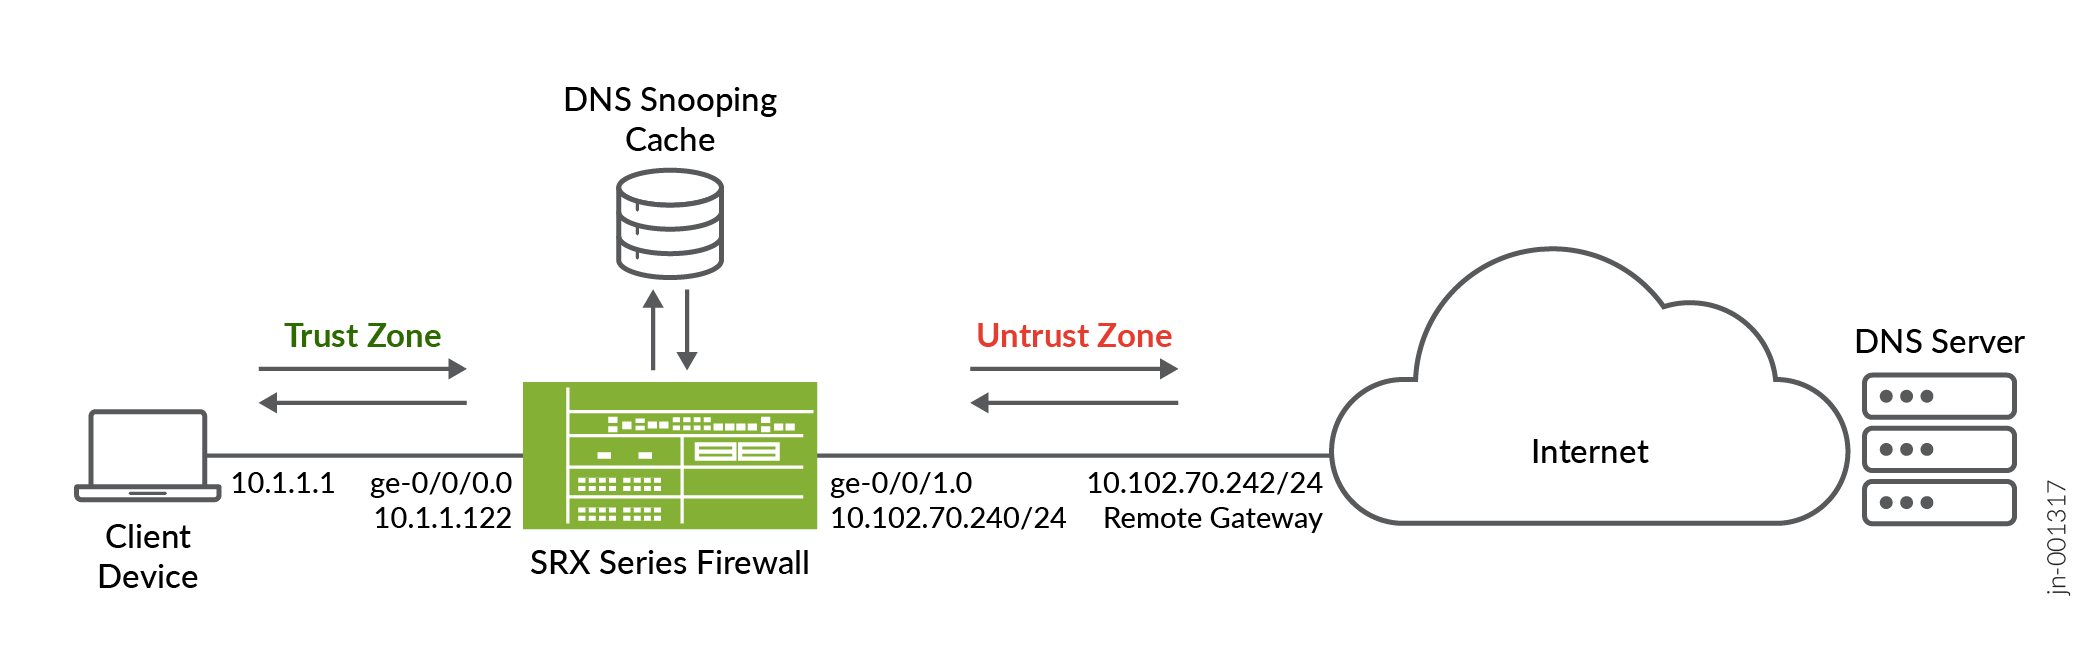
In this example, the interfaces ge-0/0/0 is in the trust zone and connected to the client device (10.1.1.1). The ge-0/0/1 is in untrust zone and is connected to the DNS server through the Internet gateway (10.102.70.245). You configure DNS snooping on SRX Series Firewall.
In this example, you enable DNS snooping and create a address book with FQDN name. Then create a security policy and add the address book (FQDN name) as destination address. When the traffic matches security policy, the system captures DNS response packets as traffic traverse the network, extracting the relevant DNS records and build mapping of FQDN and IP address in a local cache. This cache provides DNS mappings by ensuring that IP addresses associated with FQDN always remain current.
Topology Overview
Table 4 shows the details of configuration used in this example.
| Device | Interface | IP Address | Zone | Configured For |
|---|---|---|---|---|
| SRX Series Firewall |
ge-0/0/0.0 |
10.1.1.122/24 |
Trust |
Connects to the internal client device (10.1.1.1) |
|
ge-0/0/0.1 |
10.102.70.240/24 |
Untrust | Connects to the Internet gateway (10.102.70.254) |
Configure
To configure DNS snooping, use the following steps:
Verification
Use the following show commands to verify the feature in this example.
| Commands | Verification Task |
|---|---|
|
|
Display DNS snooping counters details. |
show services dns-snooping counters |
Display DNS snooping cache information to view mapping of IP addresses associated with Fully Qualified Domain Names (FQDNs). |
Check DNS Snooping Cache
Purpose
View and verify the details of DNS snooping cache.
Action
From operational mode, run the following command:
user@host> show services dns-snooping cache
DNS-Snooping cache on FPC: master
FQDN                             IP                       TTL
www.google.com                   142.251.46.228           242
www.google.com                   2607:f8b0:4005:813::2004 275
Meaning
Output displays mapping of IP address and FQDN. You can also see time-to-live (TTL) data in the output.
Check DNS Snooping Counters
Purpose
View and verify the details of DNS snooping counters.
Action
From operational mode, run the following command:
user@host> show services dns-snooping counters
DNS-Snooping counters on FPC:master
    Sessions ignored:           213
    Sessions interested:        85
    Sessions created:           85
    Sessions destroyed:         85
    Session dns contexts:       94
    Cache fqdn inserted:        0
    Cache fqdn deleted:         0
    Cache ip inserted:          4
    Cache ip deleted:           2
    Reports Generated:          4
    Reports Sent:               4
    Memory allocated:           102
    Memory allocation failed:   0
    Memory freed:               98
    Memory free errors:         0
    Appid errors:               0
Meaning
Output displays DNS snooping counter details including number of sessions processed, allocated and free memory, and AppID errors (if any).
Set Commands on All Devices
Set Commands on SRX Series Firewall
set services dns-snooping
set security address-book global address addr1 dns-name www.google.com
set security policies from-zone trust to-zone untrust policy p1 match source-address any
set security policies from-zone trust to-zone untrust policy p1 match destination-address addr1
set security policies from-zone trust to-zone untrust policy p1 match application any
set security policies from-zone trust to-zone untrust policy p1 then permit
set security policies from-zone trust to-zone untrust policy default-permit match source-address any
set security policies from-zone trust to-zone untrust policy default-permit match destination-address any
set security policies from-zone trust to-zone untrust policy default-permit match application any
set security policies from-zone trust to-zone untrust policy default-permit then permit
set security policies from-zone trust to-zone untrust application-services dns-snooping
set security policies pre-id-default-policy then log session-close
set security zones security-zone trust host-inbound-traffic system-services all
set security zones security-zone trust host-inbound-traffic protocols all
set security zones security-zone trust interfaces ge-0/0/0.0
set security zones security-zone untrust screen untrust-screen
set security zones security-zone untrust host-inbound-traffic system-services all
set security zones security-zone untrust host-inbound-traffic protocols all
set security zones security-zone untrust interfaces ge-0/0/1.0
set interfaces ge-0/0/0 unit 0 family inet address 10.1.1.122/24
set interfaces ge-0/0/1 unit 0 family inet address 10.102.70.240/24
Show Configuration Output
From configuration mode, confirm your configuration by entering the show
, , and other details. If the output does not display the intended
configuration, repeat the configuration instructions in this example to correct
it.
Global Address Book
[edit]
user@host# show security address-book
global {
    address addr1 {
        dns-name www.google.com;
    }
}
Services
[edit]
user@host# show services
dns-snooping;
Security Policies
[edit]
user@host# show security policies

from-zone trust to-zone untrust {
    policy p1 {
        match {
            source-address any;
            destination-address addr1;
            application any;
        }
        then {
            permit;
        }
    }
    policy default-permit {
        match {
            source-address any;
            destination-address any;
            application any;
        }
        then {
            permit;
        }
    }
    application-services {
        dns-snooping;
    }
}
pre-id-default-policy {
    then {
        log {
            session-close;
        }
    }
}
Security Zones
[edit]
user@host# show security zones
security-zone trust {
    tcp-rst;
    host-inbound-traffic {
        system-services {
            all;
        }
        protocols {
            all;
        }
    }
    interfaces {
        ge-0/0/0.0;
    }
}
security-zone untrust {
    screen untrust-screen;
    host-inbound-traffic {
        system-services {
            all;
        }
        protocols {
            all;
        }
    }
    interfaces {
        ge-0/0/1.0;
    }
}
Interfaces
[edit]
user@host# show interfaces
ge-0/0/0 {
    unit 0 {
        family inet {
            address 10.1.1.122/24;
        }
    }
}
ge-0/0/1 {
    unit 0 {
        family inet {
            address 10.102.70.240/24;
        }
    }
}
}