ON THIS PAGE
Example: Configuring Extended Communities in a Routing Policy
An extended community is similar in most ways to a regular community. Some networking implementations, such as virtual private networks (VPNs), use extended communities because the 4-octet regular community value does not provide enough expansion and flexibility. An extended community is an eight-octet value divided into two main sections.
Requirements
No special configuration beyond device initialization is required before configuring this example.
Overview
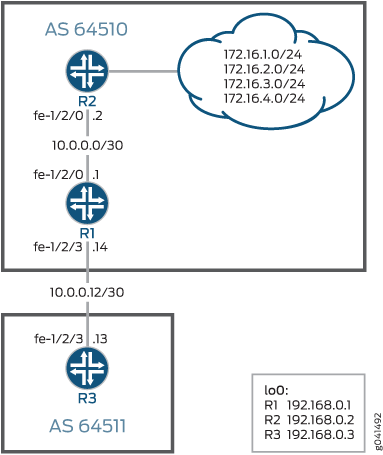
In this example, Device R1 and Device R2 are OSPF neighbors in autonomous system (AS) 64510. Device R3 has an external BGP (EBGP) connection to Device R1. Device R2 has customer networks in the 172.16/16 address space, simulated with addresses on its loopback interface (lo0). Device R1 has static routes to several 172.16.x/24 networks, and attaches regular community values to these routes. Device R1 then uses an export policy to advertise the routes to Device R3. Device R3 receives these routes and uses an import policy to add extended community values to the routes.
For a list of supported extended communities,
Topology
Figure 1 shows the sample network.
CLI Quick Configuration shows the configuration for all of the devices in Figure 1.
The section #configuration587__policy-extended-community-st describes the steps on Device R3.
Configuration
CLI Quick Configuration
To quickly
configure this example, copy the following commands, paste them into
a text file, remove any line breaks, change any details necessary
to match your network configuration, and then copy and paste the commands
into the CLI at the [edit] hierarchy level.
Device R1
set interfaces fe-1/2/0 unit 0 family inet address 10.0.0.1/30
set interfaces fe-1/2/3 unit 0 family inet address 10.0.0.14/30
set interfaces lo0 unit 0 family inet address 192.168.0.1/32 primary
set protocols bgp group ext type external
set protocols bgp group ext export send-static
set protocols bgp group ext peer-as 64511
set protocols bgp group ext neighbor 10.0.0.13
set protocols ospf area 0.0.0.0 interface fe-1/2/0.0
set protocols ospf area 0.0.0.0 interface lo0.0 passive
set policy-options policy-statement send-static term 1 from protocol static
set policy-options policy-statement send-static term 1 then accept
set routing-options static route 172.16.1.0/24 next-hop 10.0.0.2
set routing-options static route 172.16.1.0/24 community 64510:1
set routing-options static route 172.16.2.0/24 next-hop 10.0.0.2
set routing-options static route 172.16.2.0/24 community 64510:2
set routing-options static route 172.16.3.0/24 next-hop 10.0.0.2
set routing-options static route 172.16.3.0/24 community 64510:3
set routing-options static route 172.16.4.0/24 next-hop 10.0.0.2
set routing-options static route 172.16.4.0/24 community 64510:4
set routing-options router-id 192.168.0.1
set routing-options autonomous-system 64510
Device R2
set interfaces fe-1/2/0 unit 0 family inet address 10.0.0.2/30
set interfaces lo0 unit 0 family inet address 192.168.0.2/32
set interfaces lo0 unit 0 family inet address 172.16.1.1/32
set interfaces lo0 unit 0 family inet address 172.16.2.2/32
set interfaces lo0 unit 0 family inet address 172.16.3.3/32
set interfaces lo0 unit 0 family inet address 172.16.4.4/32
set protocols ospf area 0.0.0.0 interface fe-1/2/0.0
set protocols ospf area 0.0.0.0 interface lo0.0 passive
set routing-options router-id 192.168.0.2
set routing-options autonomous-system 64510
Device R3
set interfaces fe-1/2/3 unit 0 family inet address 10.0.0.13/30
set interfaces lo0 unit 0 family inet address 192.168.0.3/32
set protocols bgp group to-R1 type external
set protocols bgp group to-R1 import set-ext-comms
set protocols bgp group to-R1 peer-as 64510
set protocols bgp group to-R1 neighbor 10.0.0.14
set policy-options policy-statement set-ext-comms term route-1 from route-filter 172.16.1.0/24 exact
set policy-options policy-statement set-ext-comms term route-1 then community add target-as
set policy-options policy-statement set-ext-comms term route-1 then accept
set policy-options policy-statement set-ext-comms term route-2 from route-filter 172.16.2.0/24 exact
set policy-options policy-statement set-ext-comms term route-2 then community add target-ip
set policy-options policy-statement set-ext-comms term route-2 then accept
set policy-options policy-statement set-ext-comms term route-3 from route-filter 172.16.3.0/24 exact
set policy-options policy-statement set-ext-comms term route-3 then community add origin-as
set policy-options policy-statement set-ext-comms term route-3 then accept
set policy-options policy-statement set-ext-comms term route-4 from route-filter 172.16.4.0/24 exact
set policy-options policy-statement set-ext-comms term route-4 then community add origin-ip
set policy-options policy-statement set-ext-comms term route-4 then accept
set policy-options community origin-as members origin:64511:3
set policy-options community origin-ip members origin:172.16.7.7:4
set policy-options community target-as members target:64511:1
set policy-options community target-ip members target:172.16.7.7:2
set routing-options router-id 192.168.0.3
set routing-options autonomous-system 64511
Procedure
Step-by-Step Procedure
The following example requires that you navigate various levels in the configuration hierarchy. For information about navigating the CLI, see Use the CLI Editor in Configuration Mode in the Junos OS CLI User Guide.
To configure Device R3:
Configure the interfaces.
[edit interfaces]
user@R3# set fe-1/2/3 unit 0 family inet address 10.0.0.13/30
user@R3# set lo0 unit 0 family inet address 192.168.0.3/32
Configure the EBGP connection to Device R1.
[edit protocols bgp group to-R1]
user@R3# set type external
user@R3# set import set-ext-comms
user@R3# set peer-as 64510
user@R3# set neighbor 10.0.0.14
-
Configure the policy that adds extended community values to the routes received from Device R1.
An extended community uses a notation of
type:administrator:assigned-number.The specific community values can be anything that accomplishes your administrative goals, within certain parameters, as explained in community (Policy Options).
[edit policy-options policy-statement set-ext-comms]
user@R3# set term route-1 from route-filter 172.16.1.0/24 exact
user@R3# set term route-1 then community add target-as
user@R3# set term route-1 then accept
user@R3# set term route-2 from route-filter 172.16.2.0/24 exact
user@R3# set term route-2 then community add target-ip
user@R3# set term route-2 then accept
user@R3# set term route-3 from route-filter 172.16.3.0/24 exact
user@R3# set term route-3 then community add origin-as
user@R3# set term route-3 then accept
user@R3# set term route-4 from route-filter 172.16.4.0/24 exact
user@R3# set term route-4 then community add origin-ip
user@R3# set term route-4 then accept
[edit policy-options]
user@R3# set community origin-as members origin:64511:3
user@R3# set community origin-ip members origin:172.16.7.7:4
user@R3# set community target-as members target:64511:1
user@R3# set community target-ip members target:172.16.7.7:2
Configure the autonomous system (AS) number and router ID.
[edit routing-options]
user@R3# set router-id 192.168.0.3
user@R3# set autonomous-system 64511
Results
From configuration mode, confirm your configuration
by entering the show interfaces, show protocols, show policy-options, and show routing-options commands. If the output does not display the intended configuration,
repeat the instructions in this example to correct the configuration.
user@R3# show interfaces
fe-1/2/3 {
    unit 0 {
        family inet {
            address 10.0.0.13/30;
        }
    }
}
lo0 {
    unit 0 {
        family inet {
            address 192.168.0.3/32;
        }
    }
}
user@R3# show protocols
bgp {
    group to-R1 {
        type external;
        import set-ext-comms;
        peer-as 64510;
        neighbor 10.0.0.14;
    }
}
user@R3# show policy-options
policy-statement set-ext-comms {
    term route-1 {
        from {
            route-filter 172.16.1.0/24 exact;
        }
        then {
            community add target-as;
            accept;
        }
    }
    term route-2 {
        from {
            route-filter 172.16.2.0/24 exact;
        }
        then {
            community add target-ip;
            accept;
        }
    }
    term route-3 {
        from {
            route-filter 172.16.3.0/24 exact;
        }
        then {
            community add origin-as;
            accept;
        }
    }
    term route-4 {
        from {
            route-filter 172.16.4.0/24 exact;
        }
        then {
            community add origin-ip;
            accept;
        }
    }
}
community origin-as members origin:64511:3;
community origin-ip members origin:172.16.7.7:4;
community target-as members target:64511:1;
community target-ip members target:172.16.7.7:2;
user@R3# show routing-options
router-id 192.168.0.3;
autonomous-system 64511;
If you are done configuring the device, enter commit from configuration mode.
Verification
Confirm that the configuration is working properly.
Verifying the Routes on Device R1
Purpose
On Device R1, check the 172.16. routes in the routing table.
Action
user@R1> show route protocol static match-prefix 172.16.* detail

inet.0: 15 destinations, 15 routes (15 active, 0 holddown, 0 hidden)
172.16.1.0/24 (1 entry, 1 announced)
        *Static Preference: 5
                Next hop type: Router, Next hop index: 835
                Address: 0x9260250
                Next-hop reference count: 19
                Next hop: 10.0.0.2 via fe-1/2/0.0, selected
                State: <Active Int Ext>
                Local AS: 64510
                Age: 2:06:08
                Task: RT
                Announcement bits (2): 2-KRT 3-BGP_RT_Background
                AS path: I
                Communities: 64510:1

172.16.2.0/24 (1 entry, 1 announced)
        *Static Preference: 5
                Next hop type: Router, Next hop index: 835
                Address: 0x9260250
                Next-hop reference count: 19
                Next hop: 10.0.0.2 via fe-1/2/0.0, selected
                State: <Active Int Ext>
                Local AS: 64510
                Age: 2:06:08
                Task: RT
                Announcement bits (2): 2-KRT 3-BGP_RT_Background
                AS path: I
                Communities: 64510:2

172.16.3.0/24 (1 entry, 1 announced)
        *Static Preference: 5
                Next hop type: Router, Next hop index: 835
                Address: 0x9260250
                Next-hop reference count: 19
                Next hop: 10.0.0.2 via fe-1/2/0.0, selected
                State: <Active Int Ext>
                Local AS: 64510
                Age: 2:06:08
                Task: RT
                Announcement bits (2): 2-KRT 3-BGP_RT_Background
                AS path: I
                Communities: 64510:3

172.16.4.0/24 (1 entry, 1 announced)
        *Static Preference: 5
                Next hop type: Router, Next hop index: 835
                Address: 0x9260250
                Next-hop reference count: 19
                Next hop: 10.0.0.2 via fe-1/2/0.0, selected
                State: <Active Int Ext>
                Local AS: 64510
                Age: 2:06:08
                Task: RT
                Announcement bits (2): 2-KRT 3-BGP_RT_Background
                AS path: I
                Communities: 64510:4
Meaning
The output shows that the regular community values are attached to the routes.
The communities are attached to static routes, thus demonstrating that communities can be attached to non-BGP routes.
Verifying the Routes on Device R3
Purpose
On Device R3, check the 172.16. routes in the routing table.
Action
user@R3> show route protocol bgp match-prefix 172.16.* detail
betsy@tp5# run show route protocol bgp match-prefix 172.16.* detail logical-system R3

inet.0: 7 destinations, 7 routes (7 active, 0 holddown, 0 hidden)
172.16.1.0/24 (1 entry, 1 announced)
        *BGP    Preference: 170/-101
                Next hop type: Router, Next hop index: 611
                Address: 0x9260130
                Next-hop reference count: 8
                Source: 10.0.0.14
                Next hop: 10.0.0.14 via fe-1/2/3.0, selected
                State: <Active Ext>
                Local AS: 64511 Peer AS: 64510
                Age: 1:57:27
                Task: BGP_64510.10.0.0.14+54618
                Announcement bits (1): 0-KRT
                AS path: 64510 I
                Communities: 64510:1 target:64511:1
                Accepted
                Localpref: 100
                Router ID: 192.168.0.1

172.16.2.0/24 (1 entry, 1 announced)
        *BGP    Preference: 170/-101
                Next hop type: Router, Next hop index: 611
                Address: 0x9260130
                Next-hop reference count: 8
                Source: 10.0.0.14
                Next hop: 10.0.0.14 via fe-1/2/3.0, selected
                State: <Active Ext>
                Local AS: 64511 Peer AS: 64510
                Age: 1:57:27
                Task: BGP_64510.10.0.0.14+54618
                Announcement bits (1): 0-KRT
                AS path: 64510 I
                Communities: 64510:2 target:172.16.7.7:2
                Accepted
                Localpref: 100
                Router ID: 192.168.0.1

172.16.3.0/24 (1 entry, 1 announced)
        *BGP    Preference: 170/-101
                Next hop type: Router, Next hop index: 611
                Address: 0x9260130
                Next-hop reference count: 8
                Source: 10.0.0.14
                Next hop: 10.0.0.14 via fe-1/2/3.0, selected
                State: <Active Ext>
                Local AS: 64511 Peer AS: 64510
                Age: 1:57:27
                Task: BGP_64510.10.0.0.14+54618
                Announcement bits (1): 0-KRT
                AS path: 64510 I
                Communities: 64510:3 origin:64511:3
                Accepted
                Localpref: 100
                Router ID: 192.168.0.1

172.16.4.0/24 (1 entry, 1 announced)
        *BGP    Preference: 170/-101
                Next hop type: Router, Next hop index: 611
                Address: 0x9260130
                Next-hop reference count: 8
                Source: 10.0.0.14
                Next hop: 10.0.0.14 via fe-1/2/3.0, selected
                State: <Active Ext>
                Local AS: 64511 Peer AS: 64510
                Age: 1:57:27
                Task: BGP_64510.10.0.0.14+54618
                Announcement bits (1): 0-KRT
                AS path: 64510 I
                Communities: 64510:4 origin:172.16.7.7:4
                Accepted
                Localpref: 100
                Router ID: 192.168.0.1
Meaning
The output shows that the regular community values remain attached to the routes, and the extended community values are added.