Traffic Control in a RIPng Network
Understanding RIPng Traffic Control with Metrics for Optimizing the Path Cost
To tune a RIPng network and to control traffic flowing through the network, you increase or decrease the cost of the paths through the network. RIPng provides two ways to modify the path cost: an incoming metric and an outgoing metric, which are each set to 1 by default. In other words, by default, the metric of routes that RIPng imports from a neighbor or exports to a neighbor is incremented by 1. These routes include those learned from RIPng as well as those learned from other protocols. The metrics are attributes that specify the cost of any route advertised through a host. By increasing or decreasing the metrics—and thus the cost—of links throughout the network, you can control packet transmission across the network.
The incoming metric modifies the cost of an individual segment when a route across the segment is imported into the routing table. For example, if you set the incoming metric on the segment to 3, the individual segment cost along the link is changed from 1 to 3. The increased cost affects all route calculations through that link. Other routes that were previously excluded because of a high hop count might now be selected into the router's forwarding table.
The outgoing metric modifies the path cost for all the routes advertised out of a particular interface. Unlike the incoming metric, the outgoing metric modifies the routes that other routers are learning and thereby controls the way they send traffic.
If an exported route was learned from a member of the same RIPng group, the metric associated with that route is the normal RIPng metric. For example, a RIPng route with a metric of 5 learned from a neighbor configured with an incoming metric of 2 is advertised with a combined metric of 7 when advertised to neighbors in the same group. However, if this route was learned from a RIPng neighbor in a different group or from a different protocol, the route is advertised with the metric value configured in the outgoing metric for that group.
You might want to increase the metric of routes to decrease the likelihood that a particular route is selected and installed in the routing table. This process is sometimes referred to as route poisoning. Some reasons that you might want to poison a route are that the route is relatively expensive to use, or it has relatively low bandwidth.
A route with a higher metric than another route becomes the active route only when the lower-metric route becomes unavailable. In this way, the higher-metric route serves as a backup path.
One way to increase the metric of imported routes is to configure
an import policy. Another way is to include the metric-in statement in the RIPng neighbor configuration. One way to increase
the metric of export routes is to configure an export policy. Another
way is to include the metric-out statement in the RIPng
neighbor configuration.
Example: Configuring the Metric Value Added to Imported RIPng Routes to Control the Route Selection Process
This example shows how to change the default metric to be added to incoming routes to control the route selection process.
Requirements
No special configuration beyond device initialization is required before configuring this example.
Overview
Normally, when multiple routes are available, RIPng selects the route with the lowest hop count. Changing the default metric enables you to control the route selection process such that a route with a higher hop count can be preferred over of a route with a lower hop count.
Figure 1 shows the topology used in this example.
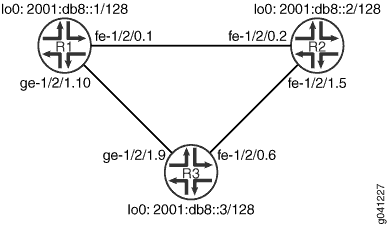
Device R1 has two potential paths to reach 2001:db8::2/128.
The default behavior is to send traffic out the 2001:db8:0:1::/64
interface facing Device R2. Suppose, though, that the path through
Device R3 is less expensive to use or has higher bandwidth links.
This example shows how to use the metric-in statement to
ensure that Device R1 uses the path through Device R3 to reach 2001:db8::2/128. CLI Quick Configuration shows the configuration for all
of the devices in Figure 1. The section #d17e63__d17e205 describes the steps on
Device R1.
Topology
Configuration
Procedure
CLI Quick Configuration
To quickly configure
this example, copy the following commands, paste them into a text
file, remove any line breaks, change any details necessary to match
your network configuration, and then copy and paste the commands into
the CLI at the [edit] hierarchy level.
Device R1
set interfaces fe-1/2/0 unit 1 description to-R2
set interfaces fe-1/2/0 unit 1 family inet6 address 2001:db8:0:1::/64 eui-64
set interfaces ge-1/2/1 unit 10 description to-R3
set interfaces ge-1/2/1 unit 10 family inet6 address 2001:db8:0:5::/64 eui-64
set interfaces lo0 unit 1 family inet6 address 2001:db8::1/128
set protocols ripng group primary export advertise-routes-through-ripng
set protocols ripng group primary neighbor ge-1/2/1.10
set protocols ripng group secondary export advertise-routes-through-ripng
set protocols ripng group secondary neighbor fe-1/2/0.1 metric-in 4
set policy-options policy-statement advertise-routes-through-ripng term 1 from protocol direct
set policy-options policy-statement advertise-routes-through-ripng term 1 from protocol ripng
set policy-options policy-statement advertise-routes-through-ripng term 1 then accept
Device R2
set interfaces fe-1/2/0 unit 2 family inet6 address 2001:db8:0:2::/64 eui-64
set interfaces fe-1/2/1 unit 5 description to-R3
set interfaces fe-1/2/1 unit 5 family inet6 address 2001:db8:0:3::/64 eui-64
set interfaces lo0 unit 2 family inet6 address 2001:db8::2/128
set protocols ripng group ripng-group export advertise-routes-through-ripng
set protocols ripng group ripng-group neighbor fe-1/2/0.2
set protocols ripng group ripng-group neighbor fe-1/2/1.5
set policy-options policy-statement advertise-routes-through-ripng term 1 from protocol direct
set policy-options policy-statement advertise-routes-through-ripng term 1 from protocol ripng
set policy-options policy-statement advertise-routes-through-ripng term 1 then accept
Device R3
set interfaces fe-1/2/0 unit 6 family inet6 address 2001:db8:0:4::/64 eui-64
set interfaces ge-1/2/1 unit 9 description to-R1
set interfaces ge-1/2/1 unit 9 family inet address 10.0.0.9/30
set interfaces ge-1/2/1 unit 9 family inet6 address 2001:db8:0:6::/64 eui-64
set interfaces lo0 unit 3 family inet6 address 2001:db8::3/128
set protocols ripng group ripng-group export advertise-routes-through-ripng
set protocols ripng group ripng-group neighbor fe-1/2/0.6
set protocols ripng group ripng-group neighbor ge-1/2/1.9
set policy-options policy-statement advertise-routes-through-ripng term 1 from protocol direct
set policy-options policy-statement advertise-routes-through-ripng term 1 from protocol ripng
set policy-options policy-statement advertise-routes-through-ripng term 1 then accept
Step-by-Step Procedure
The following example requires you to navigate various levels in the configuration hierarchy. For information about navigating the CLI, see Using the CLI Editor in Configuration Mode in the CLI User Guide.
To configure a RIPng metrics:
Configure the network interfaces.
[edit interfaces]
user@R1# set fe-1/2/0 unit 1 description to-R2
user@R1# set fe-1/2/0 unit 1 family inet6 address 2001:db8:0:1::/64 eui-64
user@R1# set ge-1/2/1 unit 10 description to-R3
user@R1# set ge-1/2/1 unit 10 family inet6 address 2001:db8:0:5::/64 eui-64
user@R1# set lo0 unit 1 family inet6 address 2001:db8::1/128
Create the RIPng groups and add the interfaces.
To configure RIPng in Junos OS, you must configure one or more groups that contain the interfaces on which RIPng is enabled. You do not need to enable RIPng on the loopback interface.
For the interface that is facing Device R2, the metric-in 4 setting causes this route to be less likely to be chosen as the active route.
[edit protocols ripng]
user@R1# set group primary neighbor ge-1/2/1.10
user@R1# set group secondary neighbor fe-1/2/0.1 metric-in 4
Create the routing policy to advertise both direct and RIPng-learned routes.
[edit policy-options policy-statement advertise-routes-through-ripng term 1]
user@R1# set from protocol direct
user@R1# set from protocol ripng
user@R1# set then accept
Apply the routing policy.
In Junos OS, you can only apply RIPng export policies at the group level.
[edit protocols ripng]
user@R1# set group primary export advertise-routes-through-ripng
user@R1# set group secondary export advertise-routes-through-ripng
Results
From configuration mode, confirm your configuration
by entering the show interfaces, show protocols, and show policy-options commands. If the output does
not display the intended configuration, repeat the configuration instructions
in this example to correct it.
user@R1# show interfaces
fe-1/2/0 {
    unit 1 {
        description to-R2;
        family inet6 {
            address 2001:db8:0:1::/64 {
                eui-64;
            }
        }
    }
}
ge-1/2/1 {
    unit 10 {
        description to-R3;
        family inet6 {
            address 2001:db8:0:5::/64 {
                eui-64;
            }
        }
    }
}
lo0 {
    unit 1 {
        family inet6 {
            address 2001:db8::1/128;
        }
    }
}
user@R1# show protocols
ripng {
    group primary {
        export advertise-routes-through-ripng;
        neighbor ge-1/2/0.10;
    }
    group secondary {
        export advertise-routes-through-ripng;
        neighbor fe-1/2/0.1 {
            metric-in 4;
        }
    }
}
user@R1# show policy-options
policy-statement advertise-routes-through-ripng {
    term 1 {
        from protocol [ direct ripng ];
        then accept;
    }
}
If you are done configuring the device, enter commit from configuration mode.
Verification
Confirm that the configuration is working properly.
Verifying That the Expected Route Is Active
Purpose
Make sure that Device R1 uses the path through Device R3 to reach 2001:db8:0:2:2a0:a514:0:24c/128.
Action
From operational mode, enter the show route 2001:db8:0:2:2a0:a514:0:24c command.
user@R1> show route 2001:db8:0:2:2a0:a514:0:24c
inet6.0: 16 destinations, 17 routes (16 active, 0 holddown, 0 hidden)
+ = Active Route, - = Last Active, * = Both

2001:db8:0:2::/64  *[RIPng/100] 01:54:35, metric 3, tag 0
                    > to fe80::2a0:a514:0:94c via ge-1/2/1.10
Meaning
The to fe80::2a0:a514:0:94c via ge-1/2/1.10 output shows that Device R1 uses the path through Device R3 to reach 2001:db8:0:2:2a0:a514:0:24c/128. The metric for this route is 3.
Removing the metric-in Statement
Purpose
Delete or deactivate the metric-in statement to see what happens to the 2001:db8:0:2:2a0:a514:0:24c/128 route.
Action
From configuration mode, deactivate the
metric-instatement.[edit protocols ripng group secondary neighbor fe-1/2/0.1] user@R1# deactivate metric-in user@R1# commit
From operational mode, enter the
show route 2001:db8:0:2:2a0:a514:0:24ccommand.user@R1> show route 2001:db8:0:2:2a0:a514:0:24c inet6.0: 16 destinations, 17 routes (16 active, 0 holddown, 0 hidden) + = Active Route, - = Last Active, * = Both 2001:db8:0:2::/64 *[RIPng/100] 00:00:02, metric 2, tag 0 > to fe80::2a0:a514:0:24c via fe-1/2/0.1
Meaning
The to fe80::2a0:a514:0:24c via fe-1/2/0.1 output shows that Device R1 uses the path through Device R2 to reach 2001:db8:0:2:2a0:a514:0:24c/128. The metric for this route is 2.