RIPng Import Policy
Understanding RIPng Import Policies to Filter Routes
The default RIPng import policy is to accept all received RIPng
routes that pass a validity check. To filter routes being imported
by the local routing device from its neighbors, include the import statement and list the names of one or more policies to be evaluated.
If you specify more than one policy, they are evaluated in order (first
to last) and the first matching policy is applied to the route. If
no match is found, the local routing device does not import any routes.
Example: Applying Policies to RIPng Routes Imported from Neighbors
This example shows how to configure an import policy in a RIPng network.
Requirements
No special configuration beyond device initialization is required before configuring this example.
Overview
In this example, Device R2 has several extra loopback interface addresses configured to simulate additional networks.
Device R1 has an import policy that accepts the fe80::/64 and 2001:db8::/64 routes and rejects all other routes. This means that the extra networks advertised by Device R2 are not accepted into Device R1’s routing table.
An export policy is also shown because an export policy is required as part of the minimum configuration for RIPng.
Figure 1 shows the topology used in this example.
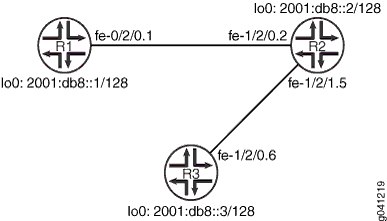
CLI Quick Configuration shows the configuration for all of the devices in Figure 1. The section #d70e61__d70e207 describes the steps on Device R1.
Topology
Configuration
Procedure
CLI Quick Configuration
To quickly configure
this example, copy the following commands, paste them into a text
file, remove any line breaks, change any details necessary to match
your network configuration, and then copy and paste the commands into
the CLI at the [edit] hierarchy level.
Device R1
set interfaces fe-1/2/0 unit 1 description to-R2
set interfaces fe-1/2/0 unit 1 family inet6 address 2001:db8:0:1::/64 eui-64
set interfaces lo0 unit 1 family inet6 address 2001:db8::1/128
set protocols ripng group ripng-group export advertise-routes-through-ripng
set protocols ripng group ripng-group neighbor fe-1/2/0.1 import ripng-import
set policy-options policy-statement advertise-routes-through-ripng term 1 from protocol direct
set policy-options policy-statement advertise-routes-through-ripng term 1 from protocol ripng
set policy-options policy-statement advertise-routes-through-ripng term 1 then accept
set policy-options policy-statement ripng-import term 1 from route-filter fe80::/64 orlonger
set policy-options policy-statement ripng-import term 1 from route-filter 2001:db8::/64 orlonger
set policy-options policy-statement ripng-import term 1 then accept
set policy-options policy-statement ripng-import term 2 then reject
Device R2
set interfaces fe-1/2/0 unit 2 description to-R1
set interfaces fe-1/2/0 unit 2 family inet6 address 2001:db8:0:2::/64 eui-64
set interfaces fe-1/2/1 unit 5 description to-R3
set interfaces fe-1/2/1 unit 5 family inet6 address 2001:db8:0:3::/64 eui-64
set interfaces lo0 unit 2 family inet6 address 2001:db8::2/128
set interfaces lo0 unit 2 family inet6 address 2002:db8::2/128
set interfaces lo0 unit 2 family inet6 address 2002:db9::2/128
set interfaces lo0 unit 2 family inet6 address 2002:db7::2/128
set protocols ripng group ripng-group export advertise-routes-through-ripng
set protocols ripng group ripng-group neighbor fe-1/2/0.2
set protocols ripng group ripng-group neighbor fe-1/2/1.5
set policy-options policy-statement advertise-routes-through-ripng term 1 from protocol direct
set policy-options policy-statement advertise-routes-through-ripng term 1 from protocol ripng
set policy-options policy-statement advertise-routes-through-ripng term 1 then accept
Device R3
set  interfaces fe-1/2/0 unit 6 description to-R2
set  interfaces fe-1/2/0 unit 6 family inet6 address 2001:db8:0:4::/64 eui-64
set  interfaces lo0 unit 3 family inet6 address 2001:db8::3/128
set protocols ripng group ripng-group export advertise-routes-through-ripng
set protocols ripng group ripng-group neighbor fe-1/2/0.6
set policy-options policy-statement advertise-routes-through-ripng term 1 from protocol direct
set policy-options policy-statement advertise-routes-through-ripng term 1 from protocol ripng
set policy-options policy-statement advertise-routes-through-ripng term 1 then accept
Step-by-Step Procedure
The following example requires you to navigate various levels in the configuration hierarchy. For information about navigating the CLI, see Using the CLI Editor in Configuration Mode in the CLI User Guide.
To configure a RIPng import policy:
Configure the network interfaces.
This example shows multiple loopback interface addresses to simulate attached networks.
[edit interfaces]
user@R1# set fe-1/2/0 unit 1 description to-R2
user@R1# set fe-1/2/0 unit 1 family inet6 address 2001:db8:0:1::/64 eui-64
user@R1# set lo0 unit 1 family inet6 address 2001:db8::1/128
Create the RIPng group and add the interface.
To configure RIPng in Junos OS, you must configure a group that contains the interfaces on which RIPng is enabled. You do not need to enable RIPng on the loopback interface.
[edit protocols ripng group ripng-group]
user@R1# set neighbor fe-1/2/0.1
Create the routing policy to advertise both direct and RIPng-learned routes.
[edit policy-options policy-statement advertise-routes-through-ripng term 1]
user@R1# set from protocol direct
user@R1# set from protocol ripng
user@R1# set then accept
Apply the routing policy.
In Junos OS, you can only apply RIPng export policies at the group level.
[edit protocols ripng group ripng-group]
user@R1# set export advertise-routes-through-ripng
Configure the import policy.
[edit policy-options policy-statement ripng-import]
user@R1# set term 1 from route-filter fe80::/64 orlonger
user@R1# set term 1 from route-filter 2001:db8::/64 orlonger
user@R1# set term 1 then accept
user@R1# set term 2 then reject
Apply the import policy.
[edit protocols ripng group ripng-group]
user@R1# set neighbor fe-1/2/0.1 import ripng-import
Results
From configuration mode, confirm your configuration
by entering the show interfaces, show protocols, and show policy-options commands. If the output does
not display the intended configuration, repeat the configuration instructions
in this example to correct it.
user@R1# show interfaces
fe-1/2/0 {
    unit 1 {
        description to-R2;
        family inet6 {
            address 2001:db8:0:1::/64 {
                eui-64;
            }
        }
    }
}
lo0 {
    unit 1 {
        family inet6 {
            address 2001:db8::1/128;
        }
    }
}
user@R1# show protocols
ripng {
    group ripng-group {
        export advertise-routes-through-ripng;
        neighbor fe-1/2/0.1 {
            import ripng-import;
        }
    }
}
user@R1# show policy-options
policy-statement advertise-routes-through-ripng {
    term 1 {
        from protocol [ direct ripng ];
        then accept;
    }
}
policy-statement ripng-import {
    term 1 {
        from {
            route-filter fe80::/64 orlonger;
            route-filter 2001:db8::/64 orlonger;
        }
        then accept;
    }
    term 2 {
        then reject;
    }
}
If you are done configuring the device, enter commit from configuration mode.
Verification
Confirm that the configuration is working properly.
- Looking at the Neighbor Addresses for Device R2
- Looking at the Routes That Device R2 Is Advertising to Device R1
- Looking at the Routes That Device R1 Is Receiving from Device R2
- Checking the Routing Table
Looking at the Neighbor Addresses for Device R2
Purpose
Determine the neighbor address that Device R2 is using for Device R1.
Action
From operational mode, enter the show ripng neighbor command.
user@R2> show ripng neighbor fe-1/2/0.2

                    Source                           Dest               In
Neighbor     State  Address                          Address  Send Recv Met
--------     -----  -------                          -------  ---- ---- ---
fe-1/2/0.2      Up fe80::2a0:a514:0:24c              ff02::9  yes  yes  1
Meaning
Device R2 is using the fe80::2a0:a514:0:24c address to send routes to Device R1.
Looking at the Routes That Device R2 Is Advertising to Device R1
Purpose
Verify that Device R2 is sending the expected routes.
Action
From operational mode, enter the show route advertising-protocol
ripng command.
user@R2> show route advertising-protocol ripng fe80::2a0:a514:0:24c
inet6.0: 17 destinations, 18 routes (17 active, 0 holddown, 0 hidden)
+ = Active Route, - = Last Active, * = Both

2001:db8::2/128    *[Direct/0] 3d 22:00:34
                    >    via lo0.2
2001:db8::3/128    *[RIPng/100] 3d 21:47:00, metric 2, tag 0
                    > to fe80::2a0:a514:0:64c via fe-1/2/1.5
2001:db8:0:2::/64  *[Direct/0] 3d 22:00:34
                    >    via fe-1/2/0.2
2001:db8:0:3::/64  *[Direct/0] 3d 22:00:34
                    >    via fe-1/2/1.5
2001:db8:0:4::/64  *[RIPng/100] 3d 21:47:00, metric 2, tag 0
                    > to fe80::2a0:a514:0:64c via fe-1/2/1.5
2002:db7::2/128    *[Direct/0] 00:29:05
                    >    via lo0.2
2002:db8::2/128    *[Direct/0] 00:31:49
                    >    via lo0.2
2002:db9::2/128    *[Direct/0] 00:29:05
                    >    via lo0.2
Meaning
Device R2 is sending the extra loopback interface /128 routes to Device R1.
Looking at the Routes That Device R1 Is Receiving from Device R2
Purpose
Verify that Device R1 is receiving the expected routes.
Action
From operational mode, enter the show route receive-protocol
ripng command.
user@R1> show route receive-protocol ripng fe80::2a0:a514:0:24c

inet6.0: 9 destinations, 9 routes (9 active, 0 holddown, 0 hidden)
+ = Active Route, - = Last Active, * = Both

2001:db8::2/128    *[RIPng/100] 3d 21:55:49, metric 2, tag 0
                    > to fe80::2a0:a514:0:24c via fe-1/2/0.1
2001:db8::3/128    *[RIPng/100] 3d 21:55:46, metric 3, tag 0
                    > to fe80::2a0:a514:0:24c via fe-1/2/0.1
Meaning
The output shows that the extra loopback interface addresses are excluded.
Checking the Routing Table
Purpose
Verify that the routing table is populated with the expected routes.
Action
From operational mode, enter the show route protocol
ripng command.
user@R1> show route protocol ripng
inet6.0: 9 destinations, 9 routes (9 active, 0 holddown, 0 hidden)
+ = Active Route, - = Last Active, * = Both

2001:db8::2/128    *[RIPng/100] 3d 22:01:40, metric 2, tag 0
                    > to fe80::2a0:a514:0:24c via fe-1/2/0.1
2001:db8::3/128    *[RIPng/100] 3d 22:01:37, metric 3, tag 0
                    > to fe80::2a0:a514:0:24c via fe-1/2/0.1
ff02::9/128        *[RIPng/100] 00:00:08, metric 1
                         MultiRecv
Meaning
The output shows that the routes have been learned from Device R2 and Device R3.
If you delete or deactivate the import policy, the routing table contains the extra loopback interface routes.
Example: Testing a Routing Policy with Complex Regular Expressions
This example shows how to test a routing policy using the test policy command to ensure that the policy produces the results that you expect before you apply it in a production environment. Regular expressions, especially complex ones, can be tricky to get right. This example shows how to use the test policy command to make sure that your regular expressions have the intended effect.
Requirements
No special configuration beyond device initialization is required before you configure this example.
Overview
This example shows two routing devices with an external BGP (EBGP) connection between them. Device R2 uses the BGP session to send customer routes to Device R1. These static routes have multiple community values attached.
user@R2> show route match-prefix 172.16.* detail

inet.0: 7 destinations, 7 routes (7 active, 0 holddown, 0 hidden)
172.16.1.0/24 (1 entry, 1 announced)
        *Static Preference: 5
                Next hop type: Reject
                Address: 0x8fd0dc4
                Next-hop reference count: 8
                State: <Active Int Ext>
                Local AS: 64511
                Age: 21:32:13
                Validation State: unverified
                Task: RT
                Announcement bits (1): 0-KRT
                AS path: I
                Communities: 64510:1 64510:10 64510:11 64510:100 64510:111

172.16.2.0/24 (1 entry, 1 announced)
        *Static Preference: 5
                Next hop type: Reject
                Address: 0x8fd0dc4
                Next-hop reference count: 8
                State: <Active Int Ext>
                Local AS: 64511
                Age: 21:32:13
                Validation State: unverified
                Task: RT
                Announcement bits (1): 0-KRT
                AS path: I
                Communities: 64510:2 64510:20 64510:22 64510:200 64510:222

172.16.3.0/24 (1 entry, 1 announced)
        *Static Preference: 5
                Next hop type: Reject
                Address: 0x8fd0dc4
                Next-hop reference count: 8
                State: <Active Int Ext>
                Local AS: 64511
                Age: 21:32:13
                Validation State: unverified
                Task: RT
                Announcement bits (1): 0-KRT
                AS path: I
                Communities: 64510:3 64510:30 64510:33 64510:300 64510:333

172.16.4.0/24 (1 entry, 1 announced)
        *Static Preference: 5
                Next hop type: Reject
                Address: 0x8fd0dc4
                Next-hop reference count: 8
                State: <Active Int Ext>
                Local AS: 64511
                Age: 21:32:13
                Validation State: unverified
                Task: RT
                Announcement bits (1): 0-KRT
                AS path: I
                Communities: 64510:4 64510:40 64510:44 64510:400 64510:444
To test a complex regular expression, Device R2 has a policy called test-regex that locates routes. The policy is configured like this:
policy-statement test-regex {
    term find-routes {
        from community complex-regex;
        then accept;
    }
    term reject-the-rest {
        then reject;
    }
}
community complex-regex members "^64510:[13].*$";
This regular expression matches community values beginning with either 1 or 3.
Topology
Figure 2 shows the sample network.
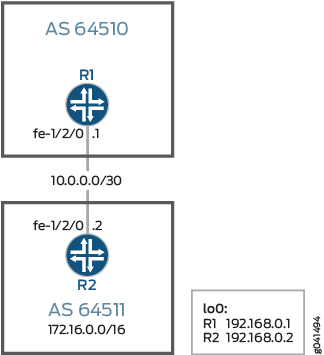
CLI Quick Configuration shows the configuration for all of the devices in Figure 2.
The section #d71e86__d71e264 describes the steps on Device R2.
Configuration
CLI Quick Configuration
To quickly configure this example, copy the following commands, paste them into a text file, remove any line breaks, change any details necessary to match your network configuration, and then copy and paste the commands into the CLI at the [edit] hierarchy level.
Device R1
set interfaces fe-1/2/0 unit 0 family inet address 10.0.0.1/30
set interfaces lo0 unit 0 family inet address 192.168.0.1/32
set protocols bgp group ext type external
set protocols bgp group ext peer-as 64511
set protocols bgp group ext neighbor 10.0.0.2
set routing-options router-id 192.168.0.1
set routing-options autonomous-system 64510
Device R2
set interfaces fe-1/2/0 unit 0 family inet address 10.0.0.2/30
set interfaces lo0 unit 0 family inet address 192.168.0.2/32
set protocols bgp group ext type external
set protocols bgp group ext peer-as 64510
set protocols bgp group ext neighbor 10.0.0.1
set policy-options policy-statement send-static term 1 from protocol static
set policy-options policy-statement send-static term 1 then accept
set policy-options policy-statement send-static term 2 then reject
set policy-options policy-statement test-regex term find-routes from community complex-regex
set policy-options policy-statement test-regex term find-routes then accept
set policy-options policy-statement test-regex term reject-the-rest then reject
set policy-options community complex-regex members "^64510:[13].*$"
set routing-options static route 172.16.1.0/24 reject
set routing-options static route 172.16.1.0/24 community 64510:1
set routing-options static route 172.16.1.0/24 community 64510:10
set routing-options static route 172.16.1.0/24 community 64510:11
set routing-options static route 172.16.1.0/24 community 64510:100
set routing-options static route 172.16.1.0/24 community 64510:111
set routing-options static route 172.16.2.0/24 reject
set routing-options static route 172.16.2.0/24 community 64510:2
set routing-options static route 172.16.2.0/24 community 64510:20
set routing-options static route 172.16.2.0/24 community 64510:22
set routing-options static route 172.16.2.0/24 community 64510:200
set routing-options static route 172.16.2.0/24 community 64510:222
set routing-options static route 172.16.3.0/24 reject
set routing-options static route 172.16.3.0/24 community 64510:3
set routing-options static route 172.16.3.0/24 community 64510:30
set routing-options static route 172.16.3.0/24 community 64510:33
set routing-options static route 172.16.3.0/24 community 64510:300
set routing-options static route 172.16.3.0/24 community 64510:333
set routing-options static route 172.16.4.0/24 reject
set routing-options static route 172.16.4.0/24 community 64510:4
set routing-options static route 172.16.4.0/24 community 64510:40
set routing-options static route 172.16.4.0/24 community 64510:44
set routing-options static route 172.16.4.0/24 community 64510:400
set routing-options static route 172.16.4.0/24 community 64510:444
set routing-options router-id 192.168.0.2
set routing-options autonomous-system 64511
Procedure
Step-by-Step Procedure
The following example requires that you navigate various levels in the configuration hierarchy. For information about navigating the CLI, see Using the CLI Editor in Configuration Mode in the CLI User Guide.
To configure Device R2:
Configure the interfaces.
[edit interfaces]
user@R2# set fe-1/2/0 unit 0 family inet address 10.0.0.2/30
user@R2# set lo0 unit 0 family inet address 192.168.0.2/32
Configure BGP.
Apply the import policy to the BGP peering session with Device R2.
[edit protocols bgp group ext]
user@R2# set type external
user@R2# set peer-as 64510
user@R2# set neighbor 10.0.0.1
Configure the routing policy that sends static routes.
[edit policy-options policy-statement send-static]
user@R2# set term 1 from protocol static
user@R2# set term 1 then accept
user@R2# set term 2 then reject
Configure the routing policy that tests a regular expression.
[edit policy-options policy-statement test-regex]
user@R2# set term find-routes from community complex-regex
user@R2# set term find-routes then accept
user@R2# set term reject-the-rest then reject
[edit policy-options community]
user@R2# set complex-regex members "^64510:[13].*$"
Configure the static routes and attaches community values.
[edit routing-options static route 172.16.1.0/24]
user@R2# set reject
user@R2# set community [ 64510:1 64510:10 64510:11 64510:100 64510:111 ]
[edit routing-options static route 172.16.2.0/24]
user@R2# set reject
user@R2# set community [ 64510:2 64510:20 64510:22 64510:200 64510:222 ]
[edit routing-options static route 172.16.3.0/24]
user@R2# set reject
user@R2# set community [ 64510:3 64510:30 64510:33 64510:300 64510:333 ]
[edit routing-options static route 172.16.4.0/24]
user@R2# set reject
user@R2# set community [ 64510:4 64510:40 64510:44 64510:400 64510:444 ]
Configure the autonomous system (AS) number and the router ID.
This affects Device R2’s routing table, and as no impact on Device R1 and Device R3.
[edit routing-options ]
user@R2# set router-id 192.168.0.2
user@R2# set autonomous-system 64511
Results
From configuration mode, confirm your configuration by entering the show interfaces, show protocols, show policy-options, and show routing-options commands. If the output does not display the intended configuration, repeat the instructions in this example to correct the configuration.
user@R2# show interfaces
fe-1/2/0 {
    unit 0 {
        family inet {
            address 10.0.0.2/30;
        }
    }
}
lo0 {
    unit 0 {
        family inet {
            address 192.168.0.2/32;
        }
    }
}
user@R2# show protocols
bgp {
    group ext {
        type external;
        peer-as 64510;
        neighbor 10.0.0.1;
    }
}
user@R2# show policy-options
policy-statement send-static {
    term 1 {
        from protocol static;
        then accept;
    }
    term 2 {
        then reject;
    }
}
policy-statement test-regex {
    term find-routes {
        from community complex-regex;
        then accept;
    }
    term reject-the-rest {
        then reject;
    }
}
community complex-regex members "^64510:[13].*$";
user@R2# show routing-options
static {
    route 172.16.1.0/24 {
        reject;
        community [ 64510:1 64510:10 64510:11 64510:100 64510:111 ];
    }
    route 172.16.2.0/24 {
        reject;
        community [ 64510:2 64510:20 64510:22 64510:200 64510:222 ];
    }
    route 172.16.3.0/24 {
        reject;
        community [ 64510:3 64510:30 64510:33 64510:300 64510:333 ];
    }
    route 172.16.4.0/24 {
        reject;
        community [ 64510:4 64510:40 64510:44 64510:400 64510:444 ];
    }
}
router-id 192.168.0.2;
autonomous-system 64511;
If you are done configuring the device, enter commit from configuration mode.
Verification
Confirm that the configuration is working properly.
Test to See Which Communities Match the Regular Expression
Purpose
You can test the regular expression and its policy by using the test policypolicy-name command.
Action
On Device R2, run the
test policy test-regex 0/0command.user@R2> test policy test-regex 0/0 inet.0: 7 destinations, 7 routes (7 active, 0 holddown, 0 hidden) + = Active Route, - = Last Active, * = Both 172.16.1.0/24 *[Static/5] 1d 00:32:50 Reject 172.16.3.0/24 *[Static/5] 1d 00:32:50 Reject Policy test-regex: 2 prefix accepted, 5 prefix rejectedOn Device R2, change the regular expression to match a community value containing any number of instances of the digit 2.
[edit policy-options community complex-regex]
user@R2# delete members "^64510:[13].*$"
user@R2# set members "^65020:2+$"
user@R2# commit
On Device R2, rerun the
test policy test-regex 0/0command.user@R2> test policy test-regex 0/0 inet.0: 7 destinations, 7 routes (7 active, 0 holddown, 0 hidden) + = Active Route, - = Last Active, * = Both 172.16.2.0/24 *[Static/5] 1d 00:31:36 Reject Policy test-regex: 1 prefix accepted, 6 prefix rejected
Meaning
The 172.16.1.0 /24 and 172.16.3.0/24 routes both have communities attached that match the ^64510:[13].*$ expression. The 172.16.2.0/24 route has communities that match the ^65020:2+$ expression.