Validate a Certificate
Learn how you can validate the CA certificates..
Validate Digital Certificate on SRX Series Firewall
During IKE negotiation, the PKI on an SRX Series Firewall validates X509 certificates received from VPN peers. The certificate validation performed is specified in RFC 5280, Internet X.509 Public Key Infrastructure Certificate and Certificate Revocation List (CRL) Profile. Basic certificate and certificate chain validations include signature and date validation as well as revocation checks. This topic describes additional digital certificate validations performed by the PKI.
Policy Validation
X509 certificates can include optional policy validation fields. If a policy validation field is present, policy validation is performed for the entire certificate chain including the end entity (EE) certificate and intermediate CA certificates. Policy validation is not applicable to the root certificate. Policy validation ensures that the EE and intermediate CA certificates have a common policy. If no common policy exists for the certificate chain that you validate, certificate validation fails.
Before policy validation, you must build a certificate chain containing the self-signed root certificate, intermediate CA certificates, and EE certificate. The policy validation starts with the intermediate CA certificate issued by the self-signed root certificate and continues through the EE certificate.
The following optional certificate fields are used for policy validation:
policy-oids
requireExplicitPolicy
skipCerts
These fields are described in the following sections.
Policy OIDs Configured on SRX Series Firewalls
In some situations, it might be desirable to only accept certificates with known policy object identifiers (OIDs) from peers. This optional configuration results in successful certificate validation only if the certificate chain received from the peer contains at least one policy OID that is configured on the SRX Series Firewall.
On the SRX Series Firewall, policy OIDs are configured in an IKE policy with the
policy-oids configuration statement at the [edit
security ike policy policy-name certificate]
hierarchy level. You can configure up to five policy OIDs. To validate a peer’s
certificate successfully, the peer’s certificate chain must contain at least one
of the policy OIDs configured on the SRX Series Firewall. Note that the
policy-oids field in a certificate is optional. If you
configure policy OIDs on the SRX Series Firewall but the peer’s certificate
chain does not contain any policy OIDs, certificate validation fails.
No Policy OIDs Configured on SRX Series Firewalls
If no policy OID is configured on the SRX Series Firewall, policy validation starts whenever the requireExplicitPolicy field is encountered in the certificate chain. A certificate can contain one or more certificate policy OIDs. For successful policy validation, a common policy OID must be present in the certificate chain.
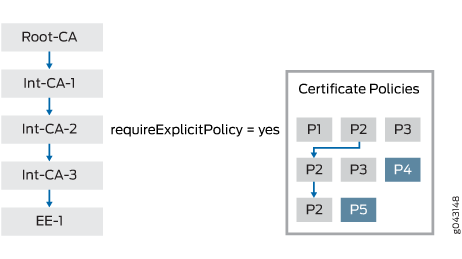
Figure 1 shows a certificate chain that consists of certificates for a root CA, three intermediate CAs, and an EE. The CA certificate for Int-CA-2 contains the requireExplicitPolicy field; therefore, policy validation starts with Int-CA-2 and continues through EE-1. The certificate for Int-CA-2 contains policy OIDs P1, P2, and P3. The certificate for Int-CA-3 contains policy OIDs P2, P3, and P4. The certificate for EE-1 contains policy OIDs P2 and P5. Because the policy OID P2 is common to the certificates being validated, policy validation succeeds.
The optional skipCerts field in an intermediate CA certificate indicates the number of certificates, including the current CA certificate, that are to be excluded from policy validation. If skipCerts is 0, policy validation starts from the current certificate. If skipCerts is 1, the current certificate is excluded from policy validation. The value of the skipCerts field is checked in every intermediate CA certificate. If a skipCerts value is encountered that is lower than the current number of certificates being excluded, the lower skipCerts value is used.
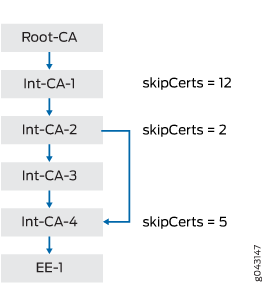
Figure 2 shows a certificate chain consisting of a root CA, four intermediate CAs, and an EE. The skipCerts value in Int-CA-1 is 12, which skips 12 certificates including the certificate for Int-CA-1. However, the skipCerts value is checked in every intermediate CA certificate in the chain. The skipCerts value in Int-CA-2 is 2, which is lower than 12, so now 2 certificates are skipped. The skipCerts value in Int-CA-4 is 5, which is greater than 2, so the Int-CA-4 skipCerts value is ignored.
When policy OIDs are configured on the SRX Series Firewall, the certificate fields requireExplicitPolicy and skipCerts are ignored.
Path Length Validation
Certificate validation can involve a certificate chain that includes a root CA, one or more optional intermediate CAs, and an EE certificate. The number of intermediate CAs can grow depending upon the deployment scenario. Path length validation provides a mechanism to limit the number of intermediate certificates involved in certificate validation. path-length is an optional field in an X509 certificate. The value of path-length indicates the number of non-self-signed intermediate CA certificates allowed for certificate validation. The last certificate, which is generally the EE certificate, is not included in the path limit. If the root certificate contains a path-length value of 0, no intermediate CA certificates are allowed. If the path-length value is 1, there can be 0 or 1 intermediate CA certificates.
path-length can be present in multiple CA certificates in the certificate chain. The path length validation always begins with the self-signed root certificate. The path limit is decremented by 1 at each intermediate certificate in the chain. If an intermediate certificate contains a path-length value less than the current path limit, the new limit is enforced. On the other hand, if the path-length value is larger than the current path limit, it is ignored.
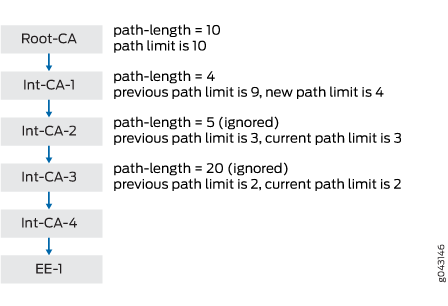
Figure 3 shows a certificate chain that consists of a root CA, four intermediate CAs, and an EE. The path-length value in Root-CA is 10; therefore, the initial path limit of non-self-signed intermediate CA certificates allowed for certificate validation is 10. At Int-CA-1, the path limit is 10-1 or 9. The path-length value in Int-CA-1 is 4, which is less than the path limit of 9, so the new path limit becomes 4. At Int-CA-2, the path limit is 4-1 or 3. The path-length value in Int-CA-2 is 5, which is larger than the path limit of 3, so it is ignored. At Int-CA-3, the path limit is 3-1 or 2. The path-length value in Int-CA-3 is 20, which is larger than the path limit of 2, so it is also ignored.
Key Usage
The key usage field in an EE or CA certificate defines the purpose of the key contained in the certificate.
For EE certificates, if the key usage field is present but the certificate does not contain digitalSignature or nonrepudiation flags, the certificate is rejected. If the key usage field is not present, then key usage is not checked.
For CA certificates, you can sue the key for certificate or CRL signature validation. Because the PKI is responsible for both X509 certificate validation and CRL downloads, you must check the key usage before validating the certificate or CRL.
In certificate signature validation, the keyCertSign flag indicates that a CA certificate can be used for certificate signature validation. If this flag is not set, certificate validation is terminated.
In Phase 1 negotiations of CRL signature validation, participants check the CRL to see if certificates received during an IKE exchange are still valid. The CRL is periodically downloaded for CA profiles configured with CRL as the certificate revocation check. You must verify the downloaded CRL files before you download them into the device. One of the verification steps is to validate the CRL signature using a CA certificate. You sign the downloaded CRL with the CA certificate’s private key, and you must verify with the private key with the CA certificate’s public key stored in the device. The key usage field in the CA certificate must contain the CRLSign flag to verify the downloaded CRL. If this flag is not present, the CRL is discarded.
Issuer and Subject DN Validation
You must perform signature validation for certificates received from a peer as well as for the CRL file downloaded from a CA server. Signature validation involves looking up the CA certificate in a CA database based on the issuer’s DN in the certificate or the CRL that is being verified.
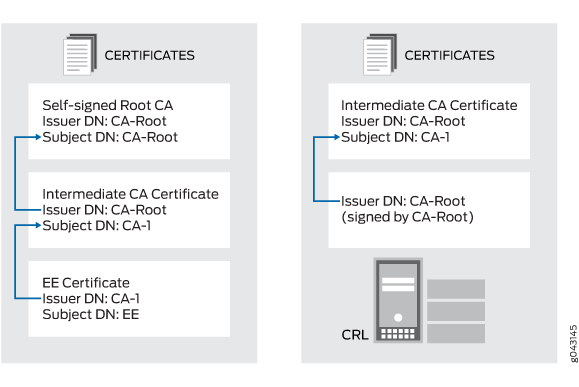
Figure 4 shows the lookup for CA certificates based on the issuer DN. In the EE certificate, the issuer DN is CA-1, which is the subject DN of the intermediate CA certificate in the chain. In the intermediate CA certificate, the issuer DN is CA-Root, which is the subject DN of the self-signed Root-CA certificate in the chain. In the CRL, the issuer DN is CA-Root, which is the subject DN of the self-signed Root-CA certificate.
The lookup for the issuer or subject DN must follow these rules for attribute values:
Attribute values encoded in different ASN.1 types (for example, PrintableString and BMPString) are assumed to represent different strings.
Attribute values encoded in PrintableString types are not case-sensitive. These attribute values are compared with each other after removing leading and trailing white spaces and converting internal substrings of one or more consecutive whites spaces to a single space.
Attribute values encoded in types other than PrintableString are case-sensitive.
Validate Digital Certificate on MX Series Devices
Staring in Junos OS Release 16.1R3, MX Series devices support digital certificate validation. During IKE negotiation, the PKI on an MX Series device validates X509 certificates received from VPN peers. The certificate validation performed is specified in RFC 5280, Internet X.509 Public Key Infrastructure Certificate and Certificate Revocation List (CRL) Profile. Basic certificate and certificate chain validations include signature and date validation as well as revocation checks. This topic describes additional digital certificate validations performed by the PKI.
Policy Validation
X509 certificates can include optional policy validation fields. If a policy validation field is present, you must perform policy validation for the entire certificate chain including the EE certificate and intermediate CA certificates. Policy validation is not applicable to the root certificate. Policy validation ensures that the EE and intermediate CA certificates have a common policy. If no common policy exists for the certificate chain being validated, certificate validation fails.
Before performing policy validation, you must build a certificate chain containing the self-signed root certificate, intermediate CA certificate, and EE certificate. The policy validation starts with the intermediate CA certificate issued by the self-signed root certificate and continues through the EE certificate.
The following optional certificate fields are used for policy validation:
policy-oids
requireExplicitPolicy
skipCerts
These fields are described in the following sections.
Policy OIDs Configured on MX Series Devices
In some situations, it might be desirable to only accept certificates with known policy object identifiers (OIDs) from peers. This optional configuration allows certificate validation to succeed only if the certificate chain received from the peer contains at least one policy OID that is configured on the MX Series device.
On the MX Series device, you must configure policy OIDs in an IKE policy with the
policy-oids configuration statement at the [edit
security ike policy policy-name certificate]
hierarchy level. You can configure up to five policy OIDs. To validate a peer’s
certificate successfully, the peer’s certificate chain must contain at least
one of the policy OIDs configured on the MX Series device. Note that the
policy-oids field in a certificate is optional. If you
configure policy OIDs on the MX Series device but the peer’s certificate chain
does not contain any policy OIDs, certificate validation fails.
No Policy OIDs Configured on MX Series Devices
If no policy OID is configured on the MX Series device, policy validation starts whenever the requireExplicitPolicy field is encountered in the certificate chain. A certificate might contain one or more certificate policy OIDs. For successful policy validation, a common policy OID must be present in the certificate chain.
Figure 5 shows a certificate chain that consists of certificates for a root CA, three intermediate CAs, and an EE. The CA certificate for Int-CA-2 contains the requireExplicitPolicy field; therefore, policy validation starts with Int-CA-2 and continues through EE-1. The certificate for Int-CA-2 contains policy OIDs P1, P2, and P3. The certificate for Int-CA-3 contains policy OIDs P2, P3, and P4. The certificate for EE-1 contains policy OIDs P2 and P5. Because the policy OID P2 is common to the certificates being validated, policy validation succeeds.
The optional skipCerts field in an intermediate CA certificate indicates the number of certificates, including the current CA certificate, that are to be excluded from policy validation. If skipCerts is 0, policy validation starts from the current certificate. If skipCerts is 1, the current certificate is excluded from policy validation. The value of the skipCerts field is checked in every intermediate CA certificate. If a skipCerts value is encountered that is lower than the current number of certificates being excluded, the lower skipCerts value is used.
Figure 6 shows a certificate chain consisting of a root CA, four intermediate CAs, and an EE. The skipCerts value in Int-CA-1 is 12, which skips 12 certificates including the certificate for Int-CA-1. However, the skipCerts value is checked in every intermediate CA certificate in the chain. The skipCerts value in Int-CA-2 is 2, which is lower than 12, so now 2 certificates are skipped. The skipCerts value in Int-CA-4 is 5, which is greater than 2, so the Int-CA-4 skipCerts value is ignored.
When policy OIDs are configured on the MX Series device, the certificate fields requireExplicitPolicy and skipCerts are ignored.
Path Length Validation
Certificate validation can involve a certificate chain that includes a root CA, one or more optional intermediate CAs, and an EE certificate. The number of intermediate CAs can grow depending upon the deployment scenario. Path length validation provides a mechanism to limit the number of intermediate certificates involved in certificate validation. path-length is an optional field in an X509 certificate. The value of path-length indicates the number of non-self-signed intermediate CA certificates allowed for certificate validation. The last certificate, which is generally the EE certificate, is not included in the path limit. If the root certificate contains a path-length value of 0, no intermediate CA certificates are allowed. If the path-length value is 1, there can be 0 or 1 intermediate CA certificates.
path-length can be present in multiple CA certificates in the certificate chain. The path length validation always begins with the self-signed root certificate. The path limit is decremented by 1 at each intermediate certificate in the chain. If an intermediate certificate contains a path-length value less than the current path limit, the new limit is enforced. On the other hand, if the path-length value is larger than the current path limit, it is ignored.
Figure 7 shows a certificate chain that consists of a root CA, four intermediate CAs, and an EE. The path-length value in Root-CA is 10, therefore the initial path limit of non-self-signed intermediate CA certificates allowed for certificate validation is 10. At Int-CA-1, the path limit is 10-1 or 9. The path-length value in Int-CA-1 is 4, which is less than the path limit of 9, so the new path limit becomes 4. At Int-CA-2, the path limit is 4-1 or 3. The path-length value in Int-CA-2 is 5, which is larger than the path limit of 3, so it is ignored. At Int-CA-3, the path limit is 3-1 or 2. The path-length value in Int-CA-3 is 20, which is larger than the path limit of 2, so it is also ignored.
Key Usage
The key usage field in an EE or CA certificate defines the purpose of the key contained in the certificate.
EE Certificates
For EE certificates, if the key usage field is present but the certificate does not contain digitalSignature or nonrepudiation flags, the certificate is rejected. If the key usage field is not present, then key usage is not checked.
CA Certificates
The key can be used for certificate or CRL signature validation. Because the PKI is responsible for both X509 certificate validation and CRL downloads, key usage must be checked before validating the certificate or CRL.
Certificate Signature Validation
The keyCertSign flag indicates that a CA certificate can be used for certificate signature validation. If this flag is not set, certificate validation is terminated.
CRL Signature Validation
In Phase 1 negotiations, participants check the CRL to see if certificates received during an IKE exchange are still valid. The CRL is periodically downloaded for CA profiles configured with CRL as the certificate revocation check. Downloaded CRL files must be verified before they are downloaded into the device. One of the verification steps is to validate the CRL signature using a CA certificate. The downloaded CRL is signed with the CA certificate’s private key and it must be verified with the CA certificate’s public key stored in the device. The key usage field in the CA certificate must contain the CRLSign flag to verify the downloaded CRL. If this flag is not present, the CRL is discarded.
Issuer and Subject Distinguished Name Validation
Signature validation is performed for certificates received from a peer as well as for the CRL file downloaded from a CA server. Signature validation involves looking up the CA certificate in a CA database based on the issuer’s DN in the certificate or the CRL being verified.
Figure 8 shows the lookup for CA certificates based on the issuer DN. In the EE certificate, the issuer DN is CA-1, which is the subject DN of the intermediate CA certificate in the chain. In the intermediate CA certificate, the issuer DN is CA-Root, which is the subject DN of the self-signed Root-CA certificate in the chain. In the CRL, the issuer DN is CA-Root, which is the subject DN of the self-signed Root-CA certificate.
The lookup for the issuer or subject DN must follow these rules for attribute values:
Attribute values encoded in different ASN.1 types (for example, PrintableString and BMPString) are assumed to represent different strings.
Attribute values encoded in PrintableString types are not case-sensitive. These attribute values are compared after removing leading and trailing white spaces and converting internal substrings of one or more consecutive whites spaces to a single space.
Attribute values encoded in types other than PrintableString are case-sensitive.
Example: Validating Digital Certificate by Configuring Policy OIDs
In some situations, it might be desirable to only accept certificates with known policy object identifiers (OIDs) from peers. This optional configuration allows certificate validation to succeed only if the certificate chain received from the peer contains at least one policy OID that is configured on the SRX Series Firewall. This example shows how to configure policy OIDs in the IKE policy on an SRX Series Firewall.
You must ensure that at least one of the policy OIDs configured on the SRX Series Firewall is included in a peer’s certificate or certificate chain. Note that the policy-oids field in a peer’s certificate is optional. If you configure policy OIDs in an IKE policy and, the peer’s certificate chain does not contain any policy OIDs, certificate validation for the peer fails.
Requirements
Before you begin:
Ensure that you are using Junos OS Release 12.3X48-D10 or later for SRX Series Firewalls.
Configure an IPsec VPN tunnel. See IPsec VPN Configuration Overview. The complete IKE phase 1 and phase 2 VPN tunnel configuration is not shown in this example.
Overview
This example shows an IKE policy configuration where policy OIDs 2.16.840.1.101.3.1.48.2 and 5.16.40.1.101.3.1.55.2 are specified. The IKE policy ike_cert_pol references the IKE proposal ike_cert_prop, which is not shown. The local certificate on the SRX Series Firewall is lc-igloo-root.
Configuration
Procedure
CLI Quick Configuration
To quickly configure this example, copy the
following commands, paste them into a text file, remove any line breaks,
change any details necessary to match your network configuration,
copy and paste the commands into the CLI at the [edit] hierarchy
level, and then enter commit from configuration mode.
set security ike policy ike_cert_pol mode main
set security ike policy ike_cert_pol proposals ike_cert_prop
set security ike policy ike_cert_pol certificate local-certificate lc-igloo-root
set security ike policy ike_cert_pol certificate policy-oids 2.16.840.1.101.3.1.48.2
set security ike policy ike_cert_pol certificate policy-oids 5.16.40.1.101.3.1.55.2
Step-by-Step Procedure
The following example requires you to navigate various levels in the configuration hierarchy. For instructions on how to do that, see Use the CLI Editor in Configuration Mode in the CLI User Guide.
To configure policy OIDs for certificate validation:
Configure the IKE policy.
[edit security ike policy ike_cert_pol]
user@host# set mode main
user@host# set proposals ike_cert_prop
user@host# set certificate local-certificate lc-igloo-root
user@host# set certificate policy-oids 2.16.840.1.101.3.1.48.2
user@host# set certificate policy-oids 5.16.40.1.101.3.1.55.2
Results
From configuration mode, confirm your configuration
by entering the show security ike policy ike_cert_pol command.
If the output does not display the intended configuration, repeat
the instructions in this example to correct the configuration.
user@host# show security ike policy ike_cert_pol
mode main;
proposals ike_cert_prop;
certificate {
    local-certificate lc-igloo-root;
    policy-oids [ 2.16.840.1.101.3.1.48.2 5.16.40.1.101.3.1.55.2 ];
}
If you are done configuring the device, enter commit from configuration mode.
Verification
Confirm that the configuration is working properly.
Verifying the CA Certificate
Purpose
Display the CA certificate configured on the device.
Action
From operational mode, enter the show security
pki ca-certificate ca-profile ca-tmp command.
user@host> show security pki ca-certificate ca-profile ca-tmp detail
                   Certificate identifier: ca-tmp
                          Certificate version: 3
                          Serial number: 00000047
                          Issuer:
                            Organization: U.S. Government,
                            Organizational unit: DoD, Organizational unit: Testing, Country: US,
                            Common name: Trust Anchor
                          Subject:
                            Organization: U.S. Government,
                            Organizational unit: Dod, Organizational unit: Testing, Country: US,
                            Common name: CA1-PP.01.03
                          Subject string:
                            C=US, O=U.S. Government, OU=Dod, OU=Testing, CN=CA1-PP.01.03
                          Validity:
                            Not before: 01- 1-1998 12:01 UTC
                            Not after: 01- 1-2048 12:01 UTC

?Public key algorithm: rsaEncryption(1024 bits)
  30:81:89:02:81:81:00:cb:fd:78:0c:be:87:ac:cd:c0:33:66:a3:18
  9e:fd:40:b7:9b:bc:dc:66:ff:08:45:f7:7e:fe:8e:d6:32:f8:5b:75
  db:76:f0:4d:21:9a:6e:4f:04:21:4c:7e:08:a1:f9:3d:ac:8b:90:76
  44:7b:c4:e9:9b:93:80:2a:64:83:6e:6a:cd:d8:d4:23:dd:ce:cb:3b
  b5:ea:da:2b:40:8d:ad:a9:4d:97:58:cf:60:af:82:94:30:47:b7:7d
  88:c3:76:c0:97:b4:6a:59:7e:f7:86:5d:d8:1f:af:fb:72:f1:b8:5c
  2a:35:1e:a7:9e:14:51:d4:19:ae:c7:5c:65:ea:f5:02:03:01:00:01
Signature algorithm: sha1WithRSAEncryption
Certificate Policy:
  Policy Identifier = 2.16.840.1.101.3.1.48.2
Use for key: CRL signing, Certificate signing
Fingerprint:
  e0:b3:2f:2e:a1:c5:ee:ad:af:dd:96:85:f6:78:24:c5:89:ed:39:40 (sha1)
  f3:47:6e:55:bc:9d:80:39:5a:40:70:8b:10:0e:93:c5 (md5)
Verifying Policy OID Validation
Purpose
If the peer’s certificate is successfully validated, IKE and IPsec SA are established. If the validation of the peer’s certificate fails, no IKE SA is established.
Action
From operational mode, enter the show security
ike security-associations and show security ipsec security-associations commands.
user@host> show security ike security-associations
node0:
--------------------------------------------------------------------------
Index   State  Initiator cookie  Responder cookie  Mode           Remote Address
821765168 UP   88875c981252c1d8  b744ac9c21bde57e  IKEv2          192.0.2.2
1106977837 UP  1a09e32d1e6f20f1  e008278091060acb  IKEv2          198.51.100.202
user@host> show security ipsec security-associations
node0:
--------------------------------------------------------------------------
  Total active tunnels: 2
  ID    Algorithm       SPI      Life:sec/kb  Mon lsys Port  Gateway
  <213909506 ESP:aes-cbc-192/sha256 8cb9e40a 1295/ unlim - root 500 192.0.2.2
  >213909506 ESP:aes-cbc-192/sha256 8271d2b2 1295/ unlim - root 500 192.0.2.2
  <218365954 ESP:aes-cbc-192/sha256 d0153bc0 1726/ unlim - root 1495 198.51.100.202
  >218365954 ESP:aes-cbc-192/sha256 97611813 1726/ unlim - root 1495 198.51.100.202
Meaning
The show security ike security-associations command lists all active IKE Phase 1
SAs. If no SAs are listed, there was a problem with Phase 1 establishment. In this case,
check for the PKID_CERT_POLICY_CHECK_FAIL message in the system logs. This message
indicates that the peer’s certificate chain does not contain a policy OID that is
configured on the SRX Series Firewall. Check the policy-oids values
in the peer’s certificate chain with the values configured on the SRX Series Firewall.
It might also be that the peer’s certificate chain does not contain any policy-oids fields, which are optional fields. If this is the case, certificate validation fails if there are any policy OIDs configured on the SRX Series Firewall.
Example: Improving Digital Certificate Validation by Configuring Policy OIDs on an MX Series Device
In some situations, it might be desirable to only accept certificates with known policy object identifiers (OIDs) from peers. This optional configuration allows certificate validation to succeed only if the certificate chain received from the peer contains at least one policy OID that is configured on the MX Series device. This example shows how to configure policy OIDs in the IKE policy on an MX Series device.
You must ensure that at least one of the policy OIDs configured on the MX Series device is included in a peer’s certificate or certificate chain. Note that the policy-oids field in a peer’s certificate is optional. If you configure policy OIDs in an IKE policy and, the peer’s certificate chain does not contain any policy OIDs, certificate validation for the peer fails.
Requirements
Before you begin:
Ensure that you are using Junos OS Release 16.1 or later for MX Series devices.
Configure an IPsec VPN tunnel.
Overview
This example shows an IKE policy configuration where policy OIDs 2.16.840.1.101.3.1.48.2 and 5.16.40.1.101.3.1.55.2 are specified. The IKE policy ike_cert_pol references the IKE proposal ike_cert_prop, which is not shown. The local certificate on the MX Series device is lc-igloo-root.
Configuration
Procedure
CLI Quick Configuration
To quickly configure this example, copy the
following commands, paste them into a text file, remove any line breaks,
change any details necessary to match your network configuration,
copy and paste the commands into the CLI at the [edit] hierarchy
level, and then enter commit from configuration mode.
set services ipsec-vpn ike policy ike_cert_pol mode main
set services ipsec-vpn ike policy ike_cert_pol proposals ike_cert_prop
set services ipsec-vpn ike policy ike_cert_pol certificate local-certificate lc-igloo-root
set services ipsec-vpn ike policy ike_cert_pol certificate policy-oids 2.16.840.1.101.3.1.48.2
set services ipsec-vpn ike policy ike_cert_pol certificate policy-oids 5.16.40.1.101.3.1.55.2
Step-by-Step Procedure
The following example requires you to navigate various levels in the configuration hierarchy. For instructions on how to do that, see Using the CLI Editor in Configuration Mode in the CLI User Guide.
To configure policy OIDs for certificate validation:
Configure the IKE policy:
[edit services ipsec-vpn ike policy ike_cert_pol]
user@host# set mode main
user@host# set proposals ike_cert_prop
user@host# set certificate local-certificate lc-igloo-root
user@host# set certificate policy-oids 2.16.840.1.101.3.1.48.2
user@host# set certificate policy-oids 5.16.40.1.101.3.1.55.2
Results
From configuration mode, confirm your configuration
by entering the show services ipsec-vpn ike policy ike_cert_pol command. If the output does not display the intended configuration,
repeat the instructions in this example to correct the configuration.
user@host# show services ipsec-vpn ike policy ike_cert_pol
mode main;
proposals ike_cert_prop;
certificate {
    local-certificate lc-igloo-root;
    policy-oids [ 2.16.840.1.101.3.1.48.2 5.16.40.1.101.3.1.55.2 ];
}
If you are done configuring the device, enter commit from configuration mode.
Verification
Confirm that the configuration is working properly.
Verifying the CA Certificate
Purpose
Display the CA certificate configured on the device.
Action
From the operational mode, enter the show security pki ca-certificate ca-profile
ca-tmp command.
user@host> show security pki ca-certificate ca-profile ca-tmp detail
                   Certificate identifier: ca-tmp
                          Certificate version: 3
                          Serial number: 00000047
                          Issuer:
                            Organization: U.S. Government,
                            Organizational unit: DoD, Organizational unit: Testing, Country: US,
                            Common name: Trust Anchor
                          Subject:
                            Organization: U.S. Government,
                            Organizational unit: Dod, Organizational unit: Testing, Country: US,
                            Common name: CA1-PP.01.03
                          Subject string:
                            C=US, O=U.S. Government, OU=Dod, OU=Testing, CN=CA1-PP.01.03
                          Validity:
                            Not before: 07- 3-2015 10:54 UTC
                            Not after: 07- 1-2020 10:54 UTC

?Public key algorithm: rsaEncryption(1024 bits)
  30:81:89:02:81:81:00:cb:fd:78:0c:be:87:ac:cd:c0:33:66:a3:18
  9e:fd:40:b7:9b:bc:dc:66:ff:08:45:f7:7e:fe:8e:d6:32:f8:5b:75
  db:76:f0:4d:21:9a:6e:4f:04:21:4c:7e:08:a1:f9:3d:ac:8b:90:76
  44:7b:c4:e9:9b:93:80:2a:64:83:6e:6a:cd:d8:d4:23:dd:ce:cb:3b
  b5:ea:da:2b:40:8d:ad:a9:4d:97:58:cf:60:af:82:94:30:47:b7:7d
  88:c3:76:c0:97:b4:6a:59:7e:f7:86:5d:d8:1f:af:fb:72:f1:b8:5c
  2a:35:1e:a7:9e:14:51:d4:19:ae:c7:5c:65:ea:f5:02:03:01:00:01
Signature algorithm: sha1WithRSAEncryption
Certificate Policy:
  Policy Identifier = 2.16.840.1.101.3.1.48.2
Use for key: CRL signing, Certificate signing
Fingerprint:
  e0:b3:2f:2e:a1:c5:ee:ad:af:dd:96:85:f6:78:24:c5:89:ed:39:40 (sha1)
  f3:47:6e:55:bc:9d:80:39:5a:40:70:8b:10:0e:93:c5 (md5)
Verifying Policy OID Validation
Purpose
If the peer’s certificate is successfully validated, IKE and IPsec SA are established. If the validation of the peer’s certificate fails, no IKE SA is established.
Action
From the operational mode, enter the show services ipsec-vpn ike
security-associations and show services ipsec-vpn ipsec
security-associations commands.
user@host> show services ipsec-vpn ike security-associations
node0:
--------------------------------------------------------------------------
Index   State  Initiator cookie  Responder cookie  Mode           Remote Address
821765168 UP   88875c981252c1d8  b744ac9c21bde57e  IKEv2          192.0.2.1
1106977837 UP  1a09e32d1e6f20f1  e008278091060acb  IKEv2          198.51.100.0
user@host> show services ipsec-vpn ipsec security-associations
node0:
--------------------------------------------------------------------------
  Total active tunnels: 2
  ID    Algorithm       SPI      Life:sec/kb  Mon lsys Port  Gateway
  <213909506 ESP:aes-cbc-192/sha256 8cb9e40a 1295/ unlim - root 500 192.0.2.1
  >213909506 ESP:aes-cbc-192/sha256 8271d2b2 1295/ unlim - root 500 192.0.2.1
  <218365954 ESP:aes-cbc-192/sha256 d0153bc0 1726/ unlim - root 1495 198.51.100.0
  >218365954 ESP:aes-cbc-192/sha256 97611813 1726/ unlim - root 1495 198.51.100.0
Meaning
The show services ipsec-vpn ike security-associations command lists all active IKE Phase 1 SAs. If no SAs are listed,
there was a problem with Phase 1 establishment. In this case, check
for the PKID_CERT_POLICY_CHECK_FAIL message in the system logs. This
message indicates that the peer’s certificate chain does not
contain a policy OID that is configured on the MX Series device. Check
the policy-oids values in the peer’s
certificate chain with the values configured on the MX Series device.
It might also be that the peer’s certificate chain does not contain any policy-oids fields, which are optional fields. If this is the case, certificate validation fails if there are any policy OIDs configured on the MX Series device.
Example: Configuring a Device for Peer Certificate Chain Validation
This example shows how to configure a device for certificate chains used to validate peer devices during IKE negotiation.
Requirements
Before you begin, obtain the address of the CA and the information they require (such as the challenge password) when you submit requests for local certificates.
Overview
This example shows how to configure a local device for certificate chains, enroll CA and local certificates, check the validity of enrolled certificates, and check the revocation status of the peer device.
Topology
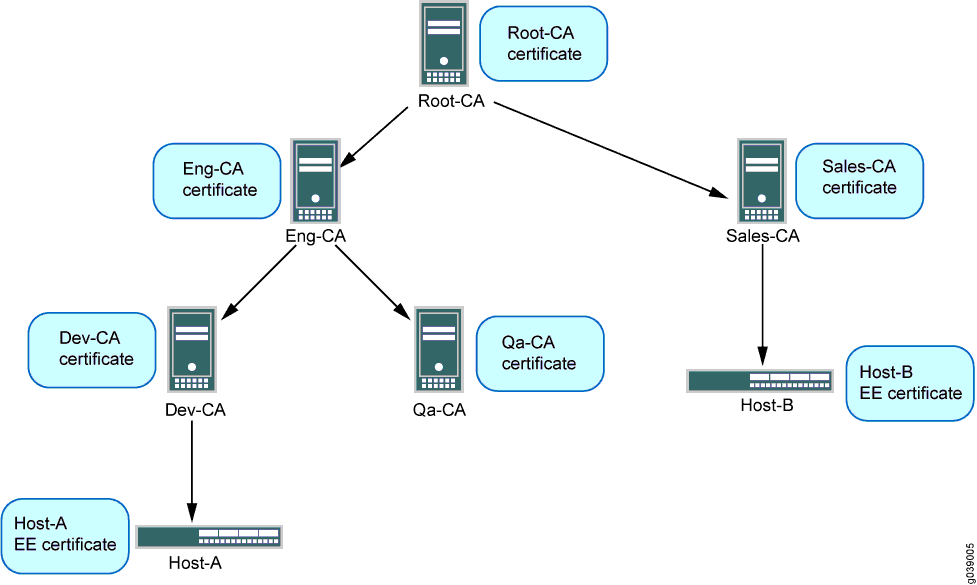
This example shows the configuration and operational commands on Host-A, as shown in Figure 9. A dynamic CA profile is automatically created on Host-A to allow Host-A to download the CRL from Sales-CA and check the revocation status of Host-B’s certificate.
The IPsec VPN configuration for Phase 1 and Phase 2 negotiation is shown for Host-A in this example. The peer device (Host-B) must be properly configured so that Phase 1 and Phase 2 options are successfully negotiated and SA are established.
Configuration
To configure a device for certificate chains:
Configure CA Profiles
CLI Quick Configuration
To quickly configure this example, copy the
following commands, paste them into a text file, remove any line breaks,
change any details necessary to match your network configuration,
copy and paste the commands into the CLI at the [edit] hierarchy
level, and then enter commit from configuration mode.
set security pki ca-profile Root-CA ca-identity CA-Root
set security pki ca-profile Root-CA enrollment url http://10.157.88.230:8080/scep/Root/
set security pki ca-profile Root-CA revocation-check use-crl
set security pki ca-profile Eng-CA ca-identity Eng-CA
set security pki ca-profile Eng-CA enrollment url http://10.157.88.230:8080/scep/Eng/
set security pki ca-profile Eng-CA revocation-check use-crl
set security pki ca-profile Dev-CA ca-identity Dev-CA
set security pki ca-profile Dev-CA enrollment url http://10.157.88.230:8080/scep/Dev/
set security pki ca-profile Dev-CA revocation-check use-crl
Step-by-Step Procedure
The following example requires you to navigate various levels in the configuration hierarchy. For instructions on how to do that, see Using the CLI Editor in Configuration Mode in the CLI User Guide.
To configure CA profiles:
Create the CA profile for Root-CA.
[edit security pki]
user@host# set ca-profile Root-CA ca-identity CA-Root
user@host# set ca-profile Root-CA enrollment url http://10.157.88.230:8080/scep/Root/
user@host# set ca-profile Root-CA revocation-check use-crl
Create the CA profile for Eng-CA.
[edit security pki]
user@host# set ca-profile Eng-CA ca-identity Eng-CA
user@host# set ca-profile Eng-CA enrollment url http://10.157.88.230:8080/scep/Eng/
user@host# set ca-profile Eng-CA revocation-check use-crl
Create the CA profile for Dev-CA.
[edit security pki]
user@host# set ca-profile Dev-CA ca-identity Dev-CA
user@host# set ca-profile Dev-CA enrollment url http://10.157.88.230:8080/scep/Dev/
user@host# set ca-profile Dev-CA revocation-check use-crl
Results
From the configuration mode, confirm your configuration by entering the show security
pki command. If the output does not display the intended
configuration, repeat the configuration instructions in this example to
correct it.
[edit]
user@host# show security pki
ca-profile Root-CA {
    ca-identity Root-CA;
    enrollment {
        url "http:/;/10.157.88.230:8080/scep/Root/";
    }
    revocation-check {
        use-crl;
    }
}
ca-profile Eng-CA {
    ca-identity Eng-CA;
    enrollment {
        url "http:/;/10.157.88.230:8080/scep/Eng/";
    }
    revocation-check {
        use-crl;
    }
}
ca-profile Dev-CA {
    ca-identity Dev-CA;
    enrollment {
        url "http:/;/10.157.88.230:8080/scep/Dev/";
    }
    revocation-check {
        use-crl;
    }
}
If you are done configuring the device, enter commit from configuration mode.
Enroll Certificates
Step-by-Step Procedure
To enroll certificates:
Enroll the CA certificates.
user@host> request security pki ca-certificate enroll ca-profile Root-CA
user@host> request security pki ca-certificate enroll ca-profile Eng-CA
user@host> request security pki ca-certificate enroll ca-profile Dev-CA
Type yes at the prompts to load the CA certificate.
Verify that the CA certificates are enrolled in the device.
user@host> show security pki ca-certificate ca-profile Root-CA Certificate identifier: Root-CA Issued to: Root-CA, Issued by: C = us, O = juniper, CN = Root-CA Validity: Not before: 07- 3-2015 10:54 UTC Not after: 07- 1-2020 10:54 UTC Public key algorithm: rsaEncryption(2048 bits)user@host> show security pki ca-certificate ca-profile Eng-CA Certificate identifier: Eng-CA Issued to: Eng-CA, Issued by: C = us, O = juniper, CN = Root-CA Validity: Not before: 07- 3-2015 10:54 UTC Not after: 07- 1-2020 10:54 UTC Public key algorithm: rsaEncryption(2048 bits)user@host> show security pki ca-certificate ca-profile Dev-CA Certificate identifier: Dev-CA Issued to: Dev-CA, Issued by: C = us, O = juniper, CN = Eng-CA Validity: Not before: 07- 3-2015 10:54 UTC Not after: 07- 1-2020 10:54 UTC Public key algorithm: rsaEncryption(2048 bits)Verify the validity of the enrolled CA certificates.
user@host> request security pki ca-certificate verify ca-profile Root-CA
CA certificate Root-CA verified successfully
user@host> request security pki ca-certificate verify ca-profile Eng-CA
CA certificate Eng-CA verified successfully
user@host> request security pki ca-certificate verify ca-profile Dev-CA
CA certificate Dev-CA verified successfully
Enroll the local certificate.
user@host> request security pki local-certificate enroll certificate-id Host-A ca-profile Dev-CA challenge-password juniper domain-name host-a.company.net email host-a@company.net subject DC=juniper,CN=Host-A, OU=DEV,O=PKI,L=Sunnyvale,ST=CA,C=US
Verify that the local certificate is enrolled in the device.
user@host> show security pki local-certificate
Issued to: Host-A, Issued by: C = us, O = juniper, CN = Dev-CA
        Validity:
          Not before: 07- 3-2015 10:54 UTC
          Not after: 07- 1-2020 10:54 UTC
        Public key algorithm: rsaEncryption(1024 bits)
Verify the validity of the enrolled local certificate.
user@host> request security pki local-certificate verify certificate-id Host-A
Local certificate Host-A verification success
Check the CRL download for configured CA profiles.
user@host> show security pki crl
     CA profile: Root-CA
        CRL version: V00000001
        CRL issuer: C = us, O = juniper, CN = Root-CA
        Effective date: 09- 9-2015 13:08
        Next update: 09-21-2015 02:55

      CA profile: Eng-CA
        CRL version: V00000001
        CRL issuer: C = us, O = juniper, CN = Eng-CA
        Effective date: 08-22-2015 17:46
        Next update: 10-24-2015 03:33

      CA profile: Dev-CA
        CRL version: V00000001
        CRL issuer: C = us, O = juniper, CN = Dev-CA
        Effective date: 09-14-2015 21:15
        Next update: 09-26-2012 11:02
Configure IPsec VPN Options
CLI Quick Configuration
To quickly configure IPsec VPN options, copy the following commands, paste them into a text file,
remove any line breaks, change any details necessary to match your network
configuration, copy and paste the commands into the CLI at the
[edit] hierarchy level, and then enter
commit from configuration mode.
set services ipsec-vpn ike proposal ike_cert_prop_01 authentication-method rsa-signatures
set services ipsec-vpn ike proposal ike_cert_prop_01 dh-group group5
set services ipsec-vpn ike proposal ike_cert_prop_01 authentication-algorithm sha1
set services ipsec-vpn ike proposal ike_cert_prop_01 encryption-algorithm aes-256-cbc
set services ipsec-vpn ike policy ike_cert_pol_01 mode main
set services ipsec-vpn ike policy ike_cert_pol_01 proposals ike_cert_prop_01
set services ipsec-vpn ike policy ike_cert_pol_01 certificate local-certificate Host-A
set services ipsec-vpn ipsec proposal ipsec_prop_01 protocol esp
set services ipsec-vpn ipsec proposal ipsec_prop_01 authentication-algorithm hmac-sha1-96
set services ipsec-vpn ipsec proposal ipsec_prop_01 encryption-algorithm 3des-cbc
set services ipsec-vpn ipsec proposal ipsec_prop_01 lifetime-seconds 300
set services ipsec-vpn ipsec policy ipsec_pol_01 proposals ipsec_prop_01
set services ipsec-vpn ipsec vpn ipsec_cert_vpn_01 ike ipsec-policy ipsec_pol_01
Step-by-Step Procedure
The following example requires you to navigate various levels in the configuration hierarchy. For instructions on how to do that, see Using the CLI Editor in Configuration Mode in the CLI User Guide.
To configure IPsec VPN options:
Configure Phase 1 options.
[edit services ipsec-vpn ike proposal ike_cert_prop_01]
user@host# set authentication-method rsa-signatures
user@host# set dh-group group5
user@host# set authentication-algorithm sha1
user@host# set encryption-algorithm aes-256-cbc
[edit services ipsec-vpn ike policy ike_cert_pol_01]
user@host# set mode main
user@host# set proposals ike_cert_prop_01
user@host# set certificate local-certificate Host-A
Configure Phase 2 options.
[edit services ipsec-vpn ipsec proposal ipsec_prop_01]
user@host# set protocol esp
user@host# set authentication-algorithm hmac-sha1-96
user@host# set encryption-algorithm 3des-cbc
user@host# set lifetime-seconds 300
[edit services ipsec-vpn ipsec policy ipsec_pol_01]
user@host# set proposals ipsec_prop_01
[edit services ipsec-vpn ipsec vpn ipsec_cert_vpn_01]
user@host# set ike ipsec-policy ipsec_pol_01
Results
From the configuration mode, confirm your configuration by entering the show security
ike and show security ipsec commands. If the
output does not display the intended configuration, repeat the configuration
instructions in this example to correct it.
[edit]
user@host# show services ipsec-vpn ike
proposal ike_cert_prop_01 {
    authentication-method rsa-signatures;
    dh-group group5;
    authentication-algorithm sha1;
    encryption-algorithm aes-256-cbc;
}
    policy ike_cert_pol_01 {
        mode main;
        proposals ike_cert_prop_01;
        certificate {
            local-certificate Host-A;
        }
    }
[edit]
user@host# show services ipsec-vpn ipsec
proposal ipsec_prop_01 {
    protocol esp;
    authentication-algorithm hmac-sha1-96;
    encryption-algorithm 3des-cbc;
    lifetime-seconds 300;
}
    policy ipsec_pol_01 {
        proposals ipsec_prop_01;
    }
If you are done configuring the device, enter commit from configuration mode.
Verification
If certificate validation is successful during IKE negotiation between peer devices, both IKE and IPsec SA are established.
Verifying IKE Phase 1 Status
Purpose
Verify the IKE Phase 1 status.
Action
Enter the show services ipsec-vpn ike security-associations command from the operational mode.
user@host> show services ipsec-vpn ike security-associations

Remote Address  State         Initiator cookie  Responder cookie  Exchange type
192.0.2.0        Matured       63b3445edda507fb  2715ee5895ed244d  Main
Verify IPsec Phase 2 Status
Purpose
Verify the IPsec Phase 2 status.
Action
Enter the show services ipsec-vpn ipsec security-associations command from the operational mode.
user@host> show services ipsec-vpn ipsec security-associations

Service set: ips_ss1, IKE Routing-instance: default

  Rule: vpn_rule_ms_2_2_01, Term: term11, Tunnel index: 1
  Local gateway: 10.0.1.2, Remote gateway: 172.16.0.0
  IPSec inside interface: ms-2/2/0.1, Tunnel MTU: 1500
  UDP encapsulate: Disabled, UDP Destination port: 0
    Direction SPI         AUX-SPI     Mode       Type     Protocol
    inbound   2151932129  0           tunnel     dynamic  ESP
    outbound  4169263669  0           tunnel     dynamic  ESP
IKE and IPsec SA Failure for a Revoked Certificate
Checking for Revoked Certificates
Problem
If certificate validation fails during IKE negotiation between peer devices, check to make sure
that the peer’s certificate has not been revoked. A dynamic CA profile
enables the local device to download the CRL from the peer’s CA and check
the revocation status of the peer’s certificate. To enable dynamic CA
profiles, the revocation-check crl option must be
configured on a parent CA profile.
Solution
To check the revocation status of a peer’s certificate:
Identify the dynamic CA profile that will show the CRL for the peer device by entering the show security pki crl command from operational mode.
user@host> show security pki crl
     CA profile: Root-CA
        CRL version: V00000001
        CRL issuer: C = us, O = juniper, CN = Root-CA
        Effective date: 09- 9-2012 13:08
        Next update: 09-21-2012 02:55

      CA profile: Eng-CA
        CRL version: V00000001
        CRL issuer: C = us, O = juniper, CN = Eng-CA
        Effective date: 08-22-2012 17:46
        Next update: 10-24-2015 03:33

      CA profile: Dev-CA
        CRL version: V00000001
        CRL issuer: C = us, O = juniper, CN = Dev-CA
        Effective date: 09-14-2012 21:15
        Next update: 09-26-2012 11:02

      CA profile: dynamic-001
        CRL version: V00000001
        CRL issuer: C = us, O = juniper, CN = Sales-CA
        Effective date: 09-14-2012 21:15
        Next update: 09-26-2012 11:02
The CA profile
dynamic-001is automatically created on Host-A so that Host-A can download the CRL from Host-B’s CA (Sales-CA) and check the revocation status of the peer’s certificate.Display CRL information for the dynamic CA profile by entering the show security pki crl ca-profile dynamic-001 detail command from the operational mode.
Enter
user@host> show security pki crl ca-profile dynamic-001 detail
    CA profile: dynamic-001
      CRL version: V00000001
        CRL issuer: C = us, O = juniper, CN = Sub11
        Effective date: 09-19-2012 17:29
        Next update: 09-20-2012 01:49
        Revocation List:
          Serial number              Revocation date
          10647C84                   09-19-2012 17:29 UTC
Host-B’s certificate (serial number 10647084) has been revoked.
Configure the Certificate Expiration Trap
Before you begin:
Understand how certificates works on VPN. Read Understanding Certificate Chains.
This topic shows how to configure certificate expiration trap and configure the number of days before you generate the trap.
Change History Table
Feature support is determined by the platform and release you are using. Use Feature Explorer to determine if a feature is supported on your platform.