Zero Touch Provisioning on NFX Series Devices
Understanding Zero Touch Provisioning
Zero Touch Provisioning (ZTP) allows you to provision and configure an NFX Series device in your network automatically, with minimal manual intervention. ZTP allows you to make configuration changes or software upgrades without logging into the device. NFX Series devices support ZTP with Sky Enterprise, which is a cloud-based network management application. For more information on Sky Enterprise, see Sky Enterprise Documentation.
The initial provisioning process involves the following components:
NFX Series device—Sends requests to Juniper’s Redirect Server.
Redirect server—Provides authentication and authorization for the devices in a network to access their assigned central servers for the boot images and initial configuration files. The redirect server resides at Juniper Networks.
Connectivity to the redirect server can be through IPv4 or IPv6 network. Depending on the source address, the redirect server redirects the ZTP to the corresponding Central Server with IPv4 or IPv6 address.
The NFX Series device is shipped with a factory default configuration. The factory default configuration includes the URL of the redirect server, that is used to connect to the central servers by using a secure encrypted connection.
Central server—Manages the network and the NFX Series devices located remotely. The central server is located at a central geographical location. Alternately, you can use Contrail Service Orchestration (CSO) along with Sky Enterprise. CSO deploys the network services and Sky Enterprise manages the devices in the network.
Pre-staging an NFX Series Device
Prestaging is an optional step for the device to by-pass Juniper’s Redirect Server and to connect to a customer specific Redirect Server or a Regional Server for authentication and authorization in the network. Prestaging involves copying and applying certificates and customer specific configuration from a specific directory in the device before the device is shipped to the customer site for installation.
The customer specific resources are stored internally. When the device boots up with the factory default configuration, the prestage resources are copied and the configuration is applied on the device.
Figure 1 illustrates the workflow of prestaging the NFX Series devices.
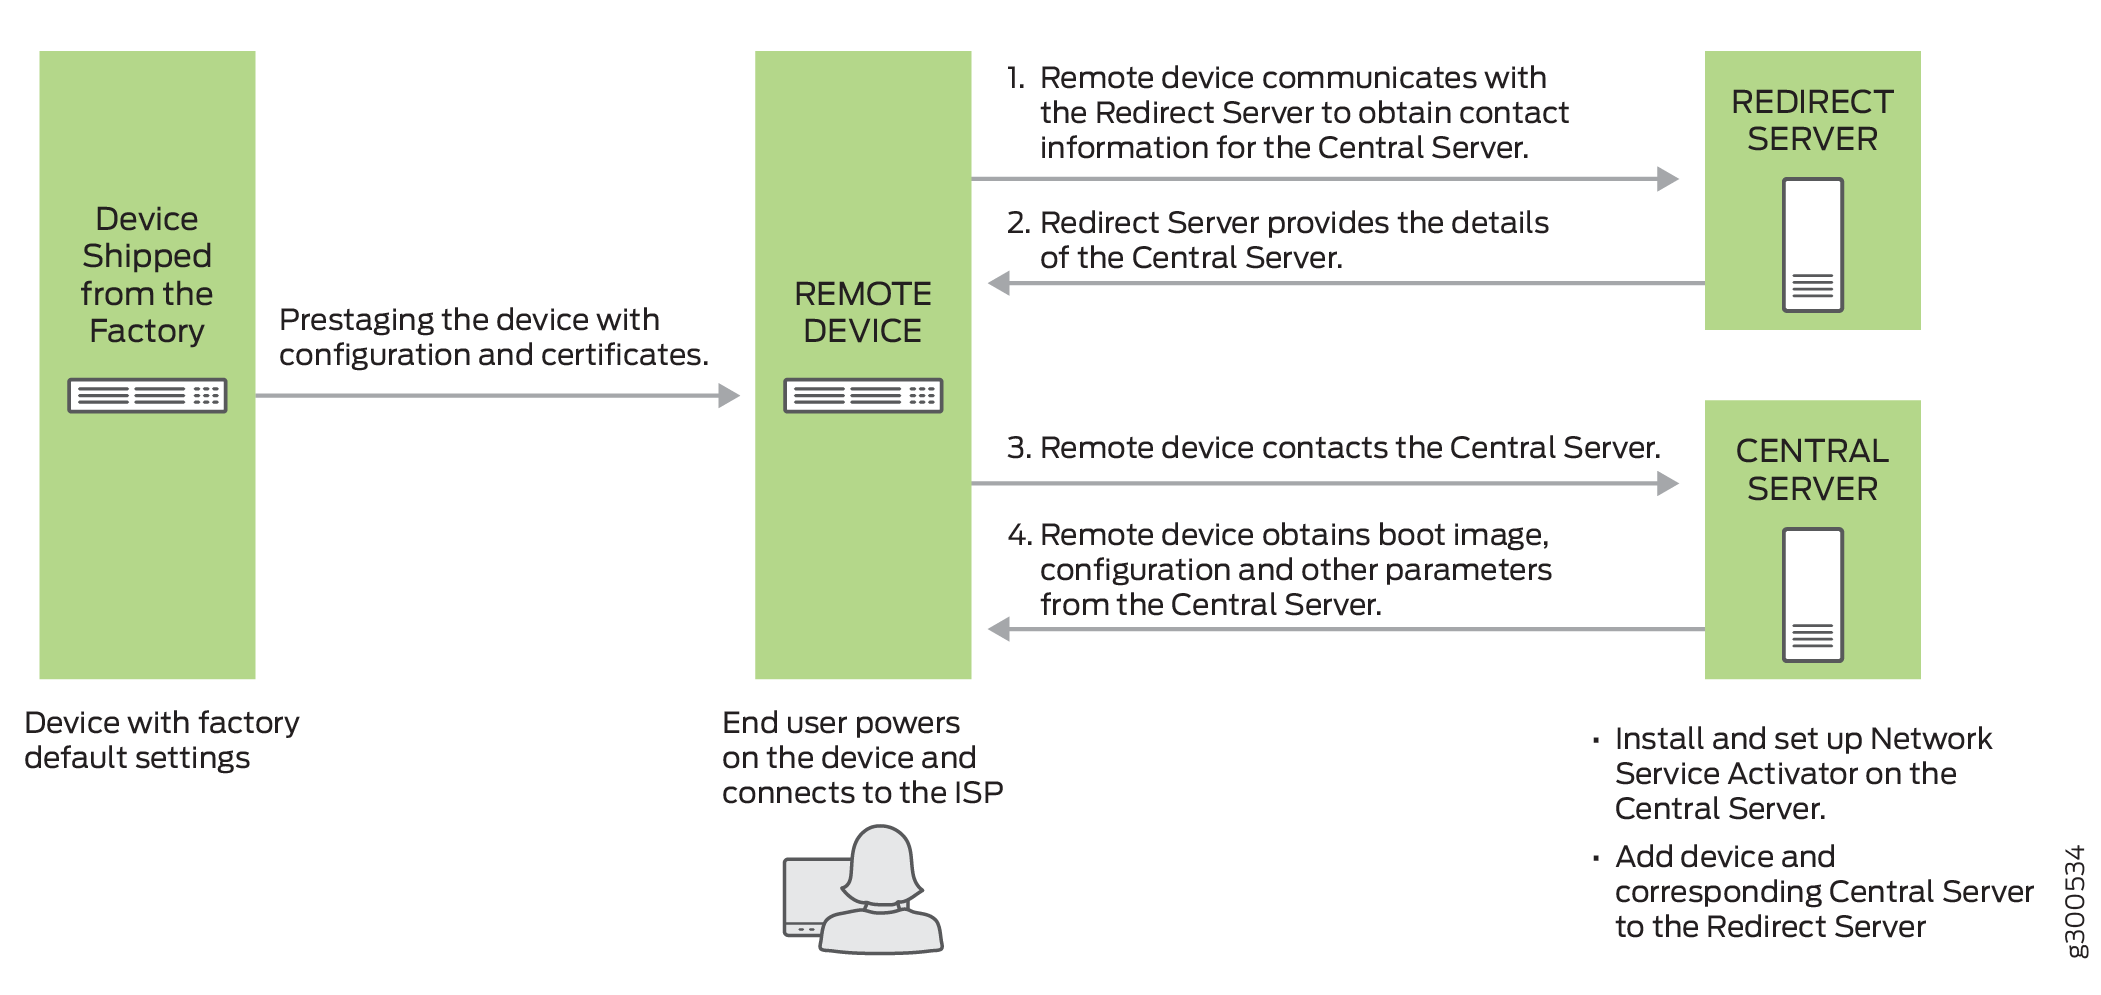
The prestage workflow proceeds as follows:
The device is shipped from the factory with the factory default configuration.
To prestage the device, the customer specific resources such as certificates and configuration are copied to the device by a user or ISP.
To add the prestage configuration and certificates, run:
user@host>request system phone-home pre-stage add configuration file
user@host>request system phone-home pre-stage add certificates file/files
After the device is prestaged, the device is shipped to the end user.
The end user powers on the remote device and connects the device to the ISP by connecting one of the WAN ports (0/12 and 0/13) to the ISP. For more information, see Initial Configuration on NFX250 NextGen Devices .
The device applies the prestage configuration and uses the certificates to authenticate the customer specific Redirect Server or Regional Server.
The Redirect Server or Regional Server sends the corresponding Central Server information to the device.
The device sends a provisioning request to the Central Server. The Central Server responds with the boot image and the configuration that is provisioned on the Central Server for that particular device.
The device fetches the boot image and configuration file from the Central Server.
The device upgrades to the boot image and applies the configuration to start the services and become operational.
To delete the prestage configuration and certificates, run:
user@host>request system phone-home pre-stage delete configuration file
user@host>request system phone-home pre-stage delete certificate all | file
user@host>request system phone-home pre-stage delete all
To verify the prestage configuration and certificates, run:
user@host>show system phone-home pre-stage configuration
user@host>show system phone-home pre-stage certificate
user@host>show system phone-home pre-stage
The prestage resources are not deleted when you upgrade the
image by using the request system software add image command or when you zeroize the device by using the request
system zeroize command.
The default configuration for phone-home is:
user@jdm# set system phone-home server https://redirect.juniper.net
user@jdm# set system phone-home upgrade-image-before-configuration
To enable trace operation:
user@jdm# set system phone-home traceoptions file file-name size file-size
user@jdm# set system phone-home traceoptions flag [all | config | function | misc | socket | state-machine]
To disable trace operation:
user@jdm# set system phone-home traceoptions no-remote-trace
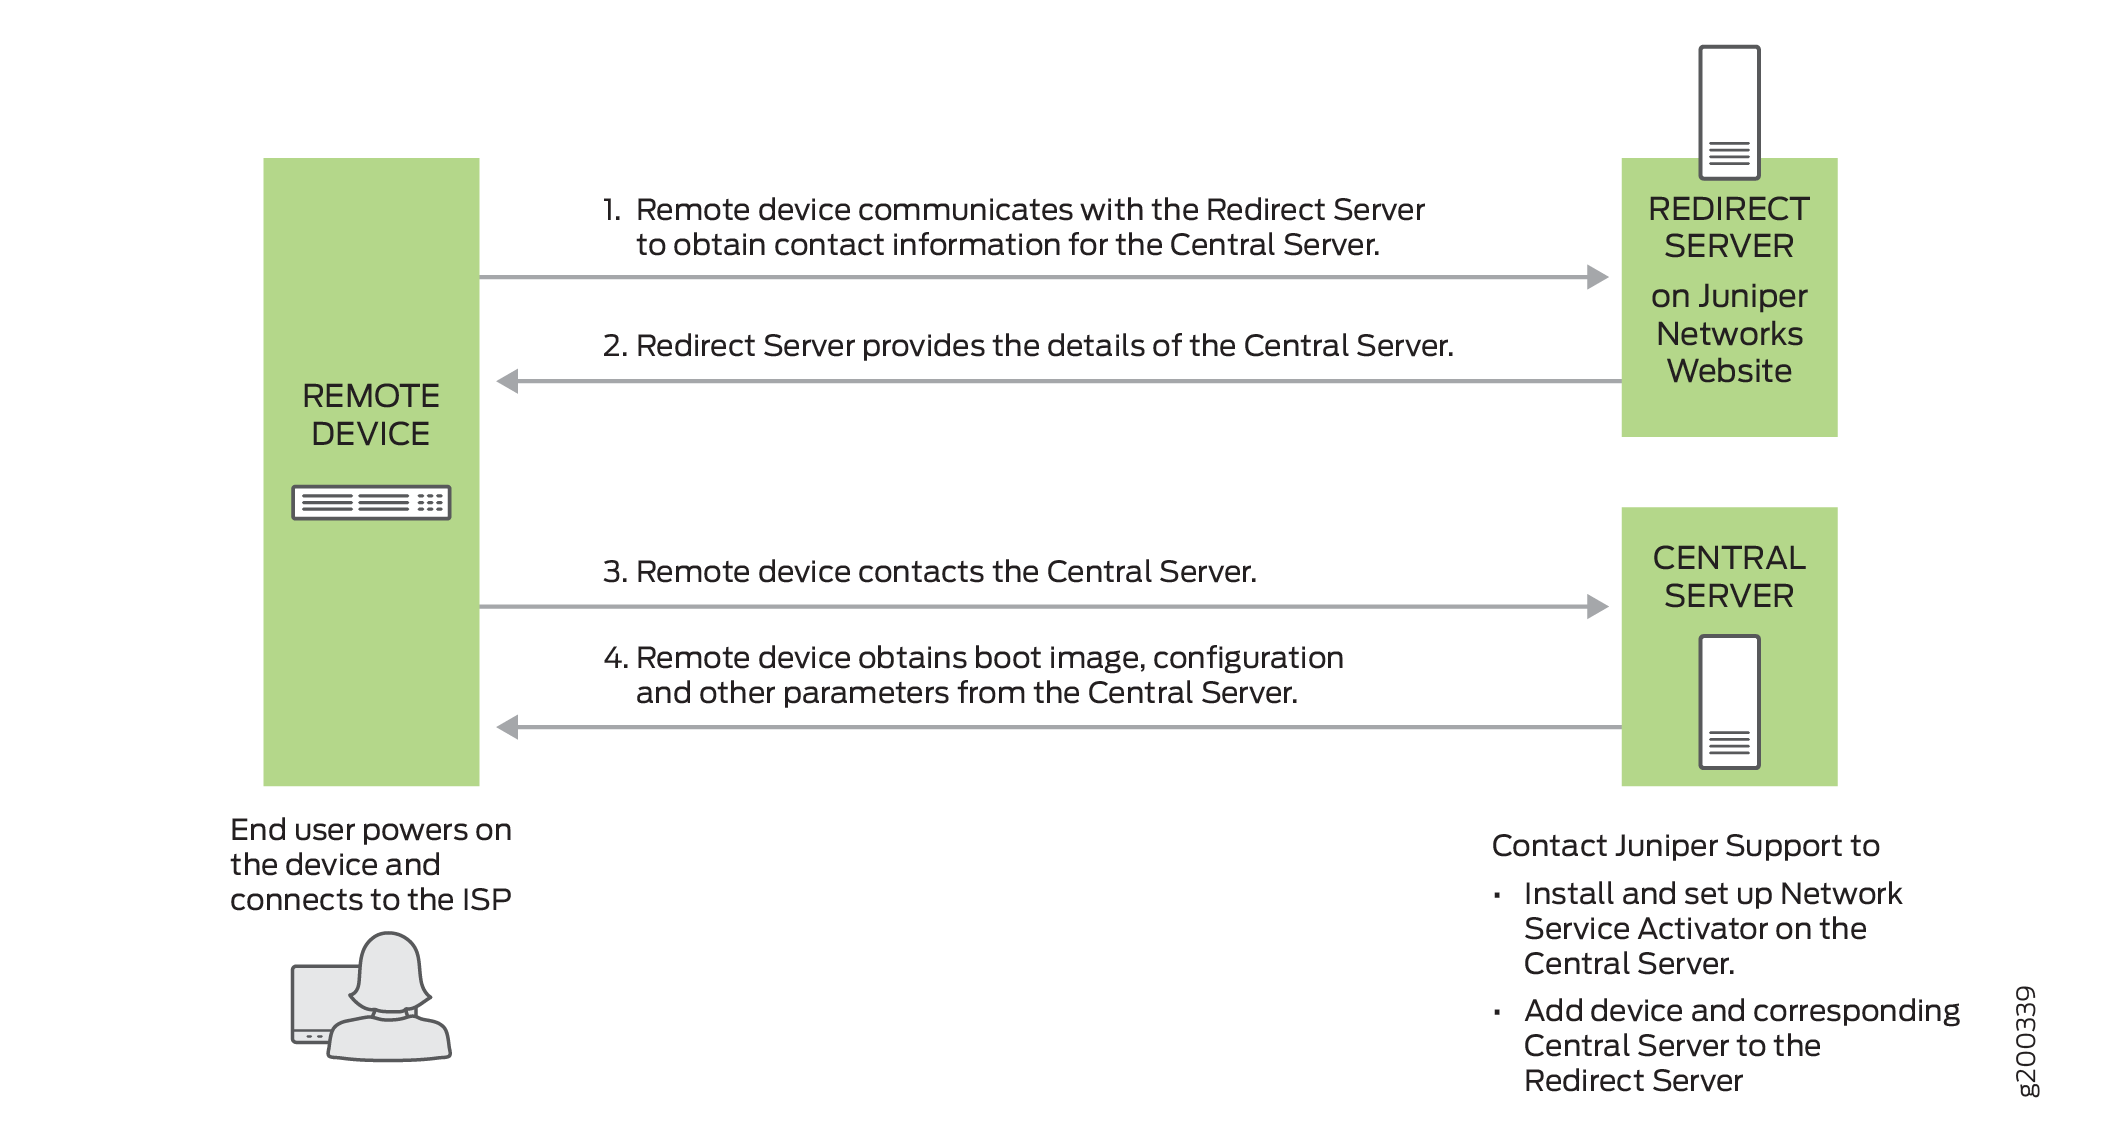
Provisioning an NFX Series Device
Figure 2 illustrates the workflow of the initial provisioning of NFX Series devices.
Contact Juniper Support to add the device and the corresponding central server to the redirect server.
The provisioning workflow proceeds as follows:
The end user powers on the remote device, and connects the remote device to the ISP through the WAN ports.
The remote device transmits its X.509 certificate and fully qualified domain name (FQDN) as a provisioning request to the redirect server.
The redirect server searches its data store for the central server that an administrator has specified for the remote device, and confirms that the remote device’s request corresponds to the X.509 certificate specified for the server.
The redirect server sends contact information for the central server to the remote device.
The remote device sends a request to the central server for the URL of the boot image and the location of the initial configuration file. The central server responds with the requested information.
The remote device fetches the boot image and configuration file from the central server.
The remote device upgrades to the boot image (if the boot image is different from the image running on the NFX Series device), and applies the configuration to start the services and become operational.
Provisioning an NFX Series Device Using Sky Enterprise
Figure 2 illustrates the workflow of the initial provisioning of NFX Series devices using Sky Enterprise.
The provisioning workflow proceeds as follows:
The end user powers on the remote device, and connects the remote device to the ISP through the WAN ports.
The NFX Series device transmits its X.509 certificate and fully qualified domain name (FQDN) as a provisioning request to the Redirect Server.
The Redirect Server connects the device to Sky Enterprise.
Click the link in the authorization e-mail that you receive from Sky Enterprise. Alternately, you can use the Sky Enterprise application to authorize the device.
The NFX Series device registers with Sky Enterprise.
The initial configuration of the device begins. The initial configuration process takes about 60 seconds.