Troubleshooting Network Issues
Working with Problems on Your Network
Problem
Description
This checklist provides links to troubleshooting basics, an example network, and includes a summary of the commands you might use to diagnose problems with the router and network.
Solution
Tasks |
Command or Action |
|---|---|
| Isolating a Broken Network Connection | |
ping (ip-address | hostname) show route (ip-address | hostname) traceroute (ip-address | hostname) |
|
|
|
|
|
|
Isolating a Broken Network Connection
By applying the standard four-step process illustrated in Figure 1, you can isolate a failed node in the network. Note that the functionality described in this section is not supported in versions 15.1X49, 15.1X49-D30, or 15.1X49-D40.

Before you embark on the four-step process, however, it is important that you are prepared for the inevitable problems that occur on all networks. While you might find a solution to a problem by simply trying a variety of actions, you can reach an appropriate solution more quickly if you are systematic in your approach to the maintenance and monitoring of your network. To prepare for problems on your network, understand how the network functions under normal conditions, have records of baseline network activity, and carefully observe the behavior of your network during a problem situation.
Figure 2 shows the network topology used in this topic to illustrate the process of diagnosing problems in a network.
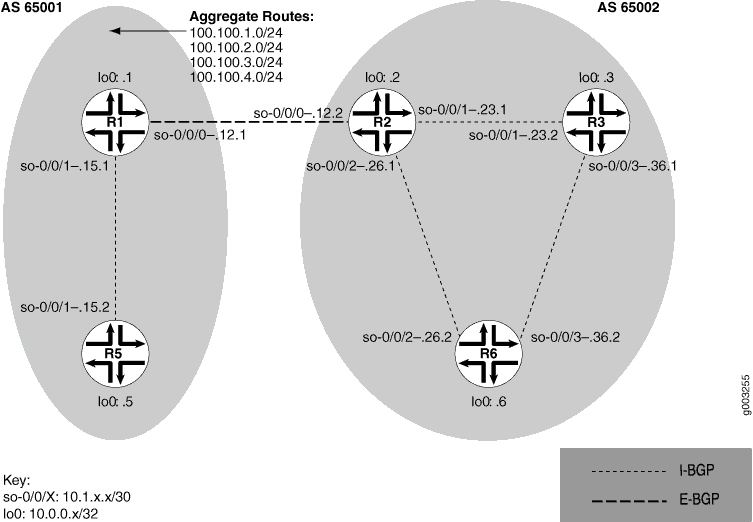
The network in Figure 2 consists of
two autonomous systems (ASs). AS 65001 includes two routers, and AS
65002 includes three routers. The border router (R1) in
AS 65001 announces aggregated prefixes 100.100/24 to the
AS 65002 network. The problem in this network is that R6 does not have access to R5 because of a loop between R2 and R6.
To isolate a failed connection in your network, follow the steps in these topics:
Identifying the Symptoms of a Broken Network Connection
Problem
Description
The symptoms of a problem in your network are usually quite obvious, such as the failure to reach a remote host.
Solution
To identify the symptoms of a problem on your network, start at one end of your network and follow the routes to the other end, entering all or one of the following Junos OS command-line interfaces (CLI) operational mode commands:
user@host> ping (ip-address|host-name) user@host> show route (ip-address|host-name) user@host> traceroute (ip-address|host-name)
Sample Output
user@R6> ping 10.0.0.5
PING 10.0.0.5 (10.0.0.5): 56 data bytes
36 bytes from 10.1.26.1: Time to live exceeded
Vr HL TOS  Len   ID Flg  off TTL Pro  cks      Src      Dst
 4  5  00 0054 e2db   0 0000  01  01 a8c6 10.1.26.2  10.0.0.5

36 bytes from 10.1.26.1: Time to live exceeded
Vr HL TOS  Len   ID Flg  off TTL Pro  cks      Src      Dst
 4  5  00 0054 e2de   0 0000  01  01 a8c3 10.1.26.2  10.0.0.5

36 bytes from 10.1.26.1: Time to live exceeded
Vr HL TOS  Len   ID Flg  off TTL Pro  cks      Src      Dst
 4  5  00 0054 e2e2   0 0000  01  01 a8bf 10.1.26.2  10.0.0.5

^C
--- 10.0.0.5 ping statistics ---
3 packets transmitted, 0 packets received, 100% packet loss

user@R6> show route 10.0.0.5

inet.0: 20 destinations, 20 routes (20 active, 0 holddown, 0 hidden)
+ = Active Route, - = Last Active, * = Both

10.0.0.5/32        *[IS-IS/165] 00:02:39, metric 10
                     > to 10.1.26.1  via so-0/0/2.0

user@R6> traceroute 10.0.0.5
traceroute to 10.0.0.5 (10.0.0.5), 30 hops max, 40 byte packets
 1  10.1.26.1 (10.1.26.1)  0.649 ms  0.521 ms  0.490 ms
 2  10.1.26.2 (10.1.26.2)  0.521 ms  0.537 ms  0.507 ms
 3  10.1.26.1 (10.1.26.1)  0.523 ms  0.536 ms  0.514 ms
 4  10.1.26.2 (10.1.26.2)  0.528 ms  0.551 ms  0.523 ms
 5  10.1.26.1 (10.1.26.1)  0.531 ms  0.550 ms  0.524 ms
Meaning
The sample output shows an unsuccessful ping command
in which the packets are being rejected because the time to live is
exceeded. The output for the show route command shows the
interface (10.1.26.1) that you can examine further for
possible problems. The traceroute command shows the loop
between 10.1.26.1 (R2) and 10.1.26.2 (R6), as indicated by the continuous repetition of the
two interface addresses.
Isolating the Causes of a Network Problem
Problem
Description
A particular symptom can be the result of one or more causes. Narrow down the focus of your search to find each individual cause of the unwanted behavior.
Solution
To isolate the cause of a particular problem, enter one or all of the following Junos OS CLI operational mode command:
user@host> show < configuration | bgp | interfaces | isis | ospf | route >
Your particular problem may require the use of more than just the commands listed above. See the appropriate command reference for a more exhaustive list of commonly used operational mode commands.
Sample Output
user@R6> show interfaces terse
Interface               Admin Link Proto Local                 Remote
so-0/0/0                up    up
so-0/0/0.0              up    up   inet  10.1.56.2/30
                                   iso
so-0/0/2                up    up
so-0/0/2.0              up    up   inet  10.1.26.2/30
                                   iso
so-0/0/3                up    up
so-0/0/3.0              up    up   inet  10.1.36.2/30
                                   iso
[...Output truncated...]
The following sample output is from R2:
user@R2> show route 10.0.0.5

inet.0: 22 destinations, 25 routes (22 active, 0 holddown, 0 hidden)
+ = Active Route, - = Last Active, * = Both

10.0.0.5/32         *[Static/5] 00:16:21
                    > to 10.1.26.2 via so-0/0/2.0
                    [BGP/170] 3d 20:23:35, MED 5, localpref 100
                      AS path: 65001 I
                    > to 10.1.12.1 via so-0/0/0.0
Meaning
The sample output shows that all interfaces on R6 are up. The output from R2 shows that a static route
[Static/5] configured on R2 points to R6 (10.1.26.2) and is the preferred route to R5 because of its low preference value. However, the route is looping
from R2 to R6, as indicated by the missing reference
to R5 (10.1.15.2).
Taking Appropriate Action for Resolving the Network Problem
Problem
Description
The appropriate action depends on the type
of problem you have isolated. In this example, a static route configured
on R2 is deleted from the [routing-options]
hierarchy level. Other appropriate actions might include the following:
Solution
Check the local router’s configuration and edit it if appropriate.
Troubleshoot the intermediate router.
Check the remote host configuration and edit it if appropriate.
Troubleshoot routing protocols.
Identify additional possible causes.
To resolve the problem in this example, enter the following Junos OS CLI commands:
[edit]
                          user@R2# delete routing-options static route destination-prefix
user@R2# commit and-quit
user@R2# show route destination-prefix
Sample Output
[edit]
user@R2# delete routing-options static route 10.0.0.5/32

[edit]
user@R2# commit and-quit
commit complete
Exiting configuration mode

user@R2> show route 10.0.0.5

inet.0: 22 destinations, 24 routes (22 active, 0 holddown, 0 hidden)
+ = Active Route, - = Last Active, * = Both

10.0.0.5/32        *[BGP/170] 3d 20:26:17, MED 5, localpref 100
                      AS path: 65001 I
                    > to 10.1.12.1 via so-0/0/0.0
Meaning
The sample output shows the static route deleted from the [routing-options] hierarchy and the new configuration committed.
The output for the show route command now shows the BGP
route as the preferred route, as indicated by the asterisk (*).
Evaluating the Solution to Check Whether the Network Problem Is Resolved
Problem
Description
If the problem is solved, you are finished. If the problem remains or a new problem is identified, start the process over again.
You can address possible causes in any order. In relation to the network in Isolating a Broken Network Connection, we chose to work from the local router toward the remote router, but you might start at a different point, particularly if you have reason to believe that the problem is related to a known issue, such as a recent change in configuration.
Solution
To evaluate the solution, enter the following Junos OS CLI commands:
user@host> show route (ip-address|host-name) user@host> ping (ip-address|host-name) user@host> traceroute (ip-address|host-name)
Sample Output
user@R6> show route 10.0.0.5

inet.0: 20 destinations, 20 routes (20 active, 0 holddown, 0 hidden)
+ = Active Route, - = Last Active, * = Both

10.0.0.5/32         *[BGP/170]  00:01:35, MED 5, localpref 100, from 10.0.0.2
                      AS path: 65001 I
                    > to 10.1.26.1 via so-0/0/2.0

user@R6> ping 10.0.0.5
PING 10.0.0.5 (10.0.0.5): 56 data bytes
64 bytes from 10.0.0.5: icmp_seq=0 ttl=253 time=0.866 ms
64 bytes from 10.0.0.5: icmp_seq=1 ttl=253 time=0.837 ms
64 bytes from 10.0.0.5: icmp_seq=2 ttl=253 time=0.796 ms
^C
--- 10.0.0.5 ping statistics ---
3 packets transmitted, 3 packets received, 0% packet loss
round-trip min/avg/max/stddev = 0.796/0.833/0.866/0.029 ms

user@R6> traceroute 10.0.0.5
traceroute to 10.0.0.5 (10.0.0.5), 30 hops max, 40 byte packets
 1  10.1.26.1 (10.1.26.1)  0.629 ms  0.538 ms  0.497 ms
 2  10.1.12.1 (10.1.12.1)  0.534 ms  0.538 ms  0.510 ms
 3  10.0.0.5 (10.0.0.5)  0.776 ms  0.705 ms  0.672 ms
Meaning
The sample output shows that there is now a connection between R6 and R5. The show route command shows
that the BGP route to R5 is preferred, as indicated by
the asterisk (*). The ping command is successful
and the traceroute command shows that the path from R6 to R5 is through R2 (10.1.26.1), and then through R1 (10.1.12.1).
Checklist for Tracking Error Conditions
Problem
Description
Table 2 provides links and commands for configuring routing protocol daemon tracing, Border Gateway Protocol (BGP), Intermediate System-to-Intermediate System (IS-IS) protocol, and Open Shortest Path First (OSPF) protocol tracing to diagnose error conditions.
Solution
Tasks |
Command or Action |
|---|---|
| Configure Routing Protocol Process Tracing | |
|
|
|
|
monitor start filename |
|
monitor stop filename |
|
| Configure BGP-Specific Options | |
|
|
|
|
|
|
| Configure IS-IS-Specific Options | |
|
|
|
|
|
|
| Configure OSPF-Specific Options | |
|
|
|
|
Configure Routing Protocol Process Tracing
Action
To configure routing protocol process (rpd) tracing, follow these steps:
In configuration mode, go to the following hierarchy level:
[edit]
user@host# edit routing-options traceoptions
Configure the file, file size, number, and flags:
[edit routing-options traceoptions]
user@host#  set file filename size size file number
[edit routing-options traceoptions]
user@host#  set flag flag
For example:
[edit routing-options traceoptions]
user@host# set file daemonlog size 10240 files 10
[edit routing-options traceoptions]
user@host# set flag general
Verify the configuration:
user@host# show
For example:
[edit routing-options traceoptions]
user@host# show
file daemonlog size 10k files 10;
flag general;
Commit the configuration:
user@host# commit
Some traceoptions flags generate an extensive amount of information. Tracing can also slow down the operation of routing protocols. Delete the traceoptions configuration if you no longer require it.
View the contents of the file containing the detailed messages:
user@host# run show log filenameFor example:
[edit routing-options traceoptions]
user@pro4-a# run show log daemonlog
Sep 17 14:17:31 trace_on: Tracing to "/var/log/daemonlog" started
Sep 17 14:17:31 Tracing flags enabled: general
Sep 17 14:17:31 inet_routerid_notify: Router ID: 10.255.245.44
Sep 17 14:17:31 inet_routerid_notify: No Router ID assigned
Sep 17 14:17:31 Initializing LSI globals
Sep 17 14:17:31 LSI initialization complete
Sep 17 14:17:31 Initializing OSPF instances
Sep 17 14:17:31 Reinitializing OSPFv2 instance master
Sep 17 14:17:31 OSPFv2 instance master running
[...Output truncated...]
Meaning
Table 3 lists tracing flags and example output for Junos-supported routing protocol daemon tracing.
Tracing Flag |
Description |
Example Output |
|---|---|---|
all |
All operations |
Not available. |
general |
Normal operations and routing table change |
Not available. |
normal |
Normal operations |
Not available. |
policy |
Policy operations and actions |
Nov 29 22:19:58 export: Dest 10.0.0.0 proto Static Nov 29 22:19:58 policy_match_qual_or: Qualifier proto Sense: 0 Nov 29 22:19:58 policy_match_qual_or: Qualifier proto Sense: 0 Nov 29 22:19:58 export: Dest 10.10.10.0 proto IS-IS |
route |
Routing table changes |
Nov 29 22:23:59 Nov 29 22:23:59 rtlist_walker_job: rt_list walk for RIB inet.0 started with 42 entries Nov 29 22:23:59 rt_flash_update_callback: flash KRT (inet.0) start Nov 29 22:23:59 rt_flash_update_callback: flash KRT (inet.0) done Nov 29 22:23:59 rtlist_walker_job: rt_list walk for inet.0 ended with 42 entries Nov 29 22:23:59 Nov 29 22:23:59 KRT Request: send len 68 v14 seq 0 CHANGE route/user af 2 addr 172.16.0.0 nhop-type unicast nhop 10.10.10.33 Nov 29 22:23:59 KRT Request: send len 68 v14 seq 0 ADD route/user af 2 addr 172.17.0.0 nhop-type unicast nhop 10.10.10.33 Nov 29 22:23:59 KRT Request: send len 68 v14 seq 0 ADD route/user af 2 addr 10.149.3.0 nhop-type unicast nhop 10.10.10.33 Nov 29 22:24:19 trace_on: Tracing to "/var/log/rpdlog" started Nov 29 22:24:19 KRT Request: send len 68 v14 seq 0 DELETE route/user af 2 addr 10.10.218.0 nhop-type unicast nhop 10.10.10.29 Nov 29 22:24:19 RELEASE 10.10.218.0 255.255.255.0 gw 10.10.10.29,10.10.10.33 BGP pref 170/-101 metric so-1/1/0.0,so-1/1/1.0 <Release Delete Int Ext> as 65401 Nov 29 22:24:19 KRT Request: send len 68 v14 seq 0 DELETE route/user af 2 addr 172.18.0.0 nhop-type unicast nhop 10.10.10.33 |
state |
State transitions |
Not available. |
task |
Interface transactions and processing |
Nov 29 22:50:04 foreground dispatch running job task_collect for task Scheduler Nov 29 22:50:04 task_collect_job: freeing task MGMT_Listen (DELETED) Nov 29 22:50:04 foreground dispatch completed job task_collect for task Scheduler Nov 29 22:50:04 background dispatch running job rt_static_update for task RT Nov 29 22:50:04 task_job_delete: delete background job rt_static_update for task RT Nov 29 22:50:04 background dispatch completed job rt_static_update for task RT Nov 29 22:50:04 background dispatch running job Flash update for task RT Nov 29 22:50:04 background dispatch returned job Flash update for task RT Nov 29 22:50:04 background dispatch running job Flash update for task RT Nov 29 22:50:04 task_job_delete: delete background job Flash update for task RT Nov 29 22:50:04 background dispatch completed job Flash update for task RT Nov 29 22:50:04 background dispatch running job Flash update for task RT Nov 29 22:50:04 task_job_delete: delete background job Flash update for task RT |
timer |
Timer usage |
Nov 29 22:52:07 task_timer_hiprio_dispatch: ran 1 timer Nov 29 22:52:07 main: running normal priority timer queue Nov 29 22:52:07 main: ran 1 timer Nov 29 22:52:07 task_timer_hiprio_dispatch: running high priority timer queue Nov 29 22:52:07 task_timer_hiprio_dispatch: ran 1 timer Nov 29 22:52:07 main: running normal priority timer queue Nov 29 22:52:07 main: ran 1 timer Nov 29 22:52:07 main: running normal priority timer queue Nov 29 22:52:07 main: ran 2 timers |
Configure Routing Protocol Tracing for a Specific Routing Protocol
Action
To configure routing protocol tracing for a specific routing protocol, follow these steps:
In configuration mode, go to the following hierarchy level:
[edit]
                 user@host# edit protocol protocol-name traceoptions
Configure the file, file size, number, and flags:
[edit protocols protocol name traceoptions]
                 user@host# set file filename size size files number
[edit protocols protocol name traceoptions]
user@host# set flag flag
For example:
[edit protocols ospf traceoptions]
user@host# set file ospflog size 10240 files 10
[edit protocols ospf traceoptions]
user@host# set flag general
Verify the configuration:
user@host# show
For example:
[edit protocols ospf traceoptions]
user@host# show
file ospflog size 10k files 10;
flag general;
Commit the configuration:
user@host# commit
View the contents of the file containing the detailed messages:
user@host# run show log filenameFor example:
[edit protocols ospf traceoptions]
user@pro4-a# run show log ospflog
Sep 17 14:23:10 trace_on: Tracing to "/var/log/ospflog" started
Sep 17 14:23:10 rt_flash_update_callback: flash OSPF (inet.0) start
Sep 17 14:23:10 OSPF:  multicast address 224.0.0.5/32, route ignored
Sep 17 14:23:10 rt_flash_update_callback: flash OSPF (inet.0) done
Sep 17 14:23:10 CHANGE   10.255.245.46/32   gw 10.10.208.67  OSPF     pref 10/0 metric 1/0 fe-0/0/0.0 <Delete Int>
Sep 17 14:23:10 CHANGE   10.255.245.46/32   gw 10.10.208.67  OSPF     pref 10/0 metric 1/0 fe-0/0/0.0 <Active Int>
Sep 17 14:23:10 ADD      10.255.245.46/32   gw 10.10.208.67  OSPF     pref 10/0 metric 1/0 fe-0/0/0.0 <Active Int>
Sep 17 14:23:10 CHANGE   10.255.245.48/32   gw 10.10.208.69  OSPF     pref 10/0 metric 1/0 fe-0/0/0.0 <Delete Int>
Sep 17 14:23:10 CHANGE   10.255.245.48/32   gw 10.10.208.69  OSPF     pref 10/0 metric 1/0 fe-0/0/0.0 <Active Int>
Sep 17 14:23:10 ADD      10.255.245.48/32   gw 10.10.208.69  OSPF     pref 10/0 metric 1/0 fe-0/0/0.0 <Active Int>
Sep 17 14:23:10 rt_close: 4/4 routes proto OSPF
[...Output truncated...]
Meaning
Table 4 lists standard tracing options that are available globally or that can be applied to specific protocols. You can also configure tracing for a specific BGP peer or peer group. For more information, see the Junos System Basics Configuration Guide.
Tracing Flag |
Description |
|---|---|
all |
All operations |
general |
Normal operations and routing table changes |
normal |
Normal operations |
policy |
Policy operations and actions |
route |
Routing table changes |
state |
State transitions |
task |
Interface transactions and processing |
timer |
Timer usage |
Monitor Trace File Messages Written in Near-Real Time
Purpose
To monitor messages in near-real time as they are being written to a trace file.
Action
To monitor messages in near-real time as they are being written to a trace file, use the following Junos OS command-line interface (CLI) operational mode command:
user@host> monitor start filename
Sample Output
command-name
user@host> monitor start isis
user@host>
*** isis ***
Sep 15 18:32:21 Updating LSP isis5.02-00 in database
Sep 15 18:32:21 Updating L2 LSP isis5.02-00 in TED
Sep 15 18:32:21 Adding a half link from isis5.02 to isis6.00
Sep 15 18:32:21 Adding a half link from isis5.02 to isis5.00
Sep 15 18:32:21 Adding a half link from isis5.02 to isis6.00
Sep 15 18:32:21 Adding a half link from isis5.02 to isis5.00
Sep 15 18:32:21 Scheduling L2 LSP isis5.02-00 sequence 0xd87 on interface fxp2.3
Sep 15 18:32:21 Updating LSP isis5.00-00 in database
Sep 15 18:32:21 Updating L1 LSP isis5.00-00 in TED
Sep 15 18:32:21 Sending L2 LSP isis5.02-00 on interface fxp2.3
Sep 15 18:32:21     sequence 0xd87, checksum 0xc1c8, lifetime 1200
Stop Trace File Monitoring
Action
To stop monitoring a trace file in near-real time, use the following Junos OS CLI operational mode command after you have started monitoring:
user@host monitor stop filename
Sample Output
user@host> monitor start isis
user@host>
*** isis ***
Sep 15 18:32:21 Updating LSP isis5.02-00 in database
Sep 15 18:32:21 Updating L2 LSP isis5.02-00 in TED
Sep 15 18:32:21 Adding a half link from isis5.02 to isis6.00
Sep 15 18:32:21 Adding a half link from isis5.02 to isis5.00
Sep 15 18:32:21 Adding a half link from isis5.02 to isis6.00
Sep 15 18:32:21 Adding a half link from isis5.02 to isis5.00
Sep 15 18:32:21 Scheduling L2 LSP isis5.02-00 sequence 0xd87 on interface fxp2.3
Sep 15 18:32:21 Updating LSP isis5.00-00 in database
Sep 15 18:32:21 Updating L1 LSP isis5.00-00 in TED
Sep 15 18:32:21 Sending L2 LSP isis5.02-00 on interface fxp2.3
Sep 15 18:32:21     sequence 0xd87, checksum 0xc1c8, lifetime 1200
monitor stop isis
user@host>