Protocol Family
Learn about protocol family and how to configure protocol family and interface address properties.
Configure the Protocol Family
A protocol family is a group of logical properties within an interface configuration. Protocol families include all the protocols that make up a protocol suite. To use a protocol within a particular suite, you must configure the entire protocol family as a logical property for an interface.
Protocol families include the following common protocol suites:
-
Inet—Supports IP protocol traffic, including OSPF, BGP, and Internet Control Message Protocol (ICMP).
-
Inet6—Supports IPv6 protocol traffic, including RIP for IPv6 (RIPng), IS-IS, and BGP.
-
ISO—Supports IS-IS traffic.
-
MPLS—Supports MPLS.
To configure the protocol family for the logical interface, include the
family statement, specifying the selected family.
When configuring the protocol family, complete the following
tasks under the [edit interfaces interface-name unit logical-unit-number
family family] hierarchy.
-
Configure MTU.
-
Configure the unit and family so that the interface can transmit and receive multicast traffic only.
-
Disable the sending of redirect messages by the router.
-
Assign an address to an interface.
Assign the Interface Address
You assign an address to an interface by specifying the address when configuring the protocol
family. For the inet or inet6 family, configure the
interface IP address. For the iso family, configure one or more
addresses for the loopback interface. For the ccc,
ethernet-switching, tcc, mpls,
tnp, and vpls families, you never configure an
address.
To assign an address to an interface, perform the following steps:
Configure Default, Primary, and Preferred Addresses and Interfaces
The following sections describe how to configure default, primary, and preferred addresses and interfaces.
- Default, Primary, and Preferred Addresses and Interfaces
- Configure the Primary Interface for the Router
- Configure the Primary Address for an Interface
- Configure the Preferred Address for an Interface
Default, Primary, and Preferred Addresses and Interfaces
The router has a default address and a primary interface; and interfaces have primary and preferred addresses.
The default address of the router is used as the source address on unnumbered interfaces. The routing protocol process tries to select the default address as the router ID, which is used by protocols, including OSPF and internal BGP (IBGP).
The primary interface for the router is the interface that packets go out when no interface name is specified and when the destination address does not imply a particular outgoing interface.
An interface’s primary address is used by default as the local address for broadcast and multicast packets sourced locally and sent out the interface. An interface’s preferred address is the default local address used for packets sourced by the local router to destinations on the subnet.
You can explicitly mark an interface's IP as primary and preferred using a configuration statement. If an interface is only assigned a single IP that address is considered the primary and preferred address by default. When assigned multiple IP addresses, none of which are explicitly configured as primary, the numerically lowest IP address is uses as the primary address on that interface.
The default address of the router is chosen using the following sequence:
-
The primary address on the loopback interface
lo0that is not127.0.0.1is used. -
The primary address on the primary interface is used.
-
When there are multiple interfaces with "primary" and "preferred" addresses, the interface with the lowest interface index is selected, and the primary address is used. In the case that none of the interface's IP addresses are explicitly marked with the
primarystatement, the numerically lowest address on that interface is used as the system default address. -
Any remaining interface with an IP address may be selected. This includes the router's management or internal interfaces. For this reason, it's recommended that you assign a loopback address, or explicitly configure a primary interface, to control default address selection.
Configure the Primary Interface for the Router
The primary interface for the router has the following characteristics:
-
It is the interface that packets go out when you type a command such as ping 255.255.255.255—that is, a command that does not include an interface name (there is no interface
type-0/0/0.0qualifier) and where the destination address does not imply any particular outgoing interface. -
It is the interface on which multicast applications running locally on the router, such as Session Announcement Protocol (SAP), do group joins by default.
-
It is the interface from which the default local address is derived for packets sourced out an unnumbered interface if there are no non-127 addresses configured on the loopback interface, lo0.
Primary Interface Selection Process
When no interface is explicitly configured as primary using the
primary statement, the router automatically selects a
primary interface based on the following criteria:
By default, the multicast-capable interface with the lowest interface index is chosen as the primary interface.
If no multicast-capable interface exists, the point-to-point interface with the lowest interface index is chosen.
Otherwise, any interface with an IP address is selected. In practice, this means that, on the router, the
fxp0orem0interface is selected by default.
For example, in a router with the following interfaces:
fxp0.0(management interface with IP address 192.168.1.1/24)ge-0/0/0.0(multicast-capable interface with IP address 10.1.1.1/24)ge-0/0/1.0(multicast-capable interface with IP address 10.1.2.1/24)so-0/1/0.0(point-to-point interface with IP address 172.16.1.1/30)
Without explicit configuration, ge-0/0/0.0 would be selected as
the primary interface because it's a multicast-capable interface with the lowest
interface index.
To ensure predictable routing behavior, it's recommended to explicitly configure
a primary interface using the primary statement rather than
relying on the automatic selection process. Using a loopback interface (lo0) as
the primary interface is a common best practice since it's not tied to any
physical interface and remains available regardless of link status.
To configure a different interface to be the primary interface, include the
primary statement:
primaryYou can include this statement at the following hierarchy level:
[edit interfaces interface-name unit logical-unit-number
                    family family]
Configure the Primary Address for an Interface
The primary address on an interface is the address
that is used by default as the local address for broadcast and multicast packets
sourced locally and sent out the interface. For example, the local address in
the packets sent by a ping interface et-0/0/0.0 255.255.255.255
command is the primary address on interface et-0/0/0.0. The
primary address flag can also be useful for selecting the local address used for
packets sent out unnumbered interfaces when multiple non-127 addresses are
configured on the loopback interface, lo0. By default, the
primary address on an interface is selected as the numerically lowest local
address configured on the interface.
To set a different primary address, include the primary
statement:
primaryYou can include this statement at the following hierarchy levels:
[edit interfaces interface-name
unit logical-unit-number family family
address address]
Configure the Preferred Address for an Interface
The preferred address on an interface is the default local address used
for packets sourced by the local router to destinations on the subnet. By
default, the numerically lowest local address is chosen. For example, if the
addresses 172.16.1.1/12, 172.16.1.2/12, and
172.16.1.3/12 are configured on the same interface, the
preferred address on the subnet (by default, 172.16.1.1) is
used as a local address when you issue a ping 172.16.1.5
command.
To set a different preferred address for the subnet, include the
preferred statement:
preferredYou can include this statement at the following hierarchy levels:
[edit interfaces interface-name
unit logical-unit-number family family
address address]
Operational Behavior of Interfaces with the Same IPv4 Address
You can configure the same IP version 4 (IPv4) address on multiple physical interfaces. When you assign the same IPv4 address to multiple physical interfaces, the operational behavior of those interfaces differs, depending on whether they are (implicitly) point-to-point or not.
If you configure the same IP address on multiple interfaces in the same routing instance, the operating system applies the configuration randomly on one of the interfaces. The other interfaces will remain without an IP address.
The following examples show the sample configuration of assigning the same IPv4 address
to interfaces that are implicitly and explicitly point-to-point interfaces. The examples
also show the show interfaces terse command
outputs that correspond to the implicit and explicit point-to-point interfaces to
display their operational status.
-
Configuring the same IPv4 address on two non-P2P interfaces:
[edit interfaces] user@host# show et-0/1/0 { unit 0 { family inet { address 203.0.113.1/24; } } }et-3/0/1 { unit 0 { family inet { address 203.0.113.1/24; } } }The following sample output (for the preceding configuration) reveals that only
et-0/1/0.0was assigned the same IPv4 address203.0.113.1/24and itslinkstate wasup, whileet-3/0/1.0was not assigned the IPv4 address, although itslinkstate was up, which means that it will be operational only when it gets a unique IPv4 address other than203.0.113.1/24.show interfaces terse
user@host> show interfaces terse et* Interface Admin Link Proto Local Remote et-0/1/0 up up et-0/1/0.0 up up inet 203.0.113.1/24 multiservice et-0/1/1 up down et-3/0/0 up down et-3/0/1 up up et-3/0/1.0 up up inet multiservice -
Configuring the same IPv4 address on (implicit) P2P interfaces:
[edit] user@host# show et-0/0/0 { unit 0 { family inet { address 203.0.113.1/24; } } } et-0/0/3 { unit 0 { family inet { address 203.0.113.1/24; } } }The following sample output (for the preceding configuration) reveals that both
et-0/0/0.0andet-0/0/3.0were assigned the same IPv4 address203.0.113.1/24and that theirlinkstates were down. The interfaces are down due to an issue with the link and not because the same IPv4 address is assigned to both the interfaces. It is expected that not more than one of the interfaces is up at any given time (following a redundancy scheme outside of the Junos OS Evolved devices scope), because both being up may cause adverse effects.show interfaces terse
user@host> show interfaces terse et* Interface Admin Link Proto Local Remote et-0/0/0 up up et-0/0/0.0 up down inet 203.0.113.1/24 et-0/0/1 up up et-0/0/2 up down et-0/0/3 up up et-0/0/3.0 up down inet 203.0.113.1/24 et-1/1/0 up down et-1/1/1 up down et-1/1/2 up up et-1/1/3 up up et-2/0/0 up up et-2/0/1 up up et-2/0/2 up up et-2/0/3 up down
-
Configuring the same IPv4 address in multiple instances of a non-P2P interface:
[edit interfaces] user@host# show et-0/0/1 { vlan-tagging; unit 0 { vlan-id 1; family inet { address 10.1.1.1/24; } } unit 1{ vlan-id 2; family inet { address 10.1.1.1/24; } } }On a non-P2P interface, you cannot configure the same local address on different units of different interfaces. If you do, a commit error will be thrown and the configuration will fail.
-
Configuring the same IPv4 address in multiple instances of the same P2P interface:
[edit interfaces] user@host# show et-0/0/10 { unit 0 { tunnel { source 10.1.1.1; destination 10.1.1.2; } family inet { mtu 1500; address 10.2.2.2/24; } } unit 1{ family inet { address 10.2.2.2/24; } } }The following sample output (for the preceding configuration) reveals that only one interfaces gets successfully configured on P2P interfaces when you try to configure the same IPv4 address for multiple instance of different interfaces.
show interfaces terse
user@host> show interfaces terse | match 10.2.2.2 Interface Admin Link Proto Local Remote et-0/0/10.0 up up inet 10.2.2.2/24
Configure Unnumbered Interfaces: Overview
Overview of Unnumbered Interfaces
When you need to conserve IP addresses, you can configure unnumbered interfaces. Setting up an unnumbered interface enables IP processing on the interface without assigning an explicit IP address to the interface. For IP version 6 (IPv6), in which conserving addresses is not a major concern, you can configure unnumbered interfaces to share the same subnet across multiple interfaces.
The IPv6 unnumbered interfaces are supported only on Ethernet interfaces. The statements you use to configure an unnumbered interface depend on the type of interface you are configuring: a point-to-point interface or an Ethernet interface:
- Configure an Unnumbered Point-to-Point Interface
- Configure an Unnumbered Ethernet or Demux Interface
- Configure a Secondary Address as a Preferred Source Address for Unnumbered Ethernet or Demux Interfaces
- Restrictions for Unnumbered Ethernet Interface Configurations
- Example: Display the Unnumbered Ethernet Interface Configuration
- Example: Display the Configured Preferred Source Address for an Unnumbered Ethernet Interface
- Example: Display the Configuration for the Unnumbered Ethernet Interface as the Next Hop for a Static Route
Configure an Unnumbered Point-to-Point Interface
To configure an unnumbered point-to-point interface:
-
When configuring unnumbered interfaces, you must ensure that a source address is configured on an interface in the router. This address is the default address. We recommend that you do this by assigning an address to the loopback interface (
lo0), as described in Loopback Interface Configuration.When you configure a routable address on the
lo0interface, that address is always the default address. This is ideal because the loopback interface is independent of any physical interfaces and therefore is always accessible.
Configure an Unnumbered Ethernet or Demux Interface
To configure an unnumbered Ethernet or demultiplexing (demux) interface:
-
The
unnumbered-addressstatement currently supports configuration of unnumbered demux interfaces only for the IP version 4 (IPv4) address family. You can configure unnumbered Ethernet interfaces for both IPv4 and IPv6 address families. -
The interface that you configure to be unnumbered borrows an assigned IP address from another interface and is therefore referred to as the borrower interface. The interface from which the IP address is borrowed is referred to as the donor interface. In the
unnumbered-addressstatement,interface-namespecifies the donor interface. For an unnumbered Ethernet interface, the donor interface can be an Ethernet or loopback interface that has a logical unit number and configured IP address and is not itself an unnumbered interface. For an unnumbered IP demux interface, the donor interface can be an Ethernet or loopback interface that has a logical unit number and configured IP address and is not itself an unnumbered interface. In addition, for either Ethernet or demux, the donor interface and the borrower interface must be members of the same routing instance and the same logical system. -
When you configure an unnumbered Ethernet or demux interface, the IP address of the donor interface becomes the source address in packets generated by the unnumbered interface.
-
You can configure a host route that points to an unnumbered Ethernet or demux interface.
Configure a Secondary Address as a Preferred Source Address for Unnumbered Ethernet or Demux Interfaces
When a loopback interface with multiple secondary IP addresses is configured as the donor interface for an unnumbered Ethernet or demultiplexing (demux) interface, you can optionally specify any one of the loopback interface’s secondary addresses as the preferred source address for the unnumbered Ethernet or demux interface. This feature enables you to use an IP address other than the primary IP address on some of the unnumbered Ethernet or demux interfaces in your network.
To configure a secondary address on a loopback donor interface as the preferred source address for unnumbered Ethernet or demux interfaces:
The following considerations apply when you configure a preferred source address on an unnumbered Ethernet or demux interface:
The
unnumbered-addressstatement currently supports the configuration of a preferred source address only for the IP version 4 (IPv4) address family for demux interfaces, and for IPv4 and IP version 6 (IPv6) address families for Ethernet interfaces.If you do not specify the preferred source address, the router uses the default primary IP address of the donor interface.
You cannot delete an address on a donor loopback interface while it is being used as the preferred source address for an unnumbered Ethernet or demux interface.
Restrictions for Unnumbered Ethernet Interface Configurations
The following requirements and restrictions apply when you configure unnumbered Ethernet interfaces:
The
unnumbered-addressstatement currently supports the configuration of unnumbered Ethernet interfaces for IP version 4 (IPv4) and IP version 6 (IPv6) address families.You can assign an IP address only to an Ethernet interface that is not already configured as an unnumbered interface.
You must configure one or more IP addresses on the donor interface for an unnumbered Ethernet interface.
You cannot configure the donor interface for an unnumbered Ethernet interface as unnumbered.
-
An unnumbered Ethernet interface does not support configuration of the following
addressstatement options:arp,broadcast,primary,preferred, orvrrp-group. You can run Internet Group Management Protocol (IGMP) and Physical Interface Module (PIM) only on unnumbered Ethernet interfaces that directly face the host and have no downstream PIM neighbors. You cannot run either IGMP or PIM on unnumbered Ethernet interfaces that act as upstream interfaces in a PIM topology.
You can run OSPF over unnumbered Ethernet interfaces configured as a point-to-point (P2P) connection. However, you cannot run OSPF or IS-IS on unnumbered Ethernet interfaces that are not configured as P2P.
For link-state distribution using an interior gateway protocol (IGP), ensure that OSPF is enabled on the donor interface for an unnumbered interface configuration so that the donor IP address is reachable to establish OSPF sessions.
If you configure the same address on multiple interfaces in the same routing instance, the operating system uses only the first configuration. In this scenario, the remaining address configurations are ignored and can leave interfaces without an address. An interface that does not have an assigned address cannot be used as a donor interface for an unnumbered Ethernet interface.
For example, in the following configuration the address configuration of interface et-0/0/1.0 is ignored:
interfaces {
et-0/0/0 {
unit 0 {
family inet {
address 192.168.1.1/24;
}
}
}
et-0/0/1 {
unit 0 {
family inet {
address 192.168.1.1/24;
}
}
}
Example: Display the Unnumbered Ethernet Interface Configuration
Purpose
To display the configured unnumbered interface at the [edit interfaces
interface-name unit
logical-unit-number] hierarchy level:
-
Unnumbered interface —et-1/0/0
-
Donor interface —et-0/0/0
-
Donor interface address —4.4.4.1/24
The unnumbered interface “borrows” an IP address from the donor interface.
Action
-
Run the
showcommand at the[edit]hierarchy level.interfaces { et-0/0/0 { unit 0 { family inet { address 4.4.4.1/24; } } } et-1/0/0 { unit 0 { family inet { unnumbered-address et-0/0/0.0; } } } }
Example: Display the Configured Preferred Source Address for an Unnumbered Ethernet Interface
Purpose
To display the configuration of preferred source address for an unnumbered interface at the
[edit interfaces interface-name unit
logical-unit-number family inet] hierarchy
level:
-
Unnumbered interface —et-4/0/0
Donor interface —lo0
Donor interface primary address—2.2.2.1/32
Donor interface secondary address—3.3.3.1/32
Action
-
Run the
showcommand at the[edit]hierarchy level.interfaces { lo0 { unit 0 { family inet { address 2.2.2.1/32; address 3.3.3.1/32; } } } } interfaces { et-4/0/0 { unit 0 { family inet { unnumbered-address lo0.0 preferred-source-address 3.3.3.1; } } } }
Meaning
The loopback interface lo0 is the donor
interface from which an unnumbered Ethernet interface et-4/0/0
“borrows” an IP address.
The example shows one of the loopback interface’s secondary addresses, 3.3.3.1, as the preferred source address for the unnumbered Ethernet interface.
Example: Display the Configuration for the Unnumbered Ethernet Interface as the Next Hop for a Static Route
Purpose
To display the unnumbered interface configured as the
next hop for the static route at the [edit interfaces interface-name unit logical-unit-number family inet] hierarchy level:
-
Unnumbered interface —et-0/0/0
Donor interface —lo0
Donor interface primary address—5.5.5.1/32
Donor interface secondary address—6.6.6.1/32
Static route—7.7.7.1/32
Action
-
Run the
showcommand at the[edit]hierarchy level.interfaces { et-0/0/0 { unit 0 { family inet { unnumbered-address lo0.0; } } } } lo0 { unit 0 { family inet { address 5.5.5.1/32; address 6.6.6.1/32; } } }
-
The following configuration enables the kernel to install a static route to address 7.7.7.1/32 with a next hop through unnumbered interface et-0/0/0.0.
static { route 7.7.7.1/32 { qualified-next-hop et-0/0/0.0; } }
Meaning
In this example, et-0/0/0 is the unnumbered
interface. A loopback interface, lo0, is the donor interface
from which et-0/0/0 “borrows” an IP address. The example also
configures a static route to 7.7.7.1/32 with a next hop through
unnumbered interface et-0/0/0.0.
Protocol MTU
Overview
The default protocol MTU depends on your device and the interface type. During initial interface configuration, the protocol MTU is calculated automatically.
Changing the media MTU updates the protocol MTU for existing address families. When you reduce the media MTU size with active address families, you must reduce the protocol MTU size. Increasing the protocol MTU size requires the media MTU to be equal to or greater than the protocol MTU and encapsulation overhead.
You can configure the protocol MTU on all tunnel interfaces.
Protocol MTU for MPLS
If you do not configure an MPLS MTU, Junos OS Evolved derives the MPLS MTU from the physical interface MTU. From this value, the software subtracts the encapsulation overhead and space for the maximum number of labels that might be pushed in the Packet Forwarding Engine. The software provides for three labels of four bytes each, for a total of 12 bytes.
The formula used to determine the MPLS MTU is as follows:
MPLS MTU = physical interface MTU – encapsulation overhead – 12
Disable the Removal of Address and Control Bytes
For some interfaces, the address and control bytes are removed by default before the packet is encapsulated into a tunnel.
However, you can disable the removal of address and control bytes.
To disable the removal of address and control bytes, include the
keep-address-and-control statement:
keep-address-and-control;
You can include this statement at the following hierarchy levels:
[edit interfaces interface-name unit
logical-unit-number family ccc]
See Also
Disable the Transmission of Redirect Messages on an Interface
By default, the interface sends protocol redirect messages. To disable the sending of
these messages on an interface, include the no-redirects statement:
no-redirectsYou can include this statement at the following hierarchy level:
[edit interfaces
                            interface-name unit
                            logical-unit-number family
                        family]
To disable the sending of protocol redirect messages for the entire router or switch,
include the no-redirects statement at the [edit
system] hierarchy level.
Apply a Filter to an Interface
Define Interface Groups in Firewall Filters
When applying a firewall filter, you can define an interface to
be part of an interface group. Packets received on that interface are tagged
as being part of the group. You can then match these packets using the
interface-group match statement, as described in the
Routing Policies, Firewall Filters, and Traffic Policers User
Guide.
To define the interface to be part of an interface group, include the
group statement:
group filter-group-number;
You can include this statement at the following hierarchy levels:
[edit interfaces interface-name unit
logical-unit-number family family
filter]
The number 0 is not a valid interface group number.
Filter-Based Forwarding on the Output Interface
If port-mirrored packets are to be distributed to multiple monitoring or collection interfaces, based on the patterns in packet headers, it is helpful to configure a filter-based forwarding (FBF) filter on the port-mirroring egress interface.
When an FBF filter is installed as an output filter, a packet that is forwarded to the filter has already undergone at least one route lookup. After the packet is classified at the egress interface by the FBF filter, it is redirected to another routing table for additional route lookup. To avoid packet looping inside the Packet Forwarding Engine, the route lookup in the latter routing table (designated by an FBF routing instance) must result in a different next hop from any next hop specified in a table that has already been applied to the packet.
If an input interface is configured for FBF, the source lookup is disabled for those packets heading to a different routing instance, since the routing table is not set up to handle the source lookup.
Apply a Filter to an Interface
To apply firewall filters to an interface, include the filter
statement:
filter {
group filter-group-number;
input filter-name;
input-list [ filter-names ];
output filter-name;
output-list [ filter-names ];
}
To apply a single filter, include the input statement:
filter {
input filter-name;
}
To apply a list of filters to evaluate packets received on an interface, include
the input-list statement.
filter {
input-list [ filter-names ];
}
You can include up to 16 filter names in an input list.
To apply a list of filters to evaluate packets transmitted on an interface,
include the output-list statement.
filter {
output-list [ filter-names ];
}
When you apply filters using the input-list statement or the
output-list statement, a new filter is created with the
name
<interface-name>.<unit-direction>.
This filter is exclusively interface specific.
You can include these statements at the following hierarchy levels:
[edit interfaces interface-name
                        unit logical-unit-number family
                        family]
In the family statement, the protocol family can be
ccc, inet, inet6,
mpls, or vpls.
In the group statement, specify the interface group number to
associate with the filter.
In the input statement, list the name of one firewall filter to
be evaluated when packets are received on the interface.
In the input-list statement, list the names of filters to
evaluate when packets are received on the interface. You can include up to 16
filter names.
In the output statement, list the name of one firewall filter to
be evaluated when packets are transmitted on the interface.
MPLS family firewall filters applied on the output interface are not supported on the PTX10003 router, due to product limitation.
In the output-list statement, list the names of filters to
evaluate when packets are transmitted on the interface. You can include up to 16
filter names.
If you apply the filter to interface lo0,
it is applied to packets received or transmitted by the Routing Engine.
For more information about firewall filters, see the Routing Policies, Firewall Filters, and Traffic Policers User Guide. For more information about MPLS filters, see the MPLS Applications User Guide.
Example: Input Filter for VPLS Traffic
[edit interfaces]
et-2/2/3 {
    vlan-tagging;
    encapsulation vlan-vpls;
    unit 601 {
        encapsulation vlan-vpls;
        vlan-id 601;
        family vpls {
            filter {
                input filter1;  # Works for multicast destination MAC address
                output filter1;  # Does not work for multicast destination MAC address
            }
        }
    }
}
[edit firewall]
family vpls {
    filter filter1 {
        term 1 {
            from {
                destination-mac-address {
                    01:00:0c:cc:cc:cd/48;
                }
            }
            then {
                discard;
            }
        }
        term 2 {
            then {
                accept;
            }
        }
    }
}
Example: Filter-Based Forwarding at the Output Interface
The following example illustrates the configuration of filter-based forwarding at the output interface. In this example, the packet flow follows this path:
-
A packet arrives at interface
et-1/2/0.0with source and destination addresses10.50.200.1and10.50.100.1, respectively. -
The route lookup in routing table
inet.0points to egress interfaceet-0/0/3.0. -
The output filter installed at
et-0/0/3.0redirects the packet to routing tablefbf.inet.0. -
The packet matches entry
10.50.100.0/25in thefbf.inet.0table, and the packet finally leaves the router from interfaceet-2/0/0.0.[edit interfaces] et-0/0/3 { unit 0 { family inet { filter { output fbf; } address 10.50.10.2/25; } } } et-1/2/0 { unit 0 { family inet { address 10.50.50.2/25; } } } et-2/0/0 { unit 0 { family inet { address 10.50.20.2/25; } } } [edit firewall] filter fbf { term 0 { from { source-address { 10.50.200.0/25; } } then routing-instance fbf; } term d { then count d; } } [edit routing-instances] fbf { instance-type forwarding; routing-options { static { route 10.50.100.0/25 next-hop et-2/0/0.0; } } } [edit routing-options] interface-routes { rib-group inet fbf-group; } static { route 10.50.100.0/25 next-hop 10.50.10.1; } rib-groups { fbf-group { import-rib [inet.0 fbf.inet.0]; } }
Enable Source Class and Destination Class Usage
Source Class and Destination Class Usage Overview
For interfaces that carry IP version 4 (IPv4), IP version 6 (IPv6), MPLS, or peer AS billing traffic, you can maintain packet counts based on the entry and exit points for traffic passing through your network. Entry and exit points are identified by source and destination prefixes grouped into disjoint sets defined as source classes and destination classes. You can define classes based on a variety of parameters, such as routing neighbors, autonomous systems, and route filters.
Source class usage (SCU) accounting counts packets sent to customers by performing lookup on the IP source address. SCU makes it possible to track traffic originating from specific prefixes on the provider core and destined for specific prefixes on the customer edge. You must enable SCU accounting on both the inbound and outbound physical interfaces, and the route for the source of the packet must be located in the forwarding table.
Neither SCU nor destination class usage (DCU) accounting works with directly connected interface routes. Source class usage does not count packets coming from sources with direct routes in the forwarding table, because of software architecture limitations.
Destination class usage (DCU) counts packets from customers by performing lookup of the IP destination address. DCU makes it possible to track traffic originating from the customer edge and destined for specific prefixes on the provider core router.
We recommend that you stop the network traffic on an interface before you modify
the DCU or SCU configuration for that interface. Modifying the DCU or SCU
configuration without stopping the traffic might corrupt the DCU or SCU
statistics. Before you restart the traffic after modifying the configuration,
enter the clear interfaces statistics command.
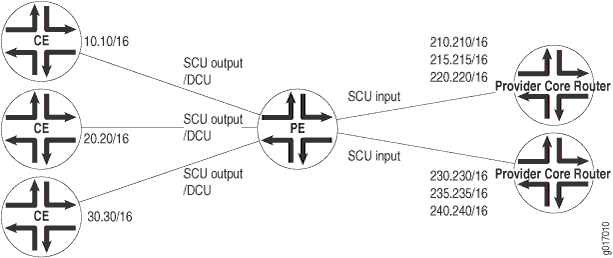
Figure 1 illustrates
an ISP network. In this topology, you can use DCU to count packets customers send to
specific prefixes. For example, you can have three counters, one per customer, that
count the packets destined for prefix 210.210/16 and
220.220/16.
You can use SCU to count packets the provider sends from specific prefixes. For
example, you can count the packets that are sent from prefix
210.210/16 and 215.215/16 and that are
transmitted on a specific output interface.
You can configure up to 126 source classes and 126 destination classes. For each interface on which you enable destination class usage and source class usage, the operating system maintains an interface-specific counter for each corresponding class up to the 126-class limit.
For transit packets exiting the router through the tunnel, forwarding path features such as RPF, forwarding table filtering, source class usage, and destination class usage are not supported on the interfaces you configure as the output interface for tunnel traffic. For firewall filtering, you must allow the output tunnel packets through the firewall filter applied to input traffic on the interface that is the next-hop interface towards the tunnel destination.
Performing DCU accounting when an output service is enabled produces inconsistent behavior in the following configuration:
-
Both SCU input and DCU are configured on the packet input interface.
-
SCU output is configured on the packet output interface.
-
Interface services is enabled on the output interface.
For an incoming packet with source and destination prefixes matching the SCU and DCU classes configured in the router, both SCU and DCU counters will be incremented. This behavior is not harmful or negative. However, it is inconsistent with non-serviced packets, in that only the SCU count will be incremented (because the SCU class ID will override the DCU class ID in this case).
To enable packet counting on an interface, include the accounting
statement:
accounting {
    destination-class-usage;
    source-class-usage {
        direction;
    }
}
direction can be one of the following:
-
input—Configure at least one expected ingress point. -
output—Configure at least one expected egress point. -
input output—On a single interface, configure at least one expected ingress point and one expected egress point.
You can include these statements at the following hierarchy levels:
[edit interfaces interface-name unit
                        logical-unit-number family (inet | inet6 |
                    mpls)]
For SCU to work, you must configure at least one input interface and at least one output interface.
After you enable accounting on an interface, the operating system maintains packet
counters for that interface, with separate counters for inet,
inet6, and mpls protocol families. You must
then configure the source class and destination class attributes in policy action
statements, which must be included in forwarding-table export policies.
When configuring policy action statements, you can configure only one source class for each matching route. In other words, more than one source class cannot be applied to the same route.
You can
configure SCU accounting for Layer 3 VPNs configured with the
vrf-table-label statement. Include the
source-class-usage statement at the [edit
routing-instances routing-instance-name
vrf-table-label] hierarchy level. The
source-class-usage statement at this hierarchy level is
supported only for the virtual routing and forwarding (VRF) instance type.
You cannot enable DCU counters on the label-switched
interface (LSI) that is created dynamically when the
vrf-table-label statement is configured within a VRF.
Enable Source Class and Destination Class Usage
Before you can enable source class usage (SCU) and destination class usage (DCU), you must configure DCU and SCU output on one interface:
[edit]
interfaces {
    et-6/1/0 {
        unit 0 {
            family inet {
                accounting {
                    destination-class-usage;
                    source-class-usage {
                        output;
                    }
                }
            }
        }
    }
}
To enable source class and destination class usage:
Overview
Targeted broadcast is a process of flooding a target subnet with L3 broadcast IP packets originating from a different subnet. The intent of targeted broadcast is to flood the target subnet with the broadcast packets on a LAN interface without broadcasting to the entire network.
IP directed broadcast is a technique where a broadcast packet is sent to a specific remote subnet, and then broadcast within that subnet. You can use IP directed broadcast to facilitate remote network management by sending broadcast packets to hosts on a specified subnet without broadcasting to the entire network. IP directed broadcast packets are broadcast on only the target subnet. The rest of the network treats IP directed broadcast packets as unicast packets and forwards the packets accordingly.
Targeted broadcast is configured with various options on the egress interface of the router or switch, and the IP packets are broadcast only on the LAN (egress) interface. Targeted broadcast helps you implement remote administration tasks, such as backups and wake-on LAN (WOL) on a LAN interface, and supports VRF instances.
Regular L3 broadcast IP packets originating from a subnet are broadcast within the same subnet. When these IP packets reach a different subnet, the packets are forwarded to the Routing Engine (to be forwarded to other applications). Hence, remote administration tasks such as backups cannot be performed on a particular subnet through another subnet. As a workaround, you can enable targeted broadcast to forward broadcast packets that originate from a different subnet.
L3 broadcast IP packets have a destination IP address that is a valid broadcast address for the target subnet. These IP packets traverse the network in the same way as unicast IP packets until the packets reach the destination subnet, as follows:
- In the destination subnet, if the receiving router has targeted broadcast enabled on the egress interface, the IP packets are forwarded to an egress interface and the Routing Engine or to an egress interface only.
- The IP packets are then translated into broadcast IP packets, which flood the target subnet only through the LAN interface, and all hosts on the target subnet receive the IP packets. The packets are discarded If no LAN interface exists.
- The final step in the sequence depends on targeted broadcast:
- If targeted broadcast is not enabled on the receiving router, the IP packets are treated as regular Layer 3 broadcast IP packets and are forwarded to the Routing Engine.
- If targeted broadcast is enabled without any options, the IP packets are forwarded to the Routing Engine.
You can configure targeted broadcast to forward the IP packets only to an egress interface. The forwarding is helpful when the router is flooded with packets to process, or to both an egress interface and the Routing Engine.
Any firewall filter that is configured on the Routing Engine lo0 cannot be applied to IP packets that are forwarded to the Routing Engine as a result of a targeted broadcast. The reason is broadcast packets are forwarded as flood next-hop traffic and not as local next-hop traffic. You can apply a firewall filter only to local next-hop routes for traffic directed toward the Routing Engine.
- Targeted Broadcast Implementation
- When to Enable Targeted Broadcast
- When Not to Enable Targeted Broadcast
Targeted Broadcast Implementation
You configure targeted broadcast on a per-subnet basis by enabling targeted broadcast on the L3 interface of the subnet’s VLAN. When the switch that is connected to that subnet receives a packet that has the subnet’s broadcast IP address as the destination address, the switch broadcasts the packet to all hosts on the subnet.
By default, targeted broadcast is disabled.
When to Enable Targeted Broadcast
Targeted broadcast is disabled by default. Enable targeted broadcast when you want to perform remote management or administration services such as backups or WOL tasks on hosts in a subnet that does not have a direct connection to the Internet.
Enabling targeted broadcast on a subnet affects only the hosts within that subnet. Only packets received on the subnet’s L3 interface that have the subnet’s broadcast IP address as the destination address is flooded on the subnet.
When Not to Enable Targeted Broadcast
Typically, you do not enable targeted broadcast on subnets that have direct connections to the Internet. Disabling targeted broadcast on a subnet’s L3 interface affects only that subnet. If you disable targeted broadcast on a subnet and a packet that has the broadcast IP address of that subnet arrives at the switch, the switch drops the broadcast packet.
If a subnet has a direct connection to the Internet, enabling targeted broadcast on it increases the network’s susceptibility to DoS attacks.
A malicious attacker can spoof a source IP address to deceive a network into identifying the attacker as legitimate. The attacker can then send targeted broadcasts with ICMP echo (ping) packets. When the hosts on the network with targeted broadcast enabled receive the ICMP echo packets, the hosts send replies to the victim that has the spoofed source IP address. The replies create a flood of ping replies in a DoS attack that can overwhelm the spoofed source address known as a smurf attack. Another common DoS attack on exposed networks with targeted broadcast enabled is a fraggle attack. The attack is similar to a smurf attack except that the malicious packet is a UDP echo packet instead of an ICMP echo packet.
Configure Targeted Broadcast
Configure Targeted Broadcast
You can configure targeted broadcast on an egress interface with different options.
Either of these configurations is acceptable:
-
You can allow the IP broadcast packets destined for an L3 address to be forwarded through the egress interface and to send a copy of the IP broadcast packets to the Routing Engine.
-
You can allow the IP broadcast packets to be forwarded through the egress interface only.
Note that the packets are broadcast only if the egress interface is a LAN interface.
To configure targeted broadcast and its options:
Display Targeted Broadcast Configuration Options
The following example topics display targeted broadcast configuration options:
- Forward IP Broadcast Packets on the Egress Interface and to the Routing Engine
- Forward IP Broadcast Packets on the Egress Interface Only
Forward IP Broadcast Packets on the Egress Interface and to the Routing Engine
Purpose
Display the configuration when targeted broadcast is configured on the egress interface to forward the IP broadcast packets on the egress interface and to send a copy of the same packets to the Routing Engine.
Action
[edit interfaces interface-name unit interface-unit-number family inet]
user@host#show
targeted-broadcast {
forward-and-send-to-re;
}
To display the configuration for irb, run the show command
at the [edit interfaces irb unit
interface-unit-number family inet].
[edit interfaces irb unit interface-unit-number family inet]
user@host#show
targeted-broadcast {
forward-and-send-to-re;
}
Forward IP Broadcast Packets on the Egress Interface Only
Purpose
Display the configuration when targeted broadcast is configured on the egress interface to forward the IP broadcast packets on the egress interface only.
Action
[edit interfaces interface-name unit interface-unit-number family inet]
user@host#show
targeted-broadcast {
forward-only;
}
To display the configuration, run the show command at the
[edit interfaces irb unit
                                interface-unit-number family inet]
.
[edit interfaces irb unit
                                interface-unit-number family inet]
user@host#show
targeted-broadcast {
forward-only;
}