Tunnel Inspection for EVPN-VXLAN by SRX Series Devices
Read this topic to understand how to setup your security device to perform tunnel inspection for EVPN-VXLAN to provide embedded security.
Overview
(Ethernet VPN) EVPN-(Virtual Extensible LAN) VXLAN provides enterprises a common framework used to manage their campus and data center networks.
The rapidly increasing usage of mobile and IoT devices adds a large number of endpoints to a network. Modern enterprise networks must scale rapidly to provide immediate access to devices and to extend security and control for these endpoints.
To provide endpoint flexibility, EVPN-VXLAN decouples the underlay network (physical topology) from the overlay network (virtual topology). By using overlays, you gain the flexibility of providing Layer 2/Layer 3 connectivity between endpoints across campus and data centers, while maintaining a consistent underlay architecture.
You can use SRX Series Firewalls in your EVPN-VXLAN solution to connect end-points in your campus, data center, branch and public cloud environments while providing embedded security.
Starting in Junos OS Release 21.1R1, the SRX Series Firewall can also apply following Layer 4/Layer 7 security services to the EVPN-VXLAN tunnel traffic:
These security services provide comprehensive protection for EVPN-VXLAN traffic:
- Application Identification—Identifies applications traversing the network regardless of port, protocol, or encryption
- IDP—Provides intrusion detection and prevention capabilities to protect against known and unknown threats
- Juniper ATP Cloud—Delivers cloud-based advanced threat detection and protection against malware and other sophisticated threats
- Content Security—Offers web filtering, antivirus, and anti-spam capabilities to protect against content-based threats
key steps required to configure tunnel inspection for EVPN-VXLAN traffic and apply relevant security services:
- Define security zones and assigns interfaces.
- Create address-book entries for VXLAN Tunnel Endpoints (VTEPs) and VLAN subnets.
- Configure security policies to permit VXLAN traffic inspection using a tunnel-inspection profile.
- Define a tunnel-inspection profile (TP-1) for VXLAN with specific VNI and policy sets.
- Associate the VXLAN Network Identifier (VNI) with the inspection profile.
- Refer the security services in a tunnel inspection policy by specifying them in a security policy permit action, when the traffic matches the policy rule.
[edit]
user@host# set security policies policy-set PSET-1 policy PSET-1-P1 then permit application-services idp-policy IDP-POLICY-NAME
user@host# set security policies policy-set PSET-1 policy PSET-1-P1 then permit application-services ssl-proxy profile-name SSL-PROFILE-NAME
user@host# set security policies policy-set PSET-1 policy PSET-1-P1 then permit application-services utm-policy UTM-POLICY-NAME
user@host# set security policies policy-set PSET-1 policy PSET-1-P1 then permit application-services security-intelligence-policy SECINTEL-POLICY-NAME
user@host# set security policies policy-set PSET-1 policy PSET-1-P1 then permit application-services advanced-anti-malware-policy AAMW-POLICY-NAME
For detailed information on configuring these security services, refer to the following documentation:
- Application Security User Guide
- IDP User Guide
- Juniper ATP Cloud Administrator Guide
- Content Security User Guide
Figure 1 shows a typical deployment scenario of EVPN-VXLAN fabric based on Edge-routed bridging (ERB) with SRX Series Firewalls functioning in an enhanced border leaf (EBL) role. EBL enhances the traditional role of a border leaf with the ability to perform inspection of traffic in VXLAN tunnels.
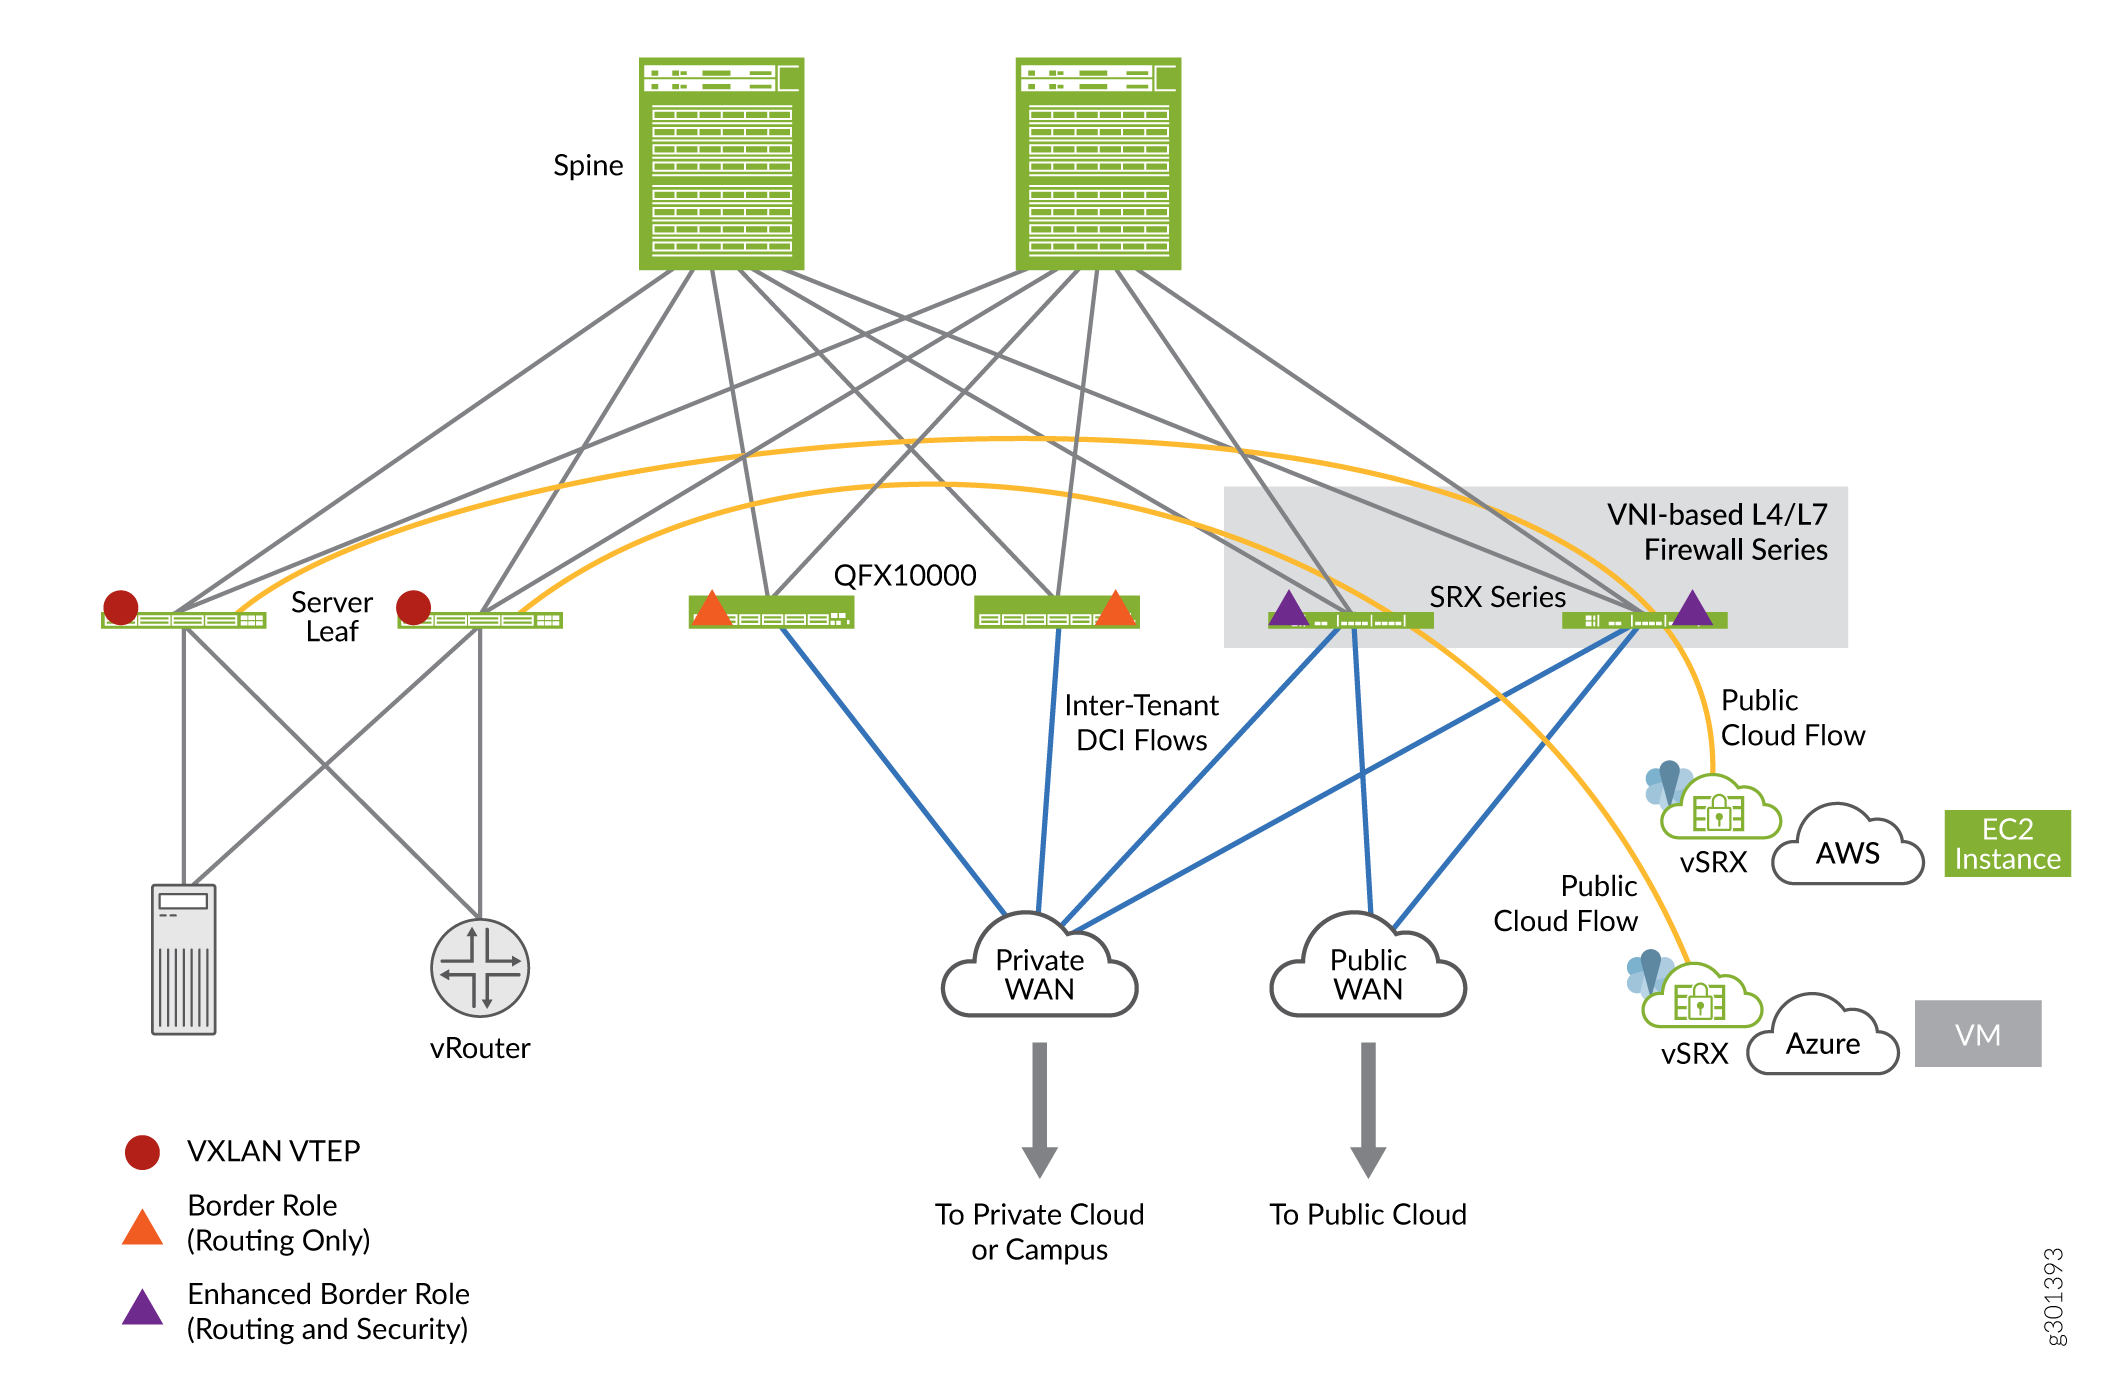
In the figure VXLAN traffic originating at the leaf 1 device traverses through the SRX Series Firewalls that function as EBLs. In this use case, the SRX Series Firewall is placed at the border, that is, at the entry and exit point of the campus or data center, to provide stateful inspection to the VXLAN encapsulated packets traversing through it.
In the architecture diagram, you can notice that an SRX Series Firewall is placed between two VTEP devices (devices that perform VXLAN encapsulation and decapsulation for the network traffic). The SRX Series Firewall performs stateful inspection when you enable the tunnel inspection feature with an appropriate security policy.
Benefits
Adding SRX Series Firewall in EVPN VXLAN provides:
- Added security with the capabilities of an enterprise grade firewall in the EVPN-VXLAN overlay.
- Enhanced tunnel inspection for VXLAN encapsulated traffic with Layer 4/Layer 7 security services.
Example - Configure Security Policies for EVPN-VXLAN Tunnel Inspection
Use this example to configure the security policies that enable inspection of EVPN EVPN-VXLAN tunnel traffic on your SRX Series Firewalls.
- Requirements
- Before you Begin
- Overview
- Configuration
- CLI Quick Configuration
- Step-by-Step Procedure
- Results
- Verification
Requirements
This example uses the following hardware and software components:
- An SRX Series Firewall or vSRX Virtual Firewall
- Junos OS Release 20.4R1
This example assumes that you already have an EVPN-VXLAN based network and want to enable tunnel inspection on SRX Series Firewall.
Before you Begin
- Ensure you have a valid application identification feature license on your SRX Series Firewall and installed application signature pack on the device.
- Make sure you understand how EVPN and VXLAN works. See EVPN-VXLAN Campus Architectures to detail understanding EVPN-VXLAN
-
This example assumes that you already have an EVPN-VXLAN based network fabric and want to enable tunnel inspection on the SRX Series Firewall. You can see the sample configuration of leaf and spine devices used in this example at Complete Device Configurations.
Overview
In this example, we are focusing on configuring the SRX Series Firewall which is a part of a working EVPN-VXLAN network that consist of two DC locations each with an IP fabric. The SRX Series Firewall is placed in a Data Center Interconnect (DCI) role between the two DCs. In this configuration, the SRX Series Firewall performs stateful inspection of VXLAN encapsulated traffic flowing between the DCs when you enable tunnel inspection.
We are using the topology shown in Figure 2 in this example.
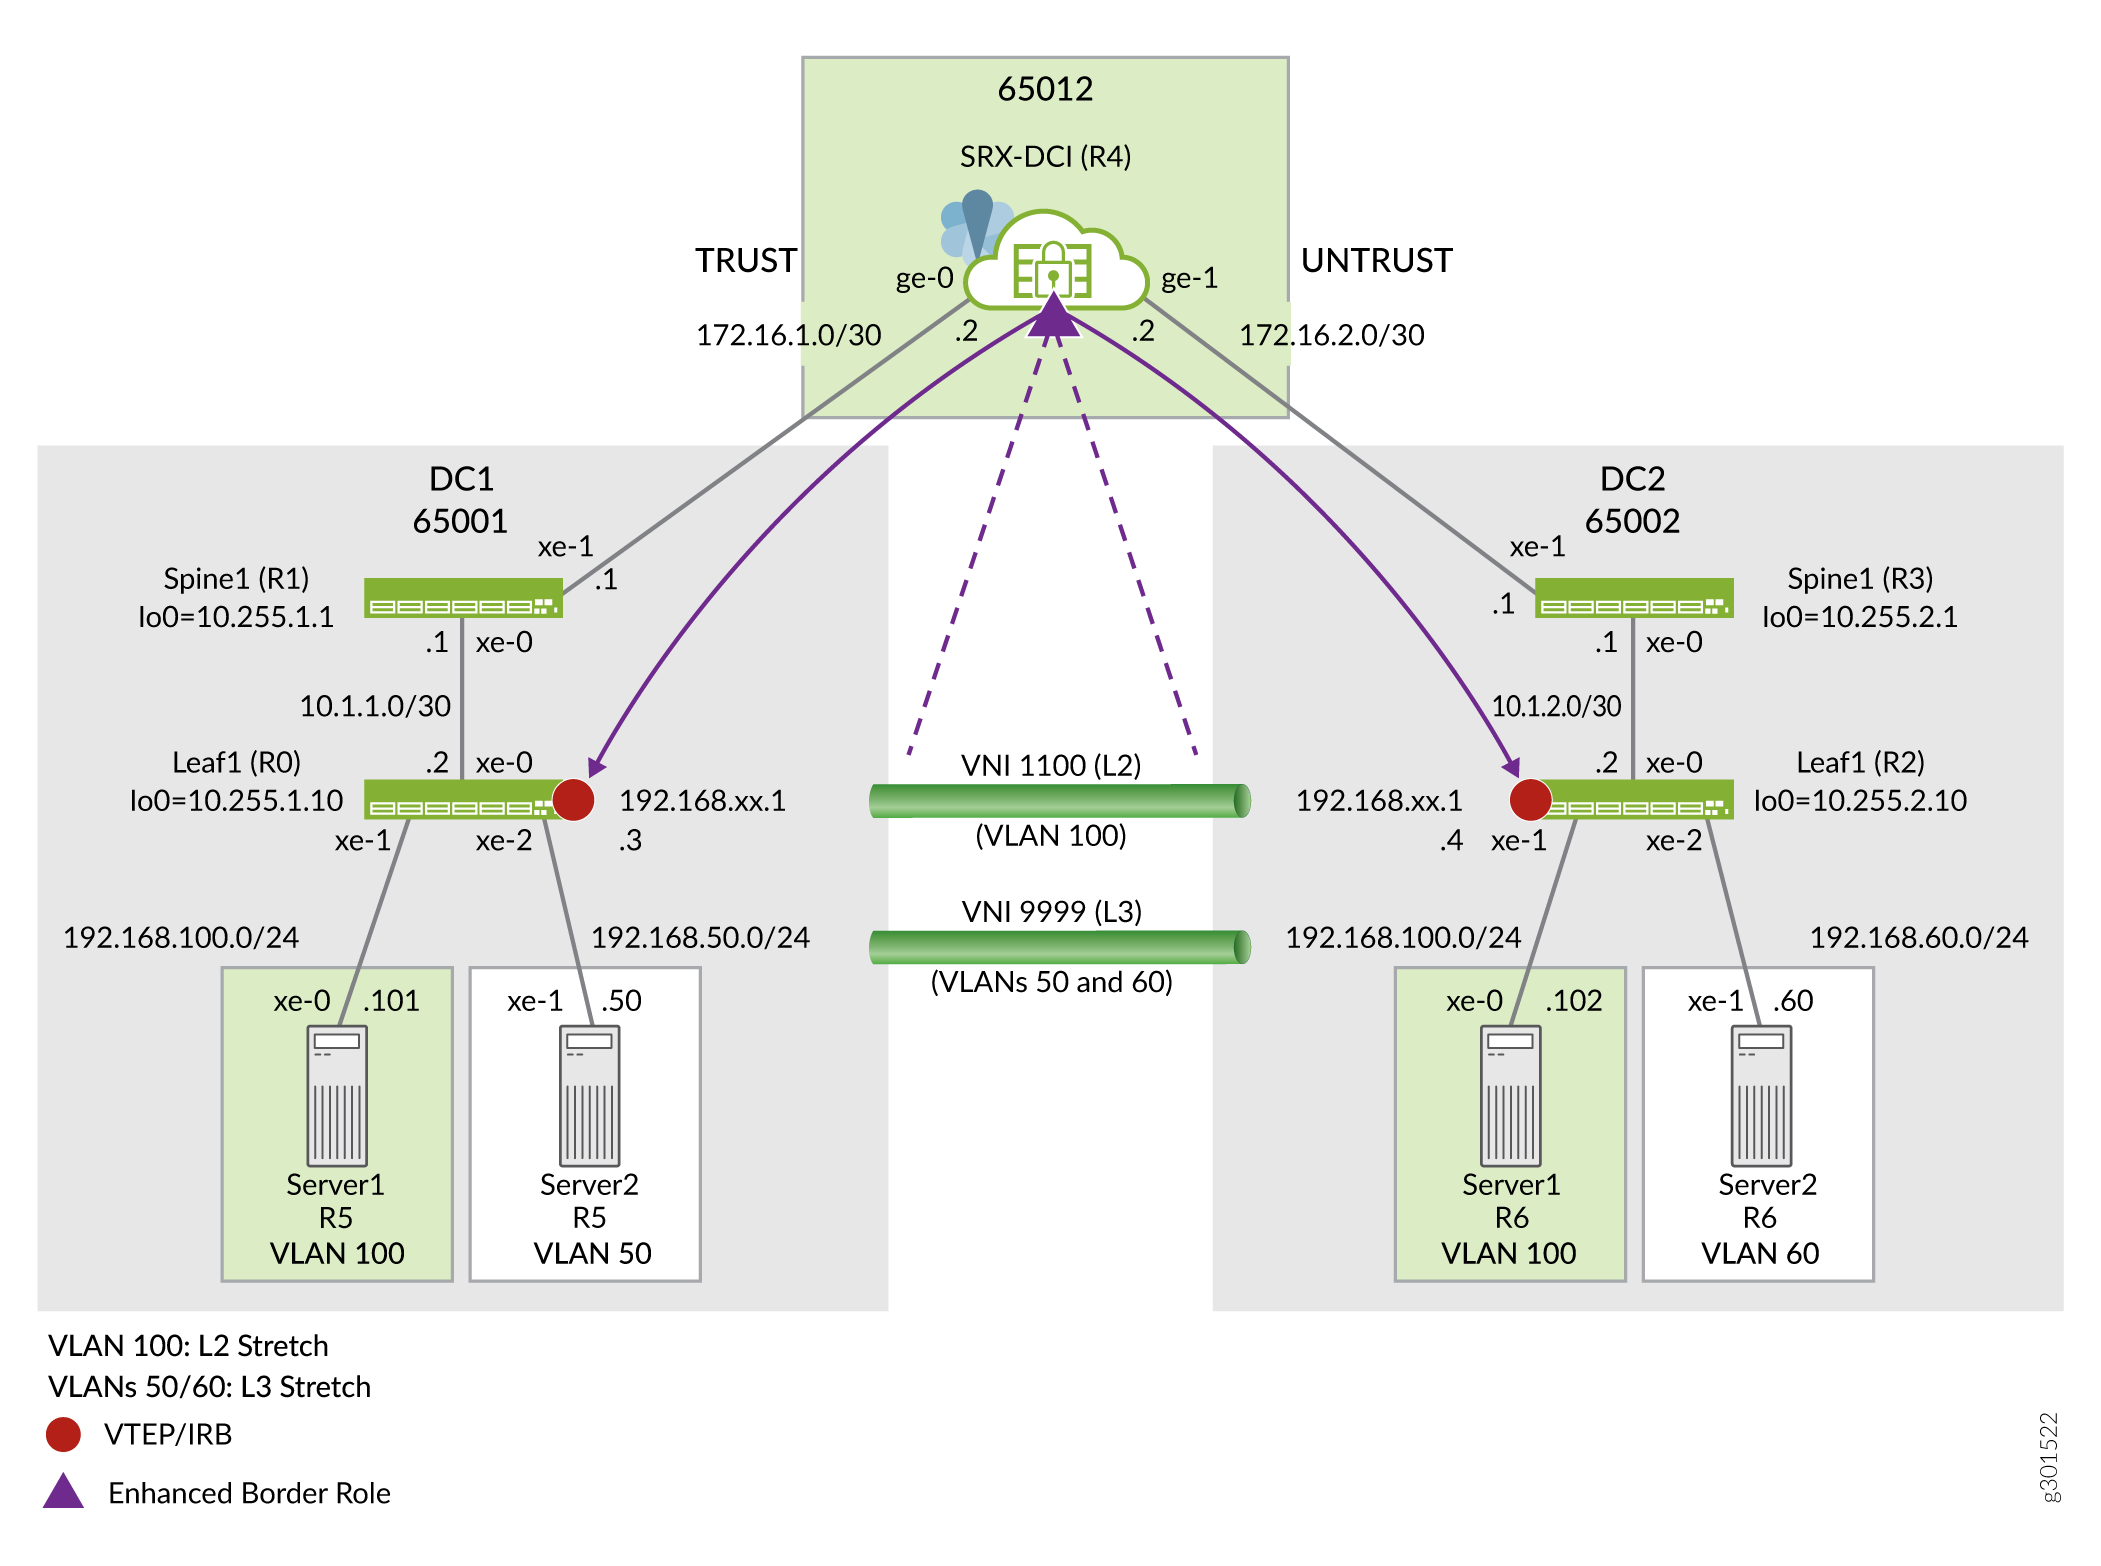
As given in the topology, the SRX Series Firewall is inspecting transit VLAN encapsulated traffic from the VXLAN tunnel endpoint (VTEP) on the leaves in both the DC-1 and DC-2 data centers. Any Juniper Networks device, both physical and virtual, that functions as a Layer 2 or Layer 3 VXLAN gateway can act as VTEP device to perform encapsulation and de-encapsulation.
Upon receipt of a Layer 2 or Layer 3 data packet from server 1, The leaf 1 VTEP adds the appropriate VXLAN header and then encapsulates the packet with a IPv4 outer header to facilitate tunneling the packet through the IPv4 underlay network. The remote VTEP at leaf 2 then de-encapsulates the traffic and forwards the original packet towards the destination host. With the Junos software release 20.4 SRX Series Firewalls are able to perform tunnel inspection for VXLAN encapsulated overlay traffic passing through it.
In this example, you’ll create a security policy to enable inspection for traffic that is encapsulated in a VXLAN tunnel . We're using the parameters described Table 1 in this example.
| Parameter | Description | Parameter Name |
|---|---|---|
| Security policy | Policy to create a flow session triggered by VXLAN overlay traffic. This policy references the outer IP source and destination address. That is, the IP addresses of the source and destination VTEPs. In this example this is the loopback address of the leaves. | P1 |
| Policy set | Policy for the inspection of inner traffic. This policy operates on the contents of matching VXLAN tunnel traffic. | PSET-1 |
| Tunnel inspection profile | Specifies parameters for security inspection on VXLAN tunnels. | TP-1 |
| Name of a VXLAN network identifier (VNI) list or range | Used to uniquely identify a list or range of VXLAN tunnel IDs. | VLAN-100 |
| VXLAN tunnel identifier name. | Used to symbolically name a VXLAN tunnel in a tunnel inspection profile. | VNI-1100 |
When you configure tunnel inspection security policies on the SRX Series Firewall, it decapsulates the packet to access the inner header when a packet matches a security policy. Next, it applies the tunnel inspection profile to determine if the inner traffic is permitted. The security device uses inner packet content and the applied tunnel inspection profile parameters to do a policy lookup and to then perform stateful inspection for the inner session.
To fix the issue without changing the VNI setup:
- Put both ingress and egress VRF IDs into the same VRF group ID.
- In the security policy, use the same source and destination VRF group ID as the matching criteria.
Configuration
In this example, you'll configure the following functionality on the SRX Series Firewall:
- Define a trust and untrust zone to permit all host traffic. This supports the BGP session to the spine devices and allow SSH etc from either zone (DC).
- Inspect traffic flowing from DC1 to DC2 in VNI 1100 (Layer 2 stretched for VLAN 100) for all hosts in the 192.168.100.0/24 subnet. Your policy should permit pings but deny all other traffic.
- Allow all return traffic from DC2 to DC1 with no tunnel inspection.
- Allow all other underlay and overlay traffic without VXLAN tunnel inspection from DC1 to DC2.
Use the following steps to enable tunnel inspection on your security device in a VXLAN-EVPN environment:
Complete functional configurations for all devices used in this example are provided Complete Device Configurations to assist the reader in testing this example.
This example focuses on the configuration steps needed to enable and validate the VXLAN tunnel inspection feature. The SRX Series Firewall is presumed to be configured with interface addressing, BGP peering, and policy to support its DCI role.
CLI Quick Configuration
To quickly configure this example on your SRX Series Firewall , copy the following commands, paste them into a text file, remove any line breaks, change any details necessary to match your network configuration, and then copy and paste the commands into the CLI at the [edit] hierarchy level.
Configuration on SRX Series Device
set system host-name r4-dci-ebr
set security address-book global address vtep-untrust 10.255.2.0/24
set security address-book global address vtep-trust 10.255.1.0/24
set security address-book global address vlan100 192.168.100.0/24
set security policies from-zone trust to-zone untrust policy P1 match source-address vtep-trust
set security policies from-zone trust to-zone untrust policy P1 match destination-address vtep-untrust
set security policies from-zone trust to-zone untrust policy P1 match application junos-vxlan
set security policies from-zone trust to-zone untrust policy P1 then permit tunnel-inspection TP-1
set security policies from-zone untrust to-zone trust policy accept-all-dc2 match source-address any
set security policies from-zone untrust to-zone trust policy accept-all-dc2 match destination-address any
set security policies from-zone untrust to-zone trust policy accept-all-dc2 match application any
set security policies from-zone untrust to-zone trust policy accept-all-dc2 then permit
set security policies policy-set PSET-1 policy PSET-1-P1 match source-address vlan100
set security policies policy-set PSET-1 policy PSET-1-P1 match destination-address vlan100
set security policies policy-set PSET-1 policy PSET-1-P1 match application junos-icmp-all
set security policies policy-set PSET-1 policy PSET-1-P1 then permit
set security zones security-zone trust host-inbound-traffic system-services all
set security zones security-zone trust host-inbound-traffic protocols all
set security zones security-zone trust interfaces ge-0/0/0.0
set security zones security-zone untrust host-inbound-traffic system-services all
set security zones security-zone untrust host-inbound-traffic protocols all
set security zones security-zone untrust interfaces ge-0/0/1.0
set security tunnel-inspection inspection-profile TP-1 vxlan VNI-1100 policy-set PSET-1
set security tunnel-inspection inspection-profile TP-1 vxlan VNI-1100 vni VLAN-100
set security tunnel-inspection vni VLAN-100 vni-id 1100
set interfaces ge-0/0/0 description "Link to DC1 Spine 1"
set interfaces ge-0/0/0 mtu 9000
set interfaces ge-0/0/0 unit 0 family inet address 172.16.1.2/30
set interfaces ge-0/0/1 description "Link to DC2 Spine 1"
set interfaces ge-0/0/1 mtu 9000
set interfaces ge-0/0/1 unit 0 family inet address 172.16.2.2/30
Step-by-Step Procedure
- Configure security zones, interfaces, and address-books.
[edit]
user@@r4-dci-ebr# set security zones security-zone trust
user@@r4-dci-ebr# set security zones security-zone untrust
user@@r4-dci-ebr# set interfaces ge-0/0/0 description "Link to DC1 Spine 1"
user@@r4-dci-ebr# set interfaces ge-0/0/0 mtu 9000
user@@r4-dci-ebr# set interfaces ge-0/0/0 unit 0 family inet address 172.16.1.2/30
user@@r4-dci-ebr# set interfaces ge-0/0/1 description "Link to DC2 Spine 1"
user@@r4-dci-ebr# set interfaces ge-0/0/1 mtu 9000
user@@r4-dci-ebr# set interfaces ge-0/0/1 unit 0 family inet address 172.16.2.2/30
user@@r4-dci-ebr# set security zones security-zone trust host-inbound-traffic system-services all
user@@r4-dci-ebr# set security zones security-zone trust host-inbound-traffic protocols all
user@@r4-dci-ebr# set security zones security-zone trust interfaces ge-0/0/0.0
user@@r4-dci-ebr# set security zones security-zone untrust host-inbound-traffic system-services all
user@@r4-dci-ebr# set security zones security-zone untrust host-inbound-traffic protocols all
user@@r4-dci-ebr# set security zones security-zone untrust interfaces ge-0/0/1.0
user@@r4-dci-ebr# set security address-book global address vtep-untrust 10.255.2.0/24
user@@r4-dci-ebr# set security address-book global address vtep-trust 10.255.1.0/24
user@@r4-dci-ebr# set security address-book global address vlan100 192.168.100.0/24
-
Define the tunnel-inspection profile. You can specify a range or a list of VNIs that should be inspected.
[edit]
user@@r4-dci-ebr# set security tunnel-inspection vni VLAN-100 vni-id 1100
user@@r4-dci-ebr# set security tunnel-inspection inspection-profile TP-1 vxlan VNI-1100 vni VLAN-100
user@@r4-dci-ebr# set security tunnel-inspection inspection-profile TP-1 vxlan VNI-1100 policy-set PSET-1
In this example only one VNI is needed so the
The tunnel inspection profile links to both the VNI list/range as well as to the related policy that should be applied to VXLAN tunnel with matching VNIs.vni-idkeyword is used instead of thevni-rangeoption. - Create a security policy to match on the outer session.
[edit]
user@@r4-dci-ebr# set security policies from-zone trust to-zone untrust policy P1 match source-address vtep-trust
user@@r4-dci-ebr# set security policies from-zone trust to-zone untrust policy P1 match destination-address vtep-untrust
user@@r4-dci-ebr# set security policies from-zone trust to-zone untrust policy P1 match application junos-vxlan
user@@r4-dci-ebr# set security policies from-zone trust to-zone untrust policy P1 then permit tunnel-inspection TP-1
TP-1tunnel inspection profile you defined in the previous step. In this example the goal is to inspect VXLAN tunnels that originate in DC1 and terminate in DC2. As a result a second policy to match on return traffic (with DC2 Leaf 1 the source VTEP) is not needed. -
Create the policy-set for the inner session.
[edit]
user@@r4-dci-ebr# set security policies policy-set PSET-1 policy PSET-1-P1 match source-address vlan100
user@@r4-dci-ebr# set security policies policy-set PSET-1 policy PSET-1-P1 match destination-address vlan100
user@@r4-dci-ebr# set security policies policy-set PSET-1 policy PSET-1-P1 match application junos-icmp-all
user@@r4-dci-ebr# set security policies policy-set PSET-1 policy PSET-1-P1 then permit
This policy performs security inspection against the payload of matching VXLAN traffic. In this example this is the traffic sent from Server 1 on VLAN 100 in DC1 to Server 1 in DC2. By specifying the
junos-icmp-allmatch condition you ensure that both ping request and replies can pass from server 1 ion DC1 to server 1 in DC2. If you specifyjunos-icmp-pingonly pings that originate from DC1 will be permitted.Recall that in this example only ping is permitted to help facilitate testing of the resulting functionality. You can match on
application anyto permit all traffic, or alter the match criteria to suit your specific security needs. -
Define the policies needed to accept all other traffic between the data centers without any tunnel inspection.
[edit]
user@@r4-dci-ebr# set security policies from-zone trust to-zone untrust policy accept-rest match source-address any
user@@r4-dci-ebr# set security policies from-zone trust to-zone untrust policy accept-rest match destination-address any
user@@r4-dci-ebr# set security policies from-zone trust to-zone untrust policy accept-rest match application any
user@@r4-dci-ebr# set security policies from-zone trust to-zone untrust policy accept-rest then permit
user@@r4-dci-ebr# set security policies from-zone untrust to-zone trust policy accept-all-dc2 match source-address any
user@@r4-dci-ebr# set security policies from-zone untrust to-zone trust policy accept-all-dc2 match destination-address any
user@@r4-dci-ebr# set security policies from-zone untrust to-zone trust policy accept-all-dc2 match application any
user@@r4-dci-ebr# set security policies from-zone untrust to-zone trust policy accept-all-dc2 then permit
Results
From configuration mode, confirm your configuration by entering the show security command. If the output does not display the intended configuration, repeat the configuration instructions in this example to correct it.
[edit]
user@host# show security
address-book {
    global {
        address vtep-untrust 10.255.2.0/24;
        address vtep-trust 10.255.1.0/24;
        address vlan100 192.168.100.0/24;
    }
}
policies {
    from-zone trust to-zone untrust {
        policy P1 {
            match {
                source-address vtep-trust;
                destination-address vtep-untrust;
                application junos-vxlan;
            }
            then {
                permit {
                    tunnel-inspection {
                        TP-1;
                    }
                }
            }
        }
        policy accept-rest {
            match {
                source-address any;
                destination-address any;
                application any;
            }
            then {
                permit;
            }
        }
    }
    from-zone untrust to-zone trust {
        policy accept-all-dc2 {
            match {
                source-address any;
                destination-address any;
                application any;
            }
            then {
                permit;
            }
        }
    }
    policy-set PSET-1 {
        policy PSET-1-P1 {
            match {
                source-address vlan100;
                destination-address vlan100;
                application junos-icmp-all;
            }
            then {
                permit;
            }
        }
    }
}
zones {
    security-zone trust {
        host-inbound-traffic {
            system-services {
                all;
            }
            protocols {
                all;
            }
        }
        interfaces {
            ge-0/0/0.0;
        }
    }
    security-zone untrust {
        host-inbound-traffic {
            system-services {
                all;
            }
            protocols {
                all;
            }
        }
        interfaces {
            ge-0/0/1.0;
        }
    }
}
tunnel-inspection {
    inspection-profile TP-1 {
        vxlan VNI-1100 {
            policy-set PSET-1;
            vni VLAN-100;
        }
    }
    vni VLAN-100 {
        vni-id 1100;
    }
}
If you are done configuring the feature on your device, enter commit from configuration mode.
Verification
At this time you should generate ping traffic between server 1 in DC1 to server 1 in DC2. The pings should succeed. Allow this test traffic to run in the background while you complete the verification tasks.
r5-dc1_server1> ping 192.168.100.102
PING 192.168.100.102 (192.168.100.102): 56 data bytes
64 bytes from 192.168.100.102: icmp_seq=0 ttl=64 time=565.451 ms
64 bytes from 192.168.100.102: icmp_seq=1 ttl=64 time=541.035 ms
64 bytes from 192.168.100.102: icmp_seq=2 ttl=64 time=651.420 ms
64 bytes from 192.168.100.102: icmp_seq=3 ttl=64 time=303.533 ms
. . .
- Verify Inner Policy Details
- Check Tunnel Inspection Traffic
- Check Tunnel Inspection Profile and VNI
- Check Security Flows
- Confirm That SSH is Blocked
Verify Inner Policy Details
Purpose
Verify the details of the policy applied for the inner session.
Action
From operational mode, enter the show security policies policy-set PSET-1 command.
From zone: PSET-1, To zone: PSET-1
  Policy: PSET-1-P1, State: enabled, Index: 7, Scope Policy: 0, Sequence number: 1, Log Profile ID: 0
    From zones: any
    To zones: any
    Source vrf group: any
    Destination vrf group: any
    Source addresses: vlan100
    Destination addresses: vlan100
    Applications: junos-icmp-all
    Source identity feeds: any
    Destination identity feeds: any
    Action: permit
Check Tunnel Inspection Traffic
Purpose
Display the tunnel inspection traffic details.
Action
From operational mode, enter the show security flow tunnel-inspection statistics command.
  Flow Tunnel-inspection statistics:
  Tunnel-inspection type VXLAN:
    overlay session active:             4
    overlay session create:           289
    overlay session close:            285
    underlay session active:            3
    underlay session create:           31
    underlay session close:            28
    input packets:          607
    input bytes:         171835
    output packets:         418
    output bytes:         75627
    bypass packets:           0
    bypass bytes:             0
Check Tunnel Inspection Profile and VNI
Purpose
Display the tunnel inspection profile and VNI details.
Action
From operational mode, enter the show security tunnel-inspection profiles command.
Logical system: root-logical-system
  Profile count: 1
  Profile: TP-1
    Type: VXLAN
    Vxlan count: 1
    Vxlan name: VXT-1
    VNI count: 1
      VNI:VNI-1
      Policy set: PSET-1
      Inspection level: 1
From operational mode, enter the show security tunnel-inspection vnis command.
Logical system: root-logical-system
  VNI count: 2
  VNI name: VLAN-100
      VNI id count: 1
      [1100 - 1100]
  VNI name: VNI-1
      VNI id count: 1
      [1100 - 1100]
Check Security Flows
Purpose
Display VXLAN security flow information on the SRX to confirm that VXLAN tunnel inspection is working.
Action
From operational mode, enter the show security flow session vxlan-vni 1100 command.
Session ID: 3811, Policy name: PSET-1-P1/7, State: Stand-alone, Timeout: 2, Valid
  In: 192.168.100.101/47883 --> 192.168.100.102/82;icmp, Conn Tag: 0xfcd, If: ge-0/0/0.0, Pkts: 1, Bytes: 84,
  Type: VXLAN, VNI: 1100, Tunnel Session ID: 2193
  Out: 192.168.100.102/82 --> 192.168.100.101/47883;icmp, Conn Tag: 0xfcd, If: ge-0/0/1.0, Pkts: 0, Bytes: 0,
  Type: VXLAN, VNI: 0, Tunnel Session ID: 0

Session ID: 3812, Policy name: PSET-1-P1/7, State: Stand-alone, Timeout: 2, Valid
  In: 192.168.100.101/47883 --> 192.168.100.102/83;icmp, Conn Tag: 0xfcd, If: ge-0/0/0.0, Pkts: 1, Bytes: 84,
  Type: VXLAN, VNI: 1100, Tunnel Session ID: 2193
  Out: 192.168.100.102/83 --> 192.168.100.101/47883;icmp, Conn Tag: 0xfcd, If: ge-0/0/1.0, Pkts: 0, Bytes: 0,
  Type: VXLAN, VNI: 0, Tunnel Session ID: 0

. . .
Confirm That SSH is Blocked
Purpose
Try to establish an SSH session between server 1 in DC1 and server 2 in DC2. Based on the policy that allows only ping traffic this session should be blocked at the SRX.
Action
From operational mode, enter the show security flow session vxlan-vni 1100 command.
r5-dc1_server1> ssh 192.168.100.102
ssh: connect to host 192.168.100.102 port 22: Operation timed out
r5_dc1_server1>
Configuration for Zone-Level Inspection, IDP, Content Security and Advanced Anti-Malware for Tunnel Inspection
Use this step if you want to configure zone-level inspection, and apply layer 7 services such as IDP, Juniper ATP, Content Security, and advanced anti-malware to the tunnel traffic. This feature is supported from Junos OS Release 21.1R1 onwards.
This example uses the following hardware and software components:
- An SRX Series Firewall or vSRX Virtual Firewall
- Junos OS Release 21.1R1
We are using the same configuration of address-books, security zones, interfaces, tunnel inspection profile, and security policy for the outer session as created in Configuration
This step assumes that you have Enrolled your SRX Series Firewall with Juniper ATP. For details on how to enroll your SRX Series Firewall, see Enroll an SRX Series Firewall using Juniper ATP Cloud Web Portal.
In this configuration, you'll create a policy set for the inner session and apply IDP, Content Security, advanced antimalware to the tunnel traffic.
- CLI Quick Configuration
- Create Zone-Level Inspection for Tunnel Inspection
- Create IDP, Content Security and Advanced Anti-Malware for Tunnel Inspection
- Results
CLI Quick Configuration
To quickly configure this example on your SRX Series Firewall , copy the following commands, paste them into a text file, remove any line breaks, change any details necessary to match your network configuration, and then copy and paste the commands into the CLI at the [edit] hierarchy level.
Configuration on SRX Series Device
set system host-name r4-dci-ebr
set security address-book global address vtep-untrust 10.255.2.0/24
set security address-book global address vtep-trust 10.255.1.0/24
set security address-book global address vlan100 192.168.100.0/24
set security policies from-zone trust to-zone untrust policy P1 match source-address vtep-trust
set security policies from-zone trust to-zone untrust policy P1 match destination-address vtep-untrust
set security policies from-zone trust to-zone untrust policy P1 match application junos-vxlan
set security policies from-zone trust to-zone untrust policy P1 then permit tunnel-inspection TP-1
set security policies from-zone untrust to-zone trust policy accept-all-dc2 match source-address any
set security policies from-zone untrust to-zone trust policy accept-all-dc2 match destination-address any
set security policies from-zone untrust to-zone trust policy accept-all-dc2 match application any
set security policies from-zone untrust to-zone trust policy accept-all-dc2 then permit
set security policies policy-set PSET-1 policy PSET-1-P1 match source-address vlan100
set security policies policy-set PSET-1 policy PSET-1-P1 match destination-address vlan100
set security policies policy-set PSET-1 policy PSET-1-P1 match application junos-icmp-all
set security policies policy-set PSET-1 policy PSET-1-P1 match dynamic-application any
set security policies policy-set PSET-1 policy PSET-1-P1 match url-category any
set security policies policy-set PSET-1 policy PSET-1-P1 match from-zone trust
set security policies policy-set PSET-1 policy PSET-1-P1 match to-zone untrust
set security policies policy-set PSET-1 policy PSET-1-P1 then permit
set security policies policy-set PSET-1 policy PSET-1-P1 then permit
set security zones security-zone trust host-inbound-traffic system-services all
set security zones security-zone trust host-inbound-traffic protocols all
set security zones security-zone trust interfaces ge-0/0/0.0
set security zones security-zone untrust host-inbound-traffic system-services all
set security zones security-zone untrust host-inbound-traffic protocols all
set security zones security-zone untrust interfaces ge-0/0/1.0
set security tunnel-inspection inspection-profile TP-1 vxlan VNI-1100 policy-set PSET-1
set security tunnel-inspection inspection-profile TP-1 vxlan VNI-1100 vni VLAN-100
set security tunnel-inspection vni VLAN-100 vni-id 1100
set interfaces ge-0/0/0 description "Link to DC1 Spine 1"
set interfaces ge-0/0/0 mtu 9000
set interfaces ge-0/0/0 unit 0 family inet address 172.16.1.2/30
set interfaces ge-0/0/1 description "Link to DC2 Spine 1"
set interfaces ge-0/0/1 mtu 9000
set interfaces ge-0/0/1 unit 0 family inet address 172.16.2.2/30
Create Zone-Level Inspection for Tunnel Inspection
You can add zone-level policy control for EVPN-VXLAN tunnel inspection for the inner traffic. This policy performs security inspection against the payload of matching VXLAN traffic. In the following step, you'll specify from-zone and to-zone for the traffic.
-
[edit]
user@r4-dci-ebr# set security policies policy-set PSET-1 policy PSET-1-P1 match source-address vlan100
user@r4-dci-ebr# set security policies policy-set PSET-1 policy PSET-1-P1 match destination-address vlan100
user@r4-dci-ebr# set security policies policy-set PSET-1 policy PSET-1-P1 match application any
user@r4-dci-ebr# set security policies policy-set PSET-1 policy PSET-1-P1 match dynamic-application any
user@r4-dci-ebr# set security policies policy-set PSET-1 policy PSET-1-P1 match url-category any
user@r4-dci-ebr# set security policies policy-set PSET-1 policy PSET-1-P1 match from-zone trust
user@r4-dci-ebr# set security policies policy-set PSET-1 policy PSET-1-P1 match to-zone untrust
user@r4-dci-ebr# set security policies policy-set PSET-1 policy PSET-1-P1 then permit
Create IDP, Content Security and Advanced Anti-Malware for Tunnel Inspection
You can add security services such as IDP, advanced aniti-malware, Content Security, SSL proxy for the EVPN-VXLAN tunnel inspection for the inner traffic. This policy performs security inspection against the payload of matching VXLAN traffic.
In the following step, you'll enable service such as IDP, Content Security, SSL proxy, security-intelligence, advanced anti-malware services by specifying them in a security policy permit action, when the traffic matches the policy rule.
-
[edit]
user@r4-dci-ebr# set security policies policy-set PSET-1 policy PSET-1-P1 match source-address vlan100
user@r4-dci-ebr# set security policies policy-set PSET-1 policy PSET-1-P1 match destination-address vlan100
user@r4-dci-ebr# set security policies policy-set PSET-1 policy PSET-1-P1 match application any
user@r4-dci-ebr# set security policies policy-set PSET-1 policy PSET-1-P1 then permit application-services ssl-proxy profile-name ssl-inspect-profile-1
user@r4-dci-ebr# set security policies policy-set PSET-1 policy PSET-1-P1 then permit application-services security-intelligence-policy secintel1
user@r4-dci-ebr# set security policies policy-set PSET-1 policy PSET-1-P1 then permit application-services advanced-anti-malware-policy P3
user@r4-dci-ebr# set security policies policy-set PSET-1 policy PSET-1-P1 then permit application-services idp-policy idp123
user@r4-dci-ebr# set security policies policy-set PSET-1 policy PSET-1-P1 then permit application-services utm-policy P1
The following steps show configuration snippets of Content Security, IDP, and advanced anti-malware policies at-glance.
-
Configure advanced anti-malware policy.
[edit]
user@r4-dci-ebr# set services advanced-anti-malware policy P3 http inspection-profile scripts
user@r4-dci-ebr# set services advanced-anti-malware policy P3 http action block
user@r4-dci-ebr# set services advanced-anti-malware policy P3 http notification log
user@r4-dci-ebr# set services advanced-anti-malware policy P3 http client-notify message "AAMW Blocked!"
user@r4-dci-ebr# set services advanced-anti-malware policy P3 verdict-threshold recommended
user@r4-dci-ebr# set services advanced-anti-malware policy P3 fallback-options action permit
user@r4-dci-ebr# set services advanced-anti-malware policy P3 fallback-options notification log
-
Configure security intelligence profile.
[edit]
user@r4-dci-ebr# set services security-intelligence url https://cloudfeeds.argonqa.junipersecurity.net/api/manifest.xml
user@r4-dci-ebr# set services security-intelligence authentication tls-profile aamw-ssl
user@r4-dci-ebr# set services security-intelligence profile cc_profile category CC
user@r4-dci-ebr# set services security-intelligence profile cc_profile rule cc_rule match threat-level 1
user@r4-dci-ebr# set services security-intelligence profile cc_profile rule cc_rule match threat-level 2
user@r4-dci-ebr# set services security-intelligence profile cc_profile rule cc_rule match threat-level 4
user@r4-dci-ebr# set services security-intelligence profile cc_profile rule cc_rule match threat-level 5
user@r4-dci-ebr# set services security-intelligence profile cc_profile rule cc_rule match threat-level 6
user@r4-dci-ebr# set services security-intelligence profile cc_profile rule cc_rule match threat-level 7
user@r4-dci-ebr# set services security-intelligence profile cc_profile rule cc_rule match threat-level 8
user@r4-dci-ebr# set services security-intelligence profile cc_profile rule cc_rule match threat-level 9
user@r4-dci-ebr# set services security-intelligence profile cc_profile rule cc_rule match threat-level 10
user@r4-dci-ebr# set services security-intelligence profile cc_profile rule cc_rule then action block close
user@r4-dci-ebr# set services security-intelligence profile cc_profile rule cc_rule then log
user@r4-dci-ebr# set services security-intelligence profile ih_profile category Infected-Hosts
user@r4-dci-ebr# set services security-intelligence profile ih_profile rule ih_rule match threat-level 7
user@r4-dci-ebr# set services security-intelligence profile ih_profile rule ih_rule match threat-level 8
user@r4-dci-ebr# set services security-intelligence profile ih_profile rule ih_rule match threat-level 9
user@r4-dci-ebr# set services security-intelligence profile ih_profile rule ih_rule match threat-level 10
user@r4-dci-ebr# set services security-intelligence profile ih_profile rule ih_rule then action block close http message "Blocked!"
user@r4-dci-ebr# set services security-intelligence profile ih_profile rule ih_rule then log
user@r4-dci-ebr# set services security-intelligence policy secintel1 CC cc_profile
user@r4-dci-ebr# set services security-intelligence policy secintel1 Infected-Hosts ih_profile
-
Configure IDP policy.
[edit]
user@r4-dci-ebr# set security idp idp-policy idp123 rulebase-ips rule rule1 match application junos-icmp-all
user@r4-dci-ebr# set security idp idp-policy idp123 rulebase-ips rule rule1 then action no-action
-
Configure Content Security policy.
[edit]
user@r4-dci-ebr# set security utm default-configuration anti-virus type sophos-engine
user@r4-dci-ebr## set security utm utm-policy P1 anti-virus http-profile junos-sophos-av-defaults
-
Configure SSL profiles.
[edit]
user@r4-dci-ebr# set services ssl initiation profile aamw-ssl
user@r4-dci-ebr# set services ssl proxy profile ssl-inspect-profile-1 root-ca VJSA
Results
From configuration mode, confirm your configuration by entering the show security command. If the output does not display the intended configuration, repeat the configuration instructions in this example to correct it.
[edit]
user@host# show security
address-book {
    global {
        address vtep-untrust 10.255.2.0/24;
        address vtep-trust 10.255.1.0/24;
        address vlan100 192.168.100.0/24;
    }
}
policies {
    from-zone trust to-zone untrust {
        policy P1 {
            match {
                source-address vtep-trust;
                destination-address vtep-untrust;
                application junos-vxlan;
            }
            then {
                permit {
                    tunnel-inspection {
                        TP-1;
                    }
                }
            }
        }
        policy accept-rest {
            match {
                source-address any;
                destination-address any;
                application any;
            }
            then {
                permit;
            }
        }
    }
    from-zone untrust to-zone trust {
        policy accept-all-dc2 {
            match {
                source-address any;
                destination-address any;
                application any;
            }
            then {
                permit;
            }
        }
    }
    policy-set PSET-1 {
        policy PSET-1-P1 {
            match {
                source-address vlan100;
                destination-address vlan100;
                application junos-icmp-all;
                dynamic-application any;
                url-category any;
                from-zone trust;
                to-zone untrust;
            }
           then {
            permit {
                application-services {
                    idp-policy idp123;
                    ssl-proxy {
                        profile-name ssl-inspect-profile-1;
                    }
                    utm-policy P1;
                    security-intelligence-policy secintel1;
                    advanced-anti-malware-policy P3;
                }
            }
        }
            }
        }
    }
}
zones {
    security-zone trust {
        host-inbound-traffic {
            system-services {
                all;
            }
            protocols {
                all;
            }
        }
        interfaces {
            ge-0/0/0.0;
        }
    }
    security-zone untrust {
        host-inbound-traffic {
            system-services {
                all;
            }
            protocols {
                all;
            }
        }
        interfaces {
            ge-0/0/1.0;
        }
    }
}
tunnel-inspection {
    inspection-profile TP-1 {
        vxlan VNI-1100 {
            policy-set PSET-1;
            vni VLAN-100;
        }
    }
    vni VLAN-100 {
        vni-id 1100;
    }
}
[edit]
user@host# show services
application-identification;
ssl {
    initiation {
        profile aamw-ssl;
    }
    proxy {
        profile ssl-inspect-profile-1 {
            root-ca VJSA;
        }
    }
}
advanced-anti-malware {
    policy P3 {
        http {
            inspection-profile scripts;
            action block;
            client-notify {
                message "AAMW Blocked!";
            }
            notification {
                log;
            }
        }
        verdict-threshold recommended;
        fallback-options {
            action permit;
            notification {
                log;
            }
        }
    }
}
security-intelligence {
    url https://cloudfeeds.argonqa.junipersecurity.net/api/manifest.xml;
    authentication {
        tls-profile aamw-ssl;
    }
    profile cc_profile {
        category CC;
        rule cc_rule {
            match {
                threat-level [ 1 2 4 5 6 7 8 9 10 ];
            }
            then {
                action {
                    block {
                        close;
                    }
                }
                log;
            }
        }
    }
    profile ih_profile {
        category Infected-Hosts;
        rule ih_rule {
            match {
                threat-level [ 7 8 9 10 ];
            }
            then {
                action {
                    block {
                        close {
                            http {
                                message "Blocked!";
                            }
                        }
                    }
                }
                log;
            }
        }
    }
    policy secintel1 {
        CC {
            cc_profile;
        }
        Infected-Hosts {
            ih_profile;
        }
    }
}
If you are done configuring the feature on your device, enter commit from configuration mode.
Complete Device Configurations
Refer to these configurations to better understand or recreate the context of this example. They include the complete ERB based EVPN-VXLAN configurations for the QFX Series switches that form the DC fabrics, as well as the ending state of the SRX Series Firewall for both the basic and advanced VXLAN tunnel inspection examples.
The provided configurations do not show user login, system logging, or management related configuration as this varies by location is not related to the VXLAN tunnel inspection feature.
For more details and example on configuring EVPN-VXLAN, see the network configuration example at Configuring an EVPN-VXLAN Fabric for a Campus Network with ERB.
- Configuration on Leaf 1 Device
- Configuration on Spine 1 Device
- Configuration on Leaf 2 Device
- Configuration on Spine 2 Device
- Basic Tunnel Inspection Configuration on SRX Series Device
- Tunnel Inspection Configuration on SRX Series Device with Layer 7 Security Services
Configuration on Leaf 1 Device
set system host-name r0_dc1_leaf1
set interfaces xe-0/0/0 mtu 9000
set interfaces xe-0/0/0 unit 0 family inet address 10.1.1.2/30
set interfaces xe-0/0/1 unit 0 family ethernet-switching vlan members v100
set interfaces xe-0/0/2 unit 0 family ethernet-switching vlan members v50
set interfaces irb unit 50 virtual-gateway-accept-data
set interfaces irb unit 50 family inet address 192.168.50.3/24 preferred
set interfaces irb unit 50 family inet address 192.168.50.3/24 virtual-gateway-address 192.168.50.1
set interfaces irb unit 100 virtual-gateway-accept-data
set interfaces irb unit 100 family inet address 192.168.100.3/24 preferred
set interfaces irb unit 100 family inet address 192.168.100.3/24 virtual-gateway-address 192.168.100.1
set interfaces lo0 unit 0 family inet address 10.255.1.10/32
set interfaces lo0 unit 1 family inet address 10.255.10.10/32
set forwarding-options vxlan-routing next-hop 32768
set forwarding-options vxlan-routing overlay-ecmp
set policy-options policy-statement ECMP-POLICY then load-balance per-packet
set policy-options policy-statement FROM_Lo0 term 10 from interface lo0.0
set policy-options policy-statement FROM_Lo0 term 10 then accept
set policy-options policy-statement FROM_Lo0 term 20 then reject
set policy-options policy-statement OVERLAY_IMPORT term 5 from community comm_pod1
set policy-options policy-statement OVERLAY_IMPORT term 5 then accept
set policy-options policy-statement OVERLAY_IMPORT term 10 from community comm_pod2
set policy-options policy-statement OVERLAY_IMPORT term 10 then accept
set policy-options policy-statement OVERLAY_IMPORT term 20 from community shared_100_fm_pod2
set policy-options policy-statement OVERLAY_IMPORT term 20 from community shared_100_fm_pod1
set policy-options policy-statement OVERLAY_IMPORT term 20 then accept
set policy-options policy-statement T5_EXPORT term fm_direct from protocol direct
set policy-options policy-statement T5_EXPORT term fm_direct then accept
set policy-options policy-statement T5_EXPORT term fm_static from protocol static
set policy-options policy-statement T5_EXPORT term fm_static then accept
set policy-options policy-statement T5_EXPORT term fm_v4_host from protocol evpn
set policy-options policy-statement T5_EXPORT term fm_v4_host from route-filter 0.0.0.0/0 prefix-length-range /32-/32
set policy-options policy-statement T5_EXPORT term fm_v4_host then accept
set policy-options policy-statement VRF1_T5_RT_EXPORT term t1 then community add target_t5_pod1
set policy-options policy-statement VRF1_T5_RT_EXPORT term t1 then accept
set policy-options policy-statement VRF1_T5_RT_IMPORT term t1 from community target_t5_pod1
set policy-options policy-statement VRF1_T5_RT_IMPORT term t1 then accept
set policy-options policy-statement VRF1_T5_RT_IMPORT term t2 from community target_t5_pod2
set policy-options policy-statement VRF1_T5_RT_IMPORT term t2 then accept
set policy-options community comm_pod1 members target:65001:1
set policy-options community comm_pod2 members target:65002:2
set policy-options community shared_100_fm_pod1 members target:65001:100
set policy-options community shared_100_fm_pod2 members target:65002:100
set policy-options community target_t5_pod1 members target:65001:9999
set policy-options community target_t5_pod2 members target:65002:9999
set routing-instances TENANT_1_VRF routing-options multipath
set routing-instances TENANT_1_VRF protocols evpn ip-prefix-routes advertise direct-nexthop
set routing-instances TENANT_1_VRF protocols evpn ip-prefix-routes encapsulation vxlan
set routing-instances TENANT_1_VRF protocols evpn ip-prefix-routes vni 9999
set routing-instances TENANT_1_VRF protocols evpn ip-prefix-routes export T5_EXPORT
set routing-instances TENANT_1_VRF instance-type vrf
set routing-instances TENANT_1_VRF interface irb.50
set routing-instances TENANT_1_VRF interface irb.100
set routing-instances TENANT_1_VRF interface lo0.1
set routing-instances TENANT_1_VRF route-distinguisher 10.255.1.10:9999
set routing-instances TENANT_1_VRF vrf-import VRF1_T5_RT_IMPORT
set routing-instances TENANT_1_VRF vrf-export VRF1_T5_RT_EXPORT
set routing-instances TENANT_1_VRF vrf-table-label
set routing-options router-id 10.255.1.10
set routing-options autonomous-system 65001
set routing-options forwarding-table export ECMP-POLICY
set routing-options forwarding-table ecmp-fast-reroute
set routing-options forwarding-table chained-composite-next-hop ingress evpn
set protocols bgp group EVPN_FABRIC type internal
set protocols bgp group EVPN_FABRIC local-address 10.255.1.10
set protocols bgp group EVPN_FABRIC family evpn signaling
set protocols bgp group EVPN_FABRIC multipath
set protocols bgp group EVPN_FABRIC bfd-liveness-detection minimum-interval 1000
set protocols bgp group EVPN_FABRIC bfd-liveness-detection multiplier 3
set protocols bgp group EVPN_FABRIC neighbor 10.255.1.1
set protocols bgp group UNDERLAY type external
set protocols bgp group UNDERLAY family inet unicast
set protocols bgp group UNDERLAY export FROM_Lo0
set protocols bgp group UNDERLAY local-as 65510
set protocols bgp group UNDERLAY multipath multiple-as
set protocols bgp group UNDERLAY bfd-liveness-detection minimum-interval 350
set protocols bgp group UNDERLAY bfd-liveness-detection multiplier 3
set protocols bgp group UNDERLAY neighbor 10.1.1.1 peer-as 65511
set protocols evpn encapsulation vxlan
set protocols evpn default-gateway no-gateway-community
set protocols evpn vni-options vni 150 vrf-target target:65001:150
set protocols evpn vni-options vni 1100 vrf-target target:65001:100
set protocols evpn extended-vni-list 1100
set protocols evpn extended-vni-list 150
set protocols lldp interface all
set switch-options vtep-source-interface lo0.0
set switch-options route-distinguisher 10.255.1.10:1
set switch-options vrf-import OVERLAY_IMPORT
set switch-options vrf-target target:65001:1
set vlans v100 vlan-id 100
set vlans v100 l3-interface irb.100
set vlans v100 vxlan vni 1100
set vlans v50 vlan-id 50
set vlans v50 l3-interface irb.50
set vlans v50 vxlan vni 150
Configuration on Spine 1 Device
set system host-name r1_dc1_spine11
set interfaces xe-0/0/0 mtu 9000
set interfaces xe-0/0/0 unit 0 family inet address 10.1.1.1/30
set interfaces xe-0/0/1 mtu 9000
set interfaces xe-0/0/1 unit 0 family inet address 172.16.1.1/30
set interfaces lo0 unit 0 family inet address 10.255.1.1/32
set policy-options policy-statement ECMP-POLICY then load-balance per-packet
set policy-options policy-statement FROM_Lo0 term 10 from interface lo0.0
set policy-options policy-statement FROM_Lo0 term 10 then accept
set policy-options policy-statement FROM_Lo0 term 20 then reject
set policy-options policy-statement UNDERLAY-EXPORT term LOOPBACK from route-filter 10.255.0.0/16 orlonger
set policy-options policy-statement UNDERLAY-EXPORT term LOOPBACK from route-filter 10.1.0.0/16 orlonger
set policy-options policy-statement UNDERLAY-EXPORT term LOOPBACK then accept
set policy-options policy-statement UNDERLAY-EXPORT term DEFAULT then reject
set policy-options policy-statement UNDERLAY-IMPORT term LOOPBACK from route-filter 10.255.0.0/16 orlonger
set policy-options policy-statement UNDERLAY-IMPORT term LOOPBACK from route-filter 10.1.0.0/16 orlonger
set policy-options policy-statement UNDERLAY-IMPORT term LOOPBACK then accept
set policy-options policy-statement UNDERLAY-IMPORT term DEFAULT then reject
set routing-options autonomous-system 65001
set routing-options forwarding-table export ECMP-POLICY
set routing-options forwarding-table ecmp-fast-reroute
set protocols bgp group EVPN_FABRIC type internal
set protocols bgp group EVPN_FABRIC local-address 10.255.1.1
set protocols bgp group EVPN_FABRIC family evpn signaling
set protocols bgp group EVPN_FABRIC cluster 10.255.1.1
set protocols bgp group EVPN_FABRIC multipath
set protocols bgp group EVPN_FABRIC bfd-liveness-detection minimum-interval 1000
set protocols bgp group EVPN_FABRIC bfd-liveness-detection multiplier 3
set protocols bgp group EVPN_FABRIC neighbor 10.255.1.10
set protocols bgp group EVPN_FABRIC vpn-apply-export
set protocols bgp group UNDERLAY type external
set protocols bgp group UNDERLAY import UNDERLAY-IMPORT
set protocols bgp group UNDERLAY family inet unicast
set protocols bgp group UNDERLAY export UNDERLAY-EXPORT
set protocols bgp group UNDERLAY local-as 65511
set protocols bgp group UNDERLAY multipath multiple-as
set protocols bgp group UNDERLAY bfd-liveness-detection minimum-interval 350
set protocols bgp group UNDERLAY bfd-liveness-detection multiplier 3
set protocols bgp group UNDERLAY neighbor 10.1.1.2 peer-as 65510
set protocols bgp group UNDERLAY neighbor 172.16.1.2 peer-as 65012
set protocols bgp group OVERLAY_INTERDC type external
set protocols bgp group OVERLAY_INTERDC multihop no-nexthop-change
set protocols bgp group OVERLAY_INTERDC local-address 10.255.1.1
set protocols bgp group OVERLAY_INTERDC family evpn signaling
set protocols bgp group OVERLAY_INTERDC multipath multiple-as
set protocols bgp group OVERLAY_INTERDC neighbor 10.255.2.1 peer-as 65002
set protocols lldp interface all
Configuration on Leaf 2 Device
set system host-name r2_dc2_leaf1
set interfaces xe-0/0/0 mtu 9000
set interfaces xe-0/0/0 unit 0 family inet address 10.1.2.2/30
set interfaces xe-0/0/1 unit 0 family ethernet-switching vlan members v100
set interfaces xe-0/0/2 unit 0 family ethernet-switching vlan members v60
set interfaces irb unit 60 virtual-gateway-accept-data
set interfaces irb unit 60 family inet address 192.168.60.3/24 preferred
set interfaces irb unit 60 family inet address 192.168.60.3/24 virtual-gateway-address 192.168.60.1
set interfaces irb unit 100 virtual-gateway-accept-data
set interfaces irb unit 100 family inet address 192.168.100.4/24 preferred
set interfaces irb unit 100 family inet address 192.168.100.4/24 virtual-gateway-address 192.168.100.1
set interfaces lo0 unit 0 family inet address 10.255.2.10/32
set interfaces lo0 unit 1 family inet address 10.255.20.10/32
set forwarding-options vxlan-routing next-hop 32768
set forwarding-options vxlan-routing overlay-ecmp
set policy-options policy-statement ECMP-POLICY then load-balance per-packet
set policy-options policy-statement FROM_Lo0 term 10 from interface lo0.0
set policy-options policy-statement FROM_Lo0 term 10 then accept
set policy-options policy-statement FROM_Lo0 term 20 then reject
set policy-options policy-statement OVERLAY_IMPORT term 5 from community comm_pod1
set policy-options policy-statement OVERLAY_IMPORT term 5 then accept
set policy-options policy-statement OVERLAY_IMPORT term 10 from community comm_pod2
set policy-options policy-statement OVERLAY_IMPORT term 10 then accept
set policy-options policy-statement OVERLAY_IMPORT term 20 from community shared_100_fm_pod2
set policy-options policy-statement OVERLAY_IMPORT term 20 from community shared_100_fm_pod1
set policy-options policy-statement OVERLAY_IMPORT term 20 then accept
set policy-options policy-statement T5_EXPORT term fm_direct from protocol direct
set policy-options policy-statement T5_EXPORT term fm_direct then accept
set policy-options policy-statement T5_EXPORT term fm_static from protocol static
set policy-options policy-statement T5_EXPORT term fm_static then accept
set policy-options policy-statement T5_EXPORT term fm_v4_host from protocol evpn
set policy-options policy-statement T5_EXPORT term fm_v4_host from route-filter 0.0.0.0/0 prefix-length-range /32-/32
set policy-options policy-statement T5_EXPORT term fm_v4_host then accept
set policy-options policy-statement VRF1_T5_RT_EXPORT term t1 then community add target_t5_pod1
set policy-options policy-statement VRF1_T5_RT_EXPORT term t1 then accept
set policy-options policy-statement VRF1_T5_RT_IMPORT term t1 from community target_t5_pod1
set policy-options policy-statement VRF1_T5_RT_IMPORT term t1 then accept
set policy-options policy-statement VRF1_T5_RT_IMPORT term t2 from community target_t5_pod2
set policy-options policy-statement VRF1_T5_RT_IMPORT term t2 then accept
set policy-options community comm_pod1 members target:65001:1
set policy-options community comm_pod2 members target:65002:2
set policy-options community shared_100_fm_pod1 members target:65001:100
set policy-options community shared_100_fm_pod2 members target:65002:100
set policy-options community target_t5_pod1 members target:65001:9999
set policy-options community target_t5_pod2 members target:65002:9999
set routing-instances TENANT_1_VRF routing-options multipath
set routing-instances TENANT_1_VRF protocols evpn ip-prefix-routes advertise direct-nexthop
set routing-instances TENANT_1_VRF protocols evpn ip-prefix-routes encapsulation vxlan
set routing-instances TENANT_1_VRF protocols evpn ip-prefix-routes vni 9999
set routing-instances TENANT_1_VRF protocols evpn ip-prefix-routes export T5_EXPORT
set routing-instances TENANT_1_VRF instance-type vrf
set routing-instances TENANT_1_VRF interface irb.60
set routing-instances TENANT_1_VRF interface irb.100
set routing-instances TENANT_1_VRF interface lo0.1
set routing-instances TENANT_1_VRF route-distinguisher 10.255.1.2:9999
set routing-instances TENANT_1_VRF vrf-import VRF1_T5_RT_IMPORT
set routing-instances TENANT_1_VRF vrf-export VRF1_T5_RT_EXPORT
set routing-instances TENANT_1_VRF vrf-table-label
set routing-options router-id 10.255.2.10
set routing-options autonomous-system 65002
set routing-options forwarding-table export ECMP-POLICY
set routing-options forwarding-table ecmp-fast-reroute
set routing-options forwarding-table chained-composite-next-hop ingress evpn
set protocols bgp group EVPN_FABRIC type internal
set protocols bgp group EVPN_FABRIC local-address 10.255.2.10
set protocols bgp group EVPN_FABRIC family evpn signaling
set protocols bgp group EVPN_FABRIC multipath
set protocols bgp group EVPN_FABRIC bfd-liveness-detection minimum-interval 1000
set protocols bgp group EVPN_FABRIC bfd-liveness-detection multiplier 3
set protocols bgp group EVPN_FABRIC neighbor 10.255.2.1
set protocols bgp group UNDERLAY type external
set protocols bgp group UNDERLAY family inet unicast
set protocols bgp group UNDERLAY export FROM_Lo0
set protocols bgp group UNDERLAY local-as 65522
set protocols bgp group UNDERLAY multipath multiple-as
set protocols bgp group UNDERLAY bfd-liveness-detection minimum-interval 350
set protocols bgp group UNDERLAY bfd-liveness-detection multiplier 3
set protocols bgp group UNDERLAY neighbor 10.1.2.1 peer-as 65523
set protocols evpn encapsulation vxlan
set protocols evpn default-gateway no-gateway-community
set protocols evpn vni-options vni 160 vrf-target target:65002:160
set protocols evpn vni-options vni 1100 vrf-target target:65002:100
set protocols evpn extended-vni-list 1100
set protocols evpn extended-vni-list 160
set protocols lldp interface all
set switch-options vtep-source-interface lo0.0
set switch-options route-distinguisher 10.255.2.10:1
set switch-options vrf-import OVERLAY_IMPORT
set switch-options vrf-target target:65002:1
set vlans v100 vlan-id 100
set vlans v100 l3-interface irb.100
set vlans v100 vxlan vni 1100
set vlans v60 vlan-id 60
set vlans v60 l3-interface irb.60
set vlans v60 vxlan vni 160
Configuration on Spine 2 Device
set system host-name r3_dc2_spine1
set interfaces xe-0/0/0 mtu 9000
set interfaces xe-0/0/0 unit 0 family inet address 10.1.2.1/30
set interfaces xe-0/0/1 mtu 9000
set interfaces xe-0/0/1 unit 0 family inet address 172.16.2.1/30
set interfaces lo0 unit 0 family inet address 10.255.2.1/32
set policy-options policy-statement ECMP-POLICY then load-balance per-packet
set policy-options policy-statement FROM_Lo0 term 10 from interface lo0.0
set policy-options policy-statement FROM_Lo0 term 10 then accept
set policy-options policy-statement FROM_Lo0 term 20 then reject
set policy-options policy-statement UNDERLAY-EXPORT term LOOPBACK from route-filter 10.255.0.0/16 orlonger
set policy-options policy-statement UNDERLAY-EXPORT term LOOPBACK from route-filter 10.1.0.0/16 orlonger
set policy-options policy-statement UNDERLAY-EXPORT term LOOPBACK then accept
set policy-options policy-statement UNDERLAY-EXPORT term DEFAULT then reject
set policy-options policy-statement UNDERLAY-IMPORT term LOOPBACK from route-filter 10.255.0.0/16 orlonger
set policy-options policy-statement UNDERLAY-IMPORT term LOOPBACK from route-filter 10.1.0.0/16 orlonger
set policy-options policy-statement UNDERLAY-IMPORT term LOOPBACK then accept
set policy-options policy-statement UNDERLAY-IMPORT term DEFAULT then reject
set routing-options autonomous-system 65002
set routing-options forwarding-table export ECMP-POLICY
set routing-options forwarding-table ecmp-fast-reroute
set protocols bgp group EVPN_FABRIC type internal
set protocols bgp group EVPN_FABRIC local-address 10.255.2.1
set protocols bgp group EVPN_FABRIC family evpn signaling
set protocols bgp group EVPN_FABRIC cluster 10.255.2.1
set protocols bgp group EVPN_FABRIC multipath
set protocols bgp group EVPN_FABRIC bfd-liveness-detection minimum-interval 1000
set protocols bgp group EVPN_FABRIC bfd-liveness-detection multiplier 3
set protocols bgp group EVPN_FABRIC neighbor 10.255.2.10
set protocols bgp group EVPN_FABRIC vpn-apply-export
set protocols bgp group UNDERLAY type external
set protocols bgp group UNDERLAY import UNDERLAY-IMPORT
set protocols bgp group UNDERLAY family inet unicast
set protocols bgp group UNDERLAY export UNDERLAY-EXPORT
set protocols bgp group UNDERLAY local-as 65523
set protocols bgp group UNDERLAY multipath multiple-as
set protocols bgp group UNDERLAY bfd-liveness-detection minimum-interval 350
set protocols bgp group UNDERLAY bfd-liveness-detection multiplier 3
set protocols bgp group UNDERLAY neighbor 10.1.2.2 peer-as 65522
set protocols bgp group UNDERLAY neighbor 172.16.2.2 peer-as 65012
set protocols bgp group OVERLAY_INTERDC type external
set protocols bgp group OVERLAY_INTERDC multihop no-nexthop-change
set protocols bgp group OVERLAY_INTERDC local-address 10.255.2.1
set protocols bgp group OVERLAY_INTERDC family evpn signaling
set protocols bgp group OVERLAY_INTERDC multipath multiple-as
set protocols bgp group OVERLAY_INTERDC neighbor 10.255.1.1 peer-as 65001
set protocols lldp interface all
Basic Tunnel Inspection Configuration on SRX Series Device
set system host-name r4-dci-ebr
set security address-book global address vtep-untrust 10.255.2.0/24
set security address-book global address vtep-trust 10.255.1.0/24
set security address-book global address vlan100 192.168.100.0/24
set security policies from-zone trust to-zone untrust policy P1 match source-address vtep-trust
set security policies from-zone trust to-zone untrust policy P1 match destination-address vtep-untrust
set security policies from-zone trust to-zone untrust policy P1 match application junos-vxlan
set security policies from-zone trust to-zone untrust policy P1 then permit tunnel-inspection TP-1
set security policies from-zone trust to-zone untrust policy accept-rest match source-address any
set security policies from-zone trust to-zone untrust policy accept-rest match destination-address any
set security policies from-zone trust to-zone untrust policy accept-rest match application any
set security policies from-zone trust to-zone untrust policy accept-rest then permit
set security policies from-zone untrust to-zone trust policy accept-return match source-address any
set security policies from-zone untrust to-zone trust policy accept-return match destination-address any
set security policies from-zone untrust to-zone trust policy accept-return match application any
set security policies from-zone untrust to-zone trust policy accept-return then permit
set security policies policy-set PSET-1 policy PSET-1-P1 match source-address vlan100
set security policies policy-set PSET-1 policy PSET-1-P1 match destination-address vlan100
set security policies policy-set PSET-1 policy PSET-1-P1 match application junos-icmp-all
set security policies policy-set PSET-1 policy PSET-1-P1 then permit
set security zones security-zone trust host-inbound-traffic system-services all
set security zones security-zone trust host-inbound-traffic protocols all
set security zones security-zone trust interfaces ge-0/0/0.0
set security zones security-zone untrust host-inbound-traffic system-services all
set security zones security-zone untrust host-inbound-traffic protocols all
set security zones security-zone untrust interfaces ge-0/0/1.0
set security tunnel-inspection inspection-profile TP-1 vxlan VNI-1100 policy-set PSET-1
set security tunnel-inspection inspection-profile TP-1 vxlan VNI-1100 vni VLAN-100
set security tunnel-inspection vni VLAN-100 vni-id 1100
set interfaces ge-0/0/0 description "Link to DC2 Spine 1"
set interfaces ge-0/0/0 mtu 9000
set interfaces ge-0/0/0 unit 0 family inet address 172.16.1.2/30
set interfaces ge-0/0/1 mtu 9000
set interfaces ge-0/0/1 unit 0 family inet address 172.16.2.2/30
set policy-options policy-statement ECMP-POLICY then load-balance per-packet
set policy-options policy-statement dci term 1 from protocol direct
set policy-options policy-statement dci term 1 then accept
set protocols bgp group UNDERLAY export dci
set protocols bgp group UNDERLAY multipath multiple-as
set protocols bgp group UNDERLAY bfd-liveness-detection minimum-interval 350
set protocols bgp group UNDERLAY bfd-liveness-detection multiplier 3
set protocols bgp group UNDERLAY neighbor 172.16.1.1 peer-as 65511
set protocols bgp group UNDERLAY neighbor 172.16.2.1 peer-as 65523
set routing-options autonomous-system 65012
set routing-options forwarding-table export ECMP-POLICY
Tunnel Inspection Configuration on SRX Series Device with Layer 7 Security Services
set system host-name r4-dci-ebrset services application-identification
set services ssl initiation profile aamw-ssl
set services ssl proxy profile ssl-inspect-profile-1 root-ca VJSA
set services advanced-anti-malware policy P3 http inspection-profile scripts
set services advanced-anti-malware policy P3 http action block
set services advanced-anti-malware policy P3 http client-notify message "AAMW Blocked!"
set services advanced-anti-malware policy P3 http notification log
set services advanced-anti-malware policy P3 verdict-threshold recommended
set services advanced-anti-malware policy P3 fallback-options action permit
set services advanced-anti-malware policy P3 fallback-options notification log
set services security-intelligence url https://cloudfeeds.argonqa.junipersecurity.net/api/manifest.xml
set services security-intelligence authentication tls-profile aamw-ssl
set services security-intelligence profile cc_profile category CC
set services security-intelligence profile cc_profile rule cc_rule match threat-level 1
set services security-intelligence profile cc_profile rule cc_rule match threat-level 2
set services security-intelligence profile cc_profile rule cc_rule match threat-level 4
set services security-intelligence profile cc_profile rule cc_rule match threat-level 5
set services security-intelligence profile cc_profile rule cc_rule match threat-level 6
set services security-intelligence profile cc_profile rule cc_rule match threat-level 7
set services security-intelligence profile cc_profile rule cc_rule match threat-level 8
set services security-intelligence profile cc_profile rule cc_rule match threat-level 9
set services security-intelligence profile cc_profile rule cc_rule match threat-level 10
set services security-intelligence profile cc_profile rule cc_rule then action block close
set services security-intelligence profile cc_profile rule cc_rule then log
set services security-intelligence profile ih_profile category Infected-Hosts
set services security-intelligence profile ih_profile rule ih_rule match threat-level 7
set services security-intelligence profile ih_profile rule ih_rule match threat-level 8
set services security-intelligence profile ih_profile rule ih_rule match threat-level 9
set services security-intelligence profile ih_profile rule ih_rule match threat-level 10
set services security-intelligence profile ih_profile rule ih_rule then action block close http message "Blocked!"
set services security-intelligence profile ih_profile rule ih_rule then log
set services security-intelligence policy secintel1 CC cc_profile
set services security-intelligence policy secintel1 Infected-Hosts ih_profile
set security pki ca-profile aamw-ca ca-identity deviceCA
set security pki ca-profile aamw-ca enrollment url http://ca.junipersecurity.net:8080/ejbca/publicweb/apply/scep/SRX/pkiclient.exe
set security pki ca-profile aamw-ca revocation-check disable
set security pki ca-profile aamw-ca revocation-check crl url http://va.junipersecurity.net/ca/deviceCA.crl
set security pki ca-profile aamw-secintel-ca ca-identity JUNIPER
set security pki ca-profile aamw-secintel-ca revocation-check crl url http://va.junipersecurity.net/ca/current.crl
set security pki ca-profile aamw-cloud-ca ca-identity JUNIPER_CLOUD
set security pki ca-profile aamw-cloud-ca revocation-check crl url http://va.junipersecurity.net/ca/cloudCA.crl
set security idp idp-policy idp123 rulebase-ips rule rule1 match application junos-icmp-all
set security idp idp-policy idp123 rulebase-ips rule rule1 then action no-action
set security address-book global address vtep-untrust 10.255.2.0/24
set security address-book global address vtep-trust 10.255.1.0/24
set security address-book global address vlan100 192.168.100.0/24
set security utm default-configuration anti-virus type sophos-engine
set security utm utm-policy P1 anti-virus http-profile junos-sophos-av-defaults
set security policies from-zone trust to-zone untrust policy P1 match source-address vtep-trust
set security policies from-zone trust to-zone untrust policy P1 match destination-address vtep-untrust
set security policies from-zone trust to-zone untrust policy P1 match application junos-vxlan
set security policies from-zone trust to-zone untrust policy P1 then permit tunnel-inspection TP-1
set security policies from-zone trust to-zone untrust policy accept-rest match source-address any
set security policies from-zone trust to-zone untrust policy accept-rest match destination-address any
set security policies from-zone trust to-zone untrust policy accept-rest match application any
set security policies from-zone trust to-zone untrust policy accept-rest then permit
set security policies from-zone untrust to-zone trust policy accept-return match source-address any
set security policies from-zone untrust to-zone trust policy accept-return match destination-address any
set security policies from-zone untrust to-zone trust policy accept-return match application any
set security policies from-zone untrust to-zone trust policy accept-return then permit
set security policies policy-set PSET-1 policy PSET-1-P1 match source-address vlan100
set security policies policy-set PSET-1 policy PSET-1-P1 match destination-address vlan100
set security policies policy-set PSET-1 policy PSET-1-P1 match application any
set security policies policy-set PSET-1 policy PSET-1-P1 match dynamic-application any
set security policies policy-set PSET-1 policy PSET-1-P1 match url-category any
set security policies policy-set PSET-1 policy PSET-1-P1 match from-zone trust
set security policies policy-set PSET-1 policy PSET-1-P1 match to-zone untrust
set security policies policy-set PSET-1 policy PSET-1-P1 then permit application-services idp-policy idp123
set security policies policy-set PSET-1 policy PSET-1-P1 then permit application-services ssl-proxy profile-name ssl-inspect-profile-1
set security policies policy-set PSET-1 policy PSET-1-P1 then permit application-services utm-policy P1
set security policies policy-set PSET-1 policy PSET-1-P1 then permit application-services security-intelligence-policy secintel1
set security policies policy-set PSET-1 policy PSET-1-P1 then permit application-services advanced-anti-malware-policy P3
set security zones security-zone trust host-inbound-traffic system-services all
set security zones security-zone trust host-inbound-traffic protocols all
set security zones security-zone trust interfaces ge-0/0/0.0
set security zones security-zone untrust host-inbound-traffic system-services all
set security zones security-zone untrust host-inbound-traffic protocols all
set security zones security-zone untrust interfaces ge-0/0/1.0
set security tunnel-inspection inspection-profile TP-1 vxlan VNI-1100 policy-set PSET-1
set security tunnel-inspection inspection-profile TP-1 vxlan VNI-1100 vni VLAN-100
set security tunnel-inspection vni VLAN-100 vni-id 1100
set interfaces ge-0/0/0 description "Link to DC2 Spine 1"
set interfaces ge-0/0/0 mtu 9000
set interfaces ge-0/0/0 unit 0 family inet address 172.16.1.2/30
set interfaces ge-0/0/1 mtu 9000
set interfaces ge-0/0/1 unit 0 family inet address 172.16.2.2/30
set policy-options policy-statement ECMP-POLICY then load-balance per-packet
set policy-options policy-statement dci term 1 from protocol direct
set policy-options policy-statement dci term 1 then accept
set protocols bgp group UNDERLAY export dci
set protocols bgp group UNDERLAY multipath multiple-as
set protocols bgp group UNDERLAY bfd-liveness-detection minimum-interval 350
set protocols bgp group UNDERLAY bfd-liveness-detection multiplier 3
set protocols bgp group UNDERLAY neighbor 172.16.1.1 peer-as 65511
set protocols bgp group UNDERLAY neighbor 172.16.2.1 peer-as 65523
set routing-options autonomous-system 65012
set routing-options static route 0.0.0.0/0 next-hop 10.9.159.252
set routing-options forwarding-table export ECMP-POLICY