DHCPv6 Server
Junos OS device can act as a DHCPv6 server and allocates IP addresses to IPv6 clients. DHCPv6 server also delivers configuration settings to client hosts on a subnet or to the requesting devices that need an IPv6 prefix. The DHCPv6 local server sends and receives packets using the IPv6 protocol and informs IPv6 of the routing requirements of router clients. For more information, read this topic.
DHCPv6 Local Server Overview
The DHCPv6 local server is compatible with the DHCP local server and the DHCP relay agent, and can be enabled on the same interface as either the extended DHCP local server or DHCP relay agent.
The DHCPv6 local server provides many of the same features as the DHCP local server, including:
Configuration for a specific interface or for a group of interfaces
Site-specific usernames and passwords
Numbered Ethernet interfaces
Statically configured CoS and filters
AAA directed login
Use of the IA_NA option to assign a specific address to a client
When a DHCPv6 client logs in, the DHCPv6 local server can optionally use the AAA service framework to interact with the RADIUS server. The RADIUS server, which is configured independently of DHCP, authenticates the client and supplies the IPv6 prefix and client configuration parameters.
The client username, which uniquely identifies a subscriber or a DHCP client, must be present in the configuration in order for DHCPv6 local server to use RADIUS authentication.
You can configure DHCPv6 local server to communicate the following attributes to the AAA service framework and RADIUS at login time:
Client username
Client password
Based on the attributes that the DHCPv6 local server provides, RADIUS returns the information listed in Table 1 to configure the client:
Attribute Number |
Attribute Name |
Description |
|---|---|---|
27 |
Session-Timeout |
Lease time, in seconds. If not supplied, the lease does not expire |
123 |
Delegated-IPv6-Prefix |
Prefix that is delegated to the client |
26-143 |
Max-Clients-Per-Interface |
Maximum number of clients allowed per interface |
To configure the extended DHCPv6 local server on the router
(or switch), you include the dhcpv6 statement at the [edit system services dhcp-local-server] hierarchy level.
You can also include the dhcpv6 statement
at the following hierarchy levels:
[edit logical-systems logical-system-name system services dhcp-local-server][edit logical-systems logical-system-name routing-instances routing-instance-name system services dhcp-local-server][edit routing-instances routing-instance-name system services dhcp-local-server]
DHCPv6 Server Overview
A Dynamic Host Configuration Protocol version 6 (DHCPv6) server can automatically allocate IP addresses to IPv6 clients and deliver configuration settings to client hosts on a subnet or to the requesting devices that need an IPv6 prefix. A DHCPv6 server allows network administrators to manage pool of IP addresses centrally among hosts and to automate the assignment of IP addresses in a network.
SRX Series Firewalls do not support DHCP client authentication. In a DHCPv6 deployment, security policies control access through the device for any DHCP client that has received an address and other attributes from the DHCPv6 server.
Some features include:
Configuration for a specific interface or a group of interfaces
Stateless address autoconfiguration (SLAAC)
Prefix delegation, including access-internal route installation
DHCPv6 server groups
The DHCPv6 server configuration usually consists of DHCPv6 options for clients, an IPv6 prefix, an address pool that contains IPv6 address ranges and options, and a security policy to allow DHCPv6 traffic. In a typical setup the provider Juniper Networks device is configured as an IPv6 prefix delegation server that assigns addresses to the customer edge device. The customer’s edge router then provides addresses to internal devices.
To configure DHCPv6 local server on a device, you include the
DHCPv6 statement at the [edit system services dhcp-local-server] hierarchy level. You then create an address assignment pool for
DHCPv6 that is configured in the [edit access address-assignment
pool] hierarchy level using the family inet6 statement.
You can also include the dhcpv6 statement at the [edit routing-instances routing-instance-name system services dhcp-local-server] hierarchy.
Existing DHCPv4 configurations in the [edit system
services dhcp] hierarchy are not affected when you upgrade to
Junos OS Release 10.4 from an earlier version or enable DHCPv6 server.
See Also
Example: Configuring DHCPv6 Server Options
This example shows how to configure DHCPv6 server options on SRX1500, SRX5400, SRX5600, and SRX5800 devices.
Requirements
Before you begin:
Determine the IPv6 address pool range.
Determine the IPv6 prefix. See the Understanding Address Books.
Determine the grace period, maximum lease time, or any custom options that should be applied to clients.
List the IP addresses that are available for the devices on your network; for example, DNS and SIP servers.
Overview
In this example, you set a default client limit as 100 for all DHCPv6 groups. You then create a group called my-group that contains at least one interface. In this case, the interface is ge-0/0/3.0. You set a range of interfaces using the upto command and set a custom client limit as 200 for group my-group that overrides the default limit. Finally, you configure interface ge-0/0/3.0 with IPv6 address 2001:db8:3001::1/64 and set router advertisement for interface ge-0/0/3.0. Starting with Junos OS Release 15.X49-D70 and Junos OS Release 17.3R1, you can add the option dynamic-server to dynamically support prefix and attributes that are updated by the WAN server.
A DHCPv6 group must contain at least one interface.
Configuration
Procedure
CLI Quick Configuration
To quickly configure this example, copy the
following commands, paste them into a text file, remove any line breaks,
change any details necessary to match your network configuration,
copy and paste the commands into the CLI at the [edit] hierarchy
level, and then enter commit from configuration mode.
set system services dhcp-local-server dhcpv6 overrides interface-client-limit 100
set system services dhcp-local-server dhcpv6 group my-group interface ge-0/0/3.0
set system services dhcp-local-server dhcpv6 group my-group interface ge-0/0/3.0 upto ge-0/0/6.0
set system services dhcp-local-server dhcpv6 group my-group overrides interface-client-limit 200
set interfaces ge-0/0/3 unit 0 family inet6 address 2001:db8:3000::1/64
set protocols router-advertisement interface ge-0/0/3.0 prefix 2001:db8:3000::/64
Step-by-Step Procedure
The following example requires you to navigate various levels in the configuration hierarchy. For instructions on how to do that, see Using the CLI Editor in Configuration Mode in the CLI User Guide.
To configure DHCPv6 server options:
Configure a DHCP local server.
[edit]
user@host# edit system services dhcp-local-server dhcpv6
Set a default limit for all DHCPv6 groups.
[edit system services dhcp-local-server dhcpv6]
user@host# set overrides interface-client-limit 100
Specify a group name and interface.
[edit system services dhcp-local-server dhcpv6]
user@host# set group my-group interface ge-0/0/3.0
Set a range of interfaces.
[edit system services dhcp-local-server dhcpv6]
user@host# set group my-group interface ge-0/0/3.0 upto ge-0/0/6.0
Set a custom client limit for the group.
[edit system services dhcp-local-server dhcpv6]
user@host# set group my-group overrides interface-client-limit 200
Configure an interface with an IPv6 address.
[edit interfaces]
user@host# set ge-0/0/3 unit 0 family inet6 address 2001:db8:3000::1/64
Set router advertisement for the interface.
[edit protocols]
user@host# set router-advertisement interface ge-0/0/3.0 prefix 2001:db8:3000::/64
Results
From configuration mode, confirm your configuration
by entering the show system services dhcp-local-server, show interfaces ge-0/0/3, and show protocols commands.
If the output does not display the intended configuration, repeat
the configuration instructions in this example to correct it.
[edit] user@host#show system services dhcp-local-serverdhcpv6 { overrides { interface-client-limit 100; ] group my-group { overrides { interface-client-limit 200; } interface ge-0/0/3.0 { upto ge-0/0/6.0; } } } [edit] user@host#show interfaces ge-0/0/3unit 0 { family inet6 { address 2001:db8:3000::1/64; } } [edit] user@host#show protocolsrouter-advertisement { interface ge-0/0/3.0 { prefix 2001:db8:3000::1/64; } }
If you are done configuring the device, enter commit from configuration mode.
Verification
Verifying DHCPv6 Local Server Configuration
Purpose
Verify that the client address bindings and statistics for the DHCPv6 local server have been configured
Action
From operational mode, enter the show dhcpv6 server
binding command to display the address bindings in the client
table on the DHCPv6 local server.
Prefix Session Id Expires State Interface Client DUID
2001:bd8:1111:2222::/64 6 86321 BOUND ge-1/0/0.0 LL_TIME0x1-0x2e159c0-00:10:94:00:00:01
2001:bd8:1111:2222::/64 7 86321 BOUND ge-1/0/0.0 LL_TIME0x1-0x2e159c0-00:10:94:00:00:02
2001:bd8:1111:2222::/64 8 86321 BOUND ge-1/0/0.0 LL_TIME0x1-0x2e159c0-00:10:94:00:00:03
2001:bd8:1111:2222::/64 9 86321 BOUND ge-1/0/0.0 LL_TIME0x1-0x2e159c1-00:10:94:00:00:04
2001:bd8:1111:2222::/64 10 86321 BOUND ge-1/0/0.0 LL_TIME0x1-0x2e159c1-00:10:94:00:00:05
From operational mode, enter the show dhcpv6 server statistics command to display the DHCPv6 local server statistics.
Dhcpv6 Packets dropped:
Total 0
Messages received:
DHCPV6_DECLINE 0
DHCPV6_SOLICIT 9
DHCPV6_INFORMATION_REQUEST 0
DHCPV6_RELEASE 0
DHCPV6_REQUEST 5
DHCPV6_CONFIRM 0
DHCPV6_RENEW 0
DHCPV6_REBIND 0
DHCPV6_RELAY_FORW 0
Messages sent:
DHCPV6_ADVERTISE 9
DHCPV6_REPLY 5
DHCPV6_RECONFIGURE 0
DHCPV6_RELAY_REPL 0clear dhcpv6 server bindings allcommand to clear all DHCPv6 local server bindings. You can clear all bindings or clear a specific interface, or routing instance.clear dhcpv6 server statisticscommand to clear all DHCPv6 local server statistics.
Specifying the Address Pool for IPv6 Prefix Assignment
The DHCPv6 server configuration usually consists of DHCPv6 options for clients, an IPv6 prefix, an address pool that contains IPv6 address ranges and options, and a security policy to allow DHCPv6 traffic. In a typical setup, the provider Juniper Networks device is configured as an IPv6 prefix delegation server that assigns addresses to the customer edge device. The customer’s edge router then provides addresses to internal devices.
To configure DHCPv6 local server on a device, you include the
DHCPv6 statement at the [edit system services dhcp-local-server] hierarchy level. You then create an address assignment pool for
DHCPv6 that is configured in the [edit access address-assignment
pool] hierarchy level using the family inet6 statement.
You can also include the dhcpv6 statement at the [edit routing-instances routing-instance-name system services dhcp-local-server] hierarchy.
Existing DHCPv4 configurations in the [edit system
services dhcp] hierarchy are not affected when you upgrade to
Junos OS Release 10.4 from an earlier version or enable DHCPv6 server.
To configure the address pool for DHCPv6 local server:
See Also
Specifying the Delegated Address Pool for IPv6 Prefix Assignment
You can explicitly specify a delegated address pool:
On routers—Subscriber management uses the pool to assign IPv6 prefixes for subscribers. You can specify the delegated address pool globally, for a specific group of interfaces, or for a particular interface.
On switches—DHCP management uses the pool to assign IPv6 prefixes for DHCP clients. You can specify the delegated address pool globally, for a specific group of interfaces, or for a particular interface.
You can also use by Juniper Networks VSA 26-161 to specify
the delegated address pool. The VSA-specified value always takes precedence
over the delegated-address statement.
To configure the delegated address pool for DHCPv6 local server:
See Also
Preventing Binding of Clients That Do Not Support Reconfigure Messages
The DHCPv6 client and server negotiate the use of reconfigure messages. When the client can accept reconfigure messages from the server, then the client includes the Reconfigure Accept option in both solicit and request messages sent to the server.
By default, the DHCPv6 server accepts solicit messages from clients regardless of whether they support reconfiguration. You can specify that the server require clients to accept reconfigure messages. In this case, the DHCPv6 server includes the Reconfigure Accept option in both advertise and reply messages when reconfiguration is configured for the client interface. Solicit messages from nonsupporting clients are discarded and the clients are not allowed to bind.
To configure the DHCPv6 local server to bind only clients that support client-initiated reconfiguration:
Specify strict reconfiguration.
For all DHCPv6 clients:
[edit system services dhcp-local-server dhcpv6 reconfigure] user@host# set strict
For only a particular group of DHCPv6 clients:
[edit system services dhcp-local-server dhcpv6 group group-name reconfigure] user@host# set strict
The show dhcpv6 server statistics command displays
a count of solicit messages that the server has discarded.
See Also
Configuring DHCPv6 Rapid Commit (MX Series, EX Series)
You can configure the DHCPv6 local server to support the DHCPv6 Rapid Commit option (DHCPv6 option 14). When rapid commit is enabled, the server recognizes the Rapid Commit option in Solicit messages sent from the DHCPv6 client. (DHCPv6 clients are configured separately to include the DHCPv6 Rapid Commit option in the Solicit messages.) The server and client then use a two-message exchange (Solicit and Reply) to configure clients, rather than the default four-message exchange (Solicit, Advertise, Request, and Reply). The two-message exchange provides faster client configuration, and is beneficial in environments in which networks are under a heavy load.
You can configure the DHCPv6 local server to support the Rapid Commit option globally, for a specific group, or for a specific interface. By default, rapid commit support is disabled on the DHCPv6 local server.
To configure the DHCPv6 local server to support the DHCPv6 Rapid Commit option:
See Also
Allow Host Inbound Traffic for DHCPv6 Traffic
For the DHCPv6 server to allow DHCPv6 requests, you must configure host inbound traffic system services to allow DCHPv6 traffic. In this example, the zone my-zone allows DHCPv6 traffic from the zone untrust, and the ge-0/0/3.0 interface is configured with the IPv6 address 2001:db8:3001::1.
To create a security zone policy to allow DHCPv6 on SRX1500, SRX5400, SRX5600, and SRX5800 devices:
See Also
Verifying and Managing DHCPv6 Local Server Configuration
Purpose
View or clear information about client address bindings and statistics for the DHCPv6 local server.
Action
To display the address bindings in the client table on the DHCPv6 local server:
user@host> show dhcpv6 server binding
To display DHCPv6 local server statistics:
user@host> show dhcpv6 server statistics
To clear all DHCPv6 local server statistics:
user@host> clear dhcpv6 server binding
To clear all DHCPv6 local server statistics:
user@host> clear dhcpv6 server statistics
Understanding Cascaded DHCPv6 Prefix Delegating
You can use DHCPv6 client prefix delegation to automate the delegation of IPv6 prefixes to the customer premises equipment (CPE). With prefix delegation, a delegating device delegates IPv6 prefixes to a requesting device. The requesting device then uses the prefixes to assign global IPv6 addresses to the devices on the subscriber LAN. The requesting device can also assign subnet addresses to subnets on the LAN.
With cascaded prefix delegation, the IPv6 address block is delegated to a DHCPv6 client that is running on the WAN interface of a customer edge device. The identity association (IA) for the client is used for the identity association for prefix delegation (IA_PD). The CE device requests, through DHCPv6, an IPv6 address with the IA type of nontemporary addresses (IA_NA). Both IA_PD and IA_NA are requesting in the same DHCPv6 exchange.
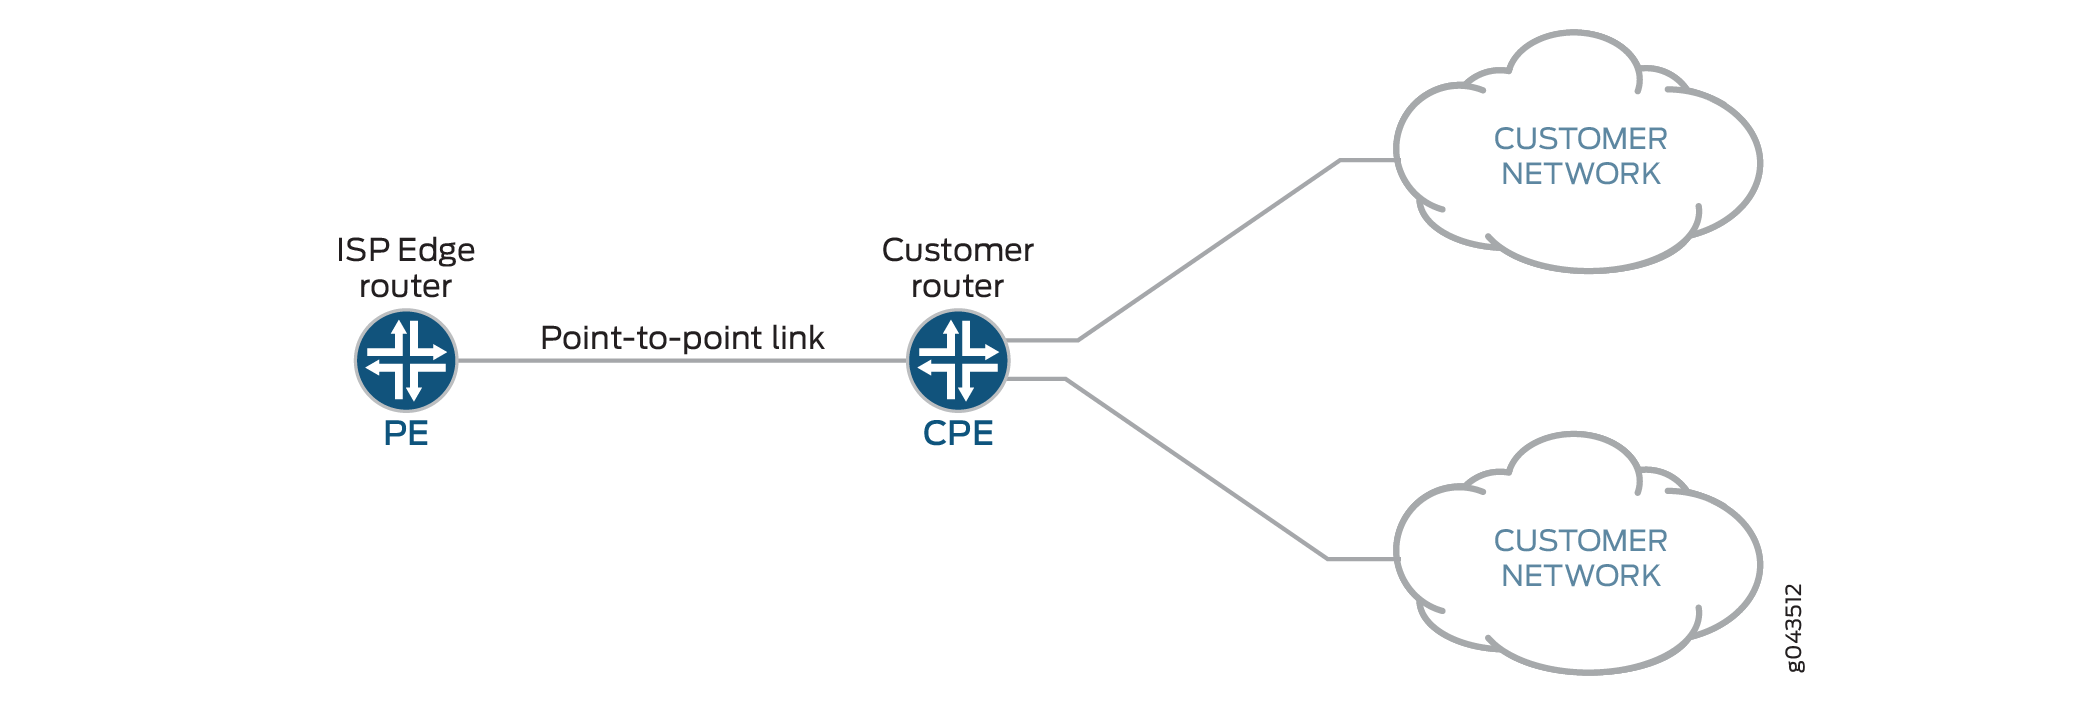
The topology in Figure 1shows an SRX Series Firewall acting as the CPE. The WAN interface links to the provider edge (PE) device and the LAN interfaces link to the customer networks. The service provider delegates a prefix (delegated-prefix) and an IPv6 address (cpe-wan-ipv6-address) to a DHCPv6 client. When a requesting device receives that IPv6 address through the DHCPv6 client, the device must install the IPv6 address on its WAN interface. The DHCPv6 client then divides the delegated prefix into sub-prefixes and subsequently assigns them to the connected LAN interfaces of the CPE device, making some subset of the remaining space available for sub-prefix delegation.
A CPE assigns sub-prefixes to its LAN interfaces and broadcasts the sub-prefixes through device advertisement. In this scenario, the CPE acts as a sub-PE and delegates sub-prefixes and assigns them to sub-CPEs.
The requirements of sub-prefix delegation are the same as for the prefix delegation defined in RFC 3769.
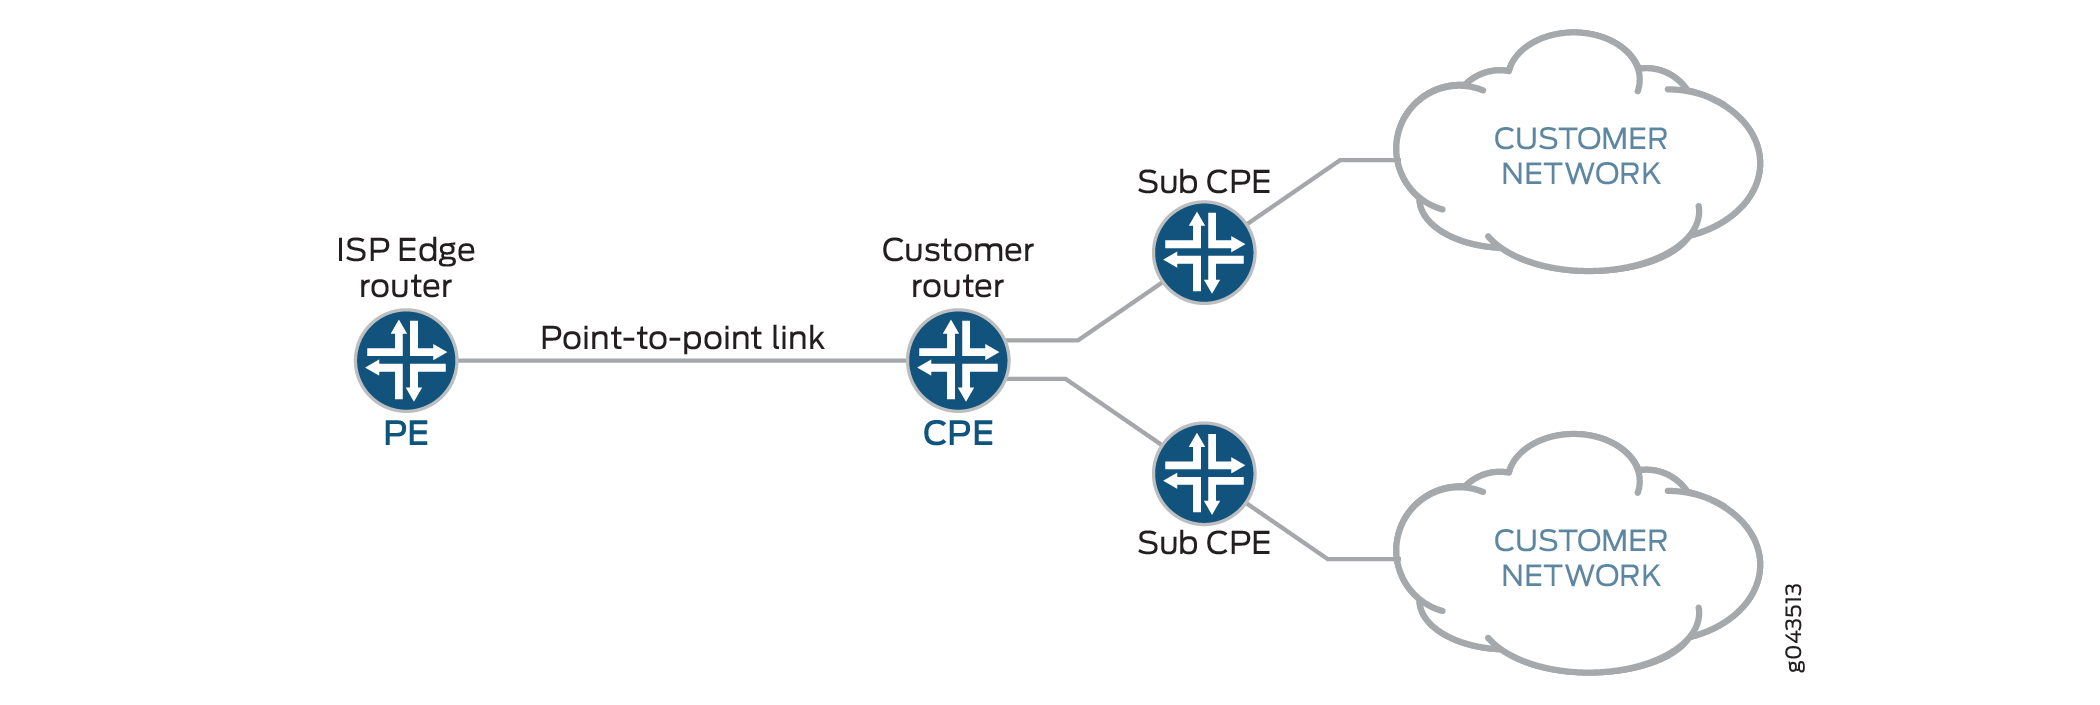
There can be multi-level sub prefix delegations, see Figure 2. The top level CPE gets a delegated prefix from the PE and delegates the sub prefixes to second level sub-CPEs, then to the third level sub-CPEs, and finally to the end levels. The end level sub-CPEs assign the IPv6 address to end hosts through SLAAC, stateless DHCPv6 or stateful DHCPv6. This is called cascaded prefix delegating.
Example - Configuring DHCPv6 Prefix Delegation (PD) over Point-to-Point Protocol over Ethernet (PPPoE)
This example shows how to configure DHCPv6 PD over PPPoE on SRX Series Firewalls.
Requirements
No special configuration beyond the device initialization is required before configuring this feature.
Overview
The example uses SRX550M devices for configuring DHCPv6 PD over PPPoE. Before you begin, configure DHCPv6 server to permit in host-inbound traffic and receive DHCPv6 packet. Provide a host-name to establish PPPoE session. To enable IPv6, chassis reboot is required.
Configuring DHCPv6 PD over PPPoE involves the following configurations:
-
Configuring DHCPv6 Server
-
DHCPv6 Client (PD)
-
DHCPv6 Client (Auto)
Topology
The following illustration describes DHCPv6 PD over PPPoE topology which provide a configuration suite using SRX Series Firewalls.
Figure 3 shows the topology used in this example.

Configuration
CLI Quick Configuration
To quickly configure this example, copy the
following commands, paste them into a text file, remove any line breaks,
change any details necessary to match your network configuration,
copy and paste the commands into the CLI at the [edit] hierarchy
level, and then enter commit from configuration mode.
Quick configuration for DHCPv6 Server:
-
DHCPv6 server configuration
set interfaces ge-0/0/1 unit 0 family inet6 set system services dhcp-local-server dhcpv6 overrides interface-client-limit 100 set system services dhcp-local-server dhcpv6 group my-group overrides interface-client-limit 200 set system services dhcp-local-server dhcpv6 group my-group overrides delegated-pool v6-pd-pool set system services dhcp-local-server dhcpv6 group my-group interface pp0.0
-
PPPoE configuration
set system host-name SRX550M set interfaces ge-0/0/1 unit 0 encapsulation ppp-over-ether set interfaces pp0 unit 0 ppp-options chap access-profile prof-ge001 set interfaces pp0 unit 0 pppoe-options underlying-interface ge-0/0/1.0 set interfaces pp0 unit 0 pppoe-options server set interfaces pp0 unit 0 family inet6 address 3000::1/64
-
Router advertisement configuration
set protocols router-advertisement interface pp0.0 max-advertisement-interval 20 set protocols router-advertisement interface pp0.0 min-advertisement-interval 10 set protocols router-advertisement interface pp0.0 managed-configuration set protocols router-advertisement interface pp0.0 other-stateful-configuration set protocols router-advertisement interface pp0.0 prefix 3000::1/64
-
Enable IPv6
set security forwarding-options family inet6 mode flow-based
-
PPPoE profile configuration
set access profile prof-ge001 client test_user chap-secret test
-
PD address pool configuration
set access address-assignment pool v6-pd-pool family inet6 prefix 2001:1:1::/48 set access address-assignment pool v6-pd-pool family inet6 range vp-pd prefix-length 48 set access address-assignment pool v6-pd-pool family inet6 dhcp-attributes dns-server 3000::1
-
Security zone configuration
set security zones security-zone trust interface pp0.0 host-inbound-traffic system-services dhcpv6
Quick configuration for DHCPv6 Client (PD):
-
DHCPv6 server configuration
set interfaces ge-0/0/1 unit 0 family inet6 set system services dhcp-local-server dhcpv6 overrides interface-client-limit 10 set system services dhcp-local-server dhcpv6 overrides process-inform pool p1 set system services dhcp-local-server dhcpv6 group ipv6 interface ge-0/0/2.0
-
PPPoE configuration
set system host-name SRX550M set interfaces ge-0/0/1 unit 0 encapsulation ppp-over-ether set interfaces pp0 unit 0 ppp-options chap default-chap-secret test set interfaces pp0 unit 0 ppp-options chap local-name test_user set interfaces pp0 unit 0 ppp-options chap passive set interfaces pp0 unit 0 pppoe-options underlying-interface ge-0/0/1.0 set interfaces pp0 unit 0 pppoe-options client
-
DHCPv6 client configuration
set interfaces pp0 unit 0 family inet6 dhcpv6-client client-type statefull set interfaces pp0 unit 0 family inet6 dhcpv6-client client-ia-type ia-pd set interfaces pp0 unit 0 family inet6 dhcpv6-client update-router-advertisement interface ge-0/0/2.0 other-stateful-configuration set interfaces pp0 unit 0 family inet6 dhcpv6-client update-router-advertisement interface ge-0/0/2.0 max-advertisement-interval 10 set interfaces pp0 unit 0 family inet6 dhcpv6-client update-router-advertisement interface ge-0/0/2.0 min-advertisement-interval 5 set interfaces pp0 unit 0 family inet6 dhcpv6-client client-identifier duid-type duid-ll set interfaces pp0 unit 0 family inet6 dhcpv6-client req-option dns-server set interfaces pp0 unit 0 family inet6 dhcpv6-client update-server set protocols router-advertisement interface pp0.0
-
Enable IPv6
set security forwarding-options family inet6 mode flow-based
-
DHCPv6 server propagate configuration
set access address-assignment pool p1 family inet6 prefix 2001::/16 set access address-assignment pool p1 family inet6 dhcp-attributes propagate-settings pp0.0
-
Security zone configuration
set security zones security-zone untrust interface pp0.0 host-inbound-traffic system-services dhcpv6 set security zones security-zone trust interface ge-0/0/2.0 host-inbound-traffic system-services dhcpv6
Quick configuration for DHCPv6 Client (Auto):
-
DHCPv6 client configuration
set interfaces ge-0/0/0 unit 0 family inet6 dhcpv6-client client-type autoconfig set interfaces ge-0/0/0 unit 0 family inet6 dhcpv6-client client-ia-type ia-na set interfaces ge-0/0/0 unit 0 family inet6 dhcpv6-client client-identifier duid-type duid-ll set interfaces ge-0/0/0 unit 0 family inet6 dhcpv6-client req-option dns-server
-
Router advertisement configuration
set protocols router-advertisement interface ge-0/0/0.0
-
Enable IPv6
set security forwarding-options family inet6 mode flow-based
-
Security zone configuration
set security zones security-zone trust interface ge-0/0/0.0 host-inbound-traffic system-services dhcpv6
Procedure
Step-by-Step Procedure
The following example requires you to navigate various levels in the configuration hierarchy. For instructions on how to do that, see Using the CLI Editor in Configuration Mode in the CLI User Guide.
-
To configure DHCPv6 server on SRX550M device:
-
Set the interface.
[edit] user@host# set interfaces ge-0/0/1 unit 0 family inet6 -
Configure a DHCP local server.
[edit ] user@host# set system services dhcp-local-server dhcpv6
-
Set a default limit for all DHCPv6 groups.
[edit system services dhcp-local-server dhcpv6] user@host# set overrides interface-client-limit 100
-
Set a custom client limit for the group.
[edit system services dhcp-local-server dhcpv6] user@host# set group my-group overrides interface-client-limit 200
-
Specify delegated pool name.
[edit system services dhcp-local-server dhcpv6] user@host# set group my-group overrides delegated-pool v6-pd-pool
-
Create a group called my-group that contains pp0 interface.
[edit system services dhcp-local-server dhcpv6] user@host# set group my-group interface pp0.0
-
-
Configuring PPPoE:
-
Set interface to encapsulate PPPoE.
[edit] user@host# set interfaces ge-0/0/1 unit 0 encapsulation ppp-over-ether
-
Set chap access profile value.
[edit system interface] user@host# set interface pp0 unit 0 ppp-options chap access-profile prof-ge001
-
Set underlying interface name.
[edit system interface] user@host# set interface pp0 unit 0 pppoe-options underlying-interface ge-0/0/1.0
-
Set PPPoE-options server.
[edit system interface] user@host# set interface pp0 unit 0 pppoe-options server
-
Set family name and address.
[edit system interface] user@host# set interface pp0 unit 0 family inet6 address 3000::1/64
-
-
Configuring Router advertisement:
-
Set max advertisement interval limit.
[edit system protocol] user@host# set protocols router-advertisement interface pp0.0 max-advertisement-interval 20
-
Set minimum advertisement interval limit.
[edit system protocol] user@host# set protocols router-advertisement interface pp0.0 min-advertisement-interval 10
-
Set the configuration state to managed configuration.
[edit system protocol] user@host# set protocols router-advertisement interface pp0.0 managed-configuration
-
Set the configuration state to other stateful configuration.
[edit system protocol] user@host# set protocols router-advertisement interface pp0.0 other-stateful-configuration
-
Set the prefix value.
[edit system protocol] user@host# set protocols router-advertisement interface pp0.0 prefix 3000::1/64
-
-
Enable IPv6:
-
Set the family name and mode to enable IPv6.
[edit] user@host# set security forwarding-options family inet6 mode flow-based
-
-
Configuring PPPoE profile:
-
Set access profile name, client name and chap secret.
[edit] user@host# set access profile prof-ge001 client test_user chap-secret test
-
-
Configuring PD address pool:
-
Set address-assignment pool name, family name and prefix.
[edit] user@host# set access address-assignment pool v6-pd-pool family inet6 prefix 2001:1:1::/48
-
Set range and prefix length.
[edit] user@host# set access address-assignment pool v6-pd-pool family inet6 range vp-pd prefix-length 48
-
Set dhcp attributes with dns server value.
[edit] user@host# set access address-assignment pool v6-pd-pool family inet6 dhcp-attributes dns-server 3000::1
-
-
Configuring Security zone:
-
Set the zone name, interface and host-inbound-traffic system-services.
[edit] user@host# set security zones security-zone trust interface pp0.0 host-inbound-traffic system-services dhcpv6
-
Procedure
Step-by-Step Procedure
-
To configure DHCPv6 client (PD) on SRX550M device:
-
Set the interface.
[edit] user@host# set interfaces ge-0/0/2 unit 0 family inet6
-
Set DHCPv6 local server to override the interface client limit.
[edit] user@host# set system services dhcp-local-server dhcpv6 overrides interface-client-limit 10
-
Set the process-inform pool name.
[edit] user@host# set system services dhcp-local-server dhcpv6 overrides process-inform pool p1
-
Set group name and interface.
[edit] user@host# set system services dhcp-local-server dhcpv6 group ipv6 interface ge-0/0/2.0
-
-
Configuring PPPoE:
-
Set the interface to encapsulate ppp over ethernet.
[edit system interface] user@host# set interface ge-0/0/1 unit 0 encapsulation ppp-over-ether
-
Set default chap secret.
[edit system interface] user@host# set interfaces pp0 unit 0 ppp-options chap default-chap-secret test
-
Set chap local name.
[edit system interface] user@host# set interfaces pp0 unit 0 ppp-options chap local-name test_user
-
Set PPP options chap state.
[edit system interface] user@host# set interfaces pp0 unit 0 ppp-options chap passive
-
Set underlying-interface.
[edit system interface] user@host# set interfaces pp0 unit 0 pppoe-options underlying-interface ge-0/0/1.0
-
Set pppoe-options.
[edit system interface] user@host# set interfaces pp0 unit 0 pppoe-options client
-
-
Configuring DHCPv6 client:
-
Set the family name and dhcpv6 client type.
[edit] user@host# set interfaces pp0 unit 0 family inet6 dhcpv6-client client-type statefull
-
Set the dhcpv6 client identity association type.
[edit] user@host# set interfaces pp0 unit 0 family inet6 dhcpv6-client client-ia-type ia-pd
-
Set update-router-advertisement interface and other stateful-configuration.
[edit] user@host# set interfaces pp0 unit 0 family inet6 dhcpv6-client update-router-advertisement interface ge-0/0/2.0 other-stateful-configuration
-
Set maximum advertisement interval value.
[edit] user@host# set interfaces pp0 unit 0 family inet6 dhcpv6-client update-router-advertisement interface ge-0/0/2.0 max-advertisement-interval 10
-
Set minimum advertisement interval value.
[edit] user@host# set interfaces pp0 unit 0 family inet6 dhcpv6-client update-router-advertisement interface ge-0/0/2.0 min-advertisement-interval 5
-
Set client-identifier duid type.
[edit] user@host# set interfaces pp0 unit 0 family inet6 dhcpv6-client client-identifier duid-type duid-11
-
Set requested option for DHCPv6 client.
[edit] user@host# set interfaces pp0 unit 0 family inet6 dhcpv6-client req-option dns-server
-
Update the server.
[edit] user@host# set interfaces pp0 unit 0 family inet6 dhcpv6-client update-server
-
Set the protocols and the interface.
[edit] user@host# set protocols router-advertisement interface pp0.0
-
-
Enable IPv6
-
Set the family name and mode to enable IPv6.
[edit] user@host# set security forwarding-options family inet6 mode flow-based
-
-
Configuring DHCPv6 server to propagate DNS server information to end device:
-
Set address assignment pool name, family name and prefix.
[edit] user@host# set access address-assignment pool p1 family inet6 prefix 2001::/16
-
Set the interface name for propagating TCP/IP settings to pool.
[edit] user@host# set access address-assignment pool p1 family inet6 dhcp-attributes propagate-settings pp0.0
-
-
Configuring security zone:
-
Set the zone name, untrust interface and system services.
[edit] user@host# set security zones security-zone trust interface pp0.0 host-inbound-traffic system-services dhcpv6
-
Set the trust interface.
[edit] user@host# set security zones security-zone trust interface ge-0/0/2.0 host-inbound-traffic system-services dhcpv6
-
Procedure
Step-by-Step Procedure
-
To configure DHCPv6 client (Auto) on SRX550M device:
-
Set the interface, unit value, family name and DHCPv6 client type.
[edit system interface] user@host# set interfaces fe-0/0/0 unit 0 family inet6 dhcpv6-client client-type autoconfig
-
Set Dhcpv6 client identity association type.
[edit system interface] user@host# set interfaces fe-0/0/0 unit 0 family inet6 dhcpv6-client client-ia-type ia-na
-
Set client-identifier type.
[edit system interface] user@host# set interfaces fe-0/0/0 unit 0 family inet6 dhcpv6-client client-identifier duid-type duid-11
-
Set DHCPV6 client requested option.
[edit system interface] user@host# set interfaces fe-0/0/0 unit 0 family inet6 dhcpv6-client req-option dns-server
-
-
Configuring router advertisement:
-
Set the protocol and interface.
[edit] user@host# set protocols router-advertisement interface fe-0/0/0.0
-
-
Enable IPv6.
-
Set family name and mode.
[edit] user@host# set security forwarding-options family inet6 mode flow-based
-
-
Configuring security zone:
-
Set the zone name, trust interface and system services.
[edit] user@host# set security zones security-zone trust interface pp0.0 host-inbound-traffic system-services dhcpv6
Results
-
Result for DHCPv6 Server:
From configuration mode, confirm your configuration by entering
the show system services dhcp-local-server, show interfaces, show protocols, show security forwarding-options, show access profile prof-ge001, show access address-assignment
pool, and show security zones commands. If the output
does not display the intended configuration, repeat the configuration
instructions in this example to correct it.
[edit]
user@host# show system services dhcp-local-server
dhcpv6 {
overrides {
interface-client-limit 100;
}
group my-group {
overrides {
interface-client-limit 200;
delegated-pool v6-pd-pool;
}
interface pp0.0set;
interface pp0.0;
}
}
...
[edit]
user@host# show interfaces
ge-0/0/1 {
unit 0 {
encapsulation ppp-over-ether;
}
}
pt-1/0/0 {
vdsl-options {
vdsl-profile auto;
}
}
pp0 {
unit 0 {
ppp-options {
chap {
default-chap-secret "$ABC123"; ## SECRET-DATA
}
}
}
}
ge-0/0/1 {
unit 0 {
encapsulation ppp-over-ether;
}
}
pt-1/0/0 {
vdsl-options {
vdsl-profile auto;
}
}
pp0 {
unit 0 {
ppp-options {
chap {
default-chap-secret "$ABC123"; ## SECRET-DATA
}
}
}
}
...
[edit]
user@host# show protocols
interface pp0.0 {
max-advertisement-interval 20;
min-advertisement-interval 10;
managed-configuration;
other-stateful-configuration;
prefix 3000::1/64;
}
...
[edit]
user@host# show security forwarding-options
family {
inet6 {
mode flow-based;
}
}
...
[edit]
user@host# show access address-assignment
pool v6-pd-pool {
family inet6 {
prefix 2001:1:1::/48;
range vp-pd prefix-length 48;
dhcp-attributes {
dns-server {
3000::1;
}
}
}
}
...
[edit]
user@host# show security zones
security-zone Host {
host-inbound-traffic {
system-services {
all;
}
}
interfaces {
ge-0/0/0.0;
}
}
security-zone trust {
interfaces {
pp0.0 {
host-inbound-traffic {
system-services {
dhcpv6;
}
}
}
}
}
-
Result for DHCPv6 Client (PD):
[edit]
user@host# show system services dhcp-local-server
dhcpv6 {
overrides {
interface-client-limit 10;
process-inform {
pool p1;
}
}
group my-group {
overrides {
interface-client-limit 200;
delegated-pool v6-pd-pool;
}
interface pp0.0;
}
group ipv6 {
interface ge-0/0/2.0;
}
}
...
[edit]
user@host# show interfaces
ge-0/0/1 {
unit 0 {
encapsulation ppp-over-ether;
}
}
pt-1/0/0 {
vdsl-options {
vdsl-profile auto;
}
}
pp0 {
unit 0 {
ppp-options {
chap {
default-chap-secret "$ABC123"; ## SECRET-DATA
local-name test_user;
passive;
}
}
pppoe-options {
underlying-interface ge-0/0/1.0;
client;
}
}
}
...
[edit]
user@host# show interfaces pp0
unit 0 {
ppp-options {
chap {
default-chap-secret "$ABC123"; ## SECRET-DATA
local-name test_user;
passive;
}
}
pppoe-options {
underlying-interface ge-0/0/1.0;
client;
}
family inet6 {
dhcpv6-client {
client-type statefull;
client-ia-type ia-pd;
update-router-advertisement {
interface ge-0/0/2.0 {
other-stateful-configuration;
max-advertisement-interval 10;
min-advertisement-interval 5;
}
}
client-identifier duid-type duid-ll;
req-option dns-server;
}
}
}
...
[edit]
user@host# show security forwarding-options
family {
inet6 {
mode flow-based;
}
}
...
[edit]
user@host# show access address-assignment
pool v6-pd-pool {
family inet6 {
prefix 2001:1:1::/48;
range vp-pd prefix-length 48;
dhcp-attributes {
dns-server {
3000::1;
}
}
}
}
pool p1 {
family inet6 {
prefix 2001::/16;
dhcp-attributes {
propagate-settings pp0.0;
}
}
}
...
[edit]
user@host# show access address-assignment
security-zone Host {
host-inbound-traffic {
system-services {
all;
}
}
interfaces {
ge-0/0/0.0;
}
}
security-zone trust {
interfaces {
pp0.0 {
host-inbound-traffic {
system-services {
dhcpv6;
}
}
}
ge-0/0/2.0 {
host-inbound-traffic {
system-services {
dhcpv6;
}
}
}
}
}
security-zone untrust {
interfaces {
pp0.0 {
host-inbound-traffic {
system-services {
dhcpv6;
}
}
}
}
}
-
Result for DHCPv6 Client (Auto):
[edit]
user@host# show interfaces ge-0/0/0
unit 0 {
family inet6 {
dhcpv6-client {
client-type autoconfig;
client-ia-type ia-na;
req-option dns-server;
}
}
}
...
[edit]
user@host# show protocols
router-advertisement {
interface pp0.0 {
max-advertisement-interval 20;
min-advertisement-interval 10;
managed-configuration;
other-stateful-configuration;
prefix 3000::1/64;
}
interface fe-0/0/0.0;
}
...
[edit]
user@host# show security forwarding-options
family {
inet6 {
mode flow-based;
}
}
...
[edit]
user@host# show security zones
security-zone Host {
host-inbound-traffic {
system-services {
all;
}
}
interfaces {
ge-0/0/0.0;
}
}
security-zone trust {
interfaces {
pp0.0 {
host-inbound-traffic {
system-services {
dhcpv6;
}
}
}
ge-0/0/2.0 {
host-inbound-traffic {
system-services {
dhcpv6;
}
}
}
fe-0/0/0.0 {
host-inbound-traffic {
system-services {
dhcpv6;
}
}
}
}
}
security-zone untrust {
interfaces {
pp0.0 {
host-inbound-traffic {
system-services {
dhcpv6;
}
}
}
}
}
Verification
- Verifying DHCPv6 Server Configuration
- Verifying DHCPv6 Client (PD) Configuration
- Verifying DHCPv6 client (Auto) Configuration
Verifying DHCPv6 Server Configuration
Purpose
Verify that the DHCPv6 Server has been configured.
Action
-
From operational mode, enter the
show dhcpv6 server bindingcommand.The following output shows the options for the
show dhcpv6 server bindingcommand.[edit] user@host>
show dhcpv6 server binding detailSession Id: 75 Client IPv6 Prefix: 2001:1:1::/48 Client DUID: LL0x1-3c:94:d5:98:90:01 State: BOUND(DHCPV6_LOCAL_SERVER_STATE_BOUND) Lease Expires: 2016-03-26 10:12:37 JST Lease Expires in: 86213 seconds Lease Start: 2016-03-25 10:12:37 JST Last Packet Received: 2016-03-25 10:12:50 JST Incoming Client Interface: pp0.0 Server Ip Address: 0.0.0.0 Client Prefix Pool Name: v6-pd-pool Client Id Length: 10 Client Id: /0x00030001/0x3c94d598/0x9001 -
From operational mode, enter the
show route table inet6.0command.The following output shows the options for the
show route table inet6.0command.[edit] user@host>
show route table inet6.0inet6.0: 4 destinations, 4 routes (4 active, 0 holddown, 0 hidden) + = Active Route, - = Last Active, * = Both 2001:1:1::/48 *[Access/13] 00:03:45 <<<<<< Route for end device will be automatically generated > to fe80::3e94:d50f:fc98:8600 via pp0.0 3000::/64 *[Direct/0] 00:04:04 > via pp0.0 3000::1/128 *[Local/0] 19:53:18 Local via pp0.0 fe80::b2c6:9a0f:fc7d:6900/128 *[Local/0] 19:53:18 Local via pp0.0 -
From operational mode, enter the
show interfaces pp0.0 tersecommand.The following output shows the options for the
show interfaces pp0.0 tersecommand.[edit] user@host>
show interfaces pp0.0 terseInterface Admin Link Proto Local Remote pp0.0 up up inet6 3000::1/64 fe80::b2c6:9a0f:fc7d:6900/64
Verifying DHCPv6 Client (PD) Configuration
Purpose
Verify that the DHCPv6 Client (PD) has been configured.
Action
-
From operational mode, enter the
show dhcpv6 client binding detailcommand.The following output shows the options for the
show dhcpv6 client binding detailcommand.[edit] user@host>
show dhcpv6 client binding detailClient Interface: pp0.0 Hardware Address: 3c:94:d5:98:86:01 State: BOUND(DHCPV6_CLIENT_STATE_BOUND) <<<<< SRX is bound to prefix via pp0.0 ClientType: STATEFUL Lease Expires: 2016-03-26 10:12:50 JST Lease Expires in: 86232 seconds Lease Start: 2016-03-25 10:12:50 JST Bind Type: IA_PD Client DUID: LL0x29-3c:94:d5:98:86:01 Rapid Commit: Off Server Ip Address: fe80::b2c6:9a0f:fc7d:6900 Update Server Yes Client IP Prefix: 2001:1:1::/48 DHCP options: Name: server-identifier, Value: VENDOR0x00000583-0x41453530 Name: dns-recursive-server, Value: 3000::1 -
From operational mode, enter the
show dhcpv6 server binding detailcommand.The following output shows the options for the
show dhcpv6 server binding detailcommand.[edit] user@host>
show dhcpv6 server binding detailSession Id: 75 Client IPv6 Prefix: 2001:1:1::/48 Client DUID: LL0x1-3c:94:d5:98:90:01 State: BOUND(DHCPV6_LOCAL_SERVER_STATE_BOUND) Lease Expires: 2016-03-26 10:12:37 JST Lease Expires in: 86213 seconds Lease Start: 2016-03-25 10:12:37 JST Last Packet Received: 2016-03-25 10:12:50 JST Incoming Client Interface: pp0.0 Server Ip Address: 0.0.0.0 Client Prefix Pool Name: v6-pd-pool Client Id Length: 10 Client Id: /0x00030001/0x3c94d598/0x9001 -
From operational mode, enter the
show route table inet6.0command.The following output shows the options for the
show route table inet6.0command.[edit] user@host>
show route table inet6.0inet6.0: 7 destinations, 7 routes (7 active, 0 holddown, 0 hidden) + = Active Route, - = Last Active, * = Both ::/0 *[Access-internal/12] 00:03:35 > to fe80::b2c6:9a0f:fc7d:6900 via pp0.0 2001:1:1:1::/64 *[Direct/0] 00:03:48 > via ge-0/0/2.0 2001:1:1:1::1/128 *[Local/0] 00:03:48 <<<<<< IPv6 address allocated by Prefix delegation Local via ge-0/0/2.0 3000::/64 *[Access-internal/12] 00:03:35 > to fe80::b2c6:9a0f:fc7d:6900 via pp0.0 fe80::/64 *[Direct/0] 00:03:48 > via ge-0/0/2.0 fe80::3e94:d50f:fc98:8600/128 *[Local/0] 19:05:19 Local via pp0.0 fe80::3e94:d5ff:fe98:8602/128 *[Local/0] 00:03:48 Local via ge-0/0/2.0 -
From operational mode, enter the
show interfaces pp0.0 tersecommand.The following output shows the options for the
show interfaces pp0.0 tersecommand.[edit] user@host>
show interfaces pp0.0 terseInterface Admin Link Proto Local Remote pp0.0 up up inet6 fe80::3e94:d50f:fc98:8600/64 -
From operational mode, enter the
show interfaces ge-0/0/2.0 tersecommand.The following output shows the options for the
show interfaces ge-0/0/2.0 tersecommand.[edit] user@host>
show interfaces ge-0/0/2.0 terseInterface Admin Link Proto Local Remote ge-0/0/2.0 up up inet6 2000:1:1:1::1/64 fe80::3e94:d5ff:fe98:8602/64 -
From operational mode, enter the
show ipv6 router-advertisementcommand.The following output shows the options for the
show ipv6 router-advertisementcommand.[edit] user@host>
show ipv6 router-advertisementInterface: pp0.0 Advertisements sent: 3, last sent 00:01:56 ago Solicits received: 0 Advertisements received: 10 Advertisement from fe80::b2c6:9a0f:fc7d:6900, heard 00:00:08 ago Managed: 1 [0] Other configuration: 1 [0] Reachable time: 0 ms Default lifetime: 60 sec [1800 sec] Retransmit timer: 0 ms Current hop limit: 64 Prefix: 3000::/64 Valid lifetime: 2592000 sec Preferred lifetime: 604800 sec On link: 1 Autonomous: 1 Interface: ge-0/0/2.0 Advertisements sent: 24, last sent 00:00:03 ago Solicits received: 0 Advertisements received: 0
Verifying DHCPv6 client (Auto) Configuration
Purpose
Verify that the DHCPv6 client (Auto) has been configured.
Action
-
From operational mode, enter the
show dhcpv6 client binding detailcommand.The following output shows the options for the
show dhcpv6 client binding detailcommand.[edit] user@host>
show dhcpv6 client binding detailClient Interface: fe-0/0/0.0 Hardware Address: 00:26:88:38:b5:00 State: BOUND(DHCPV6_CLIENT_STATE_BOUND) ClientType: AUTO Lease Expires: 2016-03-26 10:15:35 JST Lease Expires in: 86395 seconds Lease Start: 2016-03-25 10:15:35 JST Bind Type: IA_NA Client DUID: LL0x3-00:26:88:38:b5:00 Rapid Commit: Off Server Ip Address: fe80::3e94:d5ff:fe98:8602 Client IP Address: 2001:1:1:1:226:88ff:fe38:b500/128 Client IP Prefix: 2001:1:1:1::/64 DHCP options: Name: server-identifier, Value: VENDOR0x00000583-0x414c3131 -
From operational mode, enter the
show route table inet6.0command.The following output shows the options for the
show route table inet6.0command.[edit] user@host>
show route table inet6.0inet6.0: 5 destinations, 6 routes (5 active, 0 holddown, 0 hidden) + = Active Route, - = Last Active, * = Both ::/0 *[Access-internal/12] 00:02:36 > to fe80::3e94:d5ff:fe98:8602 via fe-0/0/0.0 2001:1:1:1::/64 *[Access-internal/12] 00:02:36 > to fe80::3e94:d5ff:fe98:8602 via fe-0/0/0.0 2001:1:1:1:226:88ff:fe38:b500/128 *[Direct/0] 00:02:36 > via fe-0/0/0.0 [Local/0] 00:02:36 Local via fe-0/0/0.0 fe80::/64 *[Direct/0] 1w3d 15:51:19 > via fe-0/0/0.0 fe80::226:88ff:fe38:b500/128 *[Local/0] 1w3d 15:51:19 Local via fe-0/0/0.0 -
From operational mode, enter the
show ipv6 router-advertisementcommand.The following output shows the options for the
show ipv6 router-advertisementcommand.[edit] user@host>
show ipv6 router-advertisementInterface: fe-0/0/0.0 Advertisements sent: 1, last sent 00:02:45 ago Solicits received: 0 Advertisements received: 8 Advertisement from fe80::3e94:d5ff:fe98:8602, heard 00:00:02 ago Managed: 0 Other configuration: 1 [0] Reachable time: 0 ms Default lifetime: 30 sec [1800 sec] Retransmit timer: 0 ms Current hop limit: 64 Prefix: 2001:1:1:1::/64 Valid lifetime: 86400 sec Preferred lifetime: 86400 sec On link: 1 Autonomous: 1
SLAAC (Stateless Address Auto-Configuration)
SLAAC is an IPv6 protocol that provides some similar functionality to DHCP in IPv4. Using SLAAC, network hosts can autoconfigure a globally unique IPv6 address based on the prefix provided by a nearby router in a router advertisement.
SLAAC enables an IPv6 client to generate its own addresses using a combination of locally-available information and information advertised by routers through Neighbor Discovery Protocol (NDP).
SLAAC Process
Generating a Link-Local Address
The client begins auto-configuration by generating a link-local address for the IPv6-enabled interface. This is done by combining the advertised link-local prefix (first 64 bits) with the interface identifier (last 64 bits). The address is generated according to the following format: [fe80 (10 bits) + 0 (54 bits)] + interface ID (64 bits). The auto generated link-local address cannot be deleted. However, a new link-local address can also be manually entered, which overwrites the auto generated link-local address.
Generating a Global Address
The client sends a Router Solicitation message to prompt all routers on the link to send Router Advertisement (RA) messages. Routers that are enabled to support SLAAC send an RA that contains a subnet prefix for use by neighboring hosts. The client appends the interface identifier to the subnet prefix to form a global address, and again runs DAD to confirm its uniqueness.
Checking Duplicate Address
Before assigning the link-local address to its interface, the client verifies the address by running Duplicate Address Detection (DAD). DAD sends a Neighbor Solicitation message destined to the new address. If there is a reply, then the address is a duplicate and the process stops. If the address is unique, it is assigned to the interface
Configuring SLAAC
To enable SLAAC, use the following commands:
- Assign an IPv6 address to physical and loopback
interfaces.
user@host# set interfaces ge-0/0/0 unit 0 family inet6 address 2001:db8:0:1::/64 eui-64
user@host# set interfaces lo0 unit 1 family inet6 address 2001:db8::1/128
- Configure the device to send router advertisements (RA)
for the /64 prefix via
ge-0/0/0.
user@host# set protocols router-advertisement interface ge-0/0/0 prefix 2001:db8:0:1::/64
The host uses the 64-bit prefix from the router and assigns the rest randomly or using EUI-64 to complete the 128-bit address.
Change History Table
Feature support is determined by the platform and release you are using. Use Feature Explorer to determine if a feature is supported on your platform.