ON THIS PAGE
Example: Configuring Strict-Priority Scheduling on a PTX Series Router
This example shows how to configure strict-priority scheduling for a physical interface on a PTX Series router.
Requirements
This example uses the following hardware and software components:
-
One PTX Series Packet Transport Router
-
One or more routers that provide input packets and receive output packets
-
Any supported Junos release
Overview
This example illustrates how you configure strict-priority scheduling for a physical interface on a PTX Series router to perform processing of queues in strict-priority order. Queues in the guaranteed region with the same priority are processed in round-robin fashion. Queues in the excess region are processed based on the WRR algorithm.
When you configure strict-priority scheduling, use the following guidelines:
-
The configured
transmit-ratedoes not affect the queue drain rate because packets are processed in order of queue priority. -
You can configure only one queue with
strict-highpriority at the[edit class-of-service schedulers scheduler-name priority]hierarchy level. -
You cannot configure both
transmit-rate exactandstrict-highpriority at the[edit class-of-service schedulers scheduler-name]hierarchy level. -
You cannot configure
scheduler-maporshaping-rateon an interface where you configure an output traffic control profile. -
You cannot configure
transmit-rateon a queue withlowpriority or the commit will fail.
If a strict-high priority queue is constantly loaded to 100 percent of traffic capacity, other queues are starved. Queue starvation can cause the interface hardware to generate critical interrupts.
Topology
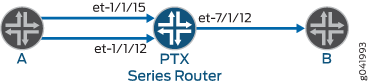
In Figure 1, the PTX Series router has inputs from Router A, et-1/1/15 and et-1/1/12, and an output to Router B, et-7/1/12. This example configures classification on the two ingress Interfaces and configures strict-priority scheduling on the egress interface.
Configuration
Configuring Strict-Priority Scheduling
CLI Quick Configuration
To quickly configure this example, copy the
following commands, paste them into a text file, remove any line breaks,
change any details necessary to match your network configuration,
and then copy and paste the commands into the CLI at the [edit] hierarchy level.
set class-of-service classifiers dscp cls forwarding-class be loss-priority high code-points 000000
set class-of-service classifiers dscp cls forwarding-class ef loss-priority medium-high code-points 000001
set class-of-service classifiers dscp cls forwarding-class af loss-priority medium-low code-points 000010
set class-of-service classifiers dscp cls forwarding-class nc loss-priority low code-points 000011
set class-of-service classifiers dscp cls forwarding-class af11 loss-priority low code-points 000100
set class-of-service classifiers dscp cls forwarding-class af12 loss-priority low code-points 000101
set class-of-service classifiers dscp cls forwarding-class af13 loss-priority low code-points 000110
set class-of-service classifiers dscp cls forwarding-class nc2 loss-priority low code-points 000111
set class-of-service forwarding-classes queue 0 be
set class-of-service forwarding-classes queue 1 ef
set class-of-service forwarding-classes queue 2 af
set class-of-service forwarding-classes queue 3 nc
set class-of-service forwarding-classes queue 4 af11
set class-of-service forwarding-classes queue 5 af12
set class-of-service forwarding-classes queue 6 af13
set class-of-service forwarding-classes queue 7 nc2
set class-of-service traffic-control-profiles tcp1 scheduler-map sch0
set class-of-service traffic-control-profiles tcp1 strict-priority-scheduler
set class-of-service interfaces et-1/1/12 unit 0 classifiers dscp cls
set class-of-service interfaces et-1/1/15 unit 0 classifiers dscp cls
set class-of-service interfaces et-7/1/12 output-traffic-control-profile tcp1
set class-of-service scheduler-maps sch0 forwarding-class be scheduler be_sch
set class-of-service scheduler-maps sch0 forwarding-class ef scheduler ef_sch
set class-of-service scheduler-maps sch0 forwarding-class af scheduler af_sch
set class-of-service scheduler-maps sch0 forwarding-class nc scheduler nc_sch
set class-of-service scheduler-maps sch0 forwarding-class af11 scheduler af11_sch
set class-of-service scheduler-maps sch0 forwarding-class af12 scheduler af12_sch
set class-of-service scheduler-maps sch0 forwarding-class af13 scheduler af13_sch
set class-of-service scheduler-maps sch0 forwarding-class nc2 scheduler nc2_sch
set class-of-service schedulers be_sch transmit-rate percent 60
set class-of-service schedulers be_sch priority high
set class-of-service schedulers ef_sch transmit-rate percent 5
set class-of-service schedulers ef_sch priority medium-high
set class-of-service schedulers af_sch transmit-rate percent 5
set class-of-service schedulers af_sch priority high
set class-of-service schedulers nc_sch transmit-rate percent 5
set class-of-service schedulers nc_sch priority strict-high
set class-of-service schedulers af11_sch transmit-rate percent 5
set class-of-service schedulers af11_sch priority high
set class-of-service schedulers af12_sch transmit-rate percent 5
set class-of-service schedulers af12_sch priority medium-high
set class-of-service schedulers af13_sch transmit-rate percent 5
set class-of-service schedulers af13_sch priority medium-low
set class-of-service schedulers nc2_sch priority low
Step-by-Step Procedure
In this example, eight schedulers are configured based on eight DSCP classifier configurations. Each associated scheduler is assigned a priority and transmit rate, although the transmit rate is ignored by the strict-priority scheduler. The scheduler map sch0 is configured with the mapping of forwarding classes to schedulers. Within the traffic control profile tcp1, the scheduler map and the strict-priority scheduler feature are configured. Two input interfaces on the PTX Series router, et-1/1/12 and et-1/1/15, are configured with the DSCP classifiers. The output traffic control profile on et-7/1/12 is configured with the traffic control profile tcp1.
The following example requires you to navigate various levels in the configuration hierarchy. For instructions on how to do that, see Using the CLI Editor in Configuration Mode in the CLI User Guide.
To configure strict-priority scheduling:
-
Configure the DSCP forwarding classes.
[edit class-of-service dscp cls]
user@host# set forwarding-class be loss-priority high code-points 000000
user@host# set forwarding-class ef loss-priority medium-high code-points 000001
user@host# set forwarding-class af loss-priority medium-low code-points 000010
user@host# set forwarding-class nc loss-priority low code-points 000011
user@host# set forwarding-class af11 loss-priority low code-points 000100
user@host# set forwarding-class af12 loss-priority low code-points 000101
user@host# set forwarding-class af13 loss-priority low code-points 000110
user@host# set forwarding-class nc2 loss-priority low code-points 000111
-
Configure the mapping of queues to forwarding classes.
[edit class-of-service forwarding-classes]
user@host# set queue 0 be
user@host# set queue 1 ef
user@host# set queue 2 af
user@host# set queue 3 nc
user@host# set queue 4 af11
user@host# set queue 5 af12
user@host# set queue 6 af13
user@host# set queue 7 nc2
-
Configure the transmit rate and priority for each scheduler.
Although you can configure a transmit rate, the value that you configure is overridden by the strict-priority scheduler.
[edit class-of-service]
user@host# set schedulers be_sch transmit-rate percent 60
user@host# set schedulers be_sch priority high
user@host# set schedulers ef_sch transmit-rate percent 5
user@host# set schedulers ef_sch priority medium-high
user@host# set schedulers af_sch transmit-rate percent 5
user@host# set schedulers af_sch priority high
user@host# set schedulers nc_sch transmit-rate percent 5
user@host# set schedulers nc_sch priority strict-high
user@host# set schedulers af11_sch transmit-rate percent 5
user@host# set schedulers af11_sch priority high
user@host# set schedulers af12_sch transmit-rate percent 5
user@host# set schedulers af12_sch priority medium-high
user@host# set schedulers af13_sch transmit-rate percent 5
user@host# set schedulers af13_sch priority medium-low
user@host# set schedulers nc2_sch priority low
-
Configure the scheduler map with the mapping of forwarding classes to schedulers.
[edit class-of-service scheduler-maps sch0]
user@host# set forwarding-class be scheduler be_sch
user@host# set forwarding-class ef scheduler ef_sch
user@host# set forwarding-class af scheduler af_sch
user@host# set forwarding-class nc scheduler nc_sch
user@host# set forwarding-class af11 scheduler af11_sch
user@host# set forwarding-class af12 scheduler af12_sch
user@host# set forwarding-class af13 scheduler af13_sch
user@host# set forwarding-class nc2 scheduler nc2_sch
-
Configure the traffic control profile to do strict-priority scheduling and define the scheduler map to use.
[edit class-of-service traffic-control-profiles tcp1]
user@host# set scheduler-map sch0
user@host# set strict-priority-scheduler
-
Apply the classifiers to the input interfaces, and the traffic control profile to the output interface.
[edit class-of-service interfaces]
user@host# set et-1/1/12 unit 0 classifiers dscp cls
user@host# set et-1/1/15 unit 0 classifiers dscp cls
user@host# set et-7/1/12 output-traffic-control-profile tcp1
Results
From configuration mode, confirm your configuration
by entering the show class-of-service command. If the output
does not display the intended configuration, repeat the configuration
instructions in this example to correct it.
[edit]
user@host# show class-of-service
forwarding-classes {
    queue 0 be;
    queue 1 ef;
    queue 2 af;
    queue 3 nc;
    queue 4 af11;
    queue 5 af12;
    queue 6 af13;
    queue 7 nc2;
}
interfaces {
    et-1/1/12 {
        unit 0 {
            classifiers {
                dscp cls;
            }
        }
    }
    et-1/1/15 {
        unit 0 {
            classifiers {
                dscp cls;
            }
        }
    }
    et-7/1/12 {
        output-traffic-control-profile tcp1;
    }
}
scheduler-maps {
    sch0 {
        forwarding-class be scheduler be_sch;
        forwarding-class ef scheduler ef_sch;
        forwarding-class af scheduler af_sch;
        forwarding-class nc scheduler nc_sch;
        forwarding-class af11 scheduler af11_sch;
        forwarding-class af12 scheduler af12_sch;
        forwarding-class af13 scheduler af13_sch;
        forwarding-class nc2 scheduler nc2_sch;
    }
}
schedulers {
    be_sch {
        transmit-rate percent 60;
        priority high;
    }
    ef_sch {
        transmit-rate percent 5;
        priority medium-high;
    }
    af_sch {
        transmit-rate percent 5;
        priority high;
    }
    nc_sch {
        transmit-rate percent 5;
        priority strict-high;
    }
    af11_sch {
        transmit-rate percent 5;
        priority high;
    }
    af12_sch {
        transmit-rate percent 5;
        priority medium-high;
    }
    af13_sch {
        transmit-rate percent 5;
        priority medium-low;
    }
    nc2_sch {
        priority low;
    }
}
traffic-control-profiles {
    tcp1 {
        scheduler-map sch0;
        strict-priority-scheduler;
    }
}
Verification
Verifying Strict-Priority Scheduling
Purpose
Verify that the strict-priority scheduling configuration is producing the results you expect.
Action
From operational mode, enter the show interfaces
queue interface-name interface-name
command
and select the output physical interface to verify.
user@host> show interfaces queue interface-name et-7/1/12

Physical interface: et-7/1/12, Enabled, Physical link is Up
  Interface index: 231, SNMP ifIndex: 612
Forwarding classes: 16 supported, 8 in use
Egress queues: 8 supported, 8 in use
Queue: 0, Forwarding classes: be
  Queued:
    Packets              :                394488                131507 pps
    Bytes                :             591732000            1578084848 bps
  Transmitted:
    Packets              :                394488                131507 pps
    Bytes                :             591732000            1578084848 bps
    Tail-dropped packets :                     0                     0 pps
    RL-dropped packets   :                     0                     0 pps
    RL-dropped bytes     :                     0                     0 bps
    RED-dropped packets  :                     0                     0 pps
    RED-dropped bytes    :                     0                     0 bps
Queue: 1, Forwarding classes: ef
  Queued:
    Packets              :                234498                 82115 pps
    Bytes                :             352963584             988886784 bps
  Transmitted:
    Packets              :                 82425                 27551 pps
    Bytes                :             123637500             330618176 bps
    Tail-dropped packets :                     0                     0 pps
    RL-dropped packets   :                     0                     0 pps
    RL-dropped bytes     :                     0                     0 bps
    RED-dropped packets  :                152073                 54564 pps
    RED-dropped bytes    :             229326084             658268608 bps
Queue: 2, Forwarding classes: af
  Queued:
    Packets              :                345175                115068 pps
    Bytes                :             517762500            1380824240 bps
  Transmitted:
    Packets              :                345175                115068 pps
    Bytes                :             517762500            1380824240 bps
    Tail-dropped packets :                     0                     0 pps
    RL-dropped packets   :                     0                     0 pps
    RL-dropped bytes     :                     0                     0 bps
    RED-dropped packets  :                     0                     0 pps
    RED-dropped bytes    :                     0                     0 bps
Queue: 3, Forwarding classes: nc
  Queued:
    Packets              :                986224                328769 pps
    Bytes                :            1479336000            3945236360 bps
  Transmitted:
    Packets              :                986224                328769 pps
    Bytes                :            1479336000            3945236360 bps
    Tail-dropped packets :                     0                     0 pps
    RL-dropped packets   :                     0                     0 pps
    RL-dropped bytes     :                     0                     0 bps
    RED-dropped packets  :                     0                     0 pps
    RED-dropped bytes    :                     0                     0 bps
Queue: 4, Forwarding classes: af11
  Queued:
    Packets              :                493110                164383 pps
    Bytes                :             739665000            1972606056 bps
  Transmitted:
    Packets              :                493110                164383 pps
    Bytes                :             739665000            1972606056 bps
    Tail-dropped packets :                     0                     0 pps
    RL-dropped packets   :                     0                     0 pps
    RL-dropped bytes     :                     0                     0 bps
    RED-dropped packets  :                     0                     0 pps
    RED-dropped bytes    :                     0                     0 bps
Queue: 5, Forwarding classes: af12
  Queued:
    Packets              :                461830                164375 pps
    Bytes                :             695777416            1981272728 bps
  Transmitted:
    Packets              :                 82778                 27543 pps
    Bytes                :             124167000             330521208 bps
    Tail-dropped packets :                     0                     0 pps
    RL-dropped packets   :                     0                     0 pps
    RL-dropped bytes     :                     0                     0 bps
    RED-dropped packets  :                379052                136832 pps
    RED-dropped bytes    :             571610416            1650751520 bps
Queue: 6, Forwarding classes: af13
  Queued:
    Packets              :                462258                164556 pps
    Bytes                :             696421280            1983445256 bps
  Transmitted:
    Packets              :                 82973                 27637 pps
    Bytes                :             124459500             331648480 bps
    Tail-dropped packets :                     0                     0 pps
    RL-dropped packets   :                     0                     0 pps
    RL-dropped bytes     :                     0                     0 bps
    RED-dropped packets  :                379285                136919 pps
    RED-dropped bytes    :             571961780            1651796776 bps
Queue: 7, Forwarding classes: nc2
  Queued:
    Packets              :                227750                 82215 pps
    Bytes                :             343447000             991843712 bps
  Transmitted:
    Packets              :                     0                     0 pps
    Bytes                :                     0                     0 bps
    Tail-dropped packets :                     0                     0 pps
    RL-dropped packets   :                     0                     0 pps
    RL-dropped bytes     :                     0                     0 bps
    RED-dropped packets  :                227750                 82215 pps
    RED-dropped bytes    :             343447000             991843712 bps
Meaning
The show command output lists the traffic
by queue and forwarding class names. The Bytes field under the Transmitted
field for each queue shows the actual bytes transmitted.
From the sample output, you can see that the strict-high queue gets the highest priority and transmits without drops. The high-priority queues are then transmitted. The medium-high and medium-low priority queues are processed in a round-robin fashion. The low-priority queue is starved.
Keep in mind the following conditions that apply to strict-priority scheduling:
-
If the traffic on the output interface is undersubscribed, no queue should show dropped traffic.
-
The strict-high queue is processed first, followed by the high-priority queues (in a round-robin fashion), and finally all remaining queues in the guaranteed region (in a round-robin fashion).
-
If the ingress traffic exceeds the capacity of the output interface, the queues are processed in strict-priority order.
-
Queues in the excess region are processed based on the WRR algorithm.