Encrypt Traffic Using SSL Proxy and TLS
SSL proxy acts as an intermediary, performing SSL encryption and decryption between the client and the server. Better visibility into application usage can be made available when the SSL forward proxy is enabled.
SSL Proxy Overview
SSL proxy is supported on SRX Series Firewalls only.
Secure Sockets Layer (SSL) is an application-level protocol that provides encryption technology for the Internet. SSL, also called Transport Layer Security (TLS), ensures the secure transmission of data between a client and a server through a combination of privacy, authentication, confidentiality, and data integrity. SSL relies on certificates and private-public key exchange pairs for this level of security.
SSL proxy is transparent proxy that performs SSL encryption and decryption between the client and the server.
- How Does SSL Proxy Work?
- SSL Proxy with Application Security Services
- Types of SSL Proxy
- Supported SSL Protocols
- Benefits of SSL Proxy
- Logical Systems Support
- Limitations
How Does SSL Proxy Work?
SSL proxy provides secure transmission of data between a client and a server through a combination of following:
Authentication-Server authentication guards against fraudulent transmissions by enabling a Web browser to validate the identity of a webserver.
Confidentiality - SSL enforces confidentiality by encrypting data to prevent unauthorized users from eavesdropping on electronic communications; thus ensures privacy of communications.
Integrity- Message integrity ensures that the contents of a communication are not tampered.
SRX Series Firewall acting as SSL proxy manages SSL connections between the client at one end and the server at the other end and performs following actions:
SSL session between client and SRX Series- Terminates an SSL connection from a client, when the SSL sessions are initiated from the client to the server. The SRX Series Firewall decrypts the traffic, inspect it for attacks (both directions), and initiates the connection on the clients’ behalf out to the server.
SSL session between server and SRX Series - Terminates an SSL connection from a server, when the SSL sessions are initiated from the external server to local server. The SRX Series Firewall receives clear text from the client, and encrypts and transmits the data as ciphertext to the SSL server. On the other side, the SRX Series decrypts the traffic from the SSL server, inspects it for attacks, and sends the data to the client as clear text.
Allows inspection of encrypted traffic.
SSL proxy server ensures secure transmission of data with encryption technology. SSL relies on certificates and private-public key exchange pairs to provide the secure communication. For more information, see SSL Certificates.
To establish and maintain an SSL session between the SRX Series Firewall and its client/server, the SRX Series Firewall applies security policy to the traffic that it receives. When the traffic match the security policy criteria, SSL proxy is enabled as an application service within a security policy.
SSL Proxy with Application Security Services
Figure 1 shows how SSL proxy works on an encrypted payload.
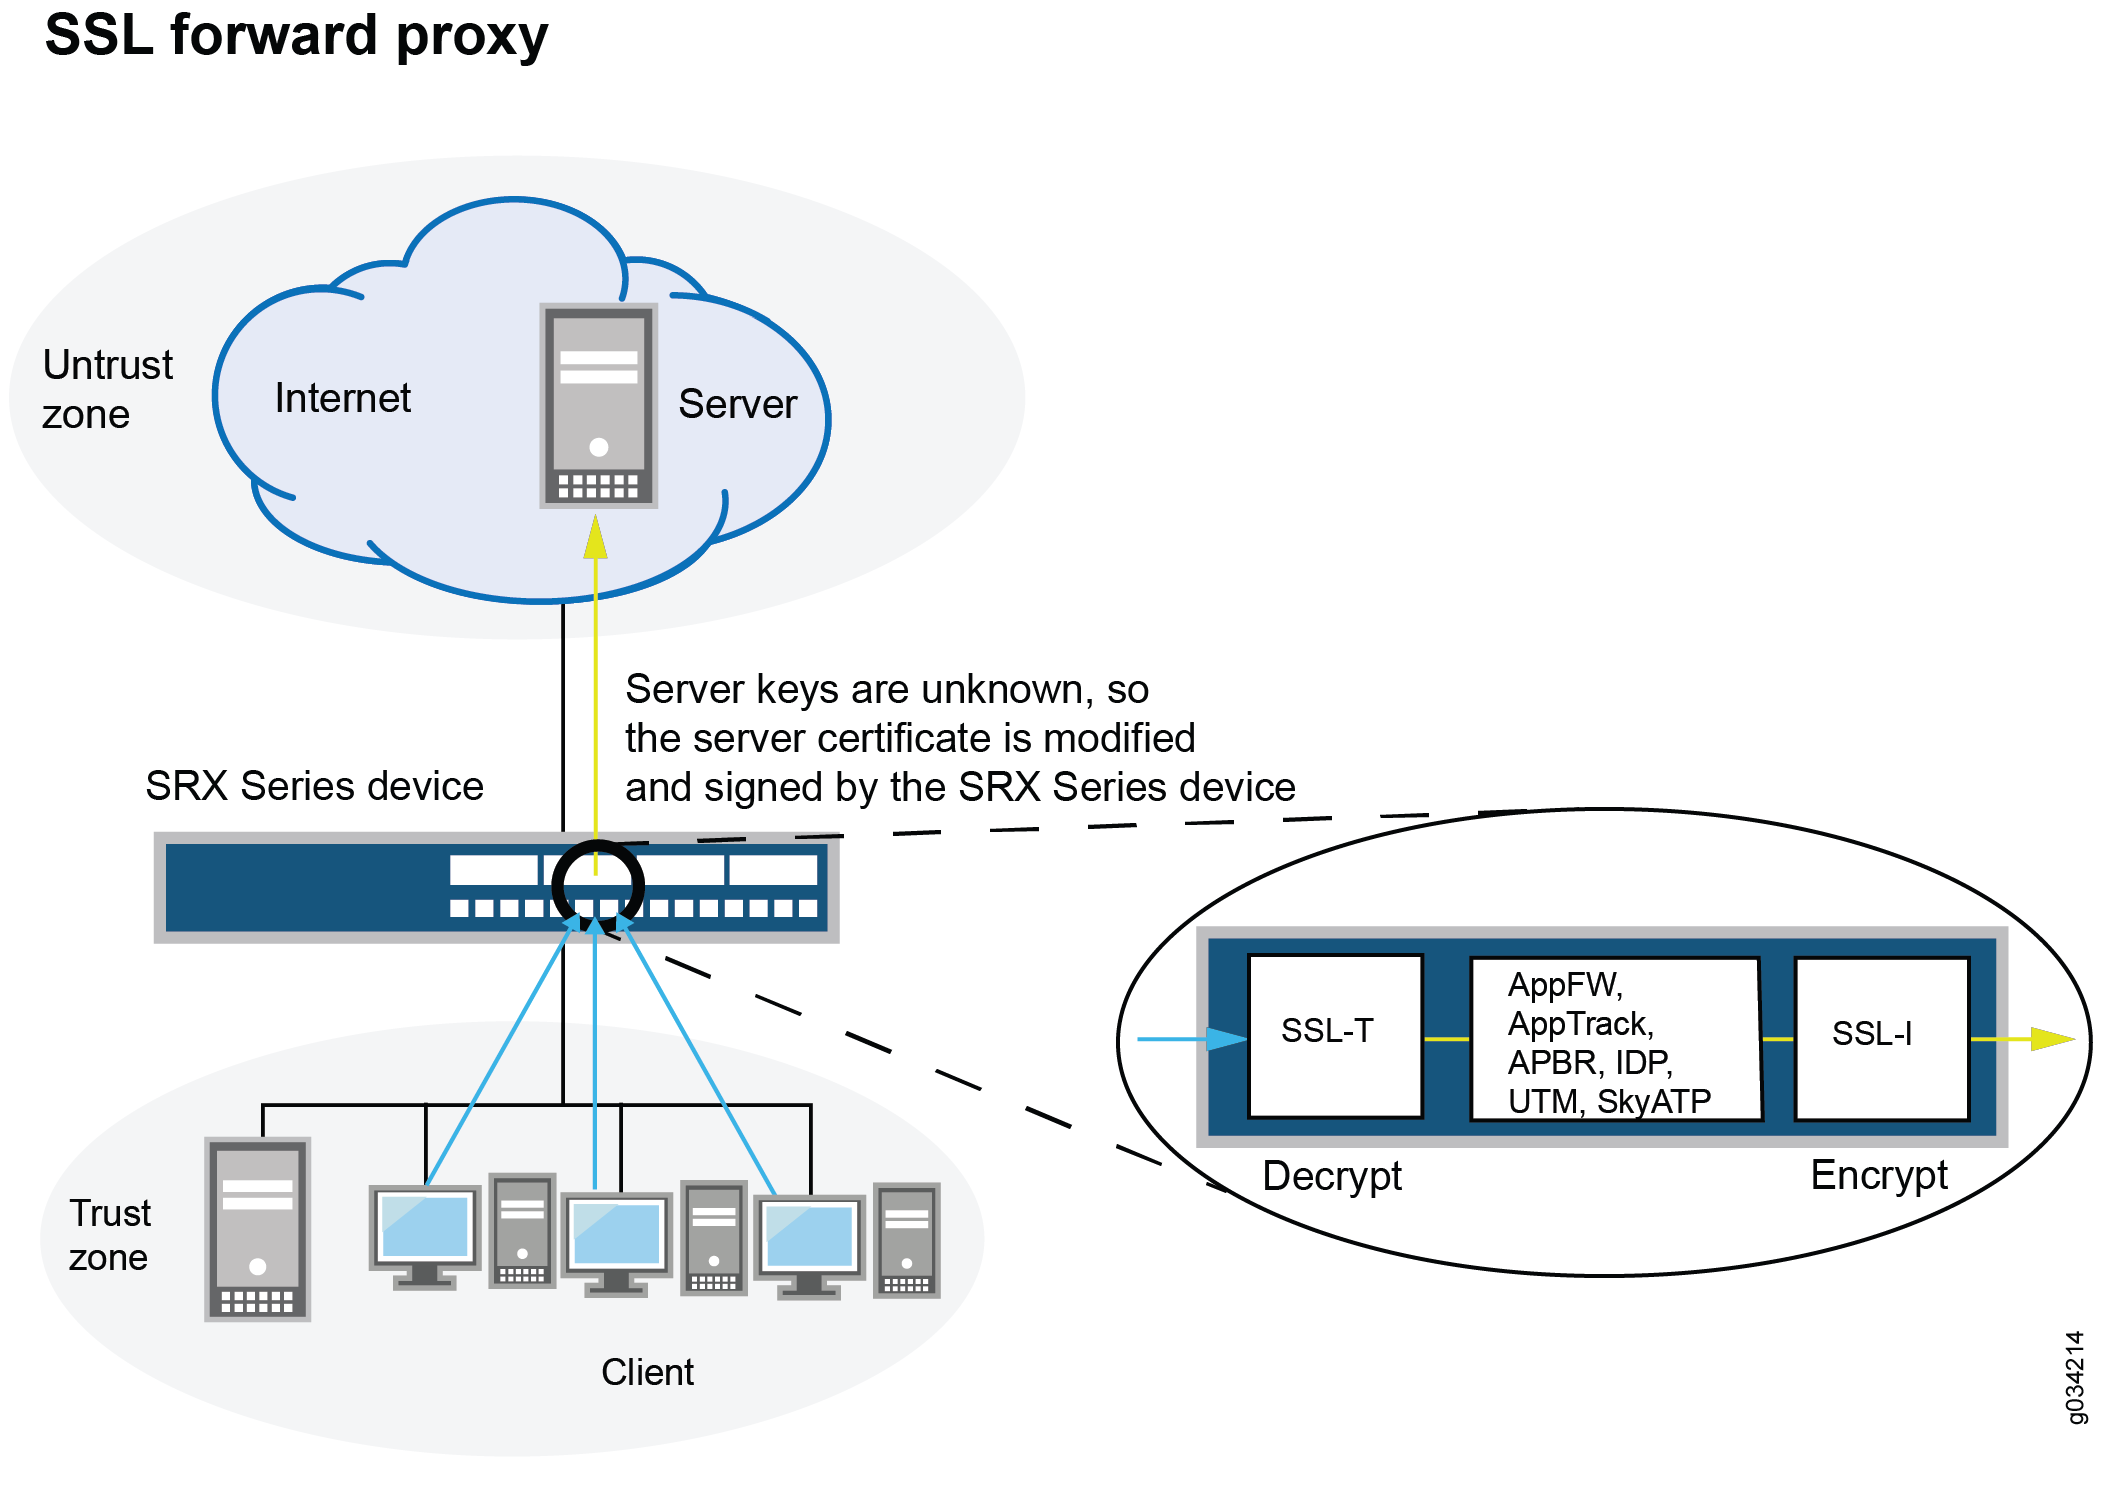
When Advanced Security services such as application firewall (AppFW), Intrusion Detection and Prevention (IDP), application tracking (AppTrack), Content Security, and ATP Cloud is configured, the SSL proxy acts as an SSL server by terminating the SSL session from the client and establishing a new SSL session to the server. The SRX Series Firewall decrypts and then reencrypts all SSL proxy traffic.
IDP, AppFW, AppTracking, advanced policy-based routing (APBR), Content Security, ATP Cloud, and ICAP service redirect can use the decrypted content from SSL proxy. If none of these services are configured, then SSL proxy services are bypassed even if an SSL proxy profile is attached to a firewall policy.
Types of SSL Proxy
SSL proxy is a transparent proxy that performs SSL encryption and decryption between the client and the server. SRX acts as the server from the client’s perspective and it acts as the client from the server’s perspective. On SRX Series Firewalls, client protection (forward proxy) and server protection (reverse proxy) are supported using same echo system SSL-T-SSL [terminator on the client side] and SSL-I-SSL [initiator on the server side]).
SRX Series Firewall support following types of SSL proxy:
Client-protection SSL proxy also known as forward proxy—The SRX Series Firewall resides between the internal client and outside server. Proxying outbound session, that is, locally initiated SSL session to the Internet. It decrypts and inspects traffic from internal users to the web.
Server-protection SSL proxy also known as reverse proxy—The SRX Series Firewall resides between the internal server and outside client. Proxying inbound session, that is, externally initiated SSL sessions from the Internet to the local server.
For more information on SSL forward proxy and reverse proxy, see Configuring SSL Proxy.
Supported SSL Protocols
The following SSL protocols are supported on SRX Series Firewalls for SSL initiation and termination service:
TLS version 1.0—Provides authentication and secure communications between communicating applications.
TLS version 1.1—This enhanced version of TLS provides protection against cipher block chaining (CBC) attacks.
TLS version 1.2 — This enhanced version of TLS provides improved flexibility for negotiation of cryptographic algorithms.
-
TLS version 1.3 — This enhanced version of TLS provides improved security and better performance.
Starting with Junos OS Release 15.1X49-D30 and Junos OS Release 17.3R1, TLS version 1.1 and TLS version 1.2 protocols are supported on SRX Series Firewalls along with TLS version 1.0.
Starting with Junos OS Release 15.1X49-D20 and Junos OS Release 17.3R1, the SSL protocol 3.0 (SSLv3) support is deprecated.
Starting in Junos OS Release 21.2R1, on SRX Series Firewalls, SSL proxy supports TLS version 1.3.
When you use TLS 1.3, the SRX Series Firewall supports the secp256r1 group for key-exchange for establishing connection with the server. If the server supports only secp384r1, then the connection will be terminated.
Benefits of SSL Proxy
Decrypts SSL traffic to obtain granular application information and enable you to apply advanced security services protection and detect threats.
Enforces the use of strong protocols and ciphers by the client and the server.
Provides visibility and protection against threats embedded in SSL encrypted traffic.
Controls what needs to be decrypted by using Selective SSL Proxy.
Logical Systems Support
It is possible to enable SSL proxy on firewall policies that are configured using logical systems; however, note the following limitations:
The “services” category is currently not supported in logical systems configuration. Because SSL proxy is under “services,” you cannot configure SSL proxy profiles on a per-logical-system basis.
Because proxy profiles configured at a global level (within “services ssl proxy”) are visible across logical system configurations, it is possible to configure proxy profiles at a global level and then attach them to the firewall policies of one or more logical systems.
Limitations
On all SRX Series Firewalls, the current SSL proxy implementation has the following connectivity limitations:
The SSLv3.0 protocol support is deprecated.
The SSLv2 protocol is not supported. SSL sessions using SSLv2 are dropped.
Only X.509v3 certificate is supported.
Client authentication of SSL handshake is not supported.
SSL sessions where client certificate authentication is mandatory are dropped.
SSL sessions where renegotiation is requested are dropped.
On SRX Series Firewalls, for a particular session, the SSL proxy is only enabled if a relevant feature related to SSL traffic is also enabled. Features that are related to SSL traffic are IDP, application identification, application firewall, application tracking, advanced policy-based routing, Content Security, ATP Cloud, and ICAP redirect service. If none of these features are active on a session, the SSL proxy bypasses the session and logs are not generated in this scenario.
See Also
Configuring SSL Forward Proxy
- SSL Proxy Configuration Overview
- Configuring a Root CA Certificate
- Generate a Root CA Certificate with CLI
- Configuring a CA Profile Group
- Importing a Root CA Certificate into a Browser
- Applying an SSL Proxy Profile to a Security Policy
- Configuring SSL Proxy Logging
- Configuring Certificate Authority Profiles
- Exporting Certificates to a Specified Location
- Ignoring Server Authentication
SSL Proxy Configuration Overview
Configuring SSL Forward Proxy displays an overview of how SSL proxy is configured. Configuring SSL proxy includes:
-
Configuring the root CA certificate
-
Loading a CA profile group
-
Configure SSL proxy profile and associate root CA certificate and CA profile group
-
Create a security policy by defining input traffic match criteria
-
Applying an SSL proxy profile to a security policy
-
Optional steps such as creating allowlists and SSL proxy logging
Configuring a Root CA Certificate
A CA can issue multiple certificates in the form of a tree structure. A root certificate is the topmost certificate of the tree, the private key of which is used to sign other certificates. All certificates immediately below the root certificate inherit the signature or trustworthiness of the root certificate. This is somewhat like the notarizing of an identity.
You can configure a root CA certificate by first obtaining a root CA certificate (by either generating a self-signed one or importing one) and then applying it to an SSL proxy profile. You can obtain a root CA certificate by using the Junos OS CLI
Generate a Root CA Certificate with CLI
To define a self-signed certificate in CLI, you must provide the following details:
Certificate identifier (generated in the previous step)
Fully qualified domain name (FQDN) for the certificate
e-mail address of the entity owning the certificate
Common name and the organization involved
Generate a root CA certificate using the Junos OS CLI:
Configuring a CA Profile Group
The CA profile defines the certificate information for authentication. It includes the public key that SSL proxy uses when generating a new certificate. Junos OS allows you to create a group of CA profiles and load multiple certificates in one action, view information about all certificates in a group, and delete unwanted CA groups.
You can load a group of CA profiles by obtaining a list of trusted CA certificates, defining a CA group, and attaching the CA group to the SSL proxy profile.
You can easily display information about all certificates in a CA profile group:
user@host> show security pki ca-certificates ca-profile-group group-name
You can delete a CA profile group. Remember that deleting a CA profile group deletes all certificates that belong to that group:
user@host> clear security pki ca-certificates ca-profile-group group-name
Importing a Root CA Certificate into a Browser
In order to have your browser or system automatically trust all certificates signed by the root CA configured in the SSL proxy profile, you must instruct your platform or browser to trust the CA root certificate.
To import a root CA certificate:
Applying an SSL Proxy Profile to a Security Policy
SSL proxy is enabled as an application service within a security policy. In a security policy, you specify the traffic that you want the SSL proxy enabled on as match criteria and then specify the SSL proxy CA profile to be applied to the traffic. Figure 2 displays a graphical view of SSL proxy profile and security policy configuration.
To enable SSL proxy in a security policy:
This example assumes that you have already creates security zones trust and untrust and creating a security policy for the traffic from trust zone to untrust zone.
Configuring SSL Proxy Logging
When configuring SSL proxy, you can choose to set the option to receive some or all of the logs. SSL proxy logs contain the logical system name, SSL proxy allowlists, policy information, SSL proxy information, and other information that helps you troubleshoot when there is an error.
You can configure logging of all or specific events, such as error, warning, and information events. You can also configure logging of sessions that are allowlisted, dropped, ignored, or allowed after an error occurs.
[edit]
user@host# set services ssl proxy profile profile-name actions log all
user@host# set services ssl proxy profile profile-name actions log sessions-whitelisted
user@host# set services ssl proxy profile profile-name actions log sessions-allowed
user@host# set services ssl proxy profile profile-name actions log errors
You can use enable-flow-tracing option to enable debug tracing.
Configuring Certificate Authority Profiles
A certificate authority (CA) profile configuration contains information specific to a CA. You can have multiple CA profiles on an SRX Series Firewall. For example, you might have one profile for orgA and one for orgB. Each profile is associated with a CA certificate. If you want to load a new CA certificate without removing the older one then create a new CA profile (for example, Microsoft-2008). You can group multiple CA profiles in one trusted CA group for a given topology.
In this example, you create a CA profile called ca-profile-security with CA identity microsoft-2008. You then create proxy profile to the CA profile.
Exporting Certificates to a Specified Location
When a self-signed certificate is generated using a PKI command, the newly generated certificate is stored in a predefined location (var/db/certs/common/local).
Use the following command to export the certificate to a specific location (within the device). You can specify the certificate ID, the filename, and the type of file format (DER/PEM):
user@host> request security pki local-certificate export certificate-id certificate-id filename filename type der
Ignoring Server Authentication
Junos OS allows you to configure an option to ignore server authentication completely. If you configure your system to ignore authentication, then any errors encountered during server certificate verification at the time of the SSL handshake are ignored. Commonly ignored errors include the inability to verify CA signature, incorrect certificate expiration dates, and so forth. If this option is not set, all the sessions where the server sends self-signed certificates are dropped when errors are encountered.
We do not recommend using this option for authentication because configuring it results in websites not being authenticated at all. However, you can use this option to effectively identify the root cause of dropped SSL sessions.
From configuration mode, specify to ignore server authentication:
[edit]
user@host# set services ssl proxy profile profile-name actions ignore-server-auth-failure
Enabling Debugging and Tracing for SSL Proxy
Debug tracing on both Routing Engine and the Packet Forwarding Engine can be enabled for SSL proxy by setting the following configuration:
user@host# set services ssl traceoptions file file-name
SSL proxy is supported on SRX340, SRX345, SRX380, SRX550M, SRX1500, SRX4100, SRX4200, SRX5400, SRX5600, SRX5800 devices and vSRX Virtual Firewall instances. Table 1 shows the supported levels for trace options.
Cause Type |
Description |
|---|---|
Brief |
Only error traces on both the Routing Engine and the Packet Forwarding Engine. |
Detail |
Packet Forwarding Engine–Only event details up to the handshake should be traced. Routing Engine–Traces related to commit. No periodic traces on the Routing Engine will be available |
Extensive |
Packet Forwarding Engine–Data transfer summary available. Routing Engine–Traces related to commit (more extensive). No periodic traces on the Routing Engine will be available. |
Verbose |
All traces are available. |
Table 2 shows the flags that are supported.
Cause Type |
Description |
|---|---|
cli-configuration |
Configuration-related traces only. |
initiation |
Enable tracing on the SSL-I plug-in. |
proxy |
Enable tracing on the SSL-Proxy-Policy plug-in. |
termination |
Enable tracing on the SSL-T plug-in. |
selected-profile |
Enable tracing only for profiles that have enable-flow-tracing set. |
You can enable logs in the SSL proxy profile to get to the root cause for the drop. The following errors are some of the most common:
Server certification validation error. Check the trusted CA configuration to verify your configuration.
System failures such as memory allocation failures.
Ciphers do not match.
SSL versions do not match.
SSL options are not supported.
Root CA has expired. You need to load a new root CA.
You can enable the ignore-server-auth-failure option in the SSL proxy profile to ensure that certificate validation, root CA expiration dates, and other such issues are ignored. If sessions are inspected after the ignore-server-auth-failure option is enabled, the problem is localized.
See Also
Transport Layer Security (TLS) Overview
Transport Layer Security (TLS) is an application-level protocol that provides encryption technology for the Internet. TLS relies on certificates and private-public key exchange pairs for this level of security. It is the most widely used security protocol for the applications that require data to be securely exchanged over a network, such as file transfers, VPN connections, instant messaging, and voice over IP (VoIP).
TLS protocol is used for certificate exchange, mutual authentication, and negotiating ciphers to secure the stream from potential tampering and eavesdropping. TLS is sometimes called as Secure Sockets Layer (SSL). TLS and SSL are not interoperable, though TLS currently provides some backward compatibility.
SRX Series Firewalls provides TLS inspection that use the TLS protocol suite consisting of different TLS versions, ciphers, and key exchange methods. TLS inspection feature enables SRX Series Firewalls to inspect HTTP traffic encrypted in TLS on any port.
- Benefits of TLS
- TLS Versions
- Three Essential Services of TLS
- TLS Handshake
- Encrypting Syslog Traffic with TLS
Benefits of TLS
TLS ensures the secure transmission of data between a client and a server through a combination of privacy, authentication, confidentiality, and data integrity.
TLS Versions
Following are the versions of TLS:
TLS version 1.0—Provides secure communication over networks by providing privacy and data integrity between communicating applications
TLS version 1.1—This enhanced version of TLS provides protection against cipher-block chaining (CBC) attacks.
TLS version 1.2 — This enhanced version of TLS provides improved flexibility for negotiation of cryptographic algorithms.
Starting with Junos OS Release 12.3X48-D30, SRX Series Firewalls support TLS version 1.2. SRX Series Firewalls running earlier release of 12.3X48-D30, supports TLS version 1.0.
Three Essential Services of TLS
The TLS protocol is designed to provide three essential services to the applications running above it: encryption, authentication, and data integrity.
Encryption—In order to establish a cryptographically secure data channel, the server and the client must agree on which cipher suites are used and the keys used to encrypt the data. The TLS protocol specifies a well-defined handshake sequence to perform this exchange. TLS uses public key cryptography, which allows the client and server to negotiate a shared secret key without having to establish any prior knowledge of each other, and to do so over an unencrypted channel.
Authentication—As part of the TLS handshake, the protocol allows both server and the client to authenticate their identity. Implicit trust between the client and the server (because the client accepts the certificate generated by the server) is an important aspect of TLS. It is extremely important that server authentication is not compromised; however, in reality, self- signed certificates and certificates with anomalies are in abundance. Anomalies can include expired certificates, instances of common name not matching a domain name, and so forth.
Integrity—With encryption and authentication in place, the TLS protocol does message framing mechanism and signs each message with a Message Authentication Code (MAC). The MAC algorithm does the effective checksum, and the keys are negotiated between the client and the server.
TLS Handshake
Each TLS session begins with a handshake during which the client and server agree on the specific security key and the encryption algorithms to use for that session. At this time, the client also authenticates the server. Optionally, the server can authenticate the client. Once the handshake is complete, transfer of encrypted data can begin.
Encrypting Syslog Traffic with TLS
TLS protocol ensures the syslog messages are securely sent and received over the network. TLS uses certificates to authenticate and encrypt the communication. The client authenticates the server by requesting its certificate and public key. Optionally, the server can also request a certificate from the client, thus mutual authentication is also possible.
A certificate on the server that identifies the server and the certificate of certificate authority (CA) issued by the server must be available with the client for TLS to encrypt syslog traffic.
For mutual authentication of client and the server, a certificate with the client that identifies the client and the certificate of CA issued by client must be available on the server. Mutual authentication ensures that the syslog server accepts log messages only from authorized clients.
See Also
Configuring the TLS Syslog Protocol on SRX Series Firewall
This example shows how to configure the Transport Layer Security (TLS) syslog protocol on SRX Series Firewalls to receive encrypted syslog events from network devices that support TLS syslog event forwarding.
Requirements
Before you begin, enable server certificate verification and encryption or decryption capabilities.
Overview
TLS syslog protocol enables log sources to receive encrypted syslog events from network devices that supports TLS syslog event forwarding. The log source creates a listen port for incoming TLS syslog events and generates a certificate file for the network devices.
In this example, you will configure a syslog collector associated with one SSL-I profile. Each SSL-I profile will enable the user to specify things like preferred ciphers suite and trusted CA certificates. Multiple SSL-I profiles can be configured and associated to different collector servers.
Configuration
Procedure
CLI Quick Configuration
To quickly configure this section of the example,
copy the following commands, paste them into a text file, remove any
line breaks, change any details necessary to match your network configuration,
copy and paste the commands into the CLI at the [edit] hierarchy
level, and then enter commit from configuration mode.
set security log mode stream
set security log format sd-syslog
set security log source-interface ge-0/0/1.0
set security log transport protocol tls
set security log transport tls-profile ssl-i-tls
set security log stream server1 format sd-syslog
set security log stream server1 category all
set security log stream server1 host 192.0.2.100
set services ssl initiation profile ssl-i-tls protocol-version all
set services ssl initiation profile ssl-i-tls trusted-ca all
set services ssl initiation profile ssl-i-tls actions ignore-server-auth-failure
Step-by-Step Procedure
The following example requires you to navigate various levels in the configuration hierarchy. For instructions on how to do that, see Using the CLI Editor in Configuration Mode in the CLI User Guide.
To configure TLS syslog protocol:
Set the log mode to stream.
[edit security]
user@host# set log mode stream
Set the format for remote security message logging to sd-syslog (structured system log).
[edit security]
user@host# set log format sd-syslog
Set the host source interface number.
[edit security]
user@host# set log source-interface ge-0/0/1.0
Set security log transport protocol tls to be used to log the data.
[edit security]
user@host# set log transport protocol tls
Specify the TLS profile name.
[edit security]
user@host# set log transport tls-profile ssl-i-tls
Set the log stream to use the structured syslog format for sending logs to server 1.
[edit security]
user@host# set log stream server1 format sd-syslog
Set the category of server 1 logging to all .
[edit security]
user@host# set log stream server1 category all
Set server host parameters by entering the server name or IP address.
[edit security]
user@host# set log stream server1 host 192.0.2.100
Define the protocol version all for SSL initiation access profile.
[edit services]
user@host# set ssl initiation profile ssl-i-tls protocol-version all
Attach all CA profile groups to the SSL initiation profile to use when requesting a certificate from the peer.
[edit services]
user@host# set ssl initiation profile ssl-i-tls trusted-ca all
Define the SSL initiation access profile to ignore the server authentication failure.
[edit services]
user@host# set ssl initiation profile ssl-i-tls actions ignore-server-auth-failure
Results
From configuration mode, confirm your configuration
by entering the show security log command. If the output
does not display the intended configuration, then repeat the configuration
instructions in this example to correct it.
[edit]
user@host# show security log
    mode stream;
        format sd-syslog;
        source-interface ge-0/0/1.0;
        transport {
            protocol tls;
            tls-profile ssl-i-tls;
        }
        stream server1 {
            format sd-syslog;
            category all;
            host {
            192.0.2.100;
            }
        }
    }
[edit]
user@host# run show configuration services ssl initiation
    profile ssl-i-tls {
        protocol-version all;
        trusted-ca all;
        actions {
            ignore-server-auth-failure;
        }
    }
If you are done configuring the device, enter commit from configuration mode.
Verification
To verify that the configuration is working
properly, enter the show log command on the syslog server.