Classify Traffic Based on User Roles
A user is allowed or denied access based on the security policies. User role firewall security policies let you classify traffic based on the roles to which a user is assigned. The user role information can be collected from Junos Pulse server or third-party authentication server.
Understanding Unified Access Control
In Junos OS Release 12.1 and later, user role firewall security policies let you classify traffic based on the roles to which a user is assigned. Based on match criteria, which includes the user’s role, you create policies to apply services that allow or block access to resources. The user role firewall is similar to the identity-based network access control (NAC) solution available with UAC on the SRX Series Firewall. A user role firewall, however, does not require the Junos Pulse/Odyssey installation, and it supports agentless transparent authentication.
User role information can be collected in several ways: locally on the SRX Series Firewall, from a Junos Pulse Access Control Service device, or by relaying authentication data from a third-party authentication server through a Junos Pulse Access Control Service device to the SRX Series Firewall.
Acquiring User Role Information from an Active Directory Authentication Server
Networks have used the IP address as a way of identifying users and servers. The strategy is based on the assumption that users or groups of users connect to the network from fixed locations and use one device at a time.
Wireless networking and mobile devices require a different strategy. Individuals can connect to the network using multiple devices simultaneously. The way in which devices connect to the network changes rapidly. It is no longer possible to identify a user with a group of statically allocated IP addresses.
In Junos OS Release 12.1 and later, user role firewall security policies let you classify traffic based on the roles to which a user is assigned. Based on match criteria, which includes the user’s role, you create policies to apply services that allow or block access to resources. The user role firewall is similar to the identity-based network access control (NAC) solution available with UAC on the SRX Series Firewall. A user role firewall, however, does not require the Junos Pulse/Odyssey installation, and it supports agentless transparent authentication.
User role information can be collected in several ways: locally on the SRX Series Firewall, from a Junos Pulse Access Control Service device, or by relaying authentication data from a third-party authentication server through a Junos Pulse Access Control Service device to the SRX Series Firewall.
Incorporating a third-party authentication server into a user role firewall configuration can also provide single sign-on (SSO) support. This allows a browser-based user to authenticate once and have that authentication communicated to other trusted servers in the domain as needed.
Requirements
This solution uses the following hardware and software components:
One MAG Series Junos Pulse Gateway device with software release 4.2 or later
The MAGx600-UAC-SRX license installed on the MAG Series device
One SRX Series Firewall with Junos OS Release 12.1 or later
One Microsoft Active Directory server using version 2008
Note:Microsoft Windows 2003 is also compatible with this functionality, but terminology, pathways, and settings might differ from what is presented in this document.
Before you begin:
Ensure that the MAG Series device is configured as an Access Control Service and is accessible to the network. See the MAG Series Junos Pulse Gateway Hardware Guide for configuration details.
Ensure that the MAGx600-UAC-SRX license is installed on the MAG Series device.
Ensure that the SRX Series Firewall is configured and initialized with Junos OS version 12.1 or later.
Ensure that the Active Directory authentication server is configured for standard Junos Pulse Access Control Service authentication. See your third-party documentation.
Ensure that the administrator has the appropriate capabilities for configuring the roles, users, and device interactions.
Overview
In this solution an SRX Series Firewall obtains user role information dynamically from a Microsoft Active Directory authentication server. Authentication verification and user role information from the Active Directory server is relayed by the Access Control Service on the MAG Series device to the SRX Series Firewall.
Users within the same domain are connected to a LAN segment. They are associated with user role groups, such as developer or manager, depending on their work in the organization. When a user authenticates to the AD authentication server, the user should be able to access protected resources without having to authenticate a second time.
The SRX Series Firewall is configured as an enforcer for the MAG Series device. It receives user role information from the MAG Series device and applies user role firewall policies accordingly to incoming and outgoing traffic.
When the SRX Series Firewall has no user role information for a user, the user’s browser is redirected to the MAG Series device. Transparently to the user, the MAG Series device requests verification from the browser. The browser retrieves a token from the Active Directory server confirming authentication and passes it to the MAG Series device. With the information provided by the token, the MAG Series device retrieves user role information for the user from the Active Directory server and creates an authentication table entry consisting of the current IP address and the user role data. The MAG Series device pushes the updated table to the SRX Series Firewall and redirects the browser back to the SRX to request access again. This time, the table does contain user role information which is then retrieved and used as part of the match criteria for applying user role firewall services.
The user is not aware of the process unless the Active Directory (AD) server has no current authentication for the user. When that is the case, the server prompts the user for name and password. Once authentication occurs, the server returns a token to the browser.
The procedure documented here initially configures the MAG Series device as the authenticator. The configuration is later modified to retrieve authentication information from the AD server. This solution uses SPNEGO negotiation and Kerberos authentication to secure communications among the SRX Series Firewall, the MAG Series device, the browser, and the authentication server.
Topology
Figure 1 shows the topology for this deployment in which the MAG Series device is used initially as the authenticationn source. Later, the AD server is used transparently unless the user is not authenticated, in which case he is prompted for a user name and password.
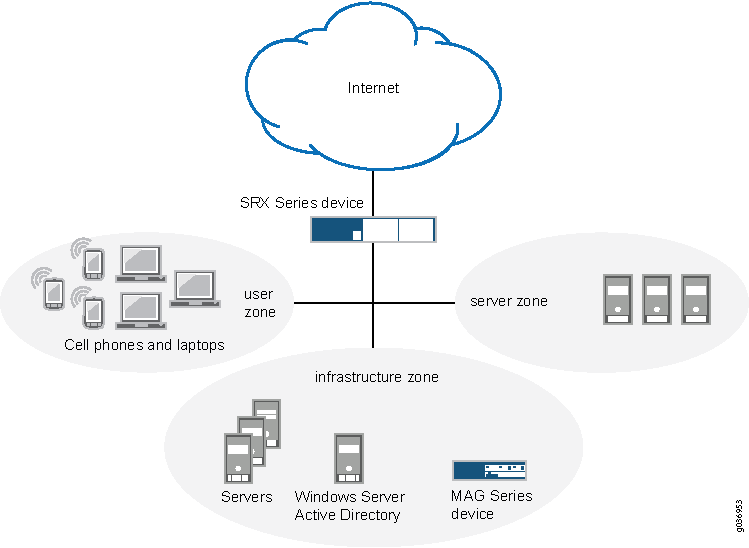
A user’s request to access another resource is controlled by roles and groups associated with the user. For example, a user belonging to a group of developers named Dev might have access to a particular test server. The same user might also be the manager and belong to the Mgr group that can access certain HR resources. A contractor working for this manager might require access to the test server as well but not to the HR resources. In this case, the user would be added to the Dev group and perhaps a Contractor group, but not the Mgr group.
User role firewall policies defined on the SRX Series Firewall control the groups and user roles that can access various resources. In this configuration, if user role data does not exist for a user requesting access, a policy redirects the user’s browser to the MAG Series device to authenticate the user and retrieve any associated user role data.
A token exchange among the Access Control Service, the browser, and the Active Directory server remains transparent to the user while it verifies the user’s authentication. The exchange uses SPNEGO negotiation and Kerberos authentication for encrypting and decrypting messages among the devices.
With information obtained from the response token, the MAG Series device retrieves the user’s roles and groups directly from the Active Directory server. It then creates an authentication table entry and passes it to the SRX Series Firewall.
Configuration
Configure the devices for this solution by performing the following tasks.
Connect the SRX Series Firewall and the MAG Series device in an enforcer configuration.
Configure the Access Control Service on the MAG Series device for local user authentication and verify that authentication information is transferred between the devices.
Configure a captive portal policy on the SRX Series Firewall to redirect any unauthenticated user to the Access Control Service and verify that redirection is functioning properly.
Configure the Microsoft Active Directory authentication server to interact with the Access Control Service and the endpoints.
Reconfigure the Access Control Service for remote authentication by the Active Directory server and redefine Active Directory groups for the SRX Series Firewall.
Configure endpoint browsers for the SPNEGO protocol
Configuring the Access Control Service using local authentication is not necessary for this solution. However, by configuring local authentication first you can verify the captive portal interaction between the MAG Series device and the SRX Series Firewall.
The following example requires you to navigate various levels in the configuration hierarchy. For instructions on how to do that, see Using the CLI Editor in Configuration Mode.
- Connecting the SRX Series Firewall to the Access Control Service
- Configuring the Access Control Service for Local User Authentication
- Configuring Redirection from the SRX Series Firewall to the Access Control Service
- Configuring Active Directory Settings
- Reconfiguring Remote Authentication on the Access Control Service
- Configuring Endpoint Browsers for the SPNEGO
Connecting the SRX Series Firewall to the Access Control Service
Step-by-Step Procedure
In an enforcer configuration, the Access Control Service on the MAG Series device and the SRX Series Firewall communicate over a secure channel. When the SRX Series Firewall first connects with the Access Control Service, the devices exchange information to ensure secure communication. Optionally, you can use digital security certificates as an enhanced mechanism for establishing trust.
See the Unified Access Control Administration Guide for details about configuring certificate trust between the SRX Series Firewall and the Access Control Service.
To connect the SRX Series Firewall and the Access Control Service on the MAG Series device:
-
Configure the SRX Series Firewall.
Step-by-Step Procedure
-
Configure the zones and interfaces of the devices.
user@host# set security zones security-zone user interfaces ge-0/0/0
user@host# set security zones security-zone infrastructure interfaces ge-0/0/1
user@host# set security zones security-zone untrust interfaces ge-0/0/2
-
Configure the IP addresses of the interfaces.
user@host# set interfaces ge-0/0/0 unit 0 family inet address 10.12.12.1/8
user@host# set interfaces ge-0/0/1 unit 0 family inet address 10.0.0.22/24
user@host# set interfaces ge-0/0/2 unit 0 family inet address 203.0.113.19/24
-
Identify the Access Control Service as a new Infranet Controller, and configure the interface for the connection to it.
[edit]
user@host# set services unified-access-control infranet-controller mag123 address 10.0.0.22
user@host# set services unified-access-control infranet-controller mag123 interface fxp0.0
-
Specify the password for securing interactions between the Access Control Service and the SRX Series Firewall.
[edit]
user@host# set services unified-access-control infranet-controller mag123 password pwd
Note:The same password must be configured on both devices.
-
(Optional) Specify the full name of the Access Control Service certificate that the SRX Series Firewall must match during connection.
user@host# set services unified-access-control infranet-controller mag123 ca-profile ca-mag123-enforcer
-
If you are done configuring the SRX Series Firewall, enter commit from configuration mode.
-
Configure the Access Control Service from the administrator console on the MAG Series device.
Step-by-Step Procedure
Navigate to the Infranet Enforcer page, and click New Enforcer.
-
Select Junos, enter the password set previously on the SRX Series Firewall (InSub321), and enter the serial number of the SRX Series Firewall.
Click Save Changes.
Results
When both devices are configured, the SRX Series Firewall connects automatically to the Access Control Service.
From the Access Control Service, select System>Status>Overview to view the status of the connection to the SRX Series Firewall. The diode in the display is green if the connection is functioning. To display additional information, click the device name.
From operational mode on the SRX Series Firewall, confirm your connection by entering the
show services unified-access-control statuscommand. If the output does not display the intended configuration, repeat the instructions in this section to correct the configuration.user@host> show services unified-access-control status
Host           Address         Port   Interface     State
       mag123        10.0.0.22        11123  fxp0.0        connected
Configuring the Access Control Service for Local User Authentication
Step-by-Step Procedure
When a user is authenticated, the Access Control Service on the MAG Series device updates its authentication table with the IP address and associated roles of the user, and pushes the updated table to the SRX Series Firewall. If this user data is deleted or modified, the Access Control Service updates the authentication table with the new information and again pushes it to the SRX Series Firewall.
To test the successful transfer and content of the authentication table, this task configures the Access Control Service on the MAG Series device for local authentication. Within this configuration you can test the user role firewall from the SRX Series Firewall without affecting other network operations. A later task modifies this configuration to provide user role retrieval from the remote Active Directory server.
It is not a requirement to configure the Access Control Service for local user authentication. It is provided so that you can test each task in the configuration.
To configure the Access Control Service for local authentication:
Define roles on the Access Control Service.
Step-by-Step Procedure
From the administrator console of the Access Control Service, select Users>User Roles>New User Role.
Enter dev as the role name.
In this solution, use the default values for other role settings.
Click Save Changes.
Note:This solution assumes that the MAGx600-UAC-SRX license is installed on the Access Control Service. If the full-feature license is installed, you will need to disable OAC Install and enable Agentless Access.
Configure the default authentication server.
Step-by-Step Procedure
Select Authentication>Auth. Servers.
Select System Local. This establishes the MAG Series device as the default authentication server.
Create users.
Step-by-Step Procedure
Select the Users tab, and click New.
Create user-a by entering the following details.
Username
User’s full name
Password
Password confirmation
Repeat the previous step to create user-b.
Click Save Changes.
Create a realm.
Step-by-Step Procedure
Select Users>User Realms>New User Realm.
Enter REALM6 as the realm name.
Select System Local in the Authentication box.
Click Save Changes.
From the same page, create role mapping rules.
Step-by-Step Procedure
Select the Role Mapping tab, and click New Rule.
Define two rules with the following details.
Enter username user-a, and assign it to role dev.
Enter username user-b, and assign it to role dev.
Click Save Changes.
Set up the default sign-in page.
Step-by-Step Procedure
Select Authentication>Signing In>Sign-in Policies.
Click the default Sign-in policy (*/).
In the Sign-in URL box, enter the IP address of this device.
In Authentication realm, Available realms, select REALM6.
Click Save Changes.
Results
Verify the results of the configuration. If the output does not display the intended configuration, repeat the instructions in this section to correct the configuration.
Step-by-Step Procedure
Verify that local authentication on the Access Control Service is functioning properly.
Open a browser window from an endpoint in the network.
Enter the fully qualified domain name for the Access Control Service.
The default sign-in page should display.
Sign in as user-a, and provide the defined password.
-
From operational mode on the SRX Series Firewall:
Step-by-Step Procedure
-
Confirm that the authentication table on the SRX Series Firewall was updated with user-a.
user@host> show services unified-access-control authentication-table
Id    Source IP       Username     Age      Role identifier
1     203.0.113.102    user-a       0        0000000001.000005.0
Total: 1
-
Confirm that the correct role has been associated with the role identifier.
user@host> show services unified-access-control roles
Name                Identifier

dev                 0000000001.000005.0
-
List all roles associated with user-a.
user@host> show services unified-access-control authentication-table detail
Identifier: 1
  Source IP: 203.0.113.102
  Username: user-a
  Age: 0
  Role identifier       Role name
    0000000001.000005.0 dev
-
Configuring Redirection from the SRX Series Firewall to the Access Control Service
Step-by-Step Procedure
Local authentication, as configured in the previous task, requires users to log on to the Access Control Service directly to gain access to network resources. The SRX Series Firewall can be configured to automatically redirect the browser of an unauthenticated user to the Access Control Service if a user requests access to a protected resource directly. You can define a user role firewall policy to redirect an unauthenticated user to a captive portal on the Access Control Service for sign-in.
Other services, such as IDP, Content Security, AppFW, and AppQoS, can be configured as well as the UAC captive portal implementation. The solution focuses on captive portal for authentication for user role implementation only.
To configure redirection from the SRX Series Firewall to the Access Control Service:
-
From configuration mode on the SRX Series Firewall, configure the profile for the captive portal acs-device.
[edit]
user@host# set services unified-access-control captive-portal acs-device redirect-traffic unauthenticated
-
Add either the redirection URL for the Access Control Service or a default URL.
[edit]
user@host# set services unified-access-control captive-portal acs-device
redirect-url “https://%ic-url%/?target=%dest-url%&enforcer=%enforcer-id%”
This command specifies the default target and enforcer variables so that the browser is returned to the SRX Series Firewall after authentication.
Allow traffic to the Acitve Directory (AD) server, the Access Control Service, and the other infrastructure servers.
[edit]
user@host# set security policies from-zone user to-zone infrastructure policy Allow-AD-UAC match source-address any
user@host# set security policies from-zone user to-zone infrastructure policy Allow-AD-UAC match destination-address any
user@host# set security policies from-zone user to-zone infrastructure policy Allow-AD-UAC application any
user@host# set security policies from-zone user to-zone infrastructure policy Allow-AD-UAC then permit
Configure a security policy that redirects HTTP traffic from zone user to zone untrust if the source-identity is unauthenticated-user.
[edit]
user@host# set security policies from-zone user to-zone untrust policy user-role-fw1 match source-address any
user@host# set security policies from-zone user to-zone untrust policy user-role-fw1 match destination-address any
user@host# set security policies from-zone user to-zone untrust policy user-role-fw1 match application http
user@host# set security policies from-zone user to-zone untrust policy user-role-fw1 match source-identity unauthenticated-user
Configure the action to be taken when traffic matches the criteria for user-role-fw1.
In this case, traffic meeting the specified criteria is allowed access to the UAC captive portal defined by the acs-device profile.
user@host# set security policies from-zone user to-zone untrust policy user-role-fw1 then permit application-services uac-policy captive-portal acs-device
Configure a security policy allowing access to any HTTP traffic from zone user to zone untrust.
[edit]
user@host# set security policies from-zone user to-zone untrust policy user-role-fw2 match source-address any
user@host# set security policies from-zone user to-zone untrust policy user-role-fw2 match destination-address any
user@host# set security policies from-zone user to-zone untrust policy user-role-fw2 match application http
user@host# set security policies from-zone user to-zone untrust policy user-role-fw2 match source-identity any
user@host# set security policies from-zone user to-zone untrust policy user-role-fw2 then permit
Note:It is important to position the redirection policy for unauthenticated users before a policy for “any” user so that UAC authentication is not shadowed by a policy intended for authenticated users.
If you are done configuring the policies, commit the changes.
[edit]
user@host# commit
Results
Step-by-Step Procedure
Confirm your configuration with the following procedures. If the output does not display the intended configuration, repeat the instructions in this section to correct the configuration.
From configuration mode, confirm your captive portal profile configuration by entering the
show servicescommand.[edit] user@host# show services
...
unified-access-control {
	captive-portal acs-device {
		redirect-traffic unauthenticated;
		redirect-url “https://%ic-url%/?target=%dest-url%&enforcer=%enforcer-id%”
...
From configuration mode, confirm your policy configuration by entering the
show security policiescommand.user@host# show security policies
...
from-zone user to-zone infrastructure {
	policy Allow-AD-UAC  {
		match {
			source-address any;
			destination-address any;
			application any;
		}
		then {
			permit
		}
	}
}
from-zone user to-zone untrust {
	policy user-role-fw1 {
		match {
			source-address any;
			destination-address any;
			application http;
			source-identity unauthenticated-user
		}
		then {
			permit {
				application-services {
					uac-policy {
						captive-portal acs-device;
					}
				}
			}
		}
	}
}
from-zone user to-zone untrust {
	policy user-role-fw2 {
		match {
			source-address any;
			destination-address any;
			application http;
			source-identity any
		}
		then {
			permit
		}
	}
}
...
Verify that the redirection policy is functioning correctly.
Step-by-Step Procedure
Open a browser window from a second endpoint in the network.
Enter a third-party URL, such as www.google.com.
The default sign-in page from the Access Control Service prompts for a user and password.
Enter the username user-b and its password.
The browser should display the requested URL.
Note:If a pop-up blocker is set on the endpoint, it could interfere with this functionality.
-
From operational mode on the SRX Series Firewall, verify that the authentication data and roles from the Access Control Service were pushed to the SRX Series Firewall successfully.
user@host> show services unified-access-control authentication-table
Id    Source IP       Username     Age      Role identifier
1     203.0.113.112    user-a       0        0000000001.000005.0
2     203.0.113.15    user-b       0        0000000001.000005.0
Total: 2
Configuring Active Directory Settings
Step-by-Step Procedure
SPNEGO negotiation and Kerberos authentication are transparent to the user and network administrator, but certain configuration options enable the use of these protocols. This section identifies configuration requirements when using Active Directory as the authentication server. To interact in SPNEGO negotiation, the Access Control Service requires a keytab file created by Active Directory. Refer to your third-party documentation for more information about enabling SPNEGO and Kerberos usage.
This section is not intended to be a tutorial for Active Directory. However, there are specific configuration details required for this solution. See your third-party documentation to set up Active Directory as a domain controller.
To configure the Active Directory authentication server:
Add a DNS entry as the UAC service account in the Forward Lookup Zones. In this way clients can refer to the MAG Series device by name or by IP address.
This UAC service account name will be used in the next section when reconfiguring the UAC service on the MAG Series device.
Single sign-on authentication requires that the UAC service account password never expires. To modify user settings:
Step-by-Step Procedure
From the Active Directory Users and Computers application in DNS, select Users>New>User and select the UAC service account created in step 1.
Select the Account tab.
In user settings, click Password Never Expires.
On the Domain Controller, open a command line, and enter the
ktpasscommand to create the SPNEGO keytab file.The keytab file created on the Active Directory server contains the full service principal name (SPN) and other encryption information from the server. The keytab file is then uploaded to the Access Control Service on the MAG Series device. This shared information identifies one device to the other whenever encrypted messages and responses are sent.
Use the following syntax.
ktpass -out output-file-name -mapuser uac-service-acccount-name -prin service://fqdn@REALM
ktpass Third-party Kerberos utility that maps an SPN to a user, in this case, to the UAC service account. The executable is available for download. Refer to your third-party documentation for the source for this utility.
-out output-file-name The name for the SPNEGO keytab file you are creating.
-mapuser uac-service-acccount-name The name of the UAC service account created in step 1.
-prin service://fqdn@REALM The service principal name. The Kerberos authentication uses the SPN in its communication. It does not use an IP address.
service The HTTP service.
fqdn The hostname of the Junos Pulse Access Control Service. The service://FQDN portion of the name is provided by the Access Control Service when registering with the Active Directory server.
REALM The realm of the Active Directory authentication server. It is the same as the domain name. The Kerberos realm name is always in uppercase letters following the recommendation in RFC 1510. This affects interoperability with other Kerberos-based environments.
The following command creates an SPNEGO keytab file named ic.ktpass.
ktpass -out ic.ktpass -mapuser icuser@UCDC.COM -princ HTTP/mag123.ucdc.com@UCDC.COM -pass Doj73096
This file is copied to the Access Control Service on the MAG Series device in the next section when SPNEGO is configured for remote authentication.
Reconfiguring Remote Authentication on the Access Control Service
Step-by-Step Procedure
This section reconfigures the Access Control Service on the MAG Series device to query the remote Active Directory server instead of the local authentication table when authenticating a user. The following steps add services and authentication options to the Access Control Service on the MAG Series device. The configuration of the SRX Series Firewall remains unchanged.
When you reconfigure the realm’s authentication server, the Access Control Service displays all roles or groups from the configured domain controller and its trusted domains. Establishing role mapping rules equates the authentication server’s roles or groups to those defined on the Access Control Service.
To reconfigure remote authentication on the Access Control Service:
From the administrator console of the Access Control Service on the MAG Series device, select Authentication>Auth. Servers.
Choose the Active Directory/Windows NT server type, and click Add New Server.
Enter the profile of the new authentication server.
Step-by-Step Procedure
Name the Active Directory server.
Enter its NetBIOS domain name in the domain box.
Note:You might receive the following message: “Either the server is not a domain controller of the domain, or the NetBIOS name of the domain is different from the Active Directory (LDAP) name.” This message is informational and does not affect the processing of the authentication.
Enter the Kerberos Realm name.
The Kerberos realm name is the FQDN of the Active Directory domain. For example, if “mycompany” is the domain or NetBIOS name, mycompany.com is the Kerberos realm name.
In the Domain Join Configuration section, enter the username and password of the UAC services account which has permission to join computers to the Active Directory domain.
Select the Save credentials box.
Enter the Container name.
This is the name of the container in Active Directory where you created the UAC services account for the Access Control Service.
Enter the Computer Name.
Specify the machine ID that the Access Control Service uses to join the specified Active Directory domain as a computer. This name is derived from the licence hardware ID of the Access Control Service in the following format: 0161MT2L00K2C0.
Verify that the join operation has succeeded.
The Join Status indicator provides a color-coded status for the domain join operation as follows:
Gray: Not started
Yellow: In progress
Red: Failed to join
Green: Joined the domain
Select Kerberos and NTLM v2 as the authentication protocols.
In the Trusts section, select the Allow trusted domains box.
Select Enable SPNEGO.
Use the Browse button to upload the keytab file that you created in the previous section.
Click Save Changes and Test Configuration.
Ensure that SSO is enabled.
Step-by-Step Procedure
Select Users>User Realms and the realm name.
Select the Active Directory server name from the Auth Server list.
Select the Authentication Policy tab.
Verify that the SSO option is selected.
Click Save Changes.
Create role-mapping policies for groups acquired from the authentication server.
Groups from the Active Directory authentication server need to be mapped to roles on the Access Control Service. You first need to create roles, and then map one or more groups to the appropriate role.
Step-by-Step Procedure
Select the Role Mapping tab.
Click New Rule, enter a role name, and click Save Changes.
You do not need to add users to the role. Create as many roles as needed to map the groups from the Active Directory authentication server.
Click Groups, and select Search to list the groups defined in the domain controller.
Select the group names that you want to map to the new role.
Repeat steps b through d to create and map other groups.
Click Save Changes.
Configuring Endpoint Browsers for the SPNEGO
Step-by-Step Procedure
Ensure that endpoint browsers have SPNEGO enabled. For further information, see your third-party documentation.
Internet Explorer
From Security>Local Intranet>Sites>Advanced add the trusted URL.
IE performs SPNEGO without any further endpoint configuration but the user is prompted for a username and password. The username and password can be cached.
To provide single sign-on support, an Internet Explorer configuration can be pushed by configuring a group policy on the Active Directory server. See your third-party documentation for further information.
Integrated Windows Authentication must be enabled. Use the Tools>Internet Options>Advanced>Security>Enable Integrated Windows Authentication path to verify that IWA is enabled.
Firefox (Windows and MacOS)
The configuration is in a hidden location. For the URL, type about:config and search for the word trusted. The required key is the comma separated parameter named network.negotiate-auth.trusted-uris.
Note:You need to specify the URL of the resource (in this solution, the FQDN or domain controller value UCDC.com).
Chrome
Use the Internet Explorer setting. From Security>Local Intranet>Sites>Advanced add the trusted URL.
An internet Explorer configuration can also be pushed by configuring a group policy on the Active Directory server. This configuration is honored by Chrome.
Obtaining Username and Role Information Through Firewall Authentication
User role firewall policies can be integrated with firewall authentication both to authenticate users and to retrieve username and role information. The information is mapped to the IP address of the traffic, stored in the firewall authentication table, and used for user role firewall policy enforcement.
The following CLI statements configure firewall authentication for user role firewall enforcement.