SRX Firewall Users
Learn about the authentication methods: pass-through authentication, captive portal authentication, pass-through with web-redirect authentication or mutual TLS (mTLS) authentication for SRX captive portal.
A SRX firewall user is a network user who must provide a username and password for authentication when initiating a connection across the firewall. You can put several user accounts together to form a user group. You can store these user group on the local database or on a RADIUS, or LDAP server. When you reference an authentication user group and an external authentication server in a policy, the traffic matching the policy triggers an authentication check.
When you define firewall users, you can create a policy that requires the users to authenticate themselves through one of the authentication methods: pass-through authentication, captive portal authentication, or pass-through with web-redirect authentication.
Pass-Through Authentication
What is pass-through authentication?
Pass-through authentication helps to authenticate yourself automatically using your currently logged in windows system username and password. You would not need to manually enter your windows credential to log-in.
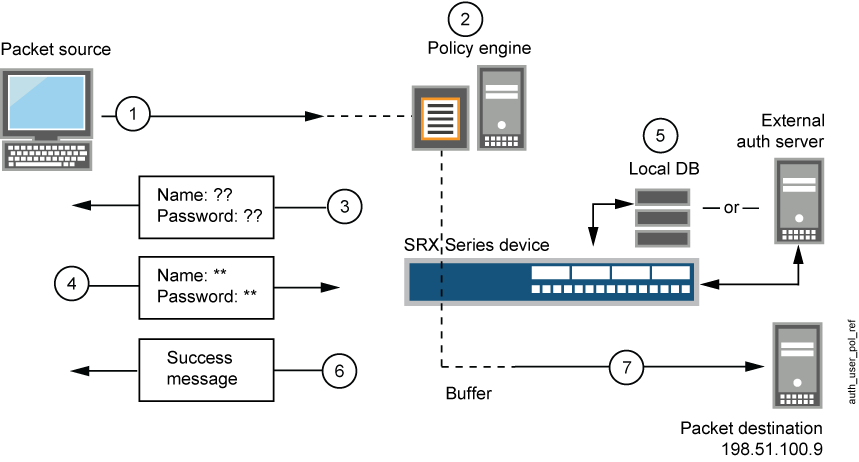
How a pass-through authentication works?
A user from one zone tries to access resources on another zone. The user is prompted to enter a username and password when pass-through authentication is invoked. If the user’s identity is validated, the user is allowed to pass through the firewall and gain access to the IP address of the protected resource.
The device uses FTP, Telnet, HTTP, or HTTPS to collect username and password information. The device then intercepts the request and prompts the user to enter a username and password. The device validates the username and password by checking them against those stored in the local database or on an external authentication server.
-
A client user sends an FTP, an HTTP, an HTTPS, or a Telnet packet to 198.51.100.9.
- The device intercepts the packet, notes that its policy requires authentication from either the local database or an external authentication server, and buffers the packet.
- The device prompts the user for login information through FTP, HTTP, HTTPS, or Telnet.
- The user replies with a username and password.
- The device either checks for an authentication user account on its local database or sends the login information to the external authentication server as specified in the policy.
- Finding a valid match (or receiving notice of such a match from the external authentication server), the device informs the user that the login has been successful.
- For HTTP, HTTPS, or Telnet traffic, the device forwards the packet from its buffer to its destination IP address, 198.51.100.9/24. However, for FTP traffic, after successful authentication, the device closes the session and the user must reconnect to the FTP server at IP address 198.51.100.9/24.
Benefits
-
Better security.
-
Easier deployment.
-
Highly available.
-
Seamless user experience.
Captive Portal Authentication
What is captive portal authentication?
A captive portal is a webpage that users of a public network view and interact with before they can access the network. The web page also prompts the users to authenticate or accept the usage policy and terms. The captive portal web login page is hosted by an internal or external server.
Firewall users must keep the captive portal web login page open after they successfully authenticate. The system automatically logs the user out of the captive portal when the login page is closed.
How a captive portal authentication works?
Users try to connect, using HTTP or HTTPS, to an IP address on the device that is enabled for captive portal authentication. Users don't get to the IP address of the protected resource. This initiates an HTTP session to the IP address hosting the captive portal authentication feature on the device. The device then prompts you for your username and password and caches the result in the device. Subsequent traffic from the user to the protected resource is allowed or denied based on the result of this authentication.

-
The default captive portal authentication profile determines if the user authenticates using the local database or the external authentication server. An access profile stores usernames and passwords of users or points to external authentication servers where such information is stored.
-
The captive portal authentication address must be in the same subnet as the interface that you want to use to host it. For example, if you want authentication users to connect using captive portal authentication through ethernet3, which has IP address 203.0.113.1/24, then you can assign captive portal authentication an IP address in the 203.0.113.0/24 subnet.
-
You can put a captive portal authentication address in the same subnet as the IP address of any physical interface or virtual security interface (VSI).
-
You can put captive portal authentication addresses on multiple interfaces.
-
After the device authenticates a user at a particular source IP address, it subsequently permits traffic as specified in the policy. This requires authentication through pass through from any other user at that same address. This might be the case if the user originates traffic from behind a NAT device that changes all original source addresses to a single translated address.
-
With captive portal authentication enabled, any HTTP traffic to the IP address will get the captive portal authentication login page instead of the administrator login page. Disabling this option will show the administrator login page (assuming that [system services web-management HTTP] is enabled.
-
We recommend that you have a separate primary or preferred IP address, if an address is used for captive portal authentication.
Benefits
-
Simpler way to access the internet.
-
Adds additional layer of security.
-
Marketing and business recognition.
Pass-Through with Web-Redirect Authentication
What is pass-through with web-redirect authentication?
Pass-through with web-redirect authentication can be used for HTTP or HTTPS client requests. When you configure firewall authentication to use pass-through authentication for HTTP and HTTPs client requests, you can use the web-redirect feature to direct the user’s requests to the device's internal webserver. The webserver sends a redirect HTTP or HTTPS response to the client system directing it to reconnect to the webserver for user authentication. The interface on which the client’s request arrives is the interface to which the redirect response is sent.
After the user has been authenticated, traffic from user's IP address is allowed to go through the web-redirect method. A message is displayed to inform the user about the successful authentication. After successful authentication, browser launches the user’s original destination URL without their needing to retype the URL.
Benefits
-
Richer user login experience—Instead of a popup prompt asking the user to enter their username and password, users are presented with the login page in a browser.
-
Seamless authentication experience—The user doesn't need to know the IP address of the captive portal authentication source but only the IP address of the resource they are attempting to access.
Captive Portal for Unauthenticated Browsers
The firewall redirects an unauthenticated user to the captive portal for authentication. While redirecting to the captive portal, the background process such as Microsoft updates triggers the captive portal before it triggers HTTP/HTTPS browser-based user’s access. This makes the browser to display “401 Unauthorized” page without presenting authentication portal. The auth-only-browser and auth-user-agent parameters give you control to handle HTTP/HTTPS traffic.
The service discarded the page without informing the browser, and the browser user was never presented with the authentication portal. The firewall did not support simultaneous authentication from the same source (IP address) on different SPUs.
The firewall supports simultaneous HTTP/HTTPS pass-through authentication across multiple SPUs, including support for web-redirect authentication. If an HTTP/HTTPS packet arrives while the SPU is querying the CP, the Firewall queues the packet to be handled later.
Additionally, the following two parameters are made available to give you greater control over how HTTP/HTTPS traffic is handled.
-
auth-only-browser—Authenticate only browser traffic. If you specify this parameter, the firewall distinguishes HTTP/HTTPS browser traffic from other HTTP/HTTPS traffic. The firewall does not respond to non-browser traffic. You can use the auth-user-agent parameter in conjunction with this control to further ensure that the HTTP traffic is from a browser.
-
auth-user-agent—Authenticate HTTP/HTTPS traffic based on the User-Agent field in the HTTP/HTTPS browser header. You can specify one user-agent value per configuration. The firewall checks the user-agent value that you specify against the User-Agent field in the HTTP/HTTPS browser header for a match to determine if the traffic is HTTP/HTTPS browser-based.
You can use this parameter with the auth-only-browser parameter or alone for both pass-through and user-firewall firewall-authentication.
You can specify only one string as a value for auth-user-agent. It must not include spaces and you do not need to enclose the string in quotation marks.
For more information on how to configure captive portal for unauthenticated browsers, see Configure Captive Portal for Unauthenticated Browsers.
Unified Policy
Unified policy enables you to authenticate users before users can access network resources behind a firewall. When you enable SRX firewall users with unified policy, a user must provide a username and password for authentication when initiating a connection across the firewall.
For information on how to configure unified policy, see Example: Configure Unified Policy.
| SRX Firewall Users with Unified Policy | Workflow |
|---|---|
| Pass-through Authentication with a traditional security Policy and an unified policy |
|
| Pass-Through Authentication with a Traditional Security Policy and a Unified Policy with Dynamic Application as "any" |
|
| Captive Portal Authentication with a Unified Policy |
|
External Authentication Servers
An external authentication server is used to collect user’s credentials from the external servers for authentication.
Authentication, authorization, and accounting (AAA) servers provide an extra level of protection and control for user access in the following ways:
- Authentication determines the firewall user.
- Authorization determines what the firewall user can do.
- Accounting determines what the firewall user did on the network.
You can use authentication alone or with authorization and accounting. Authorization always requires a user to be authenticated first. You can use accounting alone, or with authentication and authorization.
Once the user's credentials are collected, they are processed using SRX firewall user authentication, which supports the following types of servers:
-
Local authentication and authorization.
-
RADIUS authentication and authorization.
-
LDAP authentication.
Client Groups
To manage a number of SRX firewall users, you can create user or client groups and store the information either on the local Juniper Networks device or on an external RADIUS or LDAP server.
A client group is a list of groups to which the client belongs. As with client-idle timeout, a client group is used only if the external authentication server does not return a value in its response. (For example, LDAP servers do not return such information.) The RADIUS server sends the client's group information to the Juniper Networks device using Juniper VSA (46). The client-match portion of the policy accepts a string that can be either the username or the group name to which the client belongs.
The reason to have a single database for different types of clients (except admins) is based on the assumption that a single client can be of multiple types. For example, a firewall user client can also be an L2TP client.
Customize Banner
A banner is a custom message that you can create to indicate a user whether the authentication is successful or failed. A banner is a message that appears on a monitor in different places depending on the type of login.

- At the top of a browser screen after a user has successfully logged into a captive portal authentication address as shown in Figure 3.
- Before or after a Telnet, an FTP, an HTTP, or and HTTPS login prompt, success message, and fail message for users.
Mutual TLS (mTLS) Authentication for SRX Captive Portal
What Is mTLS Authentication?
Mutual Transport Layer Security (mTLS) uses a public/private keypair and TLS certificates to establish a secure connection between a client and a server. The client and the server each own a keypair and a TLS certificate and authenticate each other.
In contrast to mTLS, Transport Layer Security (TLS) requires only the server to have a TLS certificate and a public/private keypair. The client verifies the server's certificate for a secure connection.
Because of authentication by both the client and the server, you can implement mTLS within a zero trust security framework to authenticate users, devices, and servers in your organization without passwords. You can also use mTLS for increased API security.
For information on how to configure mutual TLS (mTLS) authentication for SRX captive portal, see Example: Configure Mutual-TLS (mTLS) Authentication.
How mTLS Authentication Works
Figure 4 describes how mTLS authentication works between a client device and a firewall. Mutual TLS secures traffic between a client and a firewall with the following steps:
-
User connects to the firewall and sends "Hello" message.
-
Firewall sends a "Hello" message and the TLS certificate along with the certificate chain and the public key to the user.
-
Firewall requests for the user certificate.
-
User verifies the firewall certificate.
-
User sends the TLS certificate along with the certificate chain and the public key to the firewall.
-
Firewall verifies the user certificate.
-
Firewall grants access to the user.
-
User and firewall exchange information over an encrypted mTLS connection.

Benefits
-
Increased resiliency to attacks-Block stuffing and phising attacks with mTLS authentication.
-
Improved authentication-Ensure that API requests come only from authenticated users.