
Understanding the Ansible for Junos OS Collections and Modules
Learn about the Ansible collections and modules that you can use to manage devices running Junos OS and devices running Junos OS Evolved.
Understanding Ansible Collections and Modules for Managing Junos Devices
Ansible is an IT automation framework that you can use for infrastructure configuration management. You use Ansible modules, which are discrete units of code, to perform specific functions on a managed node. You can execute individual modules on remote hosts to perform ad hoc tasks. You can also execute modules through playbooks.
Juniper Networks provides Ansible modules that you can use to manage Junos devices. The Ansible modules are grouped and distributed through Ansible Content Collections, which are hosted in the Ansible Galaxy repository. Ansible collections are a format for distributing Ansible content that is not included as part of the Ansible core installation. Collections can include a wide range of content, including modules, playbooks, plugins, and roles. Collections also have their own repositories, so they can be developed and released independently from the Ansible core installation.
Table 1 outlines the content sets available for managing Junos devices. Juniper Networks
provides the juniper.device collection.
Starting in juniper.device Release 2.0.0, we consolidated the
Juniper Networks juniper.device collection
and the Red Hat Ansible junipernetworks.junos
collection into a single collection containing both sets of modules.
| Collection | Module Set | Description |
|---|---|---|
juniper.device |
Modules for managing Junos devices. Juniper Networks provides and manages this collection as an open-source project. |
|
|
( |
Modules for managing Junos devices. The Red Hat Ansible
Networking team originally maintained this collection. In
|
Understanding the juniper.device Merged Collection
Merge Overview
Prior to juniper.device Release 2.0.0, the Juniper Networks
juniper.device collection and the Red Hat Ansible
junipernetworks.junos collection were separate distinct
collections. Each collection owner maintained their respective collection.
Starting in juniper.device Release 2.0.0, we merged the
junipernetworks.junos collection into the
juniper.device collection. Juniper Networks maintains the
merged collection going forward.
We will refer to the juniper.device
collection to indicate the combined set of modules. To distinguish
between the modules sets within the collection, we will refer to the modules as
follows:
-
juniper.devicemodules orjuniper.deviceoriginal modules -
junipernetworks.junosmodules orjuniper.device.junos_*modules
When you install the juniper.device collection, you can use
juniper.device.module_name to
execute modules from either module set. To continue using existing playbooks
that reference
junipernetworks.junos.module_name, you
must also install the junipernetworks.junos collection. To
execute the junipernetworks.junos modules using either
namespace, you must set ansible_network_os to
juniper.device.junos. Otherwise, everything else remains
the same when using either set of modules.
Although the juniper.device collection includes both sets of
modules, each module set uses different Ansible connection values and network OS
values. As a result, the two sets of modules cannot use the same inventory file
and you cannot intermix the module sets in the same playbook. Thus, we recommend
that you select one set of modules to use for your playbooks and tasks. The set
you select is a matter of preference. To help you determine which module set
works best for your environment, we've provided a high-level overview and
comparison of the two sets.
Module Set Comparison
The juniper.device collection and the
junipernetworks.junos collection were originally built for
different purposes and use cases. Juniper Networks designed the
juniper.device modules to provide users with direct access
to the full breadth of Junos OS capabilities. Red Hat developed the
junipernetworks.junos modules using a consistent approach
applied to all Red Hat-maintained networking collections. This approach provided
templated configurations for streamlined, repeatable configuration
management.
Aside from some distinct differences, both the juniper.device
modules and the junipernetworks.junos modules provide similar
functions for managing Junos devices. Both sets of modules enable you to:
-
Get device facts
-
Execute commands and RPCs on a device
-
Install software packages
-
Execute ping operations from a device
-
Configure a device
Both module sets provide similar options to configure devices. For example, you can:
-
Load configuration data in one of the accepted formats from a file
-
Load configuration data as
setcommands provided in the module arguments -
Roll back the configuration
-
Replace the entire configuration
-
Specify the format and load operation for loading configuration data
-
Commit the configuration and include common commit options
The module sets also have some differences with respect to configuration
operations. The junipernetworks.junos modules provide numerous
configuration templates that enable you to easily configure common statements
for specific areas of the configuration hierarchy. For example, you can
configure common options for OSPF or static routes.
Similarly, the juniper.device modules provide some additional
configuration capabilities. You can compare configurations, load the rescue
configuration, and load configuration data using a Jinja2 template. You can also
select the configuration mode. For example, you can use batch mode; configure a
private copy of the candidate configuration; or configure the dynamic or
ephemeral database. The juniper.device modules also provide
additional commit options for synchronizing the configuration, committing empty
changes, and ignoring commit warnings.
Another key difference between the modules sets is that the
juniper.device modules integrate with several other Juniper
Networks products. For example, your Ansible playbooks can reference Junos PyEZ
operational Tables to retrieve operational state data from a device. Ansible
playbooks can also perform Junos Snapshot Administrator in Python (JSNAPy)
operations. JSNAPy enables you to capture and audit runtime environment
snapshots of your Junos devices. Thus you can use your existing Junos PyEZ
Tables and JSNAPy configuration and test files in your Ansible playbooks.
How to Execute Modules on Junos Devices
To use collections hosted in the Ansible Galaxy repository, you must first install
Ansible on the control node and then install the collection. For more information
about installing the juniper.device collection, see Ansible for Junos OS Server Requirements.
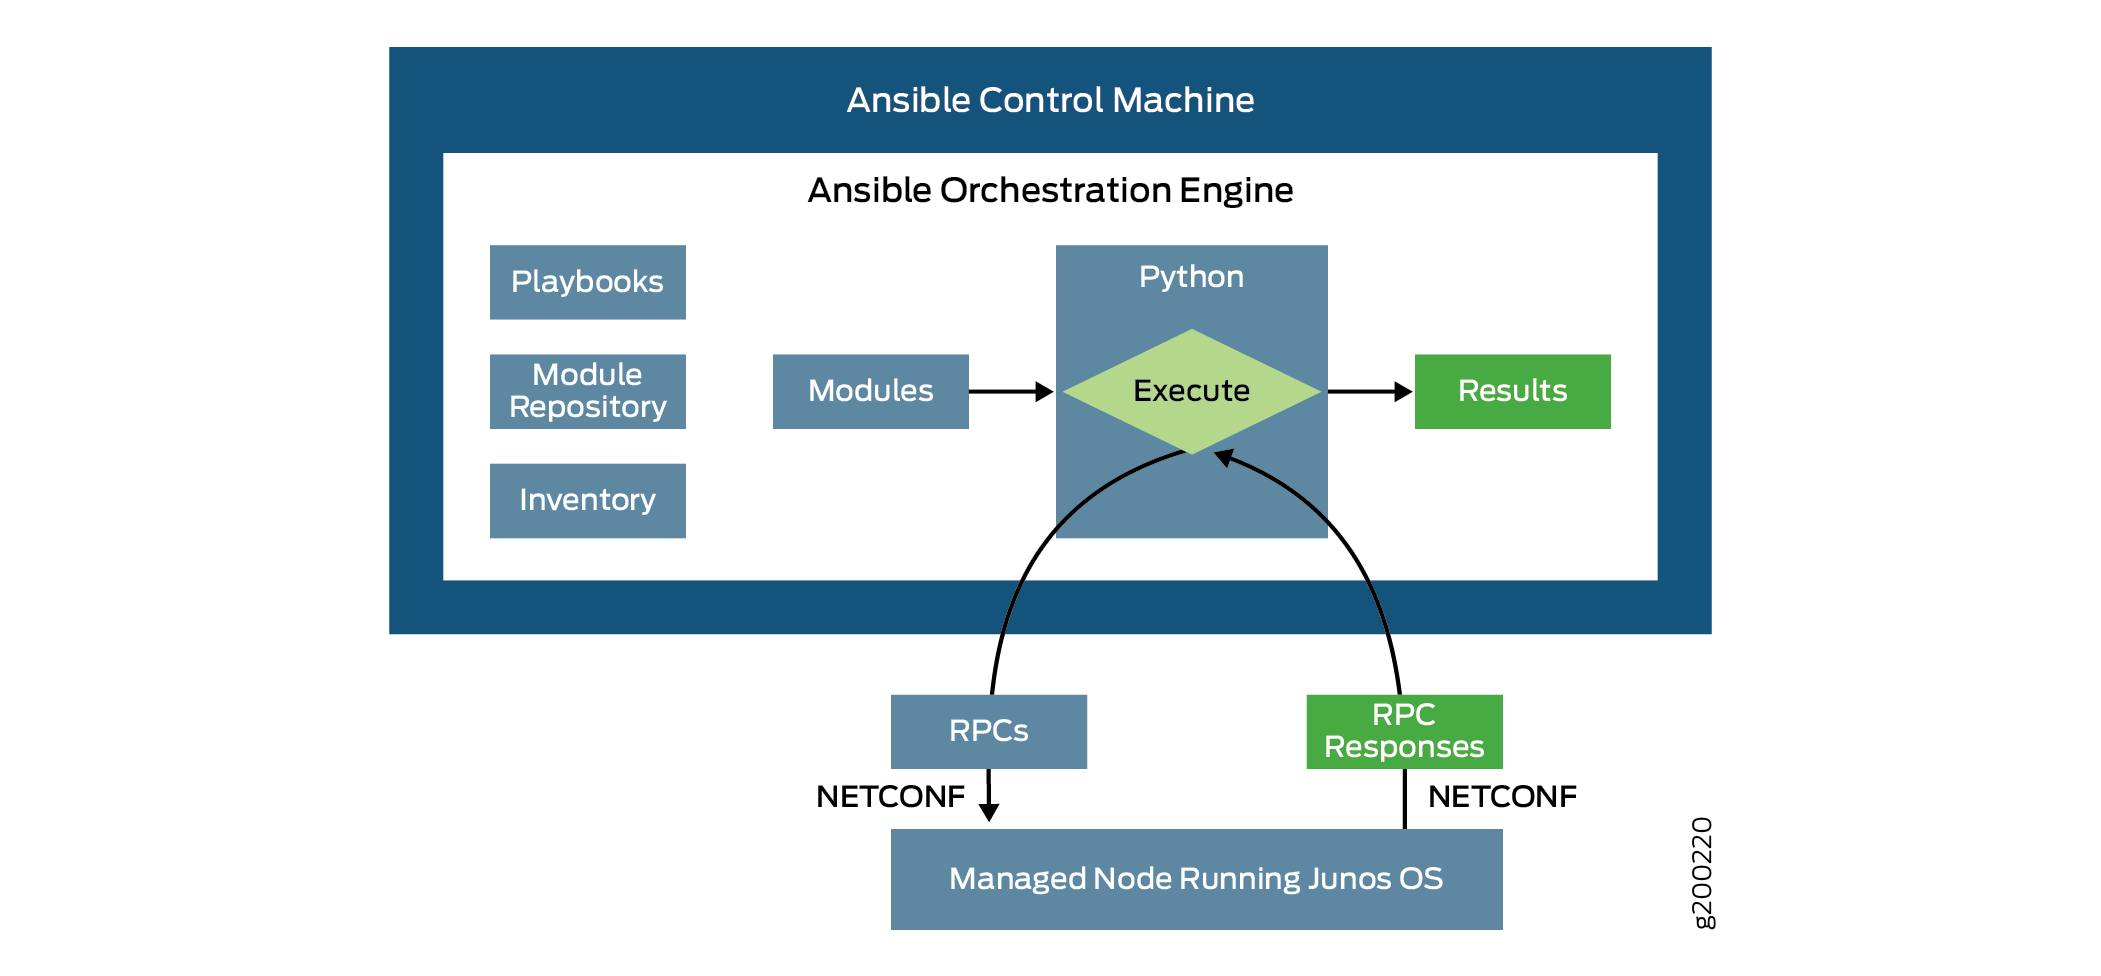
Ansible modules can perform operations on a managed node. Typically, the Ansible control node sends a module to the managed node to perform the operation. The node executes the module and then removes it. In this scenario, the managed node must have the ability to execute the module. Because most Ansible modules are written in Python, Ansible typically requires Python on the managed node.
The modules in the juniper.device collection, however, do not
require Python on the managed nodes. In contrast to the typical operation, the
Ansible control node executes the modules locally. The modules use the Junos XML API
and NETCONF to interface with the managed node. This method of execution enables you
to use Ansible to manage any supported Junos device. Figure 1 illustrates the communication between the Ansible control node and a managed
Junos device.
To use the juniper.device modules or the
junipernetworks.junos modules, your Ansible playbook or command
must:
-
Specify the collection or FQCN—To specify the collection, include the
collectionskey in the play. Alternatively, you can omit thecollectionskey and instead reference collection content by its fully qualified collection name (FQCN), which is the recommended method. -
Execute the modules locally on the control node—To run Ansible modules locally, you define the appropriate connection parameters in your playbook, inventory file, or command options. Define the
connectionparameter in the playbook or define theansible_connectionparameter in the inventory file or host or group variable files. For thejunipernetworks.junosmodules, you must also specify theansible_network_osparameter. You generally define this parameter in the inventory file. Table 2 outlines the supported values.Table 2: Connection Parameters Module Set Playbook Inventory File juniper.device
(original modules)-
connection: (local | juniper.device.pyez)
-
ansible_connection=(local | juniper.device.pyez)
junipernetworks.junos
(alljunos_*modules except
junos_netconfandjunos_ping)-
connection: netconf
-
ansible_connection=netconf -
ansible_network_os=juniper.device.junos
junipernetworks.junos
(junos_netconfandjunos_ping)-
connection: network_cli
-
ansible_connection=network_cli -
ansible_network_os=juniper.device.junos
-
-
Provide appropriate connection and authentication information to connect to the managed device.
You can execute Ansible modules using any user account that has access to the managed Junos device. When you execute Ansible modules, Junos OS user account access privileges are enforced. The class configured for the Junos OS user account determines the permissions. Thus, if a user executes a module that loads configuration changes onto a device, the user must have permissions to change the relevant portions of the configuration.
The following sections provide some sample playbooks and inventory files for the different module sets.
- Sample Playbook for
juniper.deviceModules - Sample Inventory File and Playbook for
junipernetworks.junosModules
Sample Playbook for juniper.device Modules
The following playbook executes the juniper.device.facts module
to retrieve the device facts and save them to a file. In this example, we define
the connection type in the playbook instead of the inventory file. The user
authenticates with the device using SSH keys loaded in an SSH key agent.
---
- name: Get Device Facts
  hosts: junos
  connection: local
  gather_facts: no

  tasks:
    - name: Retrieve facts from a Junos device
      juniper.device.facts:
        savedir: "{{ playbook_dir }}"
    - name: Print version
      ansible.builtin.debug:
        var: junos.version
You can also perform ad hoc operations on the command line. The following command
executes the juniper.device.facts module and retrieves device
facts from the hosts in inventory group junos.
user@ansible-cn:~$ ansible --connection local -i production junos -m juniper.device.facts
Sample Inventory File and Playbook for junipernetworks.junos Modules
If you are using the junipernetworks.junos module set, you can
define the ansible_connection and
ansible_network_os variables in your inventory file or your
host or group variable files. The following example inventory file defines the
connection parameters for group dc1 under
dc1:vars.
[dc1]
switch1.example.com

[dc1:vars]
ansible_connection=netconf
ansible_network_os=juniper.device.junos
The following playbook executes the
junipernetworks.junos.junos_facts module under the
juniper.device namespace. The playbook references the
dc1 group, which defines the appropriate connection and
network OS values in the inventory file.
- name: Get Device Facts
  hosts: dc1
  gather_facts: no

  tasks:
    - name: Retrieve facts from a Junos device
      juniper.device.junos_facts:
      register: response
    - name: Print version
      ansible.builtin.debug:
        var: response.ansible_facts.ansible_net_version
juniper.device Modules
Table 3 outlines the original juniper.device modules in the
juniper.device collection. For the current module list,
documentation, and usage examples for the modules, see https://ansible-juniper-collection.readthedocs.io.
|
Module Name |
Description |
Supported Ansible Connections |
|---|---|---|
|
|
Execute operational mode commands on the Junos device and save the output locally. |
|
|
|
Manage the configuration of Junos devices. |
|
|
|
Retrieve device-specific information from the remote host, including the Junos OS version, serial number, and hardware model number. |
|
|
|
Transfer a file between the local Ansible control node and the Junos device. |
|
|
|
Execute Junos Snapshot Administrator in Python (JSNAPy) tests through Ansible. |
|
|
|
Execute the |
|
|
|
Perform path MTU discovery (PMTUD) on Junos devices. |
|
|
|
Execute Junos OS RPCs. |
|
|
|
Install a software package and reboot a Junos device. |
|
|
|
Create an SRX Series chassis cluster for cluster-capable SRX Series Firewalls. |
|
|
|
Perform system operations on Junos devices, including resetting, rebooting, or shutting down the device. |
|
|
|
Use Junos PyEZ operational Tables and Views to retrieve operational information from Junos devices. |
|
junipernetworks.junos Modules
Starting in juniper.device Release 2.0.0, the
juniper.device collection includes the
junipernetworks.junos modules. Table 4 outlines the junipernetworks.junos modules in the
juniper.device collection. The module set enables you to
perform operational tasks. It also includes many configuration template modules that
configure common settings for various features, protocols, and services on Junos
devices.
| Module Name | Description | Supported Ansible Connections |
|---|---|---|
| Operational Modules | ||
|
|
Execute operational mode commands on the Junos device. |
|
|
|
Retrieve device-specific information from the remote host. |
|
|
|
Install a software package and reboot a Junos device. |
|
|
|
Execute the |
|
|
|
Execute Junos OS RPCs over NETCONF on a Junos device. |
|
| Configuration Modules | ||
|
|
Apply firewall filters on an interface. |
|
|
|
Configure firewall filters, sometimes called access control lists (ACLs). |
|
|
|
Configure banners. |
|
|
|
Manage the BGP Address Family attributes of interfaces. |
|
|
|
Configure BGP global properties. |
|
|
|
Manage the configuration of Junos devices. |
|
|
|
Configure the device hostname. |
|
|
|
Configure basic physical and logical interface properties. |
|
|
|
Configure L2 interfaces. |
|
|
|
Configure L3 interfaces. |
|
|
|
Configure global Link Aggregation Control Protocol (LACP) properties for aggregated Ethernet interfaces. |
|
|
|
Manage the LACP attributes of an interface. |
|
|
|
Configure Link Aggregation Groups (LAGs). |
|
|
|
Configure global settings for the Link Layer Discovery Protocol (LLDP). |
|
|
|
Manage the LLDP attributes of an interface. |
|
|
|
Configure system logging. |
|
|
|
Configure the NETCONF system service. |
|
|
|
Configure the Network Time Protocol (NTP). |
|
|
|
Manage the OSPF configuration of interfaces. |
|
|
|
Configure OSPFv2. |
|
|
|
Configure OSPFv3. |
|
|
|
Configure routing policy prefix lists. |
|
|
|
Configure routing instances. |
|
|
|
Configure routing options. |
|
|
|
Configure and manage security policies. |
|
|
|
Configure global security policy settings. |
|
|
|
Configure security zones. |
|
|
|
Manage the SNMP server configuration. |
|
|
|
Configure static routes. |
|
|
|
Manage the hostname and DNS configuration. |
|
|
|
Configure local user accounts. |
|
|
|
Configure VLANs. |
|
|
|
Manage the VRF definitions on the device. |
|