This topic outlines the workflow for stitching two services.
-
In the Topo resource, create LT interfaces on the stitching device on which the
services are provisioned.
To create LT interfaces:
Select Orchestration > Service > Resource Instances
on the left navigation menu.
The Resource Instance page appears.
Click the + (Add) icon.
The Add New Resource
Instance page appears.
In the Name field, enter a name for the resource and for
Resource Design, select
topo.
Click Create.
The Modify Resource-Instance-Name page appears.
Add the devices on which services you want to stitch are
provisioned.
Configure LT interfaces in the devices you added in step 1.e. For information
on configuring a topo resource instance, see Modify a Topology Resource Pool.
The following is an example of a logical tunnel interface configuration in
the JSON format:
"logical_tunnel": [
    {
      "name": "lt-0/0/0",
      "ranges": [
        {
          "name": "rng1",
          "pinned_reservation": {
            "brownfield": false,
            "instance": ""
          },
          "size": 10,
          "start": 100
        },
        {
          "name": "rng2",
          "pinned_reservation": {
            "brownfield": false,
            "instance": ""
          },
          "size": 10,
          "start": 200
        }
      ]
The configuration shows an LT interface named LT-0/0/0 created in the
GUI. The LT interface has two ranges (rng1 and rng2) of interface units created on
them. rng1 has ten distinctive LT interface units starting from 100. Similarly, rng2
has ten distinctive LT interface units starting from 200.
-
In the service that is initiating service stitching (also known as creator service),
for example, EVPN, define the connection access type as stitching-endpoint. To set the
connection access type as stitching-endpoint:
Select the service and click Edit.
The Modify
Service-Instance-Name page appears.
On the Modify Service-Instance-Name page, in the Customer Site
Settings tab, create or edit a site network access for referencing the creator SNA
(also known as Reference Network Access) and exposing a logical interface for use by
the connector SNA (of the connector service). The connector SNA would connect to the
creator SNA through the reference network access.
The Add Connection or Edit
Connection page appears.
On the Add Connection or Edit Connection page:
Select stitching-endpoint for Access
Type as shown in Figure 1.
Figure 1: Edit Connection Page
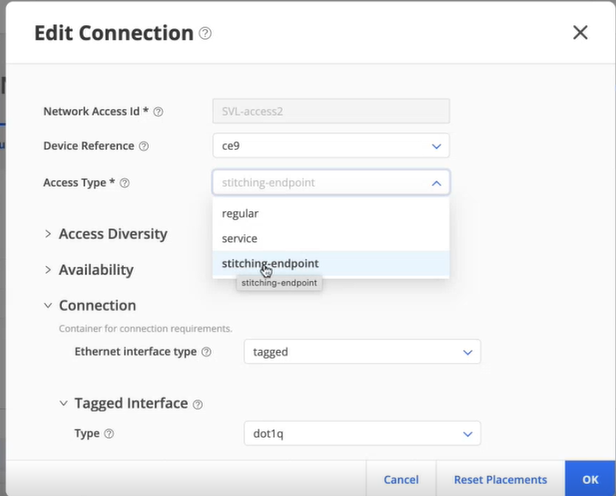
When you select stitching-endpoint, a Stitching
section appears on the page.
In the Stitching section, select the creator SNA in
the Reference Network Access drop-down
list.
For more details, see the Add a Service-Type
topic corresponding to the service initiating the service stitching in the
Provision VPN Services chapter in this User Guide.
-
Click OK.
-
Update placement resources.
To update the placement resources on the service due to changes in the connection
configuration, click Update Placements on the Customer Site
Settings tab.
An lt_right resource is allocated for use
by the connector service.
-
view the lt_right resource on the Resource Instance page (Instance > Services >
Resource Instance) by using the More > View Network Resources option.
The following is a sample of the
lt_right resource created with one
free interface lt-1/0/0/0.101 available for
stitching:
lt_right:{
  instance_uuid:{
    4930bd9a-8fea-11f0-88a9-8e19f3c4acf3:{...}
    6c15568e-9a72-11ef-a30c-9eb9a18f087b:{
      ne_id:{
        00000000-0000-0000-1000-2c6bf5c23000:{
          network_access_id:{
            bacs2:{
              named:{
                available:1
                customer:"d21fcee6-8e98-11f0-90b8-0e0898967446"
                description:"logical tunnel right interface lt-0/0/0.101 for consumption"
                free: "lt-0/0/0.101"
                instance:"EVPN-left"
                properties:{
                  left_interface:"lt-0/0/0.100"
                  vlan_id:900
                }
                resource_name:""
                total:1
                  use: NULL
                      }
                    ]
                  }
                }
              }
            }
          }
        }
     }
   }
The LT interface assigned for the stitching is displayed in the
Stitching Interface section on the Edit Connections page.
(Optional) Edit the range, the sub interface or both of the logical tunnel
interfaces assigned, if necessary and click OK.
You are returned to the Modify
Service-Instance-Name page.
-
(Optional) Edit the range, the sub interface or both of the logical tunnel interfaces
assigned, if necessary and click OK. You are returned to the Modify
Service-Instance-Name page.
-
In the connector service (for example, L3VPN), define the connection access type as
service.
On the Service Instances page (Orchestration > Service >
Instances), select the service that you want to
stitch (connector service) and click Edit.
The Modify
Service-Instance-Name page appears.
On the Modify Service-Instance-Name page, in the Customer Site
Settings tab, edit or create a site network access.
The Edit Connection page
appears.
In the Edit Connection page, select service for
Access Type.
For more details, see the Add a
Service-Type topic corresponding to the service
terminating the service stitch in the Provision VPN Services chapter in
this User Guide.
-
Update placement to view the allocated logical tunnel interfaces for the stitching.
The LT interface assigned for the stitching is displayed in the Interface For Peering
Service section on the Edit Connections page.
-
Edit the logical tunnel interfaces assigned, if necessary, and click OK.
You are returned to the Modify Service-Instance-Name page.
-
Provision the service initiating the stitch and the service terminating the
stitch.
To provision a service, select the service and click Provision.
Routing director pushes the logical tunnel configuration on to the devices to provision
service stitching.
