Configure Network Settings through Captive Portal
You must connect to the captive portal from a local IP address. Connection to the captive portal from the browser will fail if the connection request originates from a non-local network.
You can use the Captive Portal web page to configure the following elements:
-
External Network—Connect the vLWC to Juniper Cloud. You can use the External Network configuration to perform device provisioning.
-
Internal Network—Connects the vLWC to the Juniper devices on your network.
-
Active Proxy—Use an active proxy in your network infrastructure to control access to the Internet. Configuring an active proxy is optional.
To configure the network settings on vLWC:
-
Enter the vLWC serial number in the Serial Number field and
click Submit to log in.
Note: The vLWC serial number can be obtained from the filename of the vLWC OVA image. The filename has the format vLWC-version-serial.ova, where version is the version number and serial is the serial number of the vLWC image. The serial number begins with VLWC followed by eight digit numeric characters (for example, VLWC98762345).
On successful login, the JSI Data Collector page appears.
The following image displays the JSI Data Collector page when the vLWC is not connected.
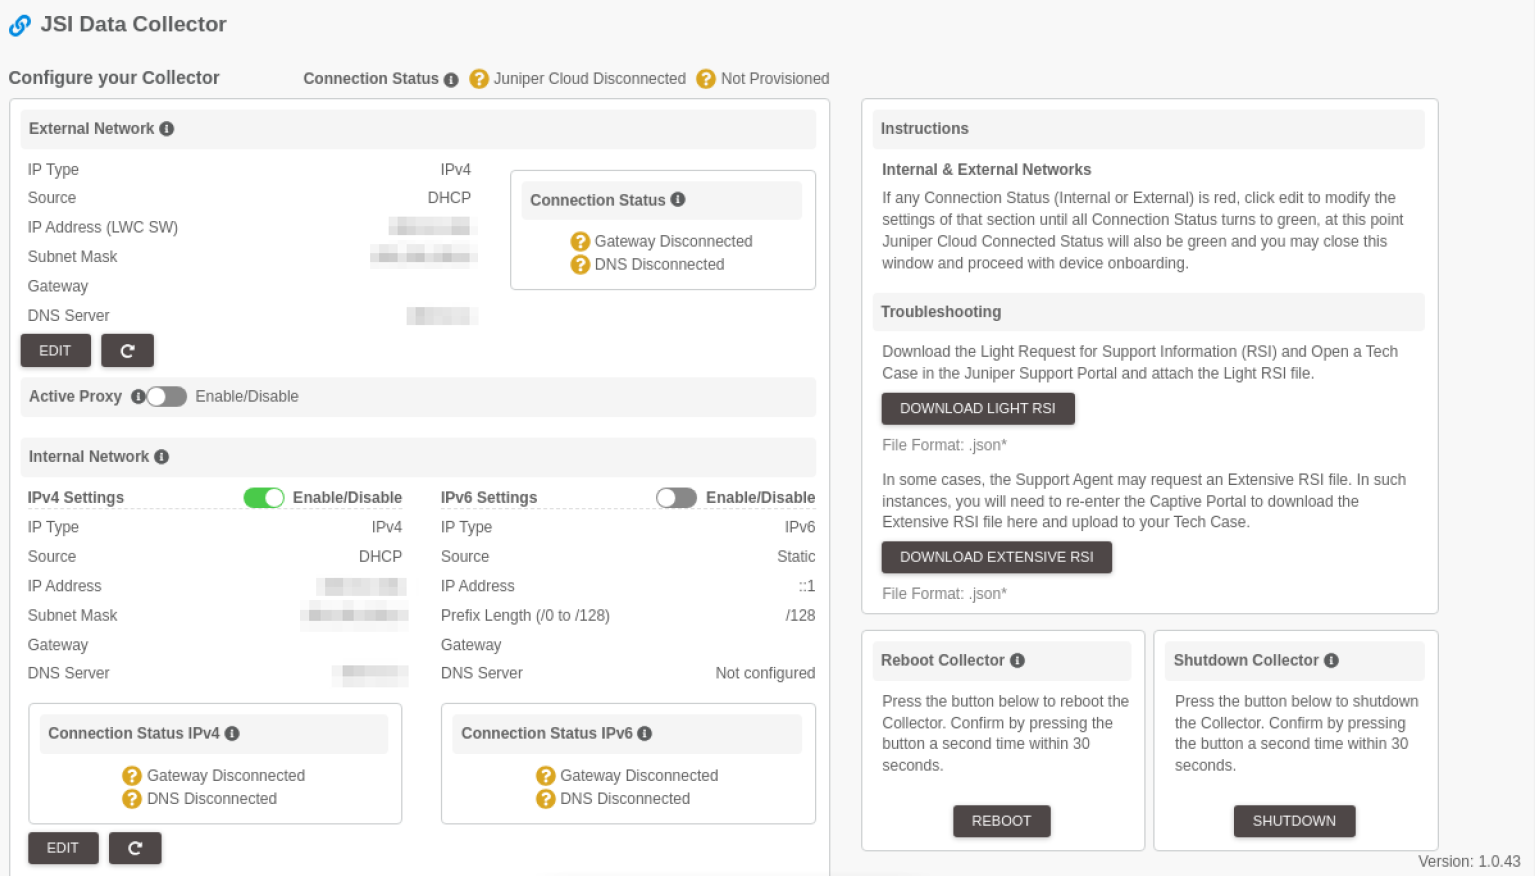 Note:
Note:If the default DHCP configuration on the vLWC is successful, the Captive Portal web page shows the vLWC's connection status as connected, and populates the fields in all the configurations sections appropriately.
Click the Refresh icon under the External Network or Internal Network sections to refresh the current connection states for that section.
The JSI Data Collector page displays configuration sections for the following:
-
External Network—Lets you configure external network port that connects the vLWC to the Juniper's Cloud. Supports DHCP and static addressing. The External Network configuration is used to perform device provisioning.
-
Internal Networks—Lets you configure the internal network port that connects the vLWC to the Juniper devices on the network. Supports DHCP and static addressing.
-
Active Proxy—Lets you configure the active proxy IP address as well as the port number if your network infrastructure controls access to the Internet though an active proxy. You need not configure this element if you are not using an active proxy.
-
-
After modifying the fields, click Update to apply the changes
and return to the homepage (the JSI Data Collector page).
If you want to discard your changes, click Cancel.
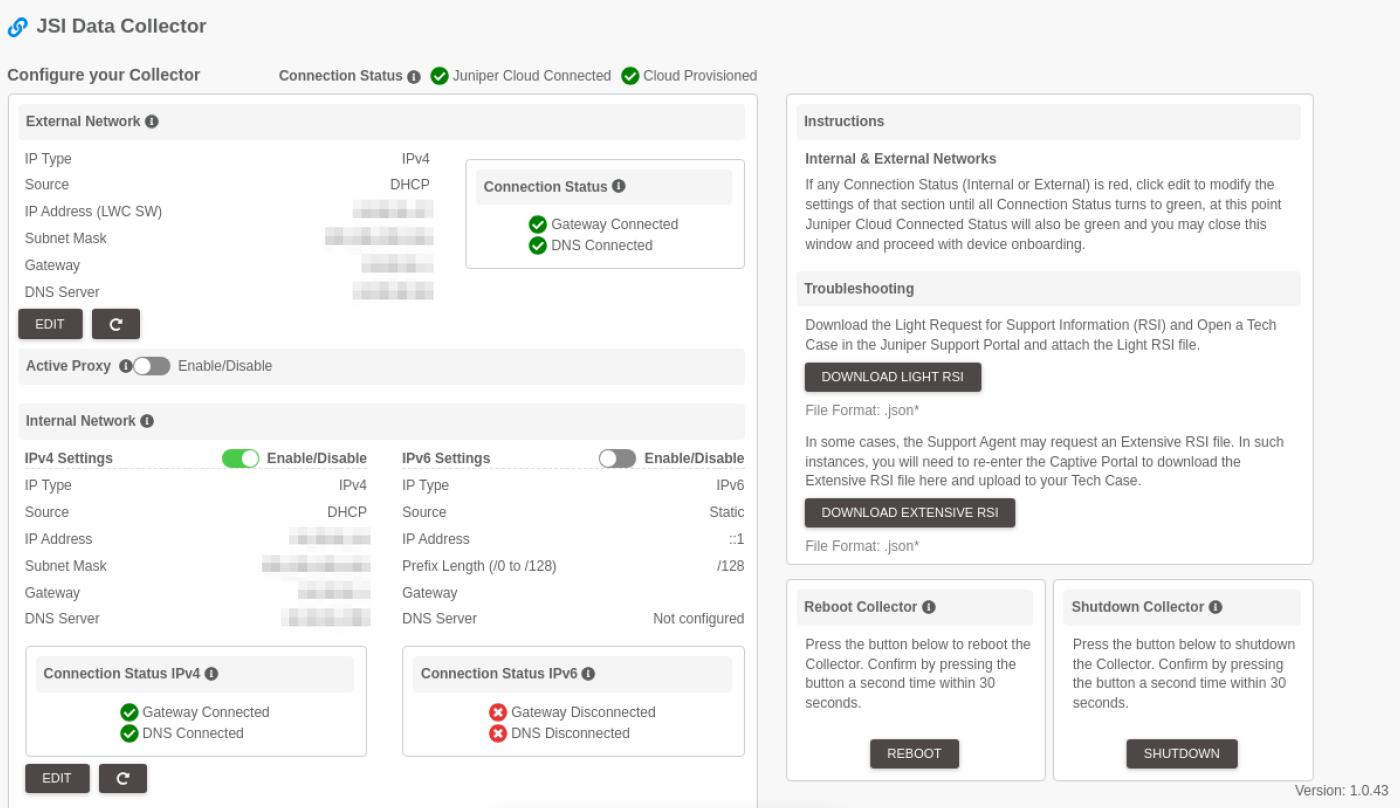
If the vLWC connects to the gateway and DNS successfully, the respective configuration element (internal or external network section) on the JSI Data Collector homepage shows the connection status as Gateway Connected and DNS Connected with green tick marks against them.
The JSI Data Collector homepage displays the Connection Status as:
-
Juniper Cloud Connected if the external connectivity to the Juniper Cloud is established and the active proxy (if applicable) settings are correctly configured.
-
Cloud Provisioned if the device is connected to Juniper Cloud and has completed the Zero Touch Experience (ZTE) process. After the Cloud connection status becomes Juniper Cloud Connected, it takes about 10 minutes for the provision status to become Cloud Provisioned.
The following image displays the JSI Data Collector page when the vLWC is connected successfully.
-
| Field | Description |
|---|---|
| External Network | |
| IP Type | Select an IP address version:
|
| Source | Select an IP address assignment type.
|
| IP Address (LWC) |
Applicable only if you selected Static as Source. Enter the IP Address of the vLWC device. |
| Subnet Mask |
Applicable only if you selected Static as Source. Enter the subnet mask address.The subnet of the IP address assigned to the internal network port must be different from the subnet of the IP address assigned to the external network port. This applies to both DHCP and static configurations. |
| Gateway |
Applicable only if you selected Static as Source. Enter the IP address of the default gateway connected to the vLWC. |
| DNS Server | Enter the DNS server IP address. |
| Active Proxy | |
| IP Address |
If you want to add an active proxy, enter the IP address of the proxy. |
| Port | Enter the port number used for the active proxy. |
| Internal Network | |
| IP Type | Select an IP address version:
|
| Source | Select an IP address assignment type.
|
| IP Address |
Applicable only if you selected Static as Source. Enter the IP Address of the LWC device. |
| Subnet Mask |
Applicable only if you selected Static as Source. Enter the subnet mask address.The subnet of the IP address assigned to the internal network port must be different from the subnet of the IP address assigned to the external network port. This applies to both DHCP and static configurations. |
| Gateway |
Applicable only if you selected Static as Source. Enter the IP address of the default gateway connected to the LWC. |
| DNS Server | Enter the DNS server IP address. |