Upgrading JSA to 7.5.0
You must upgrade all of the JSA products in your deployment to the same version.
Determine the minimum JSA release that is required for the release of JSA to which you want to update. For more information about the minimum JSA release required to update JSA, see JSA 7.4.2 Fix Pack 3 (Patch 3) release.
-
Click Help > About to check your current release of JSA.
To ensure that JSA upgrades without errors, ensure that you use only the supported versions of JSA software:
Software versions for all JSA appliances in a deployment must be the same version and fix level. Deployments that use different JSA versions of software are not supported.
Custom DSMs are not removed during the upgrade.
Upgrade your JSA Console first, and then upgrade each managed host. In high availablity (HA) deployments, when you upgrade the HA primary host, the HA secondary host is automatically upgraded.
The following JSA systems can be upgraded concurrently:
-
Event processors
-
Event collectors
-
Flow processors
-
Data nodes
-
App hosts
What to do next:
-
Unmount /media/updates by typing the following command:
umount /media/updates -
Delete the SFS file.
-
Perform an automatic update to ensure that your configuration files contain the latest network security information. For more information, see Checking for New Updates.
-
Delete the patch file to free up space on the partition.
-
Clear your web browser cache. After you upgrade JSA, the Vulnerabilities tab might not be displayed. To use JSA Vulnerability Manager after you upgrade, you must upload and allocate a valid license key. For more information, see the Juniper Secure Analytics Administration Guide for your product.
-
Determine whether there are changes that must be deployed. For more information see “Deploying Changes” in Juniper Secure Analytics Administration Guide.
Upgrading JSA by using Parallel Patching
You can upgrade all the JSA products in your deployment by using parallel patching.
From the Patch installer menu, you can choose to upgrade your JSA products by using Legacy Patching (Sequential) or Parallel Patching.
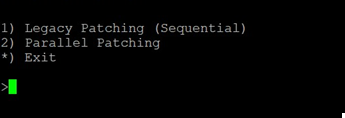
The Patch installer menu is available only when you run the installer from the console.
Legacy Patching (Sequential)
To upgrade the attached managed hosts sequentially, from the Patch installer menu, select Legacy Patching (Sequential). The default Legacy Patch installer menu is displayed as shown in Figure 2.
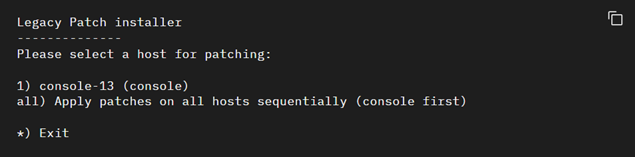
If you exit from the Legacy Patching (Sequential) menu, the installer closes. You can reload the installer to go back to the Patch installer menu.
Parallel Patching
To upgrade all attached managed hosts simultaneously, from the Patch installer menu, select Parallel Patching. The Parallel Patch Menu is displayed as shown in Figure 3.
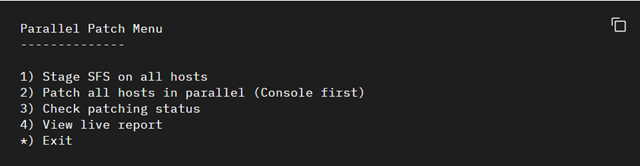
To successfully upgrade JSA by using parallel patching, do not rename the SFS file on the console.
The following table describes the options in the Parallel Patch Menu.
|
Options |
Description |
|---|---|
| Optional: Stage SFS on all hosts |
The SFS file that is on the console is staged to each managed host in the deployment before the upgrade begins. You can stage the SFS on all hosts a day or a week in advance without excess downtime. If an SFS file exists on the managed host, the console runs a hash check to verify whether the SFS file on the managed host and the console are identical. If hash check fails, the console overwrites the SFS file on the managed host. If the SFS files are identical, this step is skipped. If an error occurs during the staging, a message is displayed in the Parallel Patch Menu that indicates the managed hosts where the SFS staging failed. By default, the SFS is staged to 5 managed hosts at a time. If you face network bandwidth issues, use the -l option in the command line to specify the transfer rate in kilobits per second that is used to copy the SFS file to each managed host. For example, if the transfer limit is 500 kilobits per second, the total bandwidth that is used by the console is 2500 kilobits per second when the SFS file is staged on 5 managed hosts. |
| Patch all hosts in parallel | The SFS file is staged on all managed hosts, and the upgrade process is started. If the SFS file is not staged on the managed hosts, this option stages the SFS file on all managed hosts before the upgrade process. After the console verifies that the SFS file is staged on all the managed hosts, the upgrade process begins on the console. If the console upgrade fails, the upgrade process stops and requires investigation. When the console upgrade is successful, the console validates each managed host before the upgrade is run in your deployment. A message is displayed in the Parallel Patch Menu with a summary of the upgrade process. A managed host is skipped during the upgrade process if it meets the following conditions.
|
| Check patching status |
A high-level overview of each host is displayed with the SFS Status, Is Host Patched, and Is Patch Running details. |
| View Live Report |
The live report of the upgrade status is displayed. This
display shows all the hosts in the deployment and the
percentage complete of the upgrade. If a host fails during
the upgrade, a |
| Exit | While the upgrade is running on the managed hosts, the Exit option is not available. You can use this option when the upgrade is completed on all managed hosts. To go to the console command line during the upgrade, use only one of the following methods:
|