Create an SQS Queue and Configure S3 ObjectCreated Notifications
Before you can add a log source in JSA, you must create an SQS queue and configure S3 ObjectCreated notifications in the AWS Management Console when using the Amazon AWS S3 REST API protocol.
Complete the following procedures:
Finding the S3 Bucket that contains the Data that you want to Collect
You must find and note the region for S3 bucket that contains the data that you want to collect.
- Log in to the AWS Management Console as an administrator.
- Click Services, and then go to S3.
- From the AWS Region column in the Buckets list, note the region where the bucket that you want to collect data from is located. You need the region for the Region Name parameter value when you add a log source in JSA.
- Enable the check box beside the bucket name, and then from the panel that opens to the right, click Copy Bucket ARN to copy the value to the clipboard. Save this value or leave it on the clipboard. You need this value when you set up SQS queue permissions.
Creating the SQS Queue that is used to Receive ObjectCreated Notifications
You must create an SQS queue and configure S3 ObjectCreated notifications in the AWS Management Console when using the Amazon AWS REST API protocol.
You must complete Finding the S3 Bucket that contains the data that you want to collect. The SQS Queue must be in the same region as the AWS S3 bucket that the queue is collecting from.
-
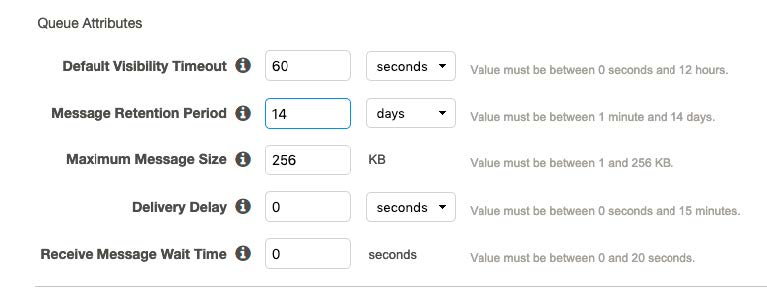
Click Standard Queue, select Configure
Queue, and then change the default values for the following
Queue Attributes.
-
Default Visibility Timeout - 60 seconds (You can use a lower value. In the case of load balanced collection, duplicate events might occur with values of less than 30 seconds. This value can't be 0.)
-
Message Retention Period - 14 days (You can use a lower value. In the event of an extended collection, data might be lost.)
Use the default value for the remaining Queue Attributes.
More options such as Redrive Policy or SSE can be used depending on the requirements for your AWS environment. These values should not affect the data collection.
-
Setting up SQS Queue Permissions
You must set up SQS queue permissions for users to access the queue.
You must complete Creating the SQS Queue that is used to Receive ObjectCreated Notifications.
You can set the SQS queue permissions by using either the Permissions Editor or a JSON policy document.
Creating ObjectCreated Notifications
Configure ObjectCreated notifications for the folders that you want to monitor in the bucket.
-
Click the Properties tab, and in the
Events pane, click Add notification.
Configure the parameters for the new event.
The following table shows an example of an ObjectCreated notification parameter configuration:
Table 3: Example: New ObjectCreated Notification Parameter Configuration Parameter
Value
Name
Type a name of your choosing.
Events
Select All object create events.
Prefix
AWSLogs/
Tip:You can choose a prefix that contains the data that you want to find, depending on where the data is located and what data that you want to go to the queue. For example, AWSLogs/, CustomPrefix/AWSLogs/, AWSLogs/123456789012/.
Suffix
json.gz
Send to
SQS queue
Tip:You can send the data from different folders to the same or different queues to suit your collection or JSA tenant needs. Choose one or more of the following methods:
-
Different folders that go to different queues
-
Different folders from different buckets that go to the same queue
-
Everything from a single bucket that goes to a single queue
-
Everything from multiple buckets that go to a single queue
SQS
The Queue Name from step 4 of Creating the SQS Queue that is used to Receive ObjectCreated Notifications.
Figure 1: Example: Events
In the example in figure 1 of a parameter configuration, notifications are created for AWSLogs/ from the root of the bucket. When you use this configuration, All ObjectCreated events trigger a notification. If there are multiple accounts and regions in the bucket, everything gets processed. In this example, json.gz is used. This file type can change depending on the data that you are collecting. Depending on the content in your bucket, you can omit the extension or choose an extension that matches the data you are looking for in the folders where you have events set up.
After approximately 5 minutes, the queue that contains data displays. In the Messages Available column, you can view the number of messages.
Figure 2: Number of Available Messages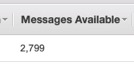
-
-
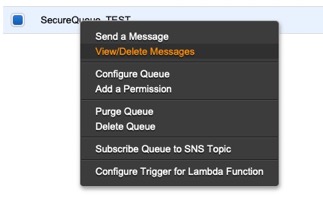
Right-click the Queue Name from step 4 of Creating the SQS Queue that is used to Receive ObjectCreated Notifications, then select View/Delete
Messages to view the messages.
Figure 3: SecureQueue TEST List
Sample message:
{ "Records":[ { "eventVersion":"2.1", "eventSource":"aws:s3", "awsRegion":"us-east-2", "eventTime":"2018-12-19T01:51:03.251Z", "eventName":"ObjectCreated:Put", "userIdentity":{ "principalId":"AWS:AIDAIZLCFC5TZD36YHNZY" }, "requestParameters":{ "sourceIPAddress":"52.46.82.38" }, "responseElements":{ "x-amz-request-id":"6C05F1340AA50D21", "x-amz-id-2":"9e8KovdAUJwmYu1qnEv+urrO8T0vQ+UOpkPnFYLE6agmJSn745 /T3/tVs0Low/vXonTdATvW23M=" }, "s3":{ "s3SchemaVersion":"1.0", "configurationId":"test_SQS_Notification_1", "bucket":{ "name":"myBucketName", "ownerIdentity":{ "principalId":"A2SGQBYRFBZET" }, "arn":"arn:aws:s3:::myBucketName" }, "object":{ "key":"AWSLogs/123456789012/CloudTTrail/eu-west- 3/2018/12/19/123456789012_CloudTrail_eu-west-3_TestAccountTrail _us-east-2_20181219T014838Z.json.gz", "size":713, "eTag":"1ff1209e4140b4ff7a9d2b922f57f486", "sequencer":"005C19A40717D99642" } } } ] } -
Set a User or Role permission to access
the SQS queue and for permission to download from the target bucket. The user or user
role must have permission to read and delete from the SQS queue. For information about
adding, managing and changing permissions for IAM users, see the IAM Users documentation. After JSA reads the notification, and
then downloads and processes the target file, the message must be deleted from the
queue.
Sample Policy:
{
"Version": "2012-10-17",
"Statement": [
{
"Sid": "VisualEditor0",
"Effect": "Allow",
"Action": [
"sqs:DeleteMessage",
"sqs:ReceiveMessage",
"s3:GetObject"
],
"Resource": [
"arn:aws:s3:::<bucket_name>/AWSLogs/*",
"arn:aws:sqs:us-east-2:<AWS_account_number>:<queue_name>"
]
}
]
}
You can add multiple buckets to the S3 queue. To ensure that all objects are accessed, you must have a trailing /* at the end of the folder path that you added.
You can add this policy directly to a user, a user role, or you can create a minimal access user with sts:AssumeRole permissions only. When you configure a log source in JSA, configure the assume Role ARN parameter for JSA to assume the role. To ensure that all files waiting to be processed in a single run (emptying the queue) can finish without retries, use the default value of 1 hour for the API Session Duration parameter.
When you use assumed roles, ensure that the ARN of the user that is assuming the rule is in the Trusted Entities for that role. From the Trusted entities pane, you can view the trusted entities that can assume the role. In addition, the user must have permission to assume roles in that (or any) account.
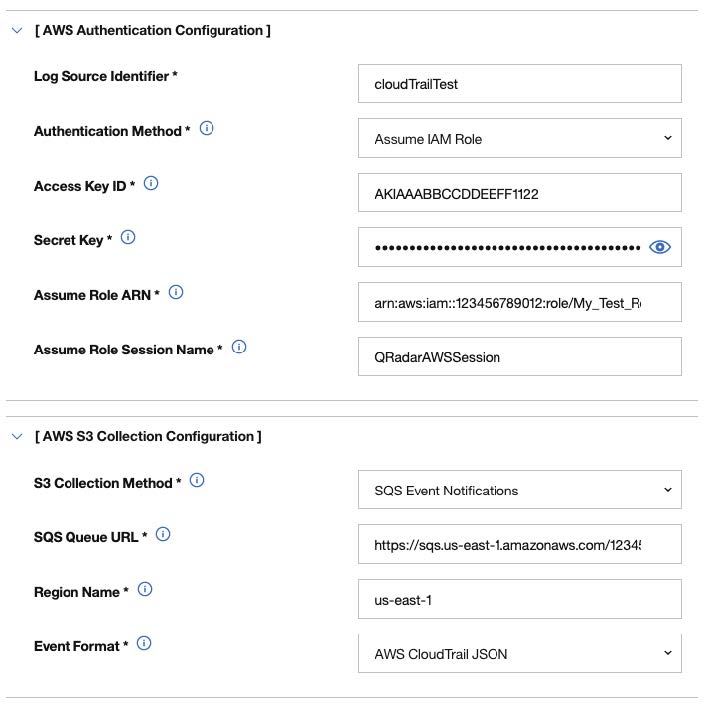
{
"Version": "2012-10-17",
"Statement": [
{
"Sid": "VisualEditor0",
"Effect": "Allow",
"Action": "sts:AssumeRole",
"Resource": "*"
}
]
}
The following image example shows a sample Amazon AWS CloudTrail log source configuration in JSA.
Tip:Use the Amazon AWS S3 REST API log source parameter values for your DSM when you configure your log source.
Figure 4: Example: Amazon AWS CloudTrail log source configuration in JSA