
Step 1 Enter Apstra Edge Details
The Apstra Edge is an on-premises component that connects your Apstra Data Center Director environment to Data Center Assurance. It runs as a container on the Apstra VM and can represent one or multiple blueprints. If your environment includes multiple Apstra VMs, each one will need its own Apstra Edge instance. Apstra Edge maintains connectivity with Data Center Assurance and forwards data centre events and sFlow data from your Apstra environment to the cloud.
To adopt Apstra Edge:
- Log in to HPE Mist Networking Data Center Assurance.
- Navigate to the DC Edges page.
Click Adopt Apstra Edge.
The Adopt Apstra Edge wizard opens.
The Adopt Apstra Edge wizard guides you through each step of the Edge onboarding workflow.
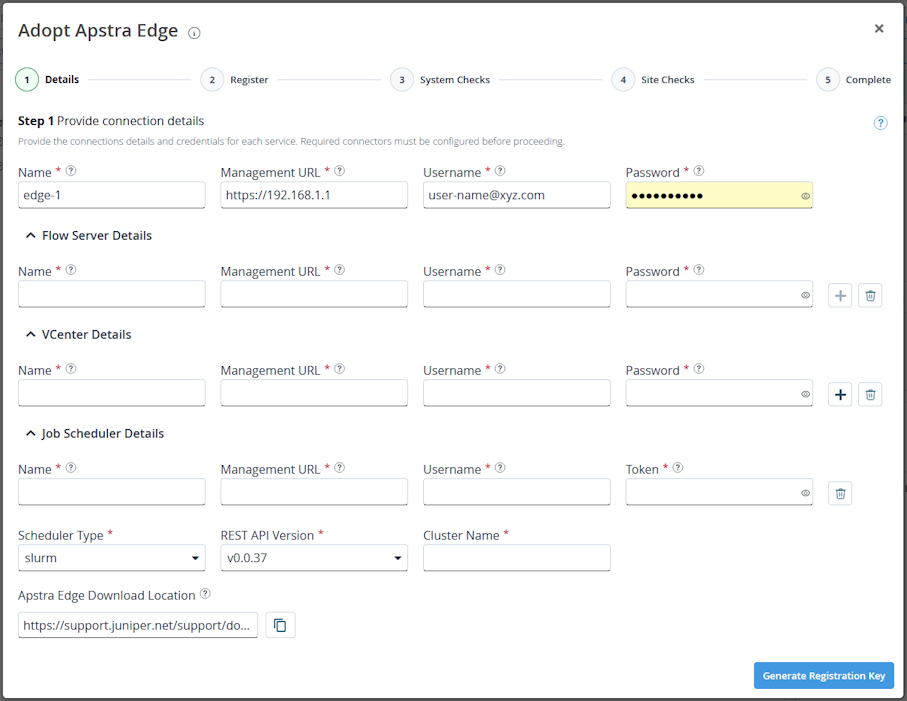
In step 1, provide details about the Apstra Edge connections.
-
Enter information about the Apstra Edge device.
Table 1: Apstra Edge Device Details Field
Description
Edge Name
Unique name to identify Apstra Edge configured in the data center.
Management URL
URL to connect to the Data Center Director instance.
The URL must follow one of the following formats:
-
For IPv4 addresses—https://ipv4-address
For example: https://192.168.1.1
-
For IPv6 addresses—https://[ipv6-address]
For example: https://[3fff:192:158:3::114]
Username
Username to log into the Data Center Director instance.
Password
Password to log into the Data Center Director instance.
-
-
Expand the Flow Server Details section and enter the Flow Server
information.
Adding Flow Server connection details allows Data Center Assurance to collect flow data from the Apstra instance. After Flow Server Details are configured, you can view information about the data center network topology, hosts, endpoints, services, and anomalies on the App Aware and the Impact Analysis pages.
You can configure as many flow servers as required. Click the "+" icon under the Flow Server section and enter details for the additional flow servers.
Table 2: Flow Server Configuration Field
Description
Flow Server Name
Name of the Apstra Flow server.
Management URL
OpenSearch REST API URL to connect to the Apstra Flow server.
The URL must follow one of the following formats:
-
For IPv4 addresses—https://ipv4-address:port-number
For example: https://192.168.1.2:9200
-
For IPv6 addresses—https://[ipv6-address]:port-number
For example: https://[3fff:192:158:3::115]:9200
Username
Username to log into Apstra Flow server.
Password
Password to log into Apstra Flow server.
Note:-
If multiple Apstra Flow servers collect flow data from their respective sites and are configured to a single Apstra Edge device, you can add each flow server to the Apstra Edge device and receive the site flow data on Data Center Assurance.
-
The Apstra Flow information collected from the Apstra instance is stored in Data Center Assurance database for 30 days.
-
-
Expand the vCenter Details section and enter the vCenter
information.
Adding vCenter connection details allows Data Center Assurance to collect information from the vCenter about the virtualized environments and the alarms detected on VMs. After the details for vCenter are configured, you can view information about the VM layer on the App Aware, the Impact Analysis, and the Dashboard Topology pages. You can configure parameters for multiple vCenters.
Table 3: vCenter Configuration Field
Description
vCenter Name
A unique, user-defined name of the vCenter.
Management URL
REST API URL to connect to the vCenter server.
The URL must follow one of the following formats:
-
For IPv4 addresses—https://ipv4-address
For example: https://192.168.1.3
-
For IPv6 addresses—https://[ipv6-address]
For example: https://[3fff:192:158:3::116]
Username
Username to log into vCenter server.
Password
Password to log into vCenter server.
-
-
Expand the Job Scheduler Details section and enter the Job Scheduler information.
Adding job scheduler server details allows Data Center Assurance to collect information from the job scheduler about job activity and status. After the details for a job scheduler are configured, you can view job-related information on the App Aware and the Dashboard Topology pages.
Table 4: Job Scheduler Configuration Field
Description
Job Scheduler Name
A unique, user-defined name of the job scheduler.
Management URL
OpenSearch REST API URL to connect to the job scheduler.
The URL must follow one of the following formats:
-
For IPv4 addresses—https://ipv4-address:port-number
For example: https://192.168.1.4:9200
-
For IPv6 addresses—https://[ipv6-address]:port-number
For example: https://[3fff:192:158:3::117]:9200
Username
Username to log into job scheduler.
Token
Token to log into the job scheduler.
Note:Create a token with a long validity period on the job scheduler since it cannot be renewed.
Scheduler Type
The type of job scheduler.
REST API Version
The version number of the REST API.
Cluster Name
The cluster name for the job scheduler.
-
- Click Generate Registration Key to move to the next step.