Upgrading the CTP150, CTP151, and CTP2000 Series Devices to Dual Image of CTPOS 9.1R3.4
Upgrading to Dual Image on CTP150, CTP151, and CTP2000 series Devices
Starting from CTPOS Release 9.1R3.4, you can install dual image of CTPOS 9.1R3.4 on CTP150, CTP151, and CTP2000 series devices. This topic describes the following upgrade procedures. Follow proper antistatic procedures throughout.
CTPOS Release 9.1R3.4 supports CTP150, CTP151, and CTP2000 series devices.
- Prerequisites for Dual Image Upgrade
- Upgrading to Dual Image on CTP151
- Upgrading to Dual Image on CTP150 and CTP2000 Series Devices
Prerequisites for Dual Image Upgrade
Upgrading to Dual Image on CTP151
Purpose
Before you upgrade to dual image, ensure that you meet the following broad level requirements.
Action
-
Dual upgrade requires having a console connection (and not SSH) to the device.
-
We recommend the following working USB models when you are upgrading from an USB.
-
LEXAR USB Flash Drive
-
UNIGEN PSK8000S1
-
-
The dual image upgrade feature is supported on CTPOS 7.3Rx, 9.0R1, 9.1R1, and 9.1R2 releases. However, if you want to upgrade any earlier CTPOS versions to CTPOS 9.1R3.4, then you must first upgrade the earlier versions to CTPOS 7.3R7-1 or CTPOS 7.3R8 on CTP150/2000 devices and to CTPOS 9.1R1 or 9.1R2 on CTP151 device.
-
The dual image upgrade feature is supported on CTP2000 (PP833 processor) and CTP150 devices running CTPOS 7.3R7-1 or 7.3R8, or 9.0R1 releases. This feature is also supported on CTP 151 device running CTPOS 9.1Rx releases.
-
Partition geometry will be different on PP833 CTP2000 platform. CTP150 platforms will have legacy bios supported partitions while CTP151 platforms will have UEFI partitions on the disk.
The partitions geometry details on both category of platforms are:
Table 1: Legacy Bios Supported Platforms–CTP2000 (PP833), CTP150 Label
Size
Type
CTP_BOOT
100M
Ext3
CTP_ROOT_1
1400M
Ext3
CTP_HOME_1
50M
Ext3
CTP_VAR_1
50M
Ext3
CTP_LOCAL_1
400M
Ext3
CTP_ROOT_2
1400M
Ext3
CTP_HOME_2
50M
Ext3
CTP_VAR_2
50M
Ext3
CTP_LOCAL_2
400M
Ext3
Following partitions will be created on CTP151 for dual image and first two partitions will be common for both images. The first partition (BIOS Type) will have 1M size and will have no label name. This partition is required for supporting dual boot feature (legacy Bios + UEFI boot).
Table 2: b. UEFI Supported Platforms–CTP151 Label
Size
Type
1M
BIOS
CTP_EFI
100M
EFI
CTP_ROOT_1
2G
Ext4
CTP_BOOT_1
100M
Ext4
CTP_HOME_1
100M
Ext4
CTP_VAR_1
100M
Ext4
CTP_LOCAL_1
670M
Ext4
CTP_ROOT_2
2G
Ext4
CTP_BOOT_2
100M
Ext4
CTP_HOME_2
100M
Ext4
CTP_VAR_2
100M
Ext4
CTP_LOCAL_2
100M
Ext4
Total Size
670M
-
Following files will be available in CTPOS 9.1R3.4 Release to install the dual image:
File Name
Purpose
acorn_310_dual_image_upgrade_ctp150_ctp2k-02_-03_240516.tgz
Dual image upgrade archive file for Legacy BIOS platforms (CTP150 PP833(03)) running 9.0x image
acorn_310_dual_image_upgrade_ctp151_240516.tgz
Dual image upgrade archive file for UEFI platforms (CTP151) running 9.1x image
acorn_429_dual_image_upgrade_ctp150_ctp2k-02_-03_240516.tgz
Dual image upgrade archive file for Legacy BIOS platforms (CTP150, PP833) running 7.x image
CTPOS_9.1R3-4_partitions_ctp150_ctp2k-02_-03_240516.tgz
Image partitions archive file for CTP150, PP833. This file needs to be copied in /mnt/ramdisk during later execution of dual upgrade process as suggested by logs.
CTPOS_9.1R3-4_partitions_ctp151_240516.tgz
Image partitions archive file for CTP151. This file needs to be copied in /mnt/ramdisk during later execution of dual upgrade process as suggested by logs.
ctpos_usb_install_9.1R3-1_ctp150_ctp2k-02_-03_211221.img
USB install image file for CTP150 and PP833 systems.
Note:This image is not supported on PP332 system.
ctpos_usb_install_9.1R3-1_ctp151_211221.img
Note:This file is provided as a compressed file (.gz) which was compressed using gzip. Instructions on how to uncompress it are included in the "Installing Dual Image on CTP151 from USB" section below.
USB install image files for CTP151 systems.
Upgrading to Dual Image on CTP151
You can upgrade to CTPOS 9.1R3.4 on a CTP151 device through three different interface methods:
CLI or manual
USB
CTPView
Preparing CTP151 before Upgrade
Before you starting upgrading to CTPOS 9.1R3.4, ensure that you complete the following tasks.
-
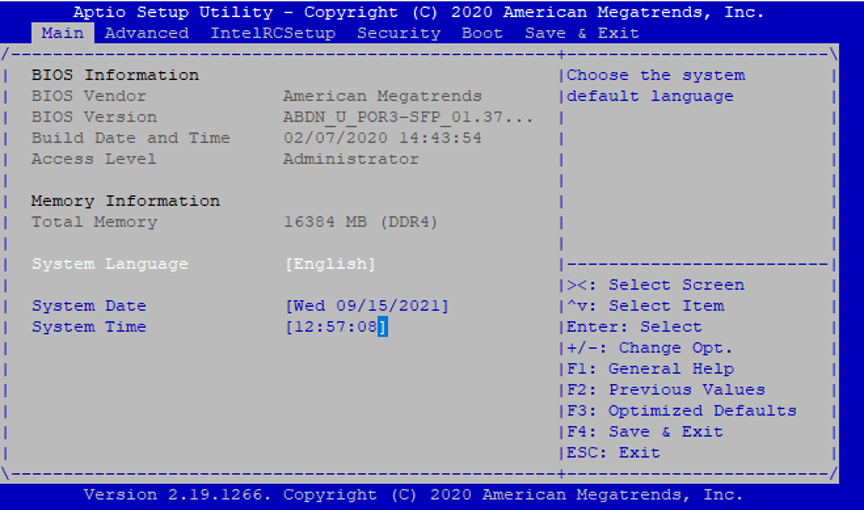
Reboot CTP Node. Click Delete or
Esc prior to GRUB load menu.The BIOS menu
appears.
-
Select
Bootmenu. The Boot menu is displayed.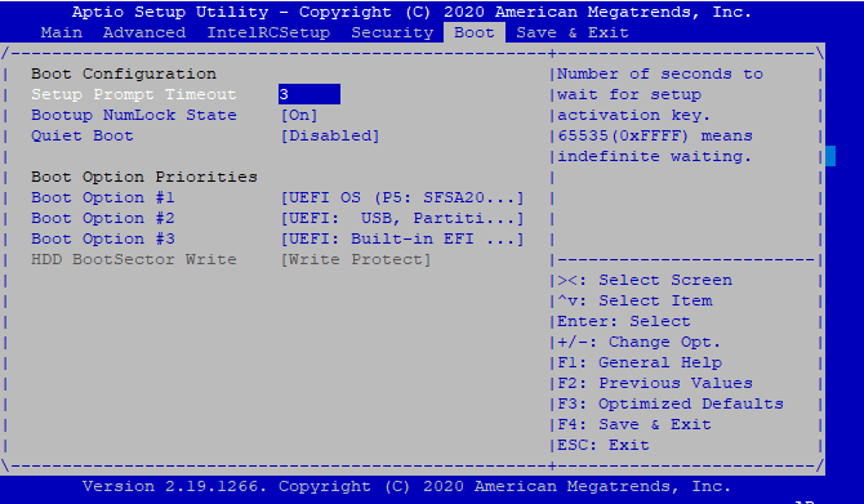
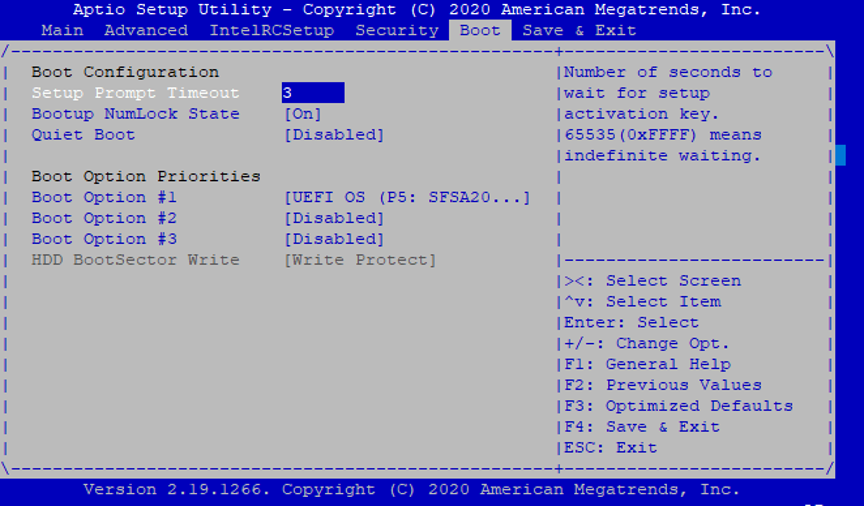
Ensure that the Boot Option #1 has UEFI OS. If not, select UEFI OS as Boot Option #1.
-
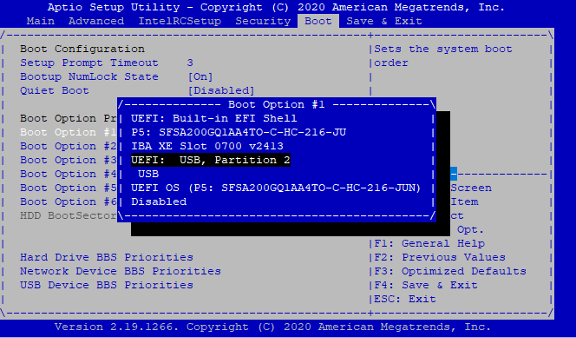
Select the last Boot Option. In this case,
last Boot option is
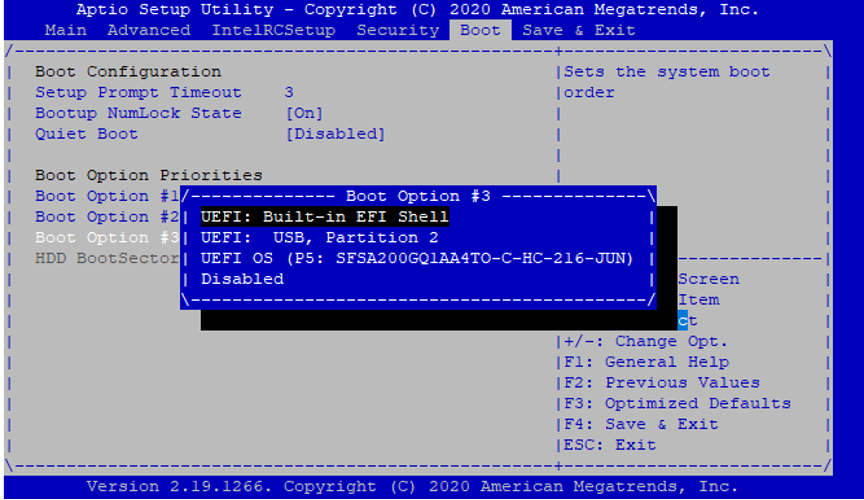
#3. Select Boot Option #3 and press Enter.The Boot Option #3 window appears.
-
Select Disabled and press Enter.
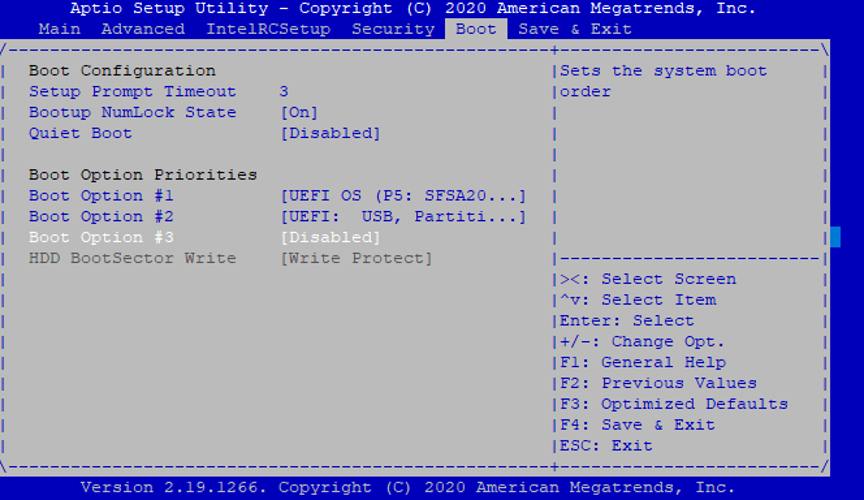
The Boot Option #3 is now disabled.
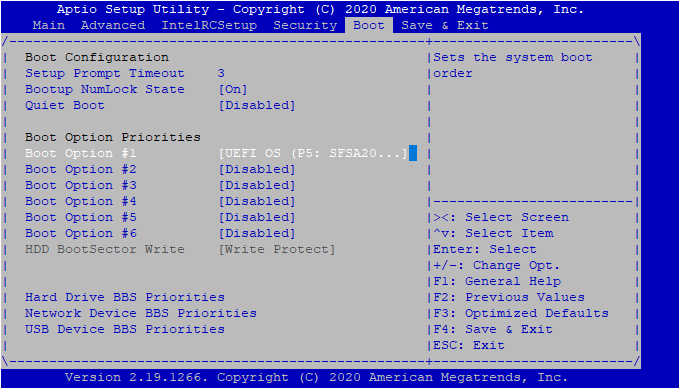
-
Similarly, disable all the other boot options
except for Boot Option #1.Only Boot Option #1
should be enabled with UEFI OS.
-
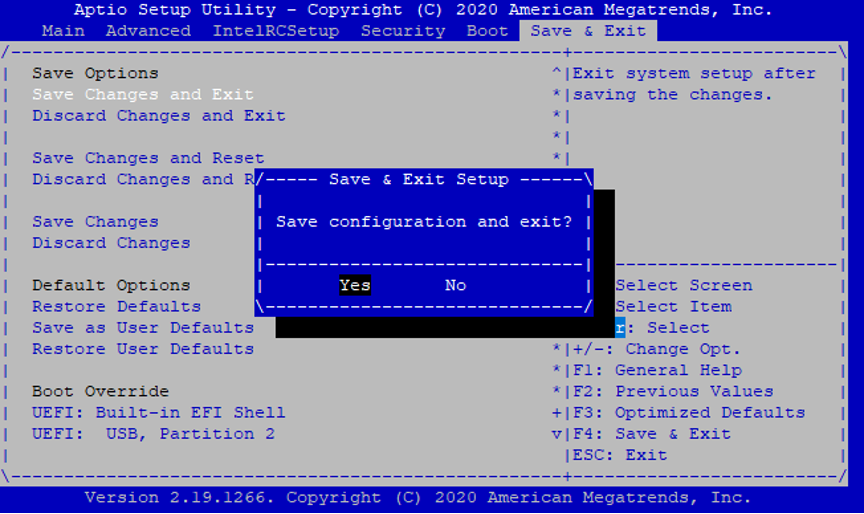
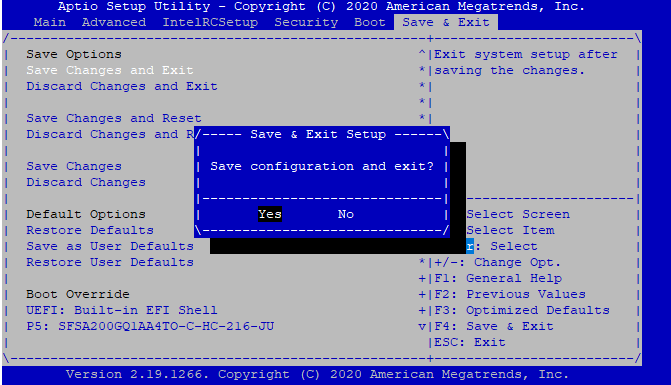
Save and exit the BIOS configuration.Go to
Save & Exit menu and select
Yes.
GNU GRUB  version 2.02~beta3-4ubuntu2.2

 /---------------------------------------------------------------------\
 |*CTPOS WRLv7                                                         |
 |                                                                     |
 |                                                                     |
 |                                                                     |
 |                                                                     |
 |                                                                     |
 \---------------------------------------------------------------------/

      Use the ^ and v keys to select which entry is highlighted.
      Press enter to boot the selected OS, `e' to edit the commands
      before booting or `c' for a command-line. ESC to return previous
      menu.

………………………..
…………………………….
…………………………..
…………………………………

[root@ctp_87:/home/ctp_cmd 1]# cmd -v

        CTPOS CLI version: 9.1R1 191223
        Compile Time: Mon Nov 29 2021 01:32:31 PM
Upgrading to Dual Image on CTP151
- Installing Dual Image on CTP151 Manually through CLI
- Installing Dual Image on CTP151 from USB
- Installing Dual Image on CTP151 from CTPView
Installing Dual Image on CTP151 Manually through CLI
The package acorn_310_dual_image_upgrade_ctp151_240516.tgz is needed to upgrade CTP151 to CTPOS 9.1R3.4. Extract this package from the tarball ctp_complete_9.1R3-4_240516.tgz that is available in the Juniper Networks download page at https://support.juniper.net/support/downloads/ for CTPOS 9.1R3.4 Release. This package, when executed:
|
On a single image system, will |
|
|
On a dual image system, will |
Prepare the system to accept image upgrade tar ball (create RAM disk) |
The following steps illustrate how to manually upgrade a CTPOS 9.1R3.4 dual image from an existing single image or a dual image using CLI commands.
The steps involved to upgrade dual image on a CTP151 device varies from the steps to upgrade on a CTP150 or CTP2000 series device.
Installing Dual Image on CTP151 from USB
The USB flash image ctpos_usb_install_9.1R3-1_ctp151_211221.img is needed to upgrade to CTPOS 9.1R3.1 in the CTP151 device. Download this image from the Juniper Networks download page at https://support.juniper.net/support/downloads/ for CTPOS 9.1R3.1 Release.When USB install for dual upgrade is executed:
|
On a single image system, it will |
|
|
On a dual image system, it will |
prepare the system to accept image upgrade tar ball (create RAM disk) |
|
For a blank or corrupted system |
Blank or corrupted “/dev/sda” disk may occur due to one of the following reasons:
If any of the above is true, you must recover CTP151 using the USB installation image of 9.1R1 or 9.1R2 release. For this, you need to follow instructions in the release notes of respective release to install image on CTP151. Following a successful installation, you can proceed further for 9.1R3.1 USB installation on CTP151.You may contact JTAC for the links to download 9.1R1 or 9.1R2 release and associated release notes. |
To install dual image from USB:
-
Reboot CTP Node. Press Delete or
ESC key to enter BIOS menu.

-
Ensure that the Boot Option #1 has UEFI USB
selected. If not, select UEFI USB as Boot Option
#1.
-
Ensure to disable all other Boot Options in
boot menu, Only UEFI USB Boot Option #1 should be
Enabled. For disabling a Boot Option, go to “Boot
Option #” which needs to be disabled and press
Enter and select Disabled.

-
Go to Save and Exit menu.Select
Save Changes and Exit.Press Enter
and select Yes.

The system will reboot.
-
Go to BIOS menu and change boot priority #1
to UEFI OS and save the
changes.
Installing Dual Image on CTP151 from CTPView
See Installing CTPOS 9.1R3.4 Dual Image on CTP device from CTPView section in CTPView Network Management System Administration Guide
Upgrading to Dual Image on CTP150 and CTP2000 Series Devices
You can upgrade to CTPOS 9.1R3.4 on a CTP150 and CTP2000 Series device through three different interface methods.
CLI or manual
USB
CTPView
Upgrading to Dual Image on CTP150 or CTP2000 Series Device
- Installing Dual Image on CTP150 or CTP2000 Series Device Manually through CLI
- Installing Dual Image on CTP150 or CTP2000 Series device from USB
- Installing Dual Image on CTP150 or CTP2000 Series device from CTPView
Installing Dual Image on CTP150 or CTP2000 Series Device Manually through CLI
The package acorn_310_dual_image_upgrade_ctp150_ctp2k-02_-03_240516.tgz is needed to upgrade to CTPOS 9.1R3.4 on CTP150 or CTP2000 Series devices running CTPOS 9.0Rx and acorn_429_dual_image_upgrade_ctp150_ctp2k-02_-03_240516.tgz package is needed to upgrade to CTPOS 9.1R3.4 on CTP150 or CTP2000 Series devices running CTPOS 7.3Rx. Extract the package from the tarball ctp_complete_9.1R3-4_240516.tgz that is available in the Juniper Networks download page at https://support.juniper.net/support/downloads/ for CTPOS 9.1R3.4 Release. This package, when executed:
|
On a single image system, it will |
|
|
On a dual image system, will |
Prepare the system to accept image upgrade tar ball (create RAM disk). |
The following steps illustrate how to manually upgrade to a CTPOS 9.1R3.4 dual image from an existing single image or a dual image using CLI commands.
The steps involved to upgrade dual image on a CTP150 or CTP2000 series device varies from the steps to upgrade dual image on a CTP151 device.
The “upgrade” program is executed to run acorn_310_dual_image_upgrade_ctp150_ctp2k-02_-03_240516.tgz or acorn_429_dual_image_upgrade_ctp150_ctp2k-02_-03_240516.tgz package on CTP2000 and CTP150.
When running “upgrade” program from a CTPOS version 9.x, the acorn_310_dual_image_upgrade_ctp150_ctp2k-02_-03_240516.tgz is required.
When running “upgrade” program from a CTPOS version 7.x, the acorn_429_dual_image_upgrade_ctp150_ctp2k-02_-03_240516.tgz is required.
The following steps show how to upgrade to a CTPOS 9.1R3.1 dual image on an existing CTPOS 9.0R1 on a CTP150 device.
Installing Dual Image on CTP150 or CTP2000 Series device from USB
The USB flash image ctpos_usb_install_9.1R3-1_ctp150_ctp2k-02_-03_211221.img is needed to upgrade to CTPOS 9.1R3.1 on a CTP150 or CTP2000 series device. Download this image from the Juniper Networks download page at https://support.juniper.net/support/downloads/ for CTPOS 9.1R3.4 Release.
USB install is not supported for CTP2000 platforms with 02 (PP332) processor.
When USB install for dual upgrade is executed:
|
On a single image system, it will |
|
|
On a dual image system, it will |
prepare the system to accept image upgrade tar ball (create RAM disk) |
Following steps illustrate how to upgrade dual image CTPOS 9.1R3.1 on a CTP2000 device with PP833 processor.
-
Reboot CTP Node.Press F2 key twice to
go to the BIOS menu in CTP2000 series device with
PP833 processor.If you are doing USB install on a
CTP150 device, press Backspace to enter the
BIOS menu.

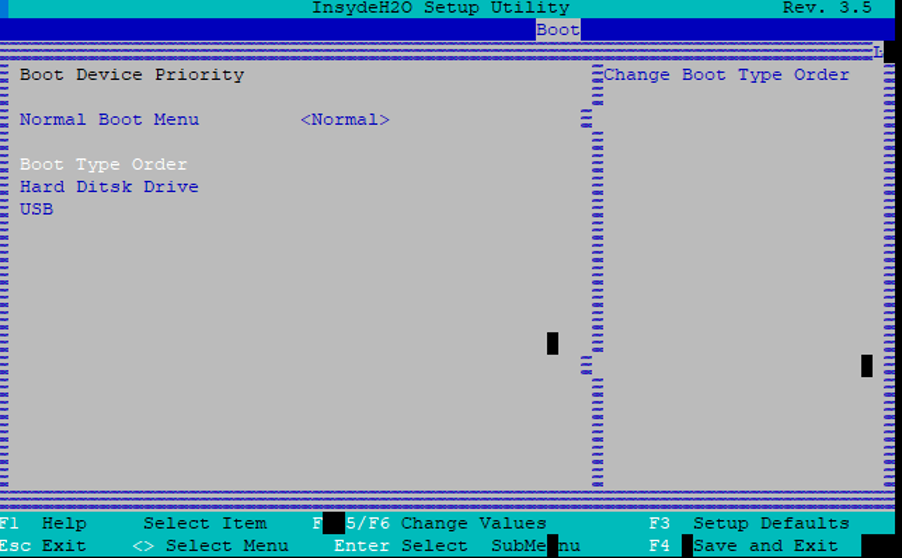
-
Press Enter and select Boot
Type Order.

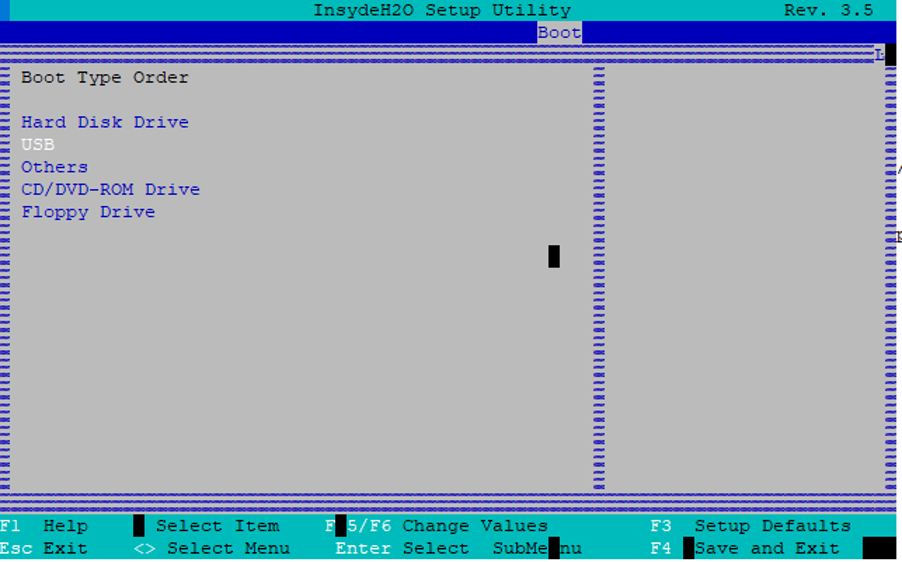
-
Press Enter. Press <F5> key to display
the USB option.

-
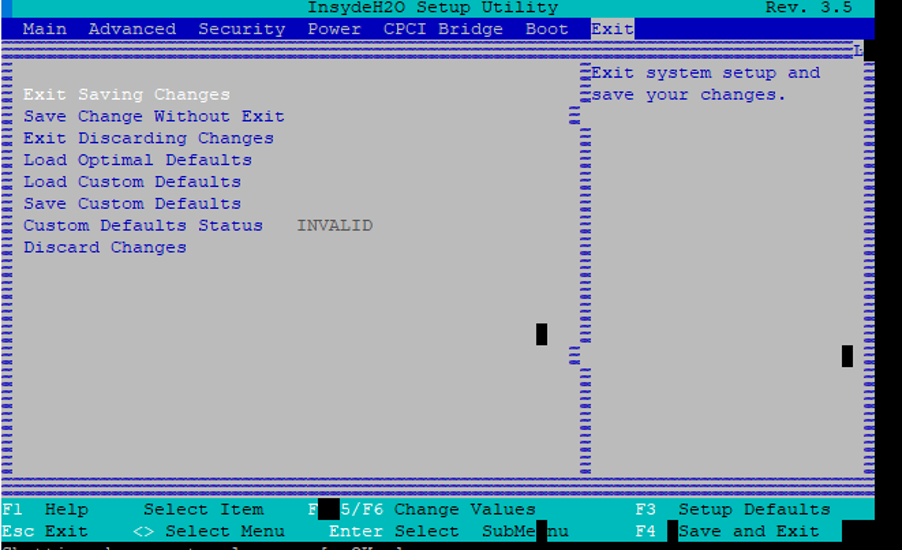
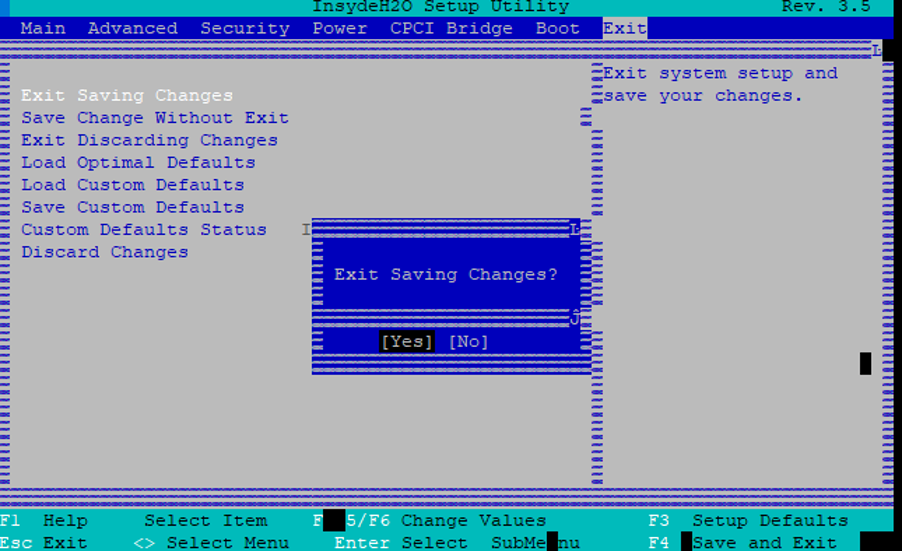
Select Exit Saving
Changes and enter Yes.
The system will boot and comes up with USB menu displaying the following.

========================================================== ========================================================== ===== CTPOS USB installation - Version 0.54 ========================================================== ========================================================== --- Checking for programs... Done. --- Detecting system type: CTP2000_PP833 --- Detecting disks/partitions on system... Done. --- Detecting available image files... Only one image file exists: 9.1R3.1 ----------------------------------------------- Please Select a destination disk from the list: 0) USB Disk /dev/sda (3.8G) ----------------------------------------------- Selection: 0 ----------------------------------------------- Here are your installation selections: Image file: 9.1R3.1 Destination disk: /dev/sda ----------------------------------------------- Continue with installation? y[n]: y !!!!!!!!!!!!!!!!!!!!!!!!!!!!!!!!!!!!!!!!!!kjournald starting. Commit interval 5 seconds EXT3-fs (sdb5): warning: maximal mount count reached, running e2fsck is recommended EXT3-fs (sdb5): using internal journal EXT3-fs (sdb5): mounted filesystem with ordered data mode !!!!!!!!!!!!!!!! !!!! You are executing in Non-Interactive Mode !!!! SYSTEM will *REBOOT* automatically once the !!!! execution completes successfully !!!!!!!!!!!!!!!!!!!!!!!!!!!!!!!!!!!!!!!!!!!!!!!!!!!!!!!!!! !!!! During this process, it is possible that you may !!!! lose IP connectivity. Juniper recommends having a !!!! console connection to the device. If you lose IP !!!! connectivity and do not have console access, you !!!! WILL lose access to the device. Backing up system identity files . . . [ OK ] Unmounting all partitions of /dev/sda kjournald starting. Commit interval 5 seconds EXT3-fs (sda1): using internal journal EXT3-fs (sda1): mounted filesystem with ordered data mode Unmounting Image1...[ OK kjournald starting. Commit interval 5 seconds EXT3-fs (sda1): using internal journal EXT3-fs (sda1): mounted filesystem with ordered data mode kjournald starting. Commit interval 5 seconds EXT3-fs (sda5): warning: maximal mount count reached, running e2fsck is recommended EXT3-fs (sda5): using internal journal EXT3-fs (sda5): mounted filesystem with ordered data mode kjournald starting. Commit interval 5 seconds EXT3-fs (sda6): using internal journal EXT3-fs (sda6): mounted filesystem with ordered data mode kjournald starting. Commit interval 5 seconds EXT3-fs (sda7): warning: maximal mount count reached, running e2fsck is recommended EXT3-fs (sda7): using internal journal EXT3-fs (sda7): mounted filesystem with ordered data mode kjournald starting. Commit interval 5 seconds EXT3-fs (sda8): using internal journal EXT3-fs (sda8): mounted filesystem with ordered data mode ] Unmounting all partitions of /dev/sda Mounting Image1 to /mnt/ ...journald starting. Commit interval 5 seconds EXT3-fs (sda1): using internal journal EXT3-fs (sda1): mounted filesystem with ordered data mode [1;34m[ OK ] mounting tkjournald starting. Commit interval 5 seconds EXT3-fs (sda1): using internal journal EXT3-fs (sda1): mounted filesystem with ordered data mode kjournald starting. Commit interval 5 seconds EXT3-fs (sda5): warning: maximal mount count reached, running e2fsck is recommended EXT3-fs (sda5): using internal journal EXT3-fs (sda5): mounted filesystem with ordered data mode kjournald starting. Commit interval 5 seconds EXT3-fs (sda6): using internal journal EXT3-fs (sda6): mounted filesystem with ordered data mode kjournald starting. Commit interval 5 seconds EXT3-fs (sda7): warning: maximal mount count reached, running e2fsck is recommended EXT3-fs (sda7): using internal journal EXT3-fs (sda7): mounted filesystem with ordered data mode kjournald starting. Commit interval 5 seconds EXT3-fs (sda8): using internal journal EXT3-fs (sda8): mounted filesystem with ordered data mode mpfs at /mnt/ramdisk[ OK ] ============================================================== System Type : CTP2000 CPU Type : pp833 Flash Type : 4G Compact Flash Currently Running CTPOS : 7.3R7 System State : Running Total RAM Size : 8043 MB Free RAM Size : 7290 MB No. of partitions on /dev/sda : 9 CTPOS installed on : Image1 & Image2 Running Image : Image1 (2.4.29) Non-Running Image : Image2 (9.0R1-comp-190503-160652-load-210705-163325) NOTE: 9.1R3-comp-YYMMDD-HHMMSS-load-YYMMDD-HHMMSS decoded as : 9.1R3 : Release Name comp-YYMMDD-HHMMSS : Root-FS/Kernel compile timestamp load-YYMMDD-HHMMSS : Image upgrade timestamp Dual Image on Flash has two logical images : Image1 - consists Five partitions (1,5,6,7,8) Image2 - consists Five partitions (1,9,10,11,12) First partition(bootable) is common to both Image1 and Image2 ============================================================== *** Image archive not found at /mnt/ramdisk *** *** Please copy CTPOS Image archive .tgz first *** *** and then re-execute dual image upgrade *** !!! NOTE: There is 7289 MB available space in /mnt/ramdisk(RAM) !!!kjournald starting. Commit interval 5 seconds EXT3-fs (sda1): using internal journal EXT3-fs (sda1): mounted filesystem with ordered data mode If your flash image .tgz is larger than this, kjournald starting. Commit interval 5 seconds EXT3-fs (sda1): using internal journal EXT3-fs (sda1): mounted filesystem with ordered data mode kjournald starting. Commit interval 5 seconds EXT3-fs (sda5): warning: maximal mount count reached, running e2fsck is recommended EXT3-fs (sda5): using internal journal EXT3-fs (sda5): mounted filesystem with ordered data mode kjournald starting. Commit interval 5 seconds EXT3-fs (sda6): using internal journal EXT3-fs (sda6): mounted filesystem with ordered data mode kjournald starting. Commit interval 5 seconds EXT3-fs (sda7): warning: maximal mount count reached, running e2fsck is recommended EXT3-fs (sda7): using internal journal EXT3-fs (sda7): mounted filesystem with ordered data mode kjournald starting. Commit interval 5 seconds EXT3-fs (sda8): using internal journal EXT3-fs (sda8): mounted filesystem with ordered data mode *do not* continue !!! with this image upgrade. Please contact JTAC for assistance. Unmounting all partitions of /dev/sda Unmounting all partitions of /dev/sda Mounting Image1 to / ...[ OK ] Exiting... Command Output: Disk /dev/sda: 3.8 GiB, 4110188544 bytes, 8027712 sectors Units: sectors of 1 * 512 = 512 bytes Sector size (logical/physical): 512 bytes / 512 bytes I/O size (minimum/optimal): 512 bytes / 512 bytes Disklabel type: dos Disk identifier: 0x000509ff Device Boot Start End Blocks Id System /dev/sda1 * 2016 201599 99792 83 Linux /dev/sda2 203616 7572095 3684240 5 Extended /dev/sda5 205632 3026015 1410192 83 Linux /dev/sda6 3028032 3126815 49392 83 Linux /dev/sda7 3128832 3227615 49392 83 Linux /dev/sda8 3229632 3832415 301392 83 Linux /dev/sda9 3834432 6654815 1410192 83 Linux /dev/sda10 6656832 6755615 49392 83 Linux /dev/sda11 6757632 6856415 49392 83 Linux /dev/sda12 6858432 7461215 301392 83 Linux Disk /dev/sdb: 29.8 GiB, 32008830976 bytes, 62517248 sectors Units: sectors of 1 * 512 = 512 bytes Sector size (logical/physical): 512 bytes / 512 bytes I/O size (minimum/optimal): 512 bytes / 512 bytes Disklabel type: dos Disk identifier: 0x9835fec0 Device Boot Start End Blocks Id System /dev/sdb1 * 2048 206847 102400 83 Linux /dev/sdb2 206848 6291000 3042076+ 83 Linux Copied /root/ CTPOS_9.1R3-1_partitions_ctp150_ctp2k-02_-03_211221.tgz to /mnt/ramdisk !!!!!!!!!!!!!!!!!!!!!!!!!!!!!!!!!!!!!!!!!!!!!!!!!!!!!!!!!! !!!! You are executing in Non-Interactive Mode !!!! SYSTEM will *REBOOT* automatically once the !!!! execution completes successfully !!!!!!!!!!!!!!!!!!!!!!!!!!!!!!!!!!!!!!!!!!!!!!!!!!!!!!!!!! !!!! During this process, it is possible that you may !!!! lose IP connectivity. Juniper recommends having a !!!! console connection to the device. If you lose IP !!!! connectivity and do not have console access, you !!!! WILL lose access to the device. [ OK ] Unmounting all partitions of /dev/sda Unmounting Image1...[ OK ] Unmounting all partitions of /dev/sda Mounting Image1 to /mnt/ ...[ OK ] ============================================================== System Type : CTP2000 CPU Type : pp833 Flash Type : 4G Compact Flash Currently Running CTPOS : 7.3R7 System State : Running Total RAM Size : 8043 MB Free RAM Size : 7138 MB No. of partitions on /dev/sda : 9 CTPOS installed on : Image1 & Image2 Running Image : Image1 (2.4.29) Non-Running Image : Image2 (9.0R1-comp-190503-160652-load-210705-163325) NOTE: 9.1R3-comp-YYMMDD-HHMMSS-load-YYMMDD-HHMMSS decoded as : 9.1R3 : Release Name comp-YYMMDD-HHMMSS : Root-FS/Kernel compile timestamp load-YYMMDD-HHMMSS : Image upgrade timestamp Dual Image on Flash has two logical images : Image1 - consists Five partitions (1,5,6,7,8) Image2 - consists Five partitions (1,9,10,11,12) First partition(bootable) is common to both Image1 and Image2 ============================================================== CTPOS_9.1R3-1_partitions_ctp150_ctp2k-02_-03_211221.tgz Image archive file found at /mnt/ramdisk Verifying CTPOS_9.1R3-1_partitions_ctp150_ctp2k-02_-03_211221.tgz archive ... CTPOS_9.1R3-1_partitions_ctp150_ctp2k-02_-03_211221.tgz md5sum - Matched !!! There is 7138 MB free space available on /mnt/ramdisk(RAM) /dev/sda1 on /boot type ext3 (rw,relatime,errors=continue,barrier=1,data=ordered) ***Upgrading Image1 partitiokjournald starting. Commit interval 5 seconds EXT3-fs (sda1): using internal journal EXT3-fs (sda1): mounted filesystem with ordered data mode kjournald starting. Commit interval 5 seconds EXT3-fs (sda5): warning: maximal mount count reached, running e2fsck is recommended EXT3-fs (sda5): using internal journal EXT3-fs (sda5): mounted filesystem with ordered data mode kjournald starting. Commit interval 5 seconds EXT3-fs (sda6): using internal journal EXT3-fs (sda6): mounted filesystem with ordered data mode kjournald starting. Commit interval 5 seconds EXT3-fs (sda7): warning: maximal mount count reached, running e2fsck is recommended EXT3-fs (sda7): using internal journal EXT3-fs (sda7): mounted filesystem with ordered data mode kjournald starting. Commit interval 5 seconds EXT3-fs (sda8): using internal journal EXT3-fs (sda8): mounted filesystem with ordered data mode n with CTPOS_9.1R3-1_partitions_ctp150_ctp2k-02_-03_211221.tgz *** Unmounting all partitions of /dev/sda Mounting Image1 to /mnt/ ...[ OK ] Extracting CTPOS_9.1R3-1_partitions_ctp150_ctp2k-02_-03_211221.tgz to Image1 ... flash_root.tgz to /mnt/flash_root [ OK ] flash_home.tgz to /mnt/flash_home [ OK ] flash_var.tgz to /mnt/flash_var [ OK ] flash_local.tgz to /mnt/flash_local [ OK ] flash_boot.tgz to /boot [ OK ] kjournald starting. Commit interval 5 seconds EXT3-fs (sda5): warning: maximal mount count reached, running e2fsck is recommended EXT3-fs (sda5): using internal journal EXT3-fs (sda5): mounted filesystem with ordered data mode Transferring system identity files . . . [ OK ] Unmounting Image1...[ OK ] Updating grub conf files... [ OK ] Unmounting all partitions of /dev/sda *** *** Upgrading Image2 partition with CTPOS_9.1R3-1_partitions_ctp150_ctp2k-02_-03_211221.tgz complete The system needs to be rebooted *** *** *** *** !!!!!!!Rebooting System... *** *** -
Press Esc key twice and go to
Exit.
-
Type F2 key twice to go to BIOS menu
in PP833.

-
Press Enter and select Boot
Type Order.
-
Press Enter and press F5 key to see
the Hard Disk Drive option as a first boot
order priority.
-
Press Esc key twice. Go to
Exit.

-
Select Exit Saving
Changes and select
Yes.
Installing Dual Image on CTP150 or CTP2000 Series device from CTPView
See Installing CTPOS 9.1R3.4 Dual Image on CTP device from CTPView section in CTPView Network Management System Administration Guide.
Personality Transfer
Personality Transfer
Till now, when you upgrade 9.x CTP device to 9.1R3.4 via the current dual image upgrade process, you were forced to “First Boot” the system, which can be a tedious and time-consuming effort.
Personality Transfer feature copies the files that are modified as part of your configuration changes to the system (such as, ctp_dbase, service config files, system settings - IP address, default ethernet, and so on) to the new CTPOS 9.1R3.4 image so that all the user system/node/bundle configurations remain intact. With this feature you need not “First Boot” the system forcefully, thus saving the time.
Starting from the CTPOS Release 9.1R3.1, the Personality Transfer feature is introduced to help you upgrade to dual image seamlessly, without first boot. This feature is supported on CTP150, CTP151, and CTP2000 series devices.
You can upgrade using three different interface methods.
- CLI or Manual
- USB
- CTPView
-
You can either choose to upgrade seamlessly in a non-interactive mode (USB or CTPView) or interactive mode (CLI or Manual).
-
You can use the Personality Transfer feature to upgrade the CTP devices which are running only CTPOS 9.0R1, 9.1R1, or 9.1R2.1 images.
-
When upgrading the CTP devices running CTPOS 7.x image, only the ethernet configuration files are restored and all other configuration files are NOT restored.
Note:If Ethernet segregation is enabled on a CTPOS 7.3 system and Personality Transfer is chosen during upgrade to CTPOS 9.1R3.4, the configuration for Ethernet segregation is lost after upgrade. In such a case, Ethernet segregation must be enabled after upgrade.
-
Personality Transfer is applied if you upgrade CTP in non-interactive mode.If you choose to upgrade in an interactive mode, you are prompted whether you want to retain system identity files.If you select Yes, personality transfer feature is applied, else it is not.
-
In case of an existing 9.0R1 dual-imaged system, where the active partition is running 7.3 version of CTPOS, an upgrade to 9.1R3.4 will replace the image in partition with 7.3 version. The CTP may go to 'first boot' state in such a scenario when upgrade is performed through CTPView or in non-interactive mode locally. If upgrade is performed using CTPView, when such a condition arises, the upgrade page will show the error message
Connection to ctp not
                                                  recovered
due to the ’first boot’ condition having occurred even though the upgrade will happen successfully. To recover the connection of CTPView with CTP, CTP should be re-connected to CTPView. -
All the CTP system identity files are copied during Personality Transfer. If you want to know what files compromise the personality files you can contact JTAC for further help.
-
When you upgrade from 9.1Rx to 9.1R3.4 dual image, the following messages are displayed:
-
Non-interactive mode
[root@md-ctp-151-35:/tmp 11]# ls
acorn_310_dual_image_upgrade_ctp151_240516.tgz
[root@md-ctp-151-35:/tmp 12]#
[root@md-ctp-151-35:/tmp 12]# upgrade y
CTP system software upgrade utility - Version 1.5.0
Found kernel version 3.14.39ltsi-WR7.0.0.27_standard, setting KVER to 310

Checking for active menu sessions
Found USB storage device... Mounting
System version is 310
Here is a list of all the found compatible CTP code archive files:
/tmp/acorn_310_dual_image_upgrade_ctp151_240516.tgz

Removing old installation residue...
/tmp/acorn_310_dual_image_upgrade_ctp151_240516.tgz is the newest archive file...

===== Uncompressing and Extracting Archive =====
Archive file: /tmp/acorn_310_dual_image_upgrade_ctp151_240516.tgz
acorn_install/
acorn_install/secure_boot_signed_files.tgz

…………………………
………………………….
………………………….

Running install non-interactively


!!!!!!!!!!!!!!!!!!!!!!!!!!!!!!!!!!!!!!!!!!!!!!!!!!!!!!!!!!
!!!! You are executing in Non-Interactive Mode
!!!! SYSTEM will *REBOOT* automatically once the
!!!! execution completes successfully
!!!!!!!!!!!!!!!!!!!!!!!!!!!!!!!!!!!!!!!!!!!!!!!!!!!!!!!!

Backing up system identity files . . .
[  OK  ]
……………………………
……………………………
……………………………
Mounting Image2 to /mnt/ ...[  OK  ]
Extracting CTPOS_9.1R3-4_partitions_ctp151_240516.tgz to Image2 ...
        flash_root.tgz to /mnt/flash_root [  OK  ]
        flash_home.tgz to /mnt/flash_home [  OK  ]
        flash_var.tgz to /mnt/flash_var [  OK  ]
        flash_local.tgz to /mnt/flash_local [  OK  ]
[  OK  ]

Transferring system identity files . . .
  [  OK  ]
Now, the personality transfer is applied.
Unmounting Image2...[  OK  ]
Updating grub conf files... [  OK  ]
-
Interactive Mode
[root@ctp_215:/tmp 12]# cmd -v

        CTPOS CLI version: 9.1R1 191223
        Compile Time: Mon Dec 23 2019 01:32:31 PM

[root@ctp_215:/tmp 13]# ls -lrt /mnt/ramdisk/
total 157364
-rwx------ 1 root root 161136861 Oct 29 17:55 CTPOS_9.1R3-4_partitions_ctp151_240516.tgz[root@ctp_215:/tmp 14]#
[root@ctp_215:/tmp 14]# upgrade
CTP system software upgrade utility - Version 1.5.0
Found kernel version 3.14.39ltsi-WR7.0.0.27_standard, setting KVER to 310

Checking for active menu sessions
Found USB storage device... Mounting
System version is 310
Here is a list of all the found compatible CTP code archive files:
/tmp/acorn_310_dual_image_upgrade_ctp151_240516.tgz

Removing old installation residue...
/tmp/acorn_310_dual_image_upgrade_ctp151_240516.tgz is the newest archive file...
******************************************************************
NOTE: CTPOS code upgrades will interrupt data on running circuits.
Say "no" to run more interactive or install a different archive)
******************************************************************
Do you want to install the newest archive in quick mode (no questions)? y[n]: n
Do you want to install the newest archive interactively (w/ questions)? y[n]: y
Copying /tmp/acorn_310_dual_image_upgrade_ctp151_211221.tgz to /tmp
cp: '/tmp/acorn_310_dual_image_upgrade_ctp151_240516.tgz' and '/tmp/acorn_310_dual_image_upgrade_ctp151_240516.tgz' are the same file
===== Uncompressing and Extracting Archive =====
      Archive file: /tmp/acorn_310_dual_image_upgrade_ctp151_240516.tgz
./acorn_install/
./acorn_install/secure_boot_signed_files.tgz
tar: ./acorn_install/secure_boot_signed_files.tgz: time stamp 2021-03-12 15:18:54 is 43190481.600093562 s in the future
./acorn_install/sgdisk
tar: ./acorn_install/sgdisk: time stamp 2021-03-12 15:18:54 is 43190481.596867394 s in the future
./acorn_install/uefi_partition_files.tgz
tar: ./acorn_install/uefi_partition_files.tgz: time stamp 2021-04-07 02:44:49 is 45391636.593182705 s in the future
./acorn_install/libstdc++.so.6
tar: ./acorn_install/libstdc++.so.6: time stamp 2021-03-12 15:18:54 is 43190481.574013122 s in the future
./acorn_install/gui_instr
tar: ./acorn_install/gui_instr: time stamp 2021-08-13 20:43:59 is 56515586.573900869 s in the future
./acorn_install/install
tar: ./acorn_install/install: time stamp 2021-08-13 20:43:46 is 56515573.573279414 s in the future
tar: ./acorn_install: time stamp 2021-11-02 14:55:48 is 63493095.573150446 s in the future

Running install interactively
[  OK  ]
Unmounting all partitions of /dev/sda
Unmounting Image1...[  OK  ]
Unmounting all partitions of /dev/sda
Mounting Image1 to /mnt/ ...[  OK  ]
==============================================================
System Type                             : CTP151
CPU Type                                : bacardi
Flash Type                              : 2.5" SSD Disk
Currently Running CTPOS                 : 9.1R1
System State                            : Running
Total RAM Size                          : 16061 MB
Free RAM Size                           : 15407 MB
No. of partitions on /dev/sda           : 10
CTPOS installed on                      : Image1 only
Running Image                           : Image1 (9.1R1-comp-191223-013231-load-191029-175301')
Non-Running Image                       : Image2 (Empty)

NOTE:
9.1R3-comp-YYMMDD-HHMMSS-load-YYMMDD-HHMMSS decoded as :
        9.1R3 : Release Name
        comp-YYMMDD-HHMMSS : Root-FS/Kernel compile timestamp
        load-YYMMDD-HHMMSS : Image upgrade timestamp
Dual Image on Flash has two logical images :
        Image1 - consists Five partitions (1,5,6,7,8)
        Image2 - consists Five partitions (1,9,10,11,12)
        First partition(bootable) is common to both Image1 and Image2
==============================================================
CTPOS_9.1R3-4_partitions_ctp151_240516.tgz Image archive file found at /mnt/ramdisk
Verifying CTPOS_9.1R3-4_partitions_ctp151_240516.tgz archive ...CTPOS_9.1R3-4_partitions_ctp151_240516.tgz md5sum - Matched
!!!  There is 15407 MB free space available on /mnt/ramdisk(RAM)
Please choose Image no. for upgrading:
        1. Upgrade to Image1:
        2. Upgrade to Image2:
        3. Exit:

Please enter valid input: 2
***Upgrading Image2 partition with CTPOS_9.1R3-4_partitions_ctp151_240516.tgz ***
Unmounting all partitions of /dev/sda
Mounting Image2 to /mnt/ ...[  OK  ]
Extracting CTPOS_9.1R3-4_partitions_ctp151_240516.tgz to Image2 ...
        flash_root.tgz to /mnt/flash_root [  OK  ]
        flash_home.tgz to /mnt/flash_home [  OK  ]
        flash_var.tgz to /mnt/flash_var [  OK  ]
        flash_local.tgz to /mnt/flash_local [  OK  ]
[  OK  ]

!!!!!!!!!!!!!!!!!!!!!!!!!!!!!!!!!!!!!!!!!!!!!!!!!!!!!!!!!!!!!!!!
!!!!!!!!!!!!!!!!!!!!!!!!!!!!!!!!!!!!!!!!!!!!!!!!!!!!!!!!!!!!!!!!
If you do not transfer system identity files (config and
user information), CTP will go to first boot which requires a
console connection to complete. You need to have console access
to do the password and ethernet configs during first boot.

If you transfer your identity files you do not need a
console connection (but it is always recommended to use
console access for upgrades). When upgrading from CTPOS
7.x release, only the ethernet configs will be transferred
and all other configs will be lost.
!!!!!!!!!!!!!!!!!!!!!!!!!!!!!!!!!!!!!!!!!!!!!!!!!!!!!!!!!!!!!!!!
!!!!!!!!!!!!!!!!!!!!!!!!!!!!!!!!!!!!!!!!!!!!!!!!!!!!!!!!!!!!!!!!

Are you sure you want to transfer system identity files? y/n :y

Transferring system identity files . . .
[  OK  ]
Unmounting Image2...[  OK  ]
Updating grub conf files... [  OK  ]
Unmounting all partitions of /dev/sda
*** ***
Upgrading Image2 partition with CTPOS_9.1R3-4_partitions_ctp151_240516.tgz complete
The system needs to be rebooted
*** ***
Do you want to reboot system now [y/n]?: y
*** ***
!!!!!!!Rebooting System...
*** ***
.
.
.


***** Normal boot up of this flash. *****

Checking modules.conf indicates system changes needed!
Using modules.conf.nova
Backing up /etc to nonvolatile storage..
SLOT0_BAR0 added/removed: 0x00000000dfa00000(old) 0x00000000dfb00000(new)
Using /etc/sysconfig/platform.conf ...
Using modules.conf.nova
Backing up /etc to nonvolatile storage..
Loading sensors modules. Please wait, this could take ~30 seconds
Assigning Mac address to all available ethernet interfaces
Starting system message bus: Unknown username "avahi" in message bus configuration file
dbus.
iptables: Applying firewall rules: [  OK  ]
ip6tables: Applying firewall rules: [  OK  ]
Bringing up loopback interface: [  OK  ]
Setting 802.1Q VLAN parameters: Set name-type for VLAN subsystem. Should be visible in /proc/net/vlan/config
[  OK  ]
Bringing up interface eth4: [  OK  ]
Starting OpenBSD Secure Shell server: sshd[  OK  ]
Starting atd: [  OK  ]
Starting irqbalance: [  OK  ]
starting rsyslogd ... [  OK  ]
Starting sticky dev is /dev/sda
[  OK  ]

Starting crond: [  OK  ]
Loading sensors modules. Please wait, this could take ~30 seconds
===== This release supports FPGA reload during runtime
----- Function: check_gluon_bacardi
----- Found 2 gluon/bacardi interface cards
===== Start GLUON runtime FPGA load at 18:16:06
Removing iTCO watchdog kernel module   [  OK  ]
CTP kernel driver not loaded
Voice Compression driver not loaded
Installing iTCO watchdog kernel module   [  OK  ]
Installing HDLC kernel driver [  OK  ]
Installing CTP kernel driver [  OK  ]
Installing HDLC FR kernel driver [  OK  ]
Installing HDLC PPP kernel driver [  OK  ]
Installing HDLC RAW kernel driver [  OK  ]
Installing HDLC CISCO kernel driver [  OK  ]
Installing layer-2 bridge kernel module [  OK  ]
Removing iTCO watchdog kernel module   [  OK  ]
Removing layer-2 bridge kernel module   [  OK  ]
Removing HDLC FR kernel driver [  OK  ]
Removing HDLC PPP kernel driver [  OK  ]
Removing HDLC RAW kernel driver [  OK  ]
Removing CTP kernel driver  [  OK  ]
Removing HDLC CISCO kernel driver [  OK  ]
Voice Compression driver not loaded
----- Card 0 bd_rev: 02, fpga_rev: 22
----- Card 1 bd_rev: 04, fpga_rev: 2b
Write Address(offset): 0xdfb00000(0x60020): 0x20
Write Address(offset): 0xdfb00000(0x1010): 0x400000
Write Address(offset): 0xdfd00000(0x60020): 0x20
Write Address(offset): 0xdfd00000(0x1010): 0x400000
----- Power down slot 0... at 18:16:21
----- Power down slot 1... at 18:16:21
----- Rescanning PCI devices ... at 18:16:24
Installing iTCO watchdog kernel module   [  OK  ]
Installing HDLC kernel driver [  OK  ]
Installing CTP kernel driver [  OK  ]
Installing HDLC FR kernel driver [  OK  ]
Installing HDLC PPP kernel driver [  OK  ]
Installing HDLC RAW kernel driver [  OK  ]
Installing HDLC CISCO kernel driver [  OK  ]
Installing layer-2 bridge kernel module [  OK  ]
----- Card 0 runtime fpga_rev: 23
----- Card 1 runtime fpga_rev: 2c
===== Finish GLUON runtime FPGA load at 18:16:28
----- Function: check_gluon_bacardi
----- Found 2 gluon/bacardi interface cards
iTCO watchdog kernel module already loaded
CTP kernel driver already loaded
Layer-2 bridge kernel module already loaded
Check CTP kernel driver [  OK  ]
Checking for required memory [  OK  ]
Checking for required bios   [  OK  ]
Starting CTP daemon:          [  OK  ]
Checking fpga for all cards . . . . . . . . . . [  OK  ]
-
-
After reboot, CTP will not run ’first boot’ if personality transfer is applied. However, you are prompted to change the password of default user accounts on first time login.
ctp_215 login: ctp_cmd
Password:
Last login: Wed Nov 17 11:22:29 UTC 2021 on console
Last login: Tue Oct 29 18:16:56 UTC 2019 on console
-------------------------------------------------------------
You need to set up system passwords of default user accounts.
-------------------------------------------------------------
Changing root's password!
#########################################################################
#########################################################################
#########################################################################
                  PLEASE REMEMBER THESE PASSWORDS!!!
Password recovery is not a simple process:
- It is service affecting.
- It requires console access to the CTP
- It requires rebooting of the device
#########################################################################
#########################################################################
#########################################################################
Enter New Password for root
Retype New Password for root
89
 Changing ctp_cmd's password!
#########################################################################
#########################################################################
#########################################################################
                  PLEASE REMEMBER THESE PASSWORDS!!!
Password recovery is not a simple process:
- It is service affecting.
- It requires console access to the CTP
- It requires rebooting of the device
#########################################################################
#########################################################################
#########################################################################
Enter New Password for ctp_cmd
Retype New Password for ctp_cmd
Changing ctp's password!
#########################################################################
#########################################################################
#########################################################################
                  PLEASE REMEMBER THESE PASSWORDS!!!
Password recovery is not a simple process:
- It is service affecting.
- It requires console access to the CTP
- It requires rebooting of the device
#########################################################################
#########################################################################
#########################################################################
Enter New Password for ctp
Retype New Password for ctp
Changing ctp_sa's password!
#########################################################################
#########################################################################
#########################################################################
                  PLEASE REMEMBER THESE PASSWORDS!!!
Password recovery is not a simple process:

90
 - It is service affecting.
- It requires console access to the CTP
- It requires rebooting of the device
#########################################################################
#########################################################################
#########################################################################
Enter New Password for ctp_sa
Retype New Password for ctp_sa
Changing ctp_audit's password!
#########################################################################
#########################################################################
#########################################################################
                  PLEASE REMEMBER THESE PASSWORDS!!!
Password recovery is not a simple process:
- It is service affecting.
- It requires console access to the CTP
- It requires rebooting of the device
#########################################################################
#########################################################################
#########################################################################
Enter New Password for ctp_audit
Retype New Password for ctp_audit
Backing up /home to nonvolatile storage..
Backing up /     to nonvolatile storage..
[ctp_cmd@ctp_215:~ 1]>
After the password script finishes the upgrade is complete.