Remote Compute
Contrail Networking supports remote compute, a method of managing a Contrail deployment across many small distributed data centers efficiently and cost effectively.
Remote Compute Overview
Remote compute enables the deployment of Contrail Networking in many small distributed data centers, up to hundreds or even thousands, for telecommunications point-of-presence (PoPs) or central offices (COs). Each small data center has only a small number of computes, typically 5-20 in a rack, running a few applications such as video caching, traffic optimization, and virtual Broadband Network Gateway (vBNG). It is not cost effective to deploy a full Contrail controller cluster of nodes of control, configuration, analytics, database, and the like, in each distributed PoP on dedicated servers. Additionally, manually managing hundreds or thousands of clusters is not feasible operationally.
Remote Compute Features
Remote compute is implemented by means of a subcluster that manages compute nodes at remote sites to receive configurations and exchange routes.
The key concepts of Contrail remote compute include:
Remote compute employs a subcluster to manage remote compute nodes away from the primary data center.
The Contrail control cluster is deployed in large centralized data centers, where it can remotely manage compute nodes in small distributed small data centers.
A lightweight version of the controller is created, limited to the control node, and the config node, analytics, and analytics database are shared across several control nodes.
Many lightweight controllers are co-located on a small number of servers to optimize efficiency and cost.
The control nodes peer with the remote compute nodes by means of XMPP and peer with local gateways by means of MP-eBGP.
Remote Compute Operations
A subcluster object is created for each remote site, with a list of links to local compute nodes that are represented as vrouter objects, and a list of links to local control nodes that are represented as BGP router objects, with an ASN as property.
The subclusters are identified in the provision script. The vrouter and bgp-router provision scripts take each subcluster as an optional argument to link or delink with the subcluster object.
It is recommended to spawn the control nodes of the remote cluster in the primary cluster, and they are IGBP-meshed among themselves within that subcluster. The control nodes BGP-peer with their respective SDN gateway, over which route exchange occurs with the primary control nodes.
Compute nodes in the remote site are provisioned to connect to their respective control nodes to receive configuration and exchange routes. Data communication among workloads between these clusters occurs through the provider backbone and their respective SDN gateways. The compute nodes and the control nodes push analytics data to analytics nodes hosted on the primary cluster.
Subcluster Properties
The Contrail Web UI shows a list of subcluster objects, each with a list of associated vrouters and BGP routers that are local in that remote site and the ASN property.
General properties of subclusters include:
A subcluster control node never directly peers with another subcluster control node or with primary control nodes.
A subcluster control node has to be created, and is referred to, in virtual-router and bgp-router objects.
A subcluster object and the control nodes under it should have the same ASN.
The ASN cannot be modified in a subcluster object.
Multinode service chaining across subclusters is not supported.
Inter Subcluster Route Filtering
Contrail Networking Release
2005 supports inter subcluster route filtering (Beta). With this release, a new extended community called origin-sub-cluster (similar to origin-vn) is added to all routes originating from a subcluster.
The format of this new extended community is subcluster:<asn>:<id>.
This new extended community is added by encoding the subcluster ID in the ID field within the extended community. The subcluster ID helps you determine the subcluster from which the route originated, and is unique for each subcluster. For a 2-byte ASN format, type/subtype is 0x8085 and subcluster ID can be 4-byte long. For a 4-byte ASN format, type/subtype is 0x8285 and subcluster ID can be 2-byte long.
You create a routing policy matching this new extended community to be able to filter routes. Routing policies are always applied to primary routes. However, a routing policy is applied to a secondary route in the following scenarios:
There is no subcluster extended community associated with the route.
Self subcluster ID does not match the subcluster ID associated with the route.
Figure 1 shows a data center network topology. All routing policies are configured on virtual networks in the main data center, POP0. Consider the following example routing policy:
From 0/0 & subcluster:<asn>:1 then LP=150
From 0/0 & subcluster:<asn>:2  then LP=140
From 0/0 then reject
Where, 1 and 2 are the subcluster IDs of subclusters POP1 and POP2 respectively.
In this example, for routes directed to POP0 from subclusters POP1 and POP2, the LP will be changed. Routes that do not match the extended community are rejected. Default routes with no extended community are also rejected.
Provisioning a Remote Compute Cluster
Contrail Networking enables you to provision remote compute using an instances.yaml file. Installing a Contrail Cluster using Contrail Command and instances.yml shows a bare minimum configuration. The YAML file described in this section builds upon that minimum configuration and uses Figure 1 as an example data center network topology.
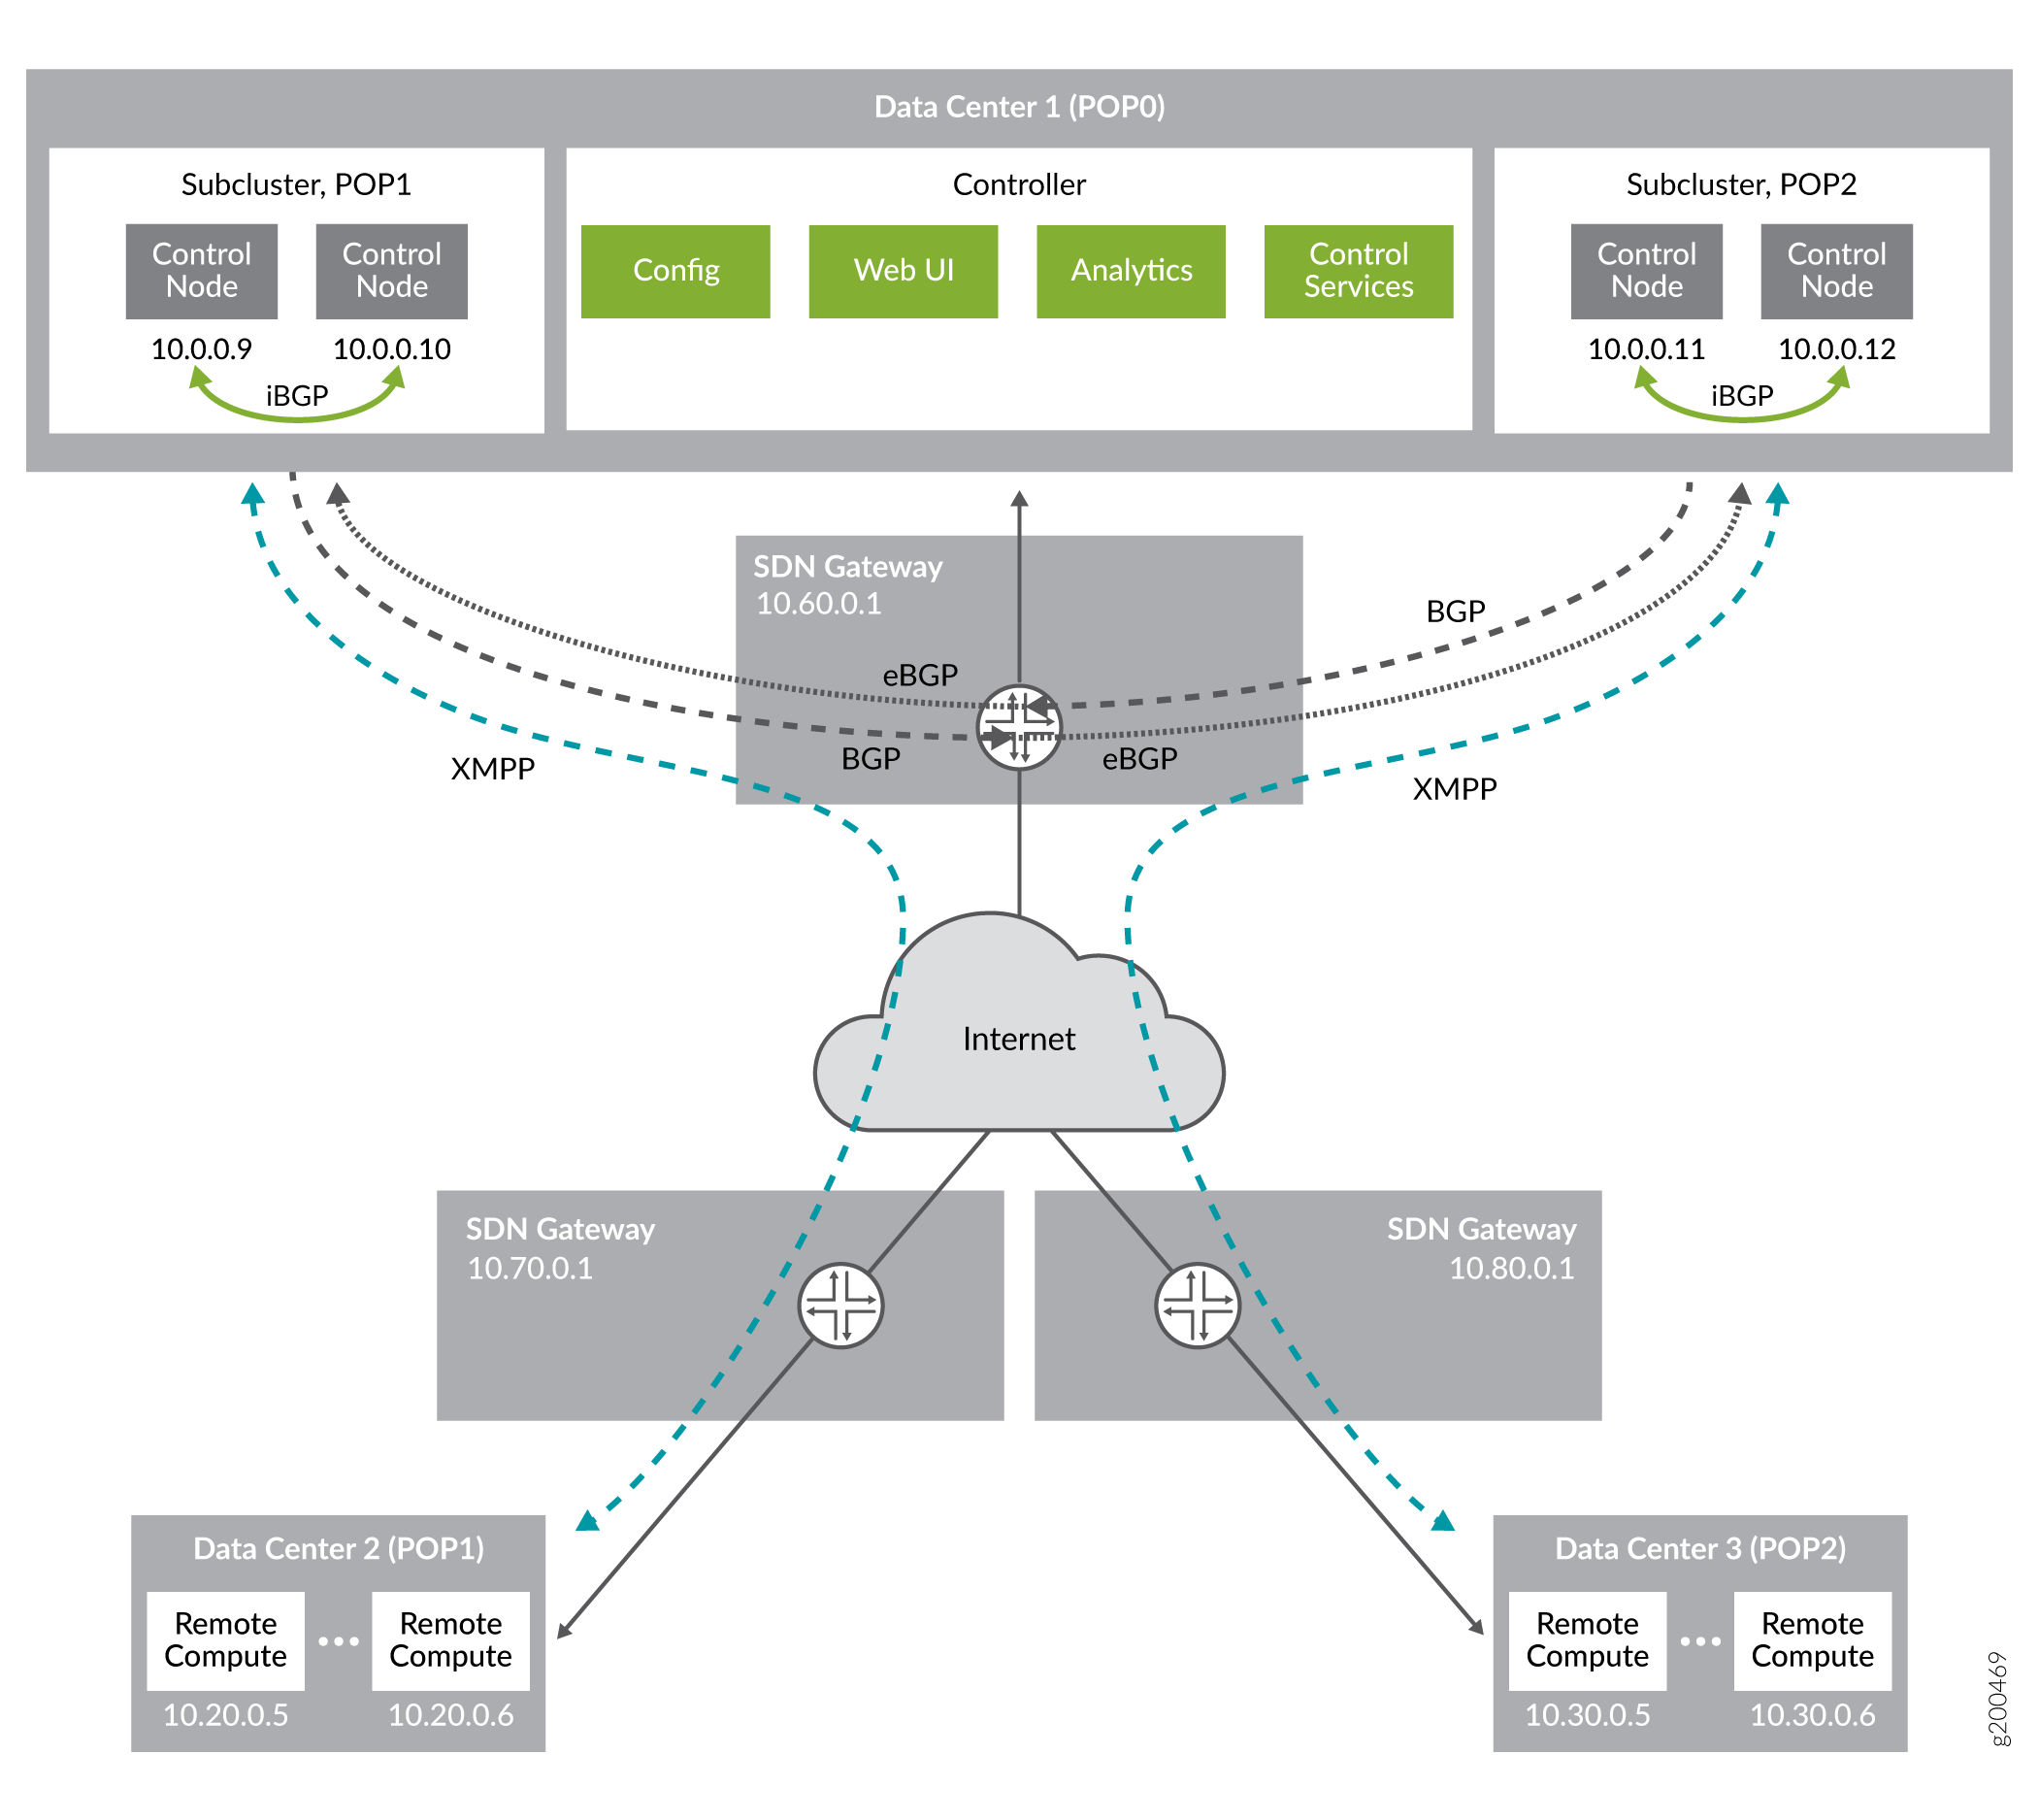
In this topology, there is one main data center (pop0) and two remote data centers (pop1 and pop2.) pop0 contains two subclusters: one for pop1, and the other for pop2. Each subcluster has two control nodes. The control nodes within a subcluster, for example 10.0.0.9 and 10.0.0.10, communicate with each other through iBGP.
Communication between the control nodes within a subcluster and the remote data center is through the SDN Gateway; there is no direct connection. For example, the remote compute in pop1 (IP address 10.20.0.5) communicates with the control nodes (IP addresses 10.0.0.9 and 10.0.0.10) in subcluster 1 through the SDN Gateway.
To configure remote compute in the YAML file:
First, create the remote locations or subclusters. In this example, we create data centers 2 and 3 (with the names pop1 and pop2, respectively), and define unique ASN numbers for each. Subcluster names must also be unique.
remote_locations:
  pop1:
    BGP_ASN: 12345
    SUBCLUSTER: pop1
  pop2:
    BGP_ASN: 12346
    SUBCLUSTER: pop2
Create the control nodes for pop1 and pop2 and assign an IP address and role. These IP addresses are the local IP address. In this example, there are two control nodes for each subcluster.
control_1_only_pop1:           # Mandatory. Instance name
    provider: bms              # Mandatory. Instance runs on BMS
    ip: 10.0.0.9
    roles:
      control:
        location: pop1
  control_2_only_pop1:         # Mandatory. Instance name
    provider: bms              # Mandatory. Instance runs on BMS
    ip: 10.0.0.10
    roles:
      control:
        location: pop1
  control_1_only_pop2:         # Mandatory. Instance name
    provider: bms              # Mandatory. Instance runs on BMS
    ip: 10.0.0.11
    roles:                     # Optional.
      control:
        location: pop2
  control_2_only_pop2:         # Mandatory. Instance name
    provider: bms              # Mandatory. Instance runs on BMS
    ip: 10.0.0.12
    roles:                     # Optional.
      control:
        location: pop2
Now, create the remote compute nodes for pop1 and pop2 and assign an IP address and role. In this example, there are two remote compute nodes for each data center. The 10.60.0.x addresses are the management IP addresses for the control service.
compute_1_pop1:                  # Mandatory. Instance name
    provider: bms                # Mandatory. Instance runs on BMS
    ip: 10.20.0.5
    roles:
      openstack_compute:         # Optional.
      vrouter:
        CONTROL_NODES: 10.60.0.9,10.60.0.10
        VROUTER_GATEWAY: 10.70.0.1
        location: pop1
  compute_2_pop1:                # Mandatory. Instance name
    provider: bms                # Mandatory. Instance runs on BMS
    ip: 10.20.0.6
    roles:
      openstack_compute:         # Optional.
      vrouter:
        CONTROL_NODES: 10.60.0.9,10.60.0.10
        VROUTER_GATEWAY: 10.70.0.1
        location: pop1
  compute_1_pop2:                # Mandatory. Instance name
    provider: bms                # Mandatory. Instance runs on BMS
    ip: 10.30.0.5
    roles:
      openstack_compute:         # Optional.
      vrouter:
        CONTROL_NODES: 10.60.0.11,10.60.0.12
        VROUTER_GATEWAY: 10.80.0.1
        location: pop2
  compute_2_pop2:                # Mandatory. Instance name
    provider: bms                # Mandatory. Instance runs on BMS
    ip: 10.30.0.6
    roles:
      openstack_compute:         # Optional.
      vrouter:
        CONTROL_NODES: 10.60.0.11,10.60.0.12
        VROUTER_GATEWAY: 10.80.0.1
        location: pop2
The entire YAML file is contained below.
Example instance.yaml with subcluster configuration
provider_config:
  bms:
    ssh_pwd: <password>
    ssh_user: <root_user>
    ntpserver: 10.84.5.100
    domainsuffix: local
instances:
  openstack_node:                  # Mandatory. Instance name
    provider: bms                  # Mandatory. Instance runs on BMS
    ip: 10.0.0.4
    roles:                         # Optional.
      openstack:
  all_contrail_roles_default_pop:  # Mandatory. Instance name
    provider: bms                  # Mandatory. Instance runs on BMS
    ip: 10.0.0.5
    roles:                         # Optional.
      config_database:             # Optional.
      config:                      # Optional.
      control:                     # Optional.
      analytics_database:          # Optional.
      analytics:                   # Optional.
      webui:                       # Optional.
  compute_3_default_pop:           # Mandatory. Instance name
    provider: bms                  # Mandatory. Instance runs on BMS
    ip: 10.0.0.6
    roles:
      openstack_compute:
      vrouter:
        VROUTER_GATEWAY: 10.60.0.1
  compute_1_default_pop:           # Mandatory. Instance name
    provider: bms                  # Mandatory. Instance runs on BMS
    ip: 10.0.0.7
    roles:
      openstack_compute:
      vrouter:
        VROUTER_GATEWAY: 10.60.0.1
  compute_2_default_pop:          # Mandatory. Instance name
    provider: bms                 # Mandatory. Instance runs on BMS
    ip: 10.0.0.8
    roles:
      openstack_compute:
      vrouter:
        VROUTER_GATEWAY: 10.60.0.1
  control_1_only_pop1:            # Mandatory. Instance name
    provider: bms                 # Mandatory. Instance runs on BMS
    ip: 10.0.0.9
    roles:
      control:
        location: pop1
  control_2_only_pop1:            # Mandatory. Instance name
    provider: bms                 # Mandatory. Instance runs on BMS
    ip: 10.0.0.10
    roles:
      control:
        location: pop1
  control_1_only_pop2:            # Mandatory. Instance name
    provider: bms                 # Mandatory. Instance runs on BMS
    ip: 10.0.0.11
    roles:                        # Optional.
      control:
        location: pop2
  control_2_only_pop2:            # Mandatory. Instance name
    provider: bms                 # Mandatory. Instance runs on BMS
    ip: 10.0.0.12
    roles:                        # Optional.
      control:
        location: pop2
  compute_1_pop1:                 # Mandatory. Instance name
    provider: bms                 # Mandatory. Instance runs on BMS
    ip: 10.20.0.5
    roles:
      openstack_compute:          # Optional.
      vrouter:
        CONTROL_NODES: 10.60.0.9,10.60.0.10
        VROUTER_GATEWAY: 10.70.0.1
        location: pop1
  compute_2_pop1:                 # Mandatory. Instance name
    provider: bms                 # Mandatory. Instance runs on BMS
    ip: 10.20.0.6
    roles:
      openstack_compute:          # Optional.
      vrouter:
        CONTROL_NODES: 10.60.0.9,10.60.0.10
        VROUTER_GATEWAY: 10.70.0.1
        location: pop1
  compute_1_pop2:                 # Mandatory. Instance name
    provider: bms                 # Mandatory. Instance runs on BMS
    ip: 10.30.0.5
    roles:
      openstack_compute:          # Optional.
      vrouter:
        CONTROL_NODES: 10.60.0.11,10.60.0.12
        VROUTER_GATEWAY: 10.80.0.1
        location: pop2
  compute_2_pop2:                 # Mandatory. Instance name
    provider: bms                 # Mandatory. Instance runs on BMS
    ip: 10.30.0.6
    roles:
      openstack_compute:          # Optional.
      vrouter:
        CONTROL_NODES: 10.60.0.11,10.60.0.12
        VROUTER_GATEWAY: 10.80.0.1
        location: pop2
global_configuration:
  CONTAINER_REGISTRY: 10.xx.x.81:5000
  REGISTRY_PRIVATE_INSECURE: True

contrail_configuration:           # Contrail service configuration section
  CONTRAIL_VERSION: <contrail_version>
  CONTROLLER_NODES: 10.60.0.5
  CLOUD_ORCHESTRATOR: openstack
  KEYSTONE_AUTH_HOST: 10.60.0.100
  KEYSTONE_AUTH_URL_VERSION: /v3
  RABBITMQ_NODE_PORT: 5673
  PHYSICAL_INTERFACE: eth1
  CONTROL_DATA_NET_LIST: 10.60.0.0/24,10.70.0.0/24,10.80.0.0/24

kolla_config:
  kolla_globals:
    network_interface: "eth1"
    enable_haproxy: "yes"
    contrail_api_interface_address: 10.60.0.5
    kolla_internal_vip_address: 10.60.0.100
    kolla_external_vip_address: 10.0.0.100
    kolla_external_vip_interface: "eth0"
  kolla_passwords:
    keystone_admin_password: <password>

remote_locations:
  pop1:
    BGP_ASN: 12345
    SUBCLUSTER: pop1
  pop2:
    BGP_ASN: 12346
    SUBCLUSTER: pop2
Replace <contrail_version> with the
correct contrail_container_tag value for your Contrail
Networking release. The respective contrail_container_tag values are listed in README Access to Contrail Registry.
Automatically Deploy Remote Compute Using RHOSP/TripleO
A Distributed compute node (DCN) architecture is designed for edge use cases, allowing remote compute and storage nodes to be deployed remotely while sharing a common centralized control plane. The DCN architecture allows you to strategically position workloads closer to your operational needs for higher performance.
Starting in Contrail Networking 21.4, you can deploy remote compute automatically using RHOSP/TripleO for edge use cases.
Example Topology
You can build the setup in different ways by providing the control plane elements. Figure 2 shows the example setup for deploying the remote compute automatically.
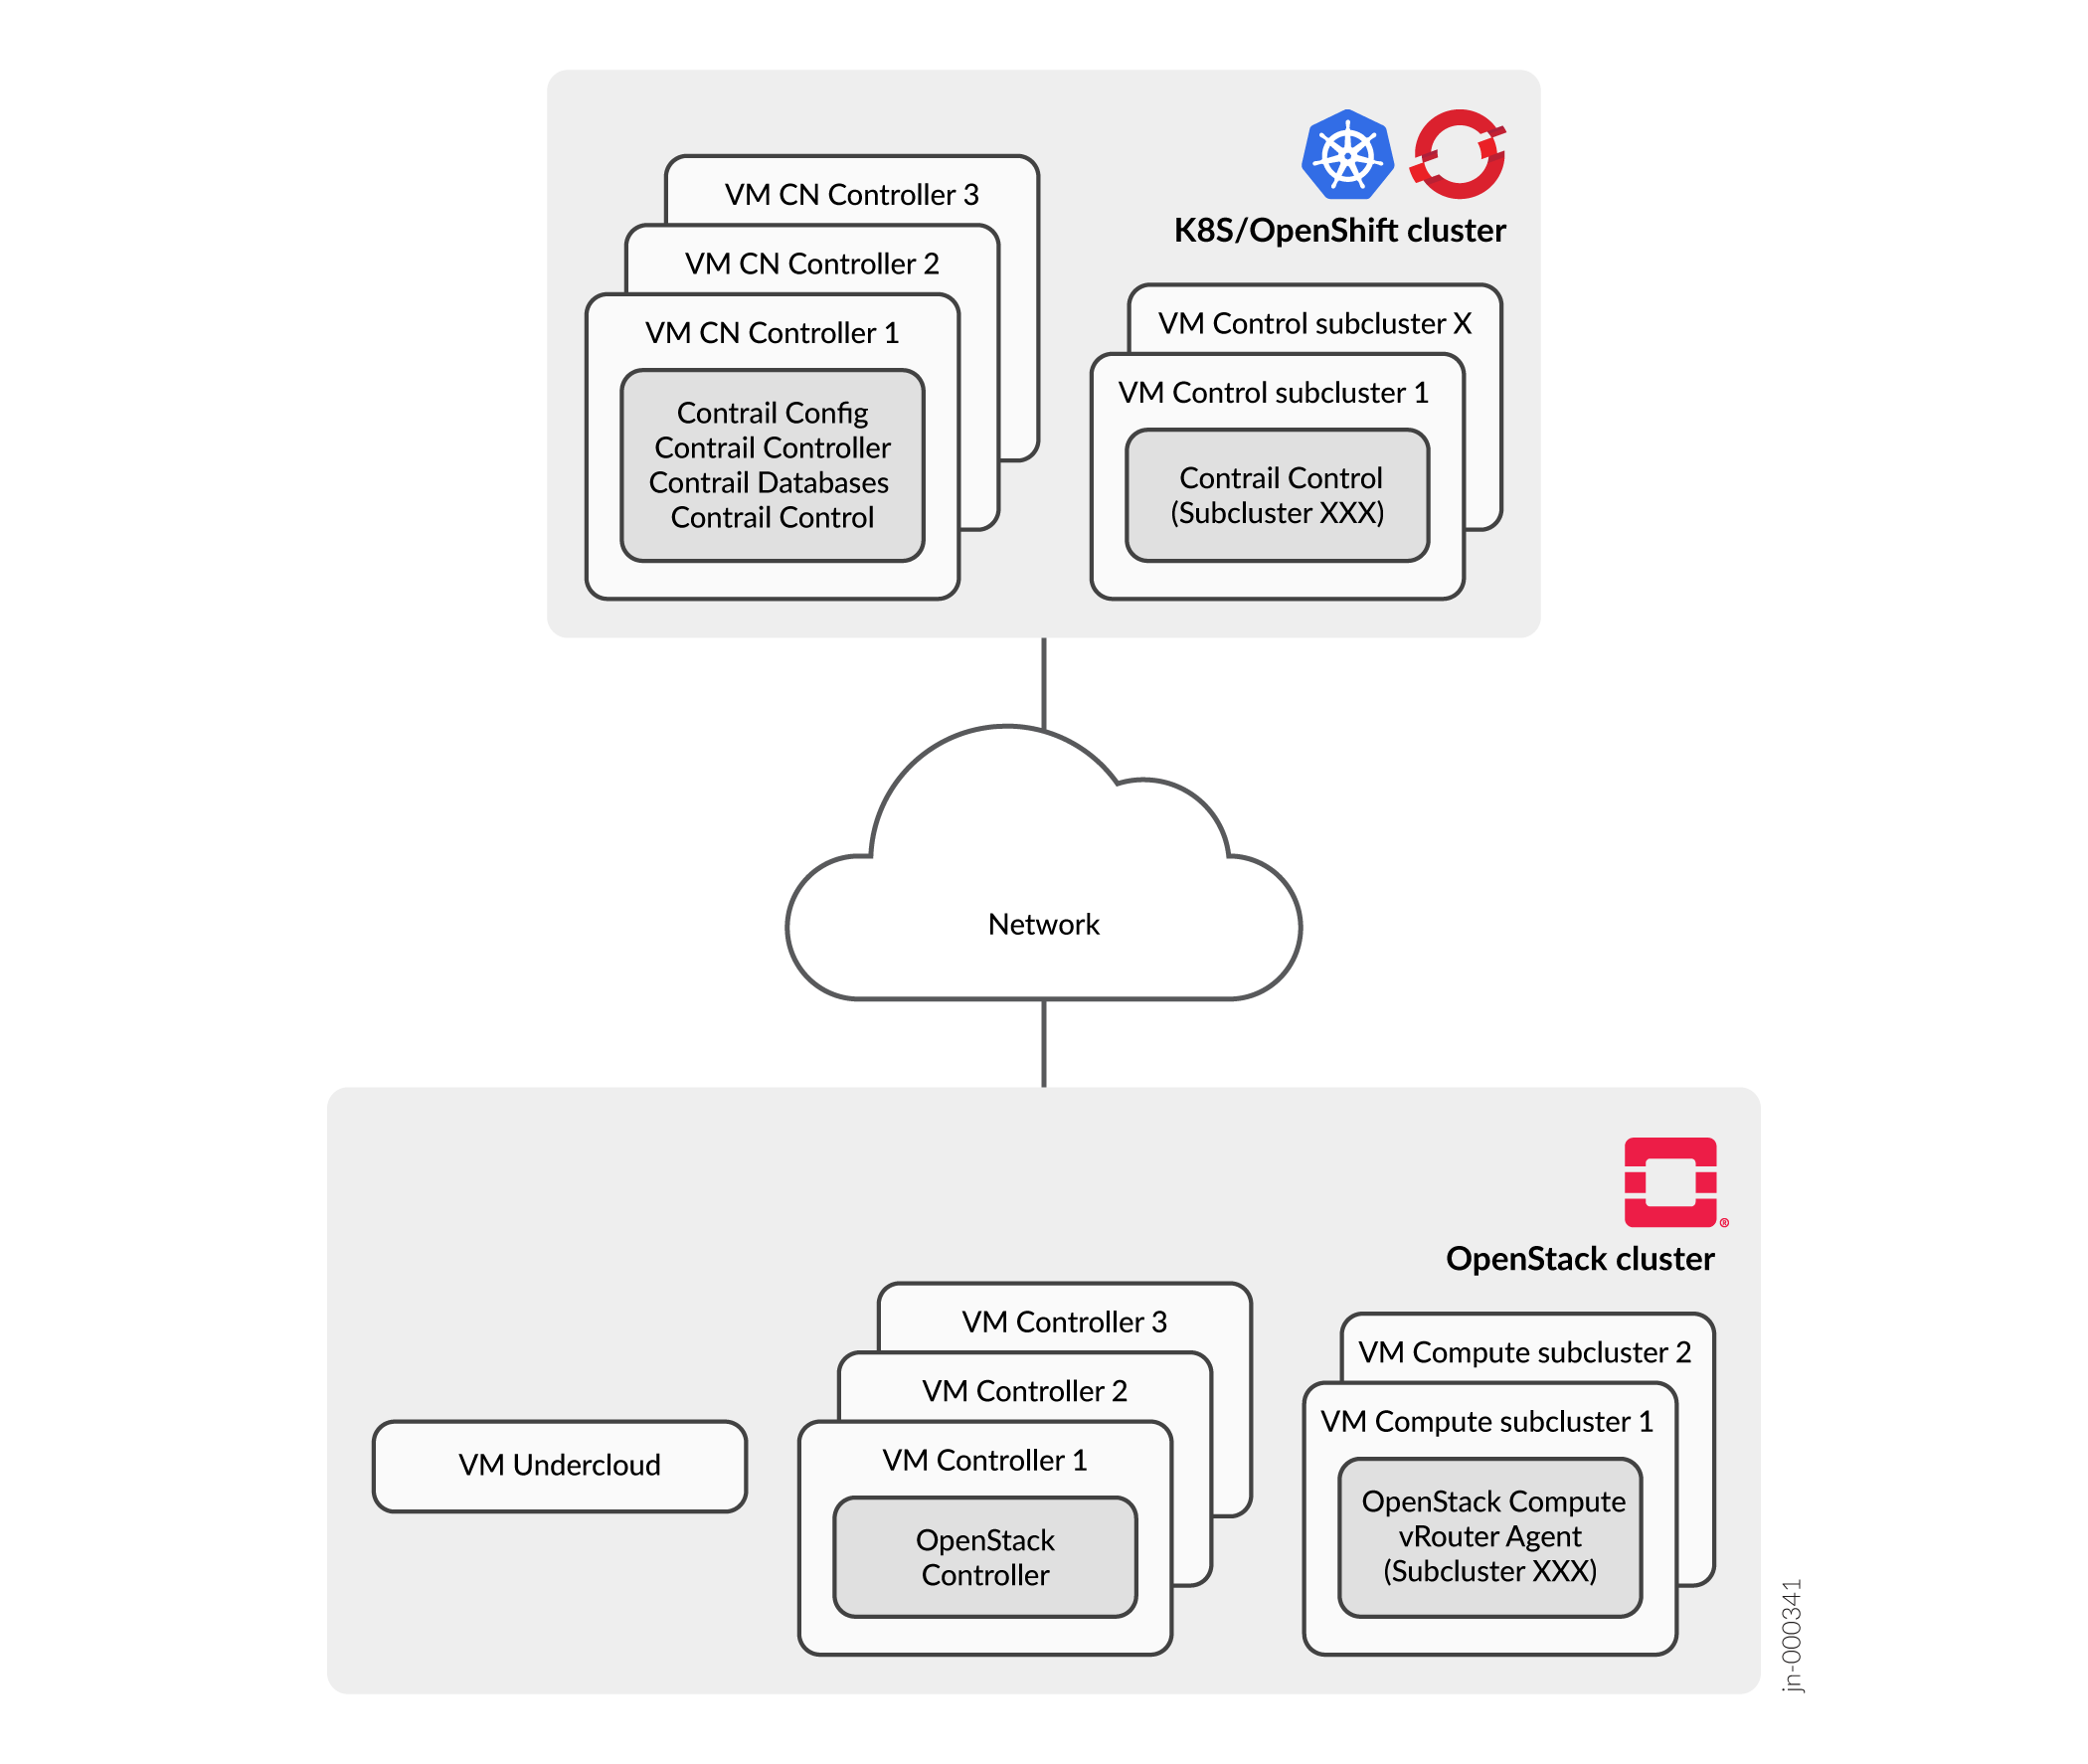
In this example:
Setup is explained without spine-leaf and/or the DCN details. See Figure 2.
Describe primarily on the Contrail specific configuration. All scripts provided are only examples. For deployment preparation instructions, see RedHat documentation.
All control plane functions are provided as virtual machines hosted on the KVM hosts:
VM 1—Kubernetes managed: Contrail Control plane (Kubernetes master)
VM 2—Kubernetes managed: Contrail Control service for remote compute (non-master Kubernetes node with a subcluster label)
VM 3—RHOSP undercloud
VM 4—RHOSP overcloud: OpenStack Controller
VM 5—RHOSP overcloud: OpenStack remote compute with subcluster param
Contrail control plane uses Kubernetes cluster. You can do the same with OpenShift.
Prepare Kubernetes Managed Hosts
To prepare Kubernetes managed hosts:
Create two Contrail master and Contrail controller machines with the following specifications:
CentOS 7
32GB RAM
80GB SDD
Deploy the Contrail Control plane in a Kubernetes cluster with at least one worker node using tf-operator.
The worker will be used for Contrail Control serving a subcluster (one for testing and minimum two for production). In the case of OpenShift, see the Contrail Control plane's Readme file.
If RHOSP uses TLS everywhere, you must deploy the Contrail Control plane with a CA bundle that includes both your own root CA and IPA CA data. For example:
# assuming that Kubernetes cluster ca is in ca.crt.pem and IPA CA is in ipa.crt
# (ipa.crt can be copied from undercloud node from /etc/ipa/ca.crt)
cat ca.crt.pem ipa.crt > ca-bundle.pem

# Assuming that Kubernetes cluster CA key is in ca.key.pem
export CERT_SIGNER="SelfSignedCA"
export TF_ROOT_CA_KEY_BASE64=$(cat ca.key.pem | base64 -w 0)
export TF_ROOT_CA_CERT_BASE64=$(cat ca-bundle.pem | base64 -w 0)

... other actions to deploy from tf-operator ...
Label worker(s) node with subcluster label.
# For each subcluster nodes
kubectl label node <worker_nodename> subcluster=<subcluster_name>
Ensure Kubernetes nodes can:
Connect to external, internal API, and tenant RHOSP networks.
Resolve RHOSP FQDNs for overcloud VIPs for external, internal API, and Control plane networks.
You can obtain FQDNs of overcloud nodes from /etc/hosts of one of the overcloud node.
For example:
cat /etc/hosts

192.x.x.x overcloud.ctlplane.5c7.local
10.x.x.x overcloud.internalapi.5c7.local
10.x.x.x overcloud.5c7.local overcloud.5c7.local

#RHOSP Computes
192.x.x.x  overcloud-remotecompute1-0.tenant.dev.localdomain
# ...
#RHOSP Contrail Dpdk
192.x.x.x  overcloud-remotecontraildpdk1-0.tenant.dev.localdomain
# ...
#RHOSP Contrail Sriov
192.x.x.x  overcloud-remotecontrailsriov1-0.tenant.dev.localdomain
# ...
#... other compute addresses if any
... IMPORTANT: all FQDNs of all overcloud nodes (all networks) ...
Edit the manager manifest to add one more control with a node selector and a subcluster parameter.
kubectl edit manager -n tf
Add a record to each subcluster's controls:
    controls:
    - metadata:
        labels:
          tf_cluster: cluster1
        name: control<subcluster_name>
      spec:
        commonConfiguration:
          nodeSelector:
            subcluster: <subcluster_name>
        serviceConfiguration:
          subcluster: <subcluster_name>
          asnNumber: <asn>
          containers:
          - name: control
            image: contrail-controller-control-control
          - name: dns
            image: contrail-controller-control-dns
          - name: named
            image: contrail-controller-control-named
          - name: nodemanager
            image: contrail-nodemgr
          - name: provisioner
            image: contrail-provisioner
Prepare OpenStack Managed Hosts
To prepare OpenStack managed hosts:
Prepare OpenStack hosts and run undercloud setup.
Run the following script to generate remote computes heat templates for kernel, DPDK, and SR-IOV:
cd
# Comma separated list of names
subcluster_names=pop1,pop2
./tripleo-heat-templates/tools/contrail/remote_compute.sh $subcluster_names
This script generates a network_data_rcomp.yaml file and the set of files for each subcluster. For example:
tripleo-heat-templates/roles/RemoteCompute1.yaml
tripleo-heat-templates/roles/RemoteContrailDpdk1.yaml
tripleo-heat-templates/roles/RemoteContrailSriov1.yaml
tripleo-heat-templates/environments/contrail/rcomp1-env.yaml
tripleo-heat-templates/network/config/contrail/compute-nic-config-rcomp1.yaml
tripleo-heat-templates/network/config/contrail/contrail-dpdk-nic-config-rcomp1.yaml
tripleo-heat-templates/network/config/contrail/contrail-sriov-nic-config-rcomp1.yaml
Ensure that the generated files and other templates are customized to your setup (storage, network CIDRs, and routes). For more information, see RedHat documentation.
Prepare Contrail templates using the generated network data file:
Modify contrail-services.yaml to provide data about the Contrail Control plane on Kubernetes.
  # Set keystone admin port to be on internal_api
  ServiceNetMap:
    # ... others options...
    KeystoneAdminApiNetwork: internal_api

  # FQDN resolving
  ExtraHostFileEntries:
    - 'IP1    <FQDN K8S master1>        <Short name master1>'
    - 'IP2    <FQDN K8S master2>        <Short name master2>'
    - 'IP3    <FQDN K8S master3>        <Short name master3>'
    - 'IP4    <FQDN K8S pop1 worker1>   <Short name pop1 worker1>'
    - 'IP5    <FQDN K8S pop1 worker2>   <Short name pop1 worker2>'
    - 'IP6    <FQDN K8S pop2 worker1>   <Short name pop2 worker1>'
    - 'IP7    <FQDN K8S pop2 worker2>   <Short name pop2 worker2>'

  # Main control plane
  ExternalContrailConfigIPs: <comma separated list of IP/FQDNs of K8S master nodes>
  ExternalContrailControlIPs: <comma separated list of IP/FQDNs of K8S master nodes>
  ExternalContrailAnalyticsIPs: <comma separated list of IP/FQDNs of K8S master nodes>

  ControllerExtraConfig:
    contrail_internal_api_ssl: True
  ComputeExtraConfig:
    contrail_internal_api_ssl: True
  # Add contrail_internal_api_ssl for all other roles if any
Enable Contrail TLS 4.2.1 if RHOSP does not use TLS everywhere or use self-signed root CA.
Prepare self-signed certificates in environments/contrail/contrail-tls.yaml.
resource_registry:
  OS::TripleO::Services::ContrailCertmongerUser: OS::Heat::None

parameter_defaults:
  ContrailSslEnabled: true
  ContrailServiceCertFile: '/etc/contrail/ssl/certs/server.pem'
  ContrailServiceKeyFile: '/etc/contrail/ssl/private/server-privkey.pem'
  ContrailCA: 'local'
  ContrailCaCertFile: '/etc/contrail/ssl/certs/ca-cert.pem'
  ContrailCaKeyFile: '/etc/contrail/ssl/private/ca-key.pem'
  ContrailCaCert: |
    <Root CA certificate from K8S setup>>
  ContrailCaKey: |
    <Root CA private key from K8S setup>
If RHOSP uses TLS everywhere, do the following:
Make a CA bundle file.
# Assuming that k8s cluster ca is in ca.crt.pem
cat /etc/ipa/ca.crt ca.crt.pem > ca-bundle.pem
Prepare an environment file ca-bundle.yaml.
# Create file
cat <<EOF > ca-bundle.yaml
resource_registry:
  OS::TripleO::NodeTLSCAData: tripleo-heat-templates/puppet/extraconfig/tls/ca-inject.yaml
parameter_defaults:
  ContrailCaCertFile: "/etc/pki/ca-trust/source/anchors/contrail-ca-cert.pem"
  SSLRootCertificatePath: "/etc/pki/ca-trust/source/anchors/contrail-ca-cert.pem"
  SSLRootCertificate: |
EOF
# Append cert data
cat ca-bundle.pem | while read l ; do
  echo "    $l" >> ca-bundle.yaml
done
# Check
cat ca-bundle.yaml
Prepare central site-specific parameters.
# !!! IMPORTANTN: Adjust to your setup
# (Check more options in RedHat doc)
cat <<EOF > central-env.yaml
parameter_defaults:
  GlanceBackend: swift
  ManageNetworks: true
  ControlPlaneSubnet: leaf0
  ControlControlPlaneSubnet: leaf0
  InternalApiInterfaceRoutes:
    - destination: 10.x.x.x/24
      nexthop: 10.x.x.x
    - destination: 10.x.x.x/24
      nexthop: 10.x.x.x
  StorageMgmtInterfaceRoutes:
    - destination: 10.x.x.x/24
      nexthop: 10.x.x.x
    - destination: 10.x.x.x/24
      nexthop: 10.x.x.x
  StorageInterfaceRoutes:
    - destination: 10.x.x.x/24
      nexthop: 10.x.x.x
    - destination: 10.x.x.x/24
      nexthop: 10.x.x.x
  TenantInterfaceRoutes:
    - destination: 172.x.x.x/24
      nexthop: 172.x.x.x
  ControlPlaneStaticRoutes:
    - destination: 172.x.x.x/24
      nexthop: 192.x.x.x
    - destination: 172.x.x.x/24
      nexthop: 192.x.x.x
  NovaComputeAvailabilityZone: 'central'
  ControllerExtraConfig:
    nova::availability_zone::default_schedule_zone: central
  NovaCrossAZAttach: false
  CinderStorageAvailabilityZone: 'central'
EOF

# If use tenant network on openstack controllers adjust nic file. For example:
# vi tripleo-heat-templates/network/config/contrail/controller-nic-config.yaml
               - type: interface
                 name: nic2
                 use_dhcp: false
                 addresses:
                 - ip_netmask:
                     get_param: TenantIpSubnet
                 routes:
                   get_param: TenantInterfaceRoutes
Prepare VIP mapping.
# !!! Adjust to your setup
# Check more options in RedHat doc
cat <<EOF > leaf-vips.yaml
parameter_defaults:
  VipSubnetMap:
    ctlplane: leaf0
    redis: internal_api_subnet
    InternalApi: internal_api_subnet
    Storage: storage_subnet
    StorageMgmt: storage_mgmt_subnet
EOF
Generate role and network files using heat templates.
cd
# generate role file (adjust to your role list)
openstack overcloud roles generate --roles-path tripleo-heat-templates/roles \
  -o /home/stack/roles_data.yaml Controller RemoteCompute1
# clean old files if any
./tripleo-heat-templates/tools/process-templates.py --clean \
  -r /home/stack/roles_data.yaml \
  -n /home/stack/tripleo-heat-templates/network_data_rcomp.yaml \
  -p tripleo-heat-templates/
# generated tripleo stack files
./tripleo-heat-templates/tools/process-templates.py \
  -r /home/stack/roles_data.yaml \
  -n /home/stack/tripleo-heat-templates/network_data_rcomp.yaml \
  -p tripleo-heat-templates/
Deploy the central location.
# Example for the case when RHOSP uses TLS everywhere
# use generated role file, network data file and files for remote computes
openstack overcloud deploy --templates tripleo-heat-templates/ \
  --stack overcloud --libvirt-type kvm \
  --roles-file /home/stack/roles_data.yaml \
  -n /home/stack/tripleo-heat-templates/network_data_rcomp.yaml \
  -e tripleo-heat-templates/environments/rhsm.yaml \
  -e tripleo-heat-templates/environments/network-isolation.yaml \
  -e tripleo-heat-templates/environments/contrail/contrail-services.yaml \
  -e tripleo-heat-templates/environments/contrail/contrail-net.yaml \
  -e tripleo-heat-templates/environments/contrail/contrail-plugins.yaml \
  -e tripleo-heat-templates/environments/contrail/contrail-tls.yaml \
  -e tripleo-heat-templates/environments/ssl/tls-everywhere-endpoints-dns.yaml \
  -e tripleo-heat-templates/environments/services/haproxy-public-tls-certmonger.yaml \
  -e tripleo-heat-templates/environments/ssl/enable-internal-tls.yaml \
  -e containers-prepare-parameter.yaml \
  -e rhsm.yaml \
  -e ca-bundle.yaml \
  -e central-env.yaml \
  -e leaf-vips.yaml
Enable keystone authentication for the Kubernetes cluster, if it is not already enabled.
# Ensure that all Kubernetes nodes can resolve overcloud VIPs FQDNs like overcloud.internalapi.5c7.local
[stack@node1 ~]$ grep overcloud.internalapi.5c7.local  /etc/hosts
10.1.0.125 overcloud.internalapi.5c7.local
...

# Edit manager object to put keystone parameters and set linklocal parameters
kubectl -n tf edit managers cluster1

# Example of configuration
apiVersion: tf.tungsten.io/v1alpha1
kind: Manager
metadata:
  name: cluster1
  namespace: tf
spec:
  commonConfiguration:
    authParameters:
      authMode: keystone
      keystoneAuthParameters:
        address: overcloud.internalapi.5c7.local
        adminPassword: <password>
        authProtocol: https
        region: regionOne
...
    config:
      metadata:
        labels:
          tf_cluster: cluster1
        name: config1
      spec:
        commonConfiguration:
          nodeSelector:
            node-role.kubernetes.io/master: ""
        serviceConfiguration:
          linklocalServiceConfig:
            ipFabricServiceHost: "overcloud.internalapi.5c7.local"
...
Deploy the remote sites. For example, export environment from the central site.
mkdir -p ~/dcn-common
openstack overcloud export \
  --stack overcloud \
  --config-download-dir /var/lib/mistral/overcloud \
  --output-file ~/dcn-common/central-export.yaml
Deploy the remote site 1.
openstack overcloud deploy --templates tripleo-heat-templates/ \
  --stack pop1 --libvirt-type kvm \
  --roles-file /home/stack/roles_data.yaml \
  -n /home/stack/tripleo-heat-templates/network_data_rcomp.yaml \
  -e tripleo-heat-templates/environments/rhsm.yaml \
  -e tripleo-heat-templates/environments/network-isolation.yaml \
  -e tripleo-heat-templates/environments/contrail/contrail-services.yaml \
  -e tripleo-heat-templates/environments/contrail/contrail-net.yaml \
  -e tripleo-heat-templates/environments/contrail/contrail-plugins.yaml \
  -e tripleo-heat-templates/environments/contrail/contrail-tls.yaml \
  -e tripleo-heat-templates/environments/ssl/tls-everywhere-endpoints-dns.yaml \
  -e tripleo-heat-templates/environments/services/haproxy-public-tls-certmonger.yaml \
  -e tripleo-heat-templates/environments/ssl/enable-internal-tls.yaml \
  -e containers-prepare-parameter.yaml \
  -e rhsm.yaml \
  -e ca-bundle.yaml \
  -e dcn-common/central-export.yaml \
  -e leaf-vips.yaml \
  -e /home/stack/tripleo-heat-templates/environments/contrail/rcomp1-env.yaml
Follow the next steps from RedHat documentation.
Deploy the edge sites with storage.
Ensure that Nova cell_v2 host mappings are created in the Nova API database after the edge locations are deployed.
Run the following command on the undercloud:
TRIPLEO_PLAN_NAME=overcloud \
  ansible -i /usr/bin/tripleo-ansible-inventory \
    nova_api[0] -b -a \
    "{{ container_cli }} exec -it nova_api \
      nova-manage cell_v2 discover_hosts --by-service --verbose"
Monitoring Remote Compute Clusters in Contrail Command
Starting in Contrail Networking Release 21.4.L1, you can use the Contrail Command graphical user interface (GUI) to monitor remote compute routing clusters.
You can gather the following data in an easy-to-read graphical presentation about any remote compute routing cluster in your environment:
Nodes
Updates Sent per Node
Updates Received per Node
BGP CPU Share per Node
BGP Memory Usage per Node
To view monitoring data about remote compute routing clusters, navigate to the Monitoring > Dashboards > Routing Cluster tab in Contrail Command.
Monitoring and Configuring BGP Routers for Remote Compute in Contrail Command
Starting in Contrail Networking Release 21.4.L1, enhancements were made to the Contrail Command graphical user interface (GUI) that allowed users to better monitor and configure BGP Routers with remote compute routing clusters..
These enhancements included:
On the Create BGP Router page in the Infrastructure > Cluster > Advanced > BGP Routers page, you can now connect a remote routing cluster to a BGP Router.
This option is now available when you navigate to the Advanced Options > Routing Cluster Id drop-down menu. You can select a remote compute routing cluster, which will be available as an option in the Routing Cluster Id drop-down menu, from the page.
On the BGP Routers tab in the Infrastructure > Cluster > Advanced page, you can now view the BGP router connections to the remote compute routing clusters.
You, notably, cannot edit or change a router cluster from configured BGP routers within Contrail Command. You cannot, for instance, edit or change the router cluster from the router cluster drop down menu on the Infrastructures > Cluster > Advanced Options > BGP Router > Create > Advanced Options > Routing Cluster-ID > Routing Cluster ASN page.
Viewing the Virtual Router Connected to Remote Compute Clusters in Contrail Command
Starting in Contrail Networking Release 21.4.L1, you can view the virtual router connected to a remote compute routing cluster in Contrail Command. The Virtual Routers will appear in the table on the Infrastructure > Cluster > Advanced > Virtual Routers page
BGP as a Service (BGPaaS) Support in Remote Compute Clusters
Starting in Contrail Networking Release 21.4.L2, you can configure BGP as a Service (BGPaaS) in remote compute clusters.
You configure BGPaaS in a remote compute cluster in the same manner that you would configure outside of a remote compute cluster. For information on configuring BGPaaS in Contrail Networking, see BGP as a Service.
Change History Table
Feature support is determined by the platform and release you are using. Use Feature Explorer to determine if a feature is supported on your platform.